Articles
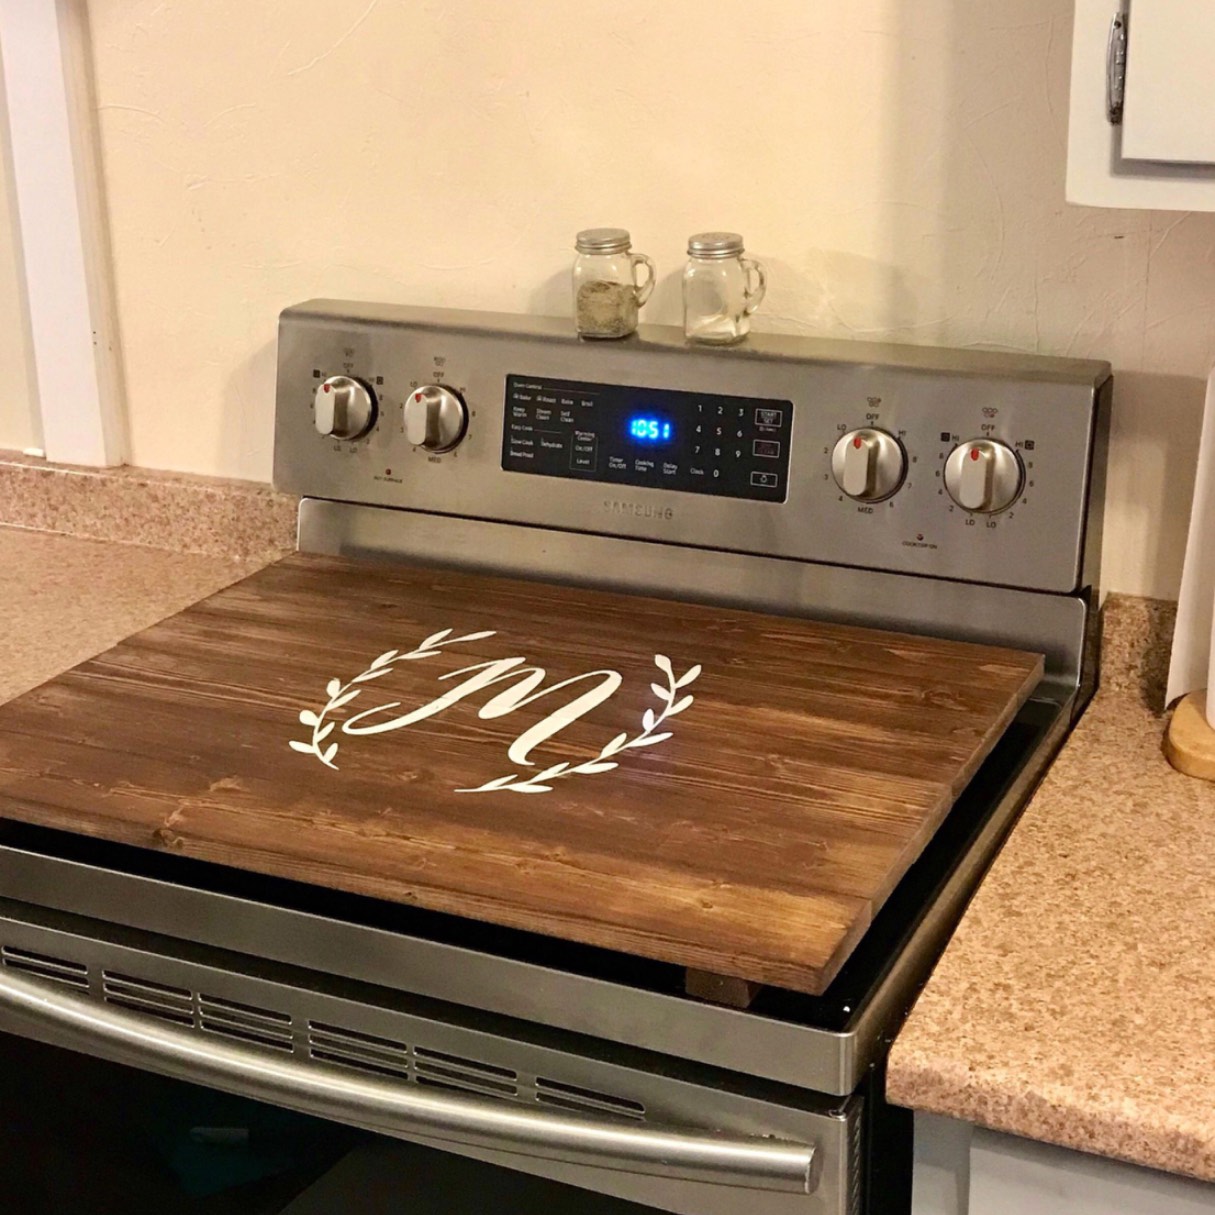
How To Make A Wood Stove Top Cover
Modified: January 18, 2024
Discover step-by-step articles on how to create a beautiful wood stove top cover, adding both functionality and style to your kitchen.
(Many of the links in this article redirect to a specific reviewed product. Your purchase of these products through affiliate links helps to generate commission for Storables.com, at no extra cost. Learn more)
Introduction
Having a wood stove in your home can provide warmth, ambiance, and a cozy atmosphere during the colder months. However, when the stove is not in use, the top can present some challenges. It may become a magnet for dust, pet hair, and other debris, or it may be an attractive surface for placing items that can potentially damage the stove.
To protect your wood stove and keep it looking clean and stylish, a wood stove top cover can be a great solution. A wood stove top cover helps to create a flat and functional surface when the stove is not in use, allowing you to utilize the space for other purposes.
In this article, we will guide you through the process of making your own wood stove top cover. With just a few materials and some basic tools, you can create a custom cover that not only protects your wood stove but also adds a touch of elegance to your home decor.
Before getting started, it’s important to note that the dimensions and design of your wood stove top cover may vary depending on the size and style of your wood stove. Make sure to take accurate measurements and consider any specific requirements or restrictions before embarking on this DIY project.
Now, without further ado, let’s gather the materials needed to make a wood stove top cover.
Key Takeaways:
- Protect your wood stove and add elegance to your home decor by crafting a custom wood stove top cover using simple materials and basic tools.
- Enhance the functionality and convenience of your wood stove top cover by adding handles and securing it in place, providing a stylish and practical solution for protecting your stove.
Read more: How To Make A Stove Top Distiller
Materials Needed
Before you begin crafting your wood stove top cover, gather the following materials:
- 1. 3/4-inch thick plywood – The size should be determined by the dimensions of your wood stove.
- 2. Measuring tape – Essential for accurately measuring the dimensions of your wood stove.
- 3. Pencil – Used to mark the measurements on the plywood.
- 4. Circular saw or jigsaw – For cutting the plywood to the desired size and shape.
- 5. Sandpaper (medium and fine grit) – To smooth and refine the edges and surface of the plywood.
- 6. Wood stain or paint – Optional, but can add a decorative touch and protect the wood surface.
- 7. Paintbrush or foam brush – Used to apply the wood stain or paint.
- 8. Polyurethane varnish – Optional, but recommended for added durability.
- 9. Clean cloth or rag – Used for applying the varnish.
- 10. Handles (optional) – If you want to make it easier to lift and move the cover.
Make sure to gather all the necessary materials before starting the project. Taking the time to prepare and have everything you need at hand will help ensure a smooth and efficient crafting process.
Once you have gathered all the materials, you are ready to move on to the next step: measuring and cutting the wood for your wood stove top cover.
Step 1: Measuring and Cutting the Wood
Before you can start making your wood stove top cover, you need to measure the dimensions of your wood stove accurately. This step is crucial to ensure that the cover fits perfectly and provides adequate protection.
Here’s how to proceed:
- Begin by measuring the width and depth of the top of your wood stove. Use a measuring tape to get precise measurements.
- Note down these measurements on a piece of paper. Make sure to account for any overhang or lip around the edge of the stove.
- Transfer the measurements onto the 3/4-inch thick plywood. Use a pencil to mark the dimensions directly on the wood.
- If your wood stove has curved or irregular edges, use a flexible material like cardboard to create a template. Trace the shape onto the cardboard and then transfer it onto the plywood.
- Take necessary safety precautions when using a circular saw or jigsaw to cut the plywood along the marked lines. Follow the manufacturer’s instructions for your specific cutting tool.
- As you cut the wood, ensure that the edges are clean and smooth. If needed, use sandpaper to refine any rough edges.
Once you have completed these steps, you will have a precisely cut piece of plywood that matches the dimensions of your wood stove. Now you’re ready to move on to the next step: sanding and smoothing the wood.
Step 2: Sanding and Smoothing the Wood
After cutting the wood for your wood stove top cover, it’s essential to smooth and refine the surface to ensure a professional and polished finish. Sanding the wood will help remove any rough patches, splinters, or imperfections, resulting in a smoother and more visually appealing surface.
Follow these steps to sand and smooth the wood:
- Start by using medium-grit sandpaper (around 120-150 grit) to sand the entire surface of the wood. Sand along the grain of the wood, applying gentle pressure.
- Pay extra attention to the edges and corners of the wood, as these areas are prone to roughness. Be careful not to sand too vigorously, as this can result in uneven surfaces or damage the wood.
- Once you have sanded the wood with medium-grit sandpaper, switch to fine-grit sandpaper (around 220-240 grit) for a finer finish. Repeat the sanding process, covering the entire surface and paying attention to the edges.
- After sanding, use a clean cloth or brush to remove any dust or debris from the wood’s surface. This step is crucial to ensure a smooth and clean finish.
By sanding and smoothing the wood, you are creating a more visually appealing and comfortable surface for your wood stove top cover. The smoothness of the wood also allows for easier application of any finishes or paints, which we will discuss in the next step.
Once you have completed the sanding process, you are ready to proceed to step 3: applying a finish to the wood.
When making a wood stove top cover, be sure to use heat-resistant materials such as ceramic tiles or metal sheeting to protect the wood from damage.
Step 3: Applying a Finish
Applying a finish to your wood stove top cover serves two main purposes: enhancing its appearance and providing protection against moisture and wear. A finish can add depth, richness, and durability to the wood, making it more resistant to spills, stains, and scratches.
Follow these steps to apply a finish to your wood stove top cover:
- If you choose to stain the wood, start by stirring the wood stain thoroughly to ensure even color distribution. Test the stain on a small, inconspicuous area of the wood to determine the desired shade or color.
- Using a paintbrush or foam brush, apply an even coat of wood stain to the surface of the wood. Follow the manufacturer’s instructions regarding the recommended drying time.
- If you prefer a natural wood look or want to protect the wood without altering its color, you can opt for a clear polyurethane varnish. Apply a thin, even coat of varnish using a clean cloth or rag. Ensure that you cover the entire surface, including the edges and corners.
- Allow the first coat of stain or varnish to dry completely. Depending on the product, this may take several hours or overnight.
- If desired, apply additional coats of stain or varnish to achieve the desired color or level of protection. Keep in mind that each coat should be allowed to dry completely before applying the next one. Lightly sand the surface between coats to ensure smoothness.
- Once you are satisfied with the finish and the wood has fully dried, inspect the surface for any rough spots or imperfections. Use fine-grit sandpaper to smooth out any uneven areas gently.
- Wipe down the wood surface with a clean cloth to remove any dust or debris. This step is crucial before proceeding to the final installation of your wood stove top cover.
By applying a finish to your wood stove top cover, you not only enhance its appearance but also protect the wood from moisture and everyday wear. The finish adds a layer of durability, ensuring that your cover will last for years to come.
With the finishing touches complete, move on to step 4: installing handles (optional).
Read more: How To Make Bread On Stove Top
Step 4: Installing Handles (optional)
Adding handles to your wood stove top cover can make it easier to lift and move, especially if you plan to use the cover frequently or need to access the stove underneath. Handles also provide a decorative touch, complementing the overall design of your cover.
Follow these steps to install handles on your wood stove top cover:
- Decide on the placement of the handles. Typically, two handles are sufficient, with one on each side of the cover.
- Measure and mark the desired location of the handles on the wood surface. Ensure that the handles are spaced evenly and centered on the sides of the cover.
- Using a drill or screwdriver, attach the handles to the wood. Make sure to use screws that are appropriate for the thickness of the plywood.
- Tighten the screws securely, ensuring that the handles are firmly attached to the wood. Test the handles by gently pulling on them to check for stability.
It’s important to note that the type and style of handles may vary depending on your personal preference and the overall aesthetic of your wood stove and home decor. Choose handles that are durable, easy to grip, and complement the design of your cover.
Installing handles is optional, but it can greatly enhance the functionality and convenience of your wood stove top cover. With handles in place, you’ll be able to lift and move the cover with ease, allowing for easy access to your wood stove when needed.
Now that the handles (if desired) are installed, it’s time to move on to step 5: placing and securing the cover on your wood stove.
Step 5: Placing and Securing the Cover
With your wood stove top cover complete, it’s time to place it on your wood stove and ensure it is securely in position. This step is essential to prevent any accidental movement or slipping of the cover, providing a stable and protective surface for your stove.
Follow these steps to place and secure the cover on your wood stove:
- Carefully lift the wood stove top cover and position it onto the top of your wood stove. Make sure it aligns properly with the dimensions of the stove and lays flat.
- If your wood stove has a raised lip or edges, ensure that the cover rests securely on top of it.
- If desired, you can apply adhesive felt pads or rubber grips to the underside of the cover to provide added stability and prevent any scratches or damage to the stove’s surface.
- Test the stability of the cover by gently pressing on different areas. It should feel secure and not easily move or shift.
By properly placing and securing the cover on your wood stove, you can ensure that it serves its intended purpose effectively. The cover will not only protect your stove but also provide a functional surface for various uses when the stove is not in use.
Congratulations! You have successfully completed all the steps to make and install a wood stove top cover. Now you can enjoy the benefits of having a stylish and practical addition to your wood stove, enhancing both its appearance and functionality.
With the project complete, take a moment to admire your craftsmanship and enjoy the peace of mind that comes with knowing your wood stove is protected with a beautiful wood stove top cover.
Thank you for following along with this DIY guide. We hope you found it helpful and that it inspires you to take on more DIY projects in the future.
Happy crafting!
Conclusion
Creating a wood stove top cover is an excellent way to protect your wood stove while adding a touch of elegance to your home decor. In this comprehensive DIY guide, we have walked you through the step-by-step process of making your own cover, from measuring and cutting the wood to placing and securing the cover on your wood stove.
By following these steps, you can create a custom wood stove top cover that fits your stove perfectly and serves its intended purpose. The materials needed are easily accessible, and the process itself is straightforward, making it a beginner-friendly DIY project.
With the right measurements, careful cutting, sanding, and the application of a finish, you can create a beautiful and durable wood stove top cover. If desired, adding handles can provide convenience and enhance the overall functionality of the cover, allowing for easy lifting and movement.
Once the cover is in place, you can enjoy a dust-free and protected wood stove surface, ready to be used whenever you need it. The cover also offers a versatile and stable surface for other activities when your wood stove is not in use.
Remember to consider safety precautions when working with tools and materials. Always use appropriate safety gear and follow the manufacturer’s instructions for each tool.
We hope this guide has inspired you to embark on this DIY project and explore your creativity. Making your own wood stove top cover not only adds a personal touch to your home but also brings you satisfaction and practicality.
Now, it’s time to gather your materials, grab your measuring tape, and get started on creating your own custom wood stove top cover. Happy crafting!
Frequently Asked Questions about How To Make A Wood Stove Top Cover
Was this page helpful?
At Storables.com, we guarantee accurate and reliable information. Our content, validated by Expert Board Contributors, is crafted following stringent Editorial Policies. We're committed to providing you with well-researched, expert-backed insights for all your informational needs.


0 thoughts on “How To Make A Wood Stove Top Cover”