
Articles
How To Measure A Sink
Modified: March 1, 2024
Learn how to measure a sink with this comprehensive guide. Read articles on various techniques and tips for accurately measuring your sink.
(Many of the links in this article redirect to a specific reviewed product. Your purchase of these products through affiliate links helps to generate commission for Storables.com, at no extra cost. Learn more)
Introduction
When it comes to installing a new sink, it is crucial to measure it properly to ensure a perfect fit. Whether you are replacing an old sink or installing a brand-new one, accurate measurements are essential for a seamless installation process. By measuring the width, depth, height, mounting hole, faucet holes, and overhang, you will have all the necessary information to choose the right sink and ensure a proper fit. In this article, we will guide you through the step-by-step process of how to measure a sink accurately.
Before you begin measuring, it’s important to gather the necessary tools and materials:
- Tape measure or ruler
- Pencil or marker
- Pad of paper or notepad
- Optional: Digital measuring device for precise measurements
Once you have these tools at hand, you’re ready to measure your sink and get started on your installation project. Let’s dive into the step-by-step process of how to measure a sink.
Key Takeaways:
- Accurate sink measurements are crucial for a seamless installation. Gather tools, measure width, depth, height, mounting hole, faucet holes, and overhang to ensure a perfect fit.
- Recording sink measurements is essential for selecting the right sink. Documenting accurate dimensions will lead to a smooth and successful installation process.
Read more: How To Bleach Sink
Tools and Materials Needed
Before you begin measuring your sink, make sure you have the following tools and materials ready:
- Tape measure or ruler: This will be your primary tool for measuring the dimensions of the sink. Make sure it is long enough to measure the entire length or width of the sink.
- Pencil or marker: You will need a writing utensil to mark down the measurements as you go.
- Pad of paper or notepad: Having a notepad or paper handy will allow you to keep track of the measurements and any additional notes you may have.
- Optional: Digital measuring device: If you want precise measurements, you can use a digital measuring device such as a laser measuring tool. This can be especially helpful when measuring larger sinks or if you prefer to have highly accurate measurements.
Ensure that these tools are easily accessible before you start measuring your sink. By having everything you need on hand, you can proceed with confidence and complete the measurements accurately.
Step 1: Measure the Width of the Sink
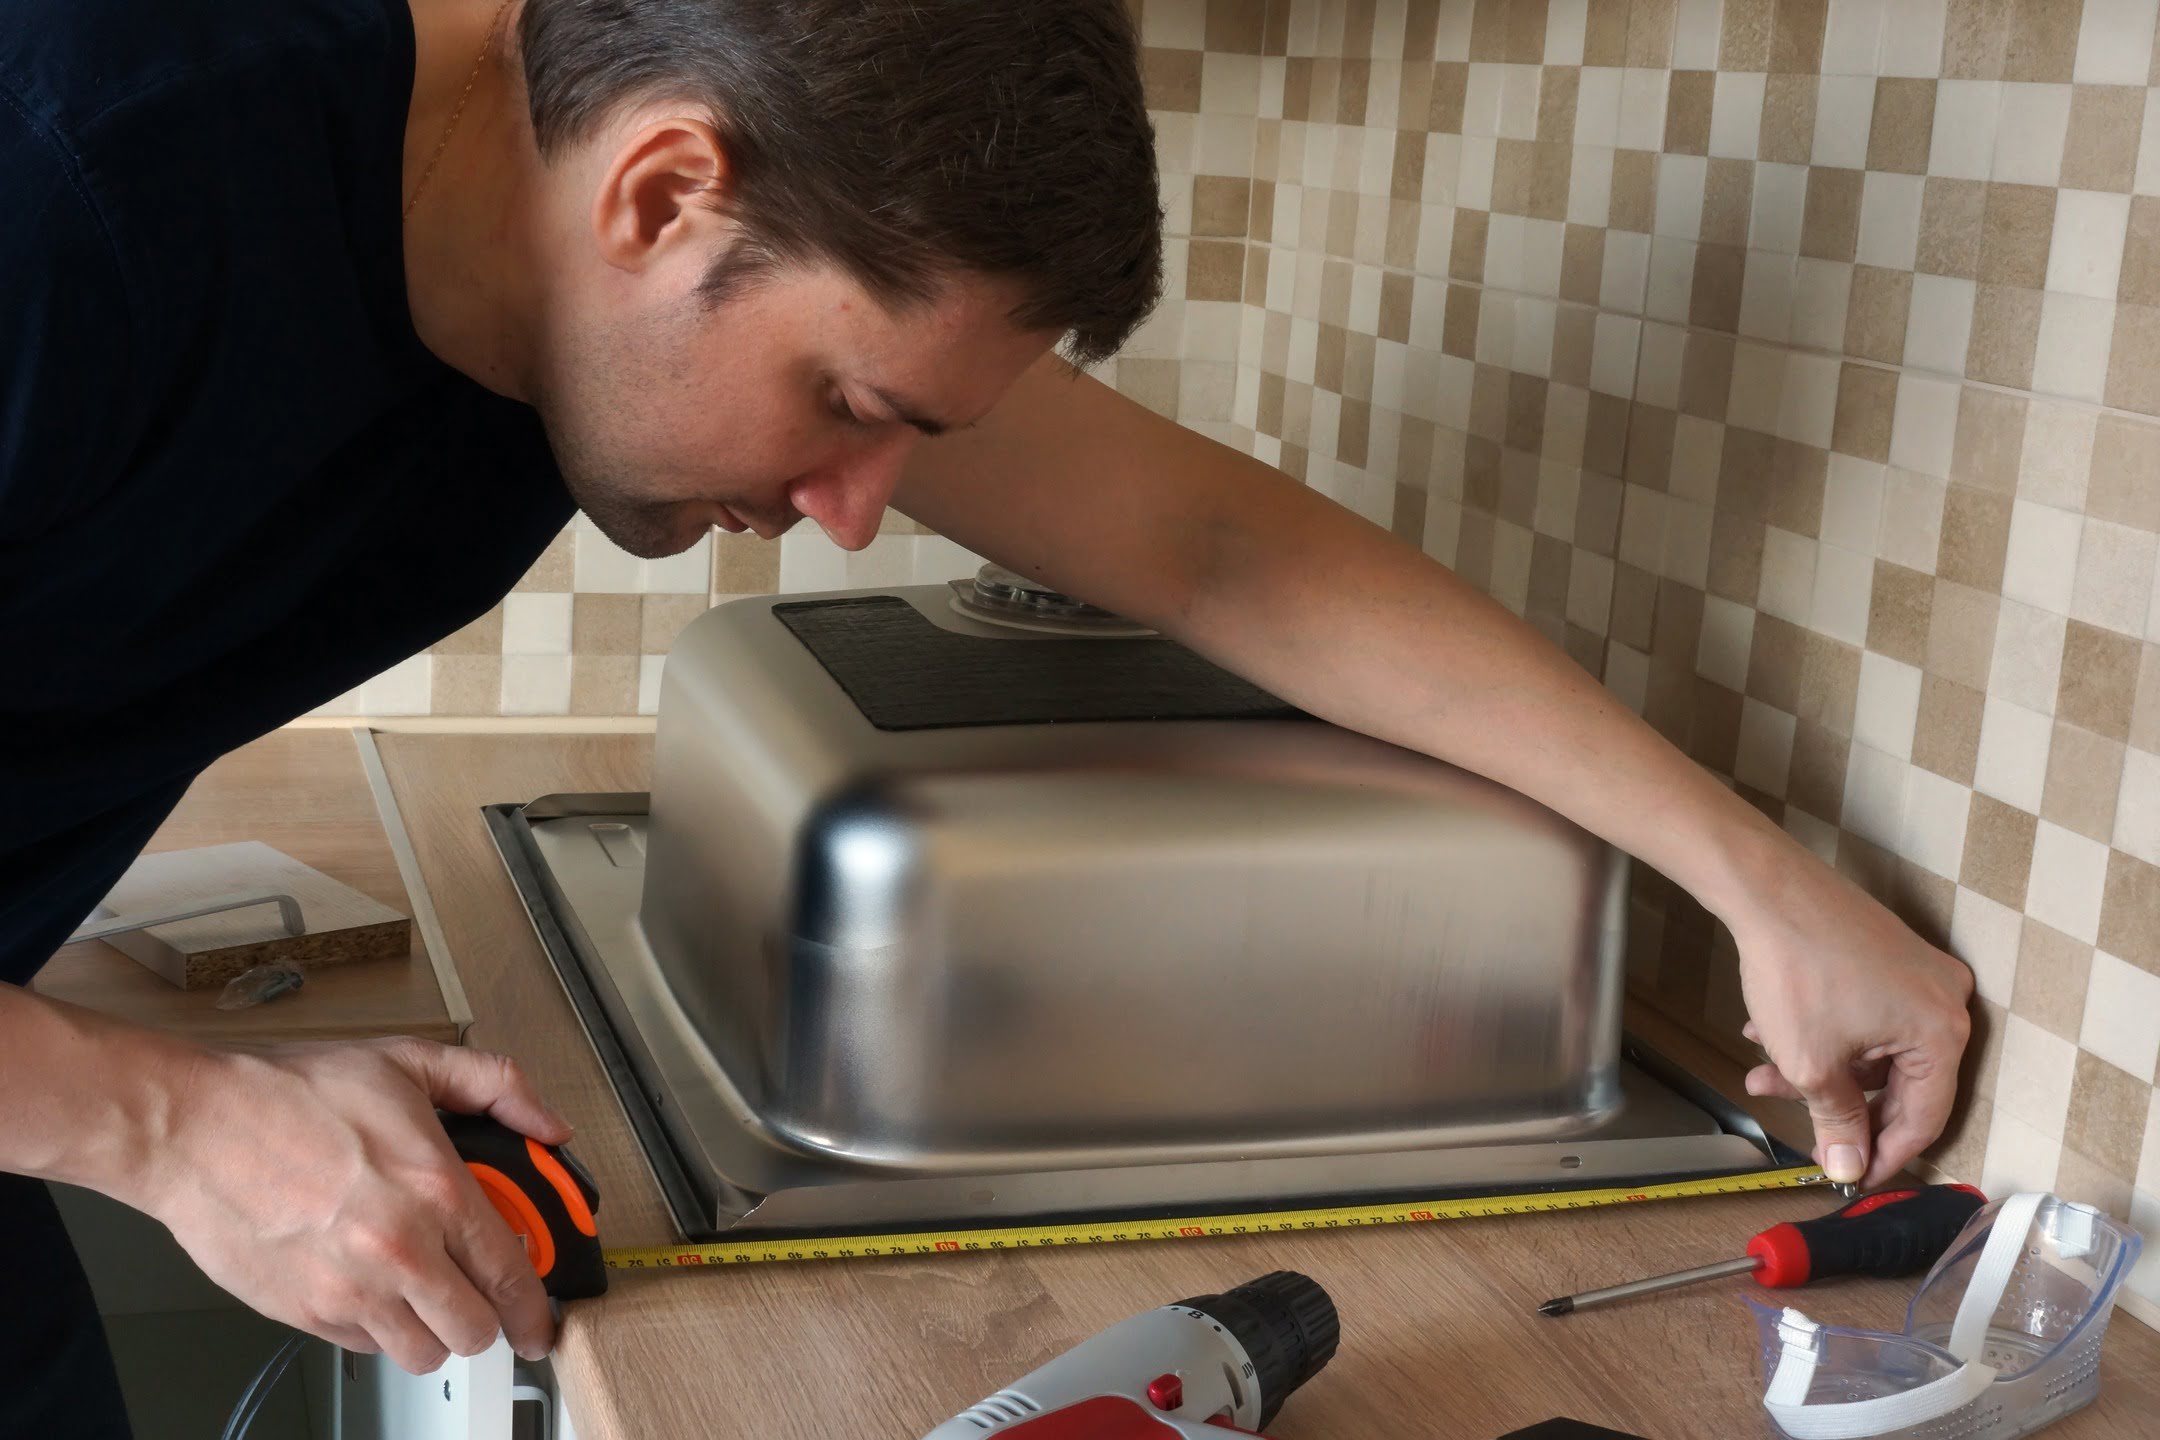
The first step in measuring a sink is to determine its width. This measurement will help you identify the size of the sink and ensure that it fits properly in your countertop or cabinet.
To measure the width of the sink, follow these steps:
- Clear any items or clutter from the sink and surrounding area to ensure an accurate measurement.
- Place one end of your tape measure or ruler at the far-left edge of the sink.
- Extend the tape measure or ruler across the sink to the far-right edge, making sure to keep it straight and level.
- Read the measurement where the tape measure or ruler meets the far-right edge of the sink. This measurement represents the width of the sink.
- Write down the width measurement on your notepad or paper for future reference.
It’s important to note that the width of the sink may vary depending on whether you are measuring the overall width, the inner basin width, or the outer edge width. Determine which width measurement is relevant to your installation needs.
By accurately measuring the width of the sink, you will have a foundational measurement that will help guide your selection and installation process. Proceed to the next step to measure the depth of the sink.
Step 2: Measure the Depth of the Sink
After measuring the width of the sink, the next step is to determine its depth. The depth measurement is essential for ensuring that the sink will fit comfortably in your countertop or cabinet and accommodate your specific needs.
To measure the depth of the sink, follow these steps:
- Clear any objects from the sink to get accurate measurements.
- Place one end of your tape measure or ruler at the top edge of the sink basin.
- Extend the tape measure or ruler down to the bottom of the sink basin, following the contour of the basin as closely as possible.
- Read the measurement where the tape measure or ruler meets the bottom of the sink basin. This measurement represents the depth of the sink.
- Write down the depth measurement on your notepad or paper for future reference.
Remember that the depth of the sink refers to the vertical distance from the top edge of the basin to the bottom of the basin. This measurement is crucial for determining the sink’s capacity and ensuring it aligns with your needs and preferences.
Take note of any special features or variations in the depth measurement, such as a deeper basin or a sloped bottom. These details will be helpful when selecting the appropriate sink and ensuring a proper fit during installation.
Now that you have measured the width and depth of the sink, you can proceed to the next step to measure its height.
Step 3: Measure the Height of the Sink
After measuring the width and depth of the sink, it’s time to determine its height. The height measurement is crucial for ensuring that the sink will fit properly within your countertop or cabinet space.
To measure the height of the sink, follow these steps:
- Clear any items or clutter from the sink and surrounding area for an accurate measurement.
- Place one end of your tape measure or ruler at the top edge of the sink, near the faucet.
- Extend the tape measure or ruler vertically to the bottom of the sink, following the contour of the sink’s front or back edge.
- Read the measurement where the tape measure or ruler meets the bottom of the sink. This measurement represents the height of the sink.
- Write down the height measurement on your notepad or paper for reference.
It’s important to note that the height of the sink refers to the distance from the top edge of the sink to the bottom edge of the sink. This measurement will help you determine if the sink will fit properly within your countertop or cabinet space.
Consider any additional factors that may affect the height measurement, such as the presence of a backsplash or the need for clearance for plumbing fixtures. These details will help ensure an accurate fit during the installation process.
Now that you have measured the width, depth, and height of the sink, you can proceed to the next step to measure the mounting hole.
When measuring a sink, be sure to measure the width, depth, and height of the sink basin. Also, measure the overall width and length of the sink from edge to edge.
Read more: How To Vent Sink
Step 4: Measure the Mounting Hole
When installing a sink, it’s important to measure the mounting hole to ensure that the sink will securely fit into your countertop or cabinet. The mounting hole measurement determines the size and shape of the opening in which the sink will be placed.
To measure the mounting hole, follow these steps:
- Clear any debris or obstructions from the area around the mounting hole.
- Place one end of your tape measure or ruler at the inner edge of the mounting hole.
- Extend the tape measure or ruler to the opposite inner edge of the mounting hole, measuring across the diameter or width of the opening.
- Read the measurement where the tape measure or ruler meets the opposite inner edge of the mounting hole. This measurement represents the size of the mounting hole.
- Write down the mounting hole measurement on your notepad or paper for reference.
Keep in mind that the shape of the mounting hole can vary depending on the type of sink you are installing. It could be round, rectangular, or have a specific shape to accommodate a particular sink design.
Take note of any special considerations, such as the clearance needed around the mounting hole or any specific requirements for the sink’s installation. These details will assist you in selecting the appropriate sink and ensure a proper fit during the installation process.
Now that you have measured the width, depth, height, and mounting hole of the sink, you can proceed to the next step to measure the faucet holes.
Step 5: Measure the Faucet Holes
When installing a sink, it’s important to measure the faucet holes to ensure that they align with the taps or fixtures you plan to install. The faucet hole measurement determines the spacing and size of the openings where the taps or fixtures will be attached.
To measure the faucet holes, follow these steps:
- Clear any debris or obstructions from the area around the faucet holes.
- Identify the number of faucet holes in your sink. Most sinks have pre-drilled holes for the installation of faucets, handles, and other fixtures.
- If you have one faucet hole, measure the diameter of the hole by placing one end of the tape measure or ruler at the edge of the hole and extending it across the width of the opening. Read the measurement where the tape measure or ruler meets the opposite edge of the hole.
- If you have multiple faucet holes, measure the distance between each hole. Place one end of the tape measure or ruler at the center of one hole and extend it to the center of the adjacent hole. Read the measurement where the tape measure or ruler meets the center of the second hole.
- Write down the faucet hole measurements on your notepad or paper for reference.
It’s important to measure the faucet holes accurately to ensure that your chosen faucets or fixtures will align properly with the holes. Inconsistent or incorrect measurements could result in a mismatch between the sink and the fixtures, leading to installation difficulties.
Additionally, consider any additional specifications for the faucet holes, such as the thickness of the sink material or any specific requirements for the installation of your chosen faucets or fixtures. These details will help you select the appropriate sink and ensure a seamless installation process.
Now that you have measured the width, depth, height, mounting hole, and faucet holes of the sink, you can proceed to the next step to measure the overhang.
Step 6: Measure the Overhang
Measuring the overhang of a sink is essential for determining how it will fit within your countertop or cabinet. The overhang refers to the amount of the sink that extends beyond the edge of the countertop or cabinet.
To measure the overhang, follow these steps:
- Clear any objects or debris from the area around the sink.
- Locate the edge of the sink that will overhang the countertop or cabinet.
- Place one end of your tape measure or ruler at the edge of the countertop or cabinet.
- Extend the tape measure or ruler to the edge of the sink, following the contour of the sink as closely as possible.
- Read the measurement where the tape measure or ruler meets the edge of the sink. This measurement represents the overhang of the sink.
- Write down the overhang measurement on your notepad or paper for reference.
Keep in mind that the overhang can vary depending on the design and style of the sink. Some sinks have a minimal overhang, while others may have a significant overhang to create a distinctive look.
Take note of any specific considerations for the overhang, such as clearance requirements or any instructions from the sink manufacturer. These details will help ensure a proper fit and a visually appealing installation.
With the width, depth, height, mounting hole, faucet hole, and overhang measurements, you now have all the necessary information to choose the right sink and proceed with the installation process.
Step 7: Record the Measurements
Once you have completed all the necessary measurements for your sink, it’s important to record them accurately. By documenting the measurements, you will have a reference guide to consult when selecting a sink and carrying out the installation.
To record the measurements, follow these steps:
- Gather all your measurements, including the width, depth, height, mounting hole size, faucet hole measurements, and overhang measurement.
- Transfer the measurements to a notepad or paper, clearly labeling each measurement.
- Double-check the accuracy of your measurements to ensure they are correct.
- Keep the recorded measurements in a safe place where you can easily access them, such as a folder or digital file, for future reference.
Having the measurements recorded will greatly assist you during the sink selection process. It will enable you to choose a sink that matches the exact dimensions of your countertop or cabinet, ensuring a seamless and successful installation.
Additionally, if you are seeking professional assistance or shopping for a sink online, having the recorded measurements readily available will allow you to provide the necessary details to get accurate recommendations or make informed purchase decisions.
By taking the time to record your sink measurements, you are setting yourself up for a smooth and efficient installation process.
Read more: How To Paint Sink
Conclusion
Measuring a sink properly is a crucial step in ensuring a successful installation. By accurately measuring the width, depth, height, mounting hole, faucet holes, and overhang, you will have the necessary information to select a sink that fits perfectly within your countertop or cabinet.
Remember to gather the essential tools such as a tape measure, pencil, and paper before you begin the measurement process. These tools will help you achieve accurate and reliable measurements.
Each step in the measuring process is important and contributes to the overall fit and functionality of the sink. Clearing the area, using precise measurements, and documenting the information will minimize errors and make the installation process much smoother.
Once you have recorded all the measurements, you can confidently proceed with purchasing the right sink for your space. The documented measurements will enable you to compare and select a sink that perfectly matches the dimensions and requirements of your countertop or cabinet.
Whether you are replacing an old sink or installing a new one, taking the time to measure the sink accurately will save you from potential headaches and ensure a seamless installation process. By following the step-by-step guide outlined in this article, you are equipped with the knowledge and tools to measure a sink like a pro.
So go ahead, measure your sink accurately, and embark on your installation journey with confidence!
Frequently Asked Questions about How To Measure A Sink
Was this page helpful?
At Storables.com, we guarantee accurate and reliable information. Our content, validated by Expert Board Contributors, is crafted following stringent Editorial Policies. We're committed to providing you with well-researched, expert-backed insights for all your informational needs.


0 thoughts on “How To Measure A Sink”