Articles
How To Refinish A Dining Room Table
Modified: December 7, 2023
Learn how to refinish a dining room table with these helpful articles. Transform your table and give it a fresh new look.
(Many of the links in this article redirect to a specific reviewed product. Your purchase of these products through affiliate links helps to generate commission for Storables.com, at no extra cost. Learn more)
Introduction
Refinishing a dining room table is a fantastic way to give new life to an old piece of furniture and add a fresh look to your dining space. Whether you have a vintage table with years of wear and tear or simply want to change the finish to match your updated decor, refinishing the table can transform its appearance and make it the centerpiece of your dining room.
In this step-by-step guide, we will walk you through the process of refinishing a dining room table. From gathering the necessary supplies to applying the new finish, you’ll learn all the tips and tricks to achieve a professional-looking result.
Before we dive into the details, it’s essential to note that refinishing a dining room table can be a time-consuming project, so make sure you have enough time and patience before starting. Also, consider the condition of your table and whether it’s resilient enough to withstand the refinishing process.
Now, let’s roll up our sleeves and get ready to transform your dining room table into a stunning focal point!
Key Takeaways:
- Refinishing a dining room table requires patience, attention to detail, and the right supplies. From removing the old finish to applying the new one, each step contributes to a professional and stunning result.
- After refinishing, proper care and maintenance are essential to preserve the beauty of the table. Regular cleaning, gentle handling, and protective measures will ensure that the refinished table remains a focal point in the dining room for years to come.
Read more: How To Refinish Dining Chairs
Step 1: Gather necessary supplies
Before you begin the refinishing process, it’s crucial to gather all the necessary supplies. Having everything you need on hand will make the project more efficient and ensure you don’t have to pause midway to search for missing items. Here are the supplies you’ll need:
- Protective gear: Start by ensuring your safety. Gather a pair of safety goggles, a dust mask, and disposable gloves. These will protect you from any potential hazards, such as chemical splashes or dust particles.
- Drop cloths or plastic sheeting: You’ll want to protect your workspace from drips, spills, and debris. Lay down drop cloths or plastic sheeting to cover the floor and nearby furniture.
- Paint stripper: If your table has an existing finish, you’ll need a paint stripper to remove it. Choose a stripper suitable for the type of finish you’re dealing with (such as water-based or oil-based).
- Scraper and steel wool: These tools will help you remove the old finish and smooth out any rough spots. A scraper is ideal for larger areas, while steel wool can be used for smaller or intricate areas.
- Sandpaper and sanding block: Depending on the condition of your table, you’ll need sandpaper of varying grits. Start with a coarser grit to remove imperfections and gradually move to a finer grit for a smooth finish. A sanding block will provide a consistent surface for sanding.
- Wood filler: If your table has any cracks, dents, or deep scratches, you’ll need wood filler to repair these imperfections. Opt for a filler that matches the color of your table for a seamless result.
- Stain or paint: Choose a stain or paint that suits your desired finish. Stains add color while still showing the natural texture of the wood, while paints provide a solid, opaque finish. Consider the style and aesthetic of your dining room when selecting the color.
- Paintbrushes and foam brushes: Different brushes are required for different steps of the refinishing process. A large paintbrush is ideal for applying paint or stain, while foam brushes are great for smaller and hard-to-reach areas.
- Clear finish or sealant: For protection and added durability, you’ll need a clear finish or sealant to coat the table once the stain or paint has dried. Choose a finish that matches your desired level of gloss or sheen.
- Clean cloth or lint-free rags: You’ll need these for wiping off excess stain, paint, or finish, as well as for applying the wood filler. Make sure they are clean and lint-free to avoid any residue.
Once you have gathered all these supplies, you’ll be well-prepared to tackle the next steps in the refinishing process.
Step 2: Prepare the workspace
Before diving into the refinishing process, it’s essential to prepare your workspace properly. By setting up a clean and organized area, you’ll ensure a smooth and efficient project. Here’s how to prepare your workspace:
- Clean the table: Start by removing any items from the table, such as dishes or decorations. Give the table a thorough clean to remove any dirt, dust, or residues that may affect the refinishing process. Use a mild detergent and water to wipe down the surface, and ensure it’s completely dry before moving on.
- Create a well-ventilated area: Refinishing a dining room table often involves working with chemicals or strong odors. Open windows and doors to create a well-ventilated workspace. If necessary, use fans or additional ventilation equipment to ensure a steady airflow.
- Protect the surrounding area: Cover the floor and nearby furniture with drop cloths or plastic sheeting. This will prevent any accidental spills or drips from damaging your flooring or other items in the room.
- Set up a worktable: If possible, set up a separate worktable to place the table on during the refinishing process. This will make it easier to access all sides of the table and provide a more comfortable working height.
- Organize your supplies: Arrange all the supplies you gathered in the previous step within easy reach of your workspace. This will save you time and prevent any disruptions while working.
- Ensure proper lighting: Good lighting is crucial for a successful refinishing job. Make sure you have adequate lighting in your workspace to accurately see the details of your table and ensure even application of the finish.
By taking the time to prepare your workspace, you’ll create an environment that is conducive to a successful refinishing project. With a clean and organized area, you can focus on achieving the best results for your dining room table.
Step 3: Remove existing finish
Now that you have your workspace set up, it’s time to remove the existing finish from your dining room table. This step is crucial, as it allows the new finish to adhere properly and ensures a smooth and even result. Follow these steps to remove the existing finish:
- Apply the paint stripper: Put on your protective gear, including safety goggles, a dust mask, and gloves. Follow the manufacturer’s instructions on the paint stripper container and apply a generous coat onto the table surface. It’s best to work in sections instead of applying the stripper to the entire table at once.
- Allow the stripper to work: Give the paint stripper some time to work its magic. The required time can vary depending on the type and thickness of the existing finish. Typically, it takes around 15 minutes to an hour for the stripper to penetrate and loosen the old finish.
- Scrape off the old finish: Once the paint stripper has done its job, use a scraper to gently remove the old finish from the table surface. Start at one end of the table and work your way across, applying light pressure. Be careful not to gouge the wood, especially if your table has intricate details.
- Repeat as necessary: In some cases, the initial application of paint stripper may not completely remove all layers of the previous finish. If needed, repeat the process of applying the stripper and scraping until the table surface is free of the old finish.
- Clean the table: After removing the old finish, clean the table surface using a clean cloth or sponge dampened with mineral spirits. This will remove any remaining residue from the paint stripper and give you a clean canvas for the next steps of the refinishing process.
Removing the existing finish can be a messy and time-consuming task, but it’s an essential step in achieving a beautiful final result. Take your time and ensure that all traces of the old finish are completely removed from the table surface before moving on to the next step.
Step 4: Sand the table surface
Once you have removed the existing finish from your dining room table, it’s time to sand the surface. Sanding allows you to smooth out any imperfections, create a uniform texture, and prepare the wood for the new finish. Follow these steps to ensure a properly sanded table surface:
- Select the right sandpaper: Choose the appropriate sandpaper grit based on the condition of your table and the desired level of smoothness. Start with a coarser grit, such as 80 or 120, to remove any rough spots or unevenness. Gradually move to finer grits, such as 220 or 320, for a smoother finish.
- Sand with the grain: Always sand in the direction of the wood grain to avoid damaging or scratching the surface. Use a sanding block or a folded piece of sandpaper to maintain a consistent pressure and ensure even sanding.
- Start sanding: Begin sanding the table surface, focusing on one section at a time. Use long, smooth strokes, applying even pressure across the entire surface. Continue sanding until the wood feels smooth to the touch and any visible imperfections have been removed.
- Check for smoothness and uniformity: After sanding a section, run your hand over the surface to feel for any rough patches or inconsistencies. If necessary, go over those areas again with the appropriate grit sandpaper until you achieve a uniform and smooth result.
- Remove sanding dust: Sanding creates a lot of fine dust particles. To ensure a clean surface for the next steps, use a clean cloth or a vacuum with a soft brush attachment to remove the sanding dust from the table. Pay attention to corners and crevices where dust may accumulate.
Sanding the table surface not only prepares it for the new finish but also helps to reveal the natural beauty of the wood. Take your time during this step, ensuring that the surface is smooth and free of any imperfections. This will set the stage for a flawless refinishing job.
Before starting the refinishing process, make sure to thoroughly clean the table to remove any dirt, grime, or old finish. This will ensure a smooth and even application of the new finish.
Read more: How To Refinish A Teak Dining Table
Step 5: Fill any imperfections
After sanding the table surface, it’s common to come across small cracks, dents, or deep scratches. These imperfections can be filled to create a smoother and more even finish. Follow these steps to effectively fill any imperfections in your dining room table:
- Inspect the table: Carefully examine the entire surface of the table and identify any noticeable imperfections that need to be filled. Common imperfections include small cracks, nail holes, or deep scratches.
- Choose the right wood filler: Select a wood filler that closely matches the color and type of wood on your table. You can find wood fillers in a variety of shades and formulas, including water-based and solvent-based options.
- Prepare the wood filler: Follow the instructions provided with the wood filler to prepare it for use. This may involve mixing the filler or simply opening the container. Stir the filler well to ensure a consistent texture.
- Apply the wood filler: Use a putty knife or a small spatula to apply the wood filler to the imperfections on the table surface. Press the filler into the cracks or holes, ensuring it fills them completely. Smooth out the filled areas, making them level with the surrounding wood.
- Allow the filler to dry: Give the wood filler sufficient time to dry and harden according to the manufacturer’s instructions. This can vary depending on the type of filler used, but typically ranges from a few hours to overnight.
- Sand the filled areas: Once the filler is completely dry, sand the filled areas gently with a fine-grit sandpaper. This will help smooth out any excess filler and blend it seamlessly with the surrounding wood surface. Be cautious not to oversand and remove too much of the filler.
- Remove sanding dust: As with the previous sanding step, use a clean cloth or a vacuum with a soft brush attachment to remove any sanding dust from the table. This will ensure a clean surface for the next steps of the refinishing process.
Filling imperfections in your dining room table is an essential step to achieve a flawless, professional-looking finish. By carefully filling and smoothing out these areas, you’ll create a table surface that is ready for the application of the new finish.
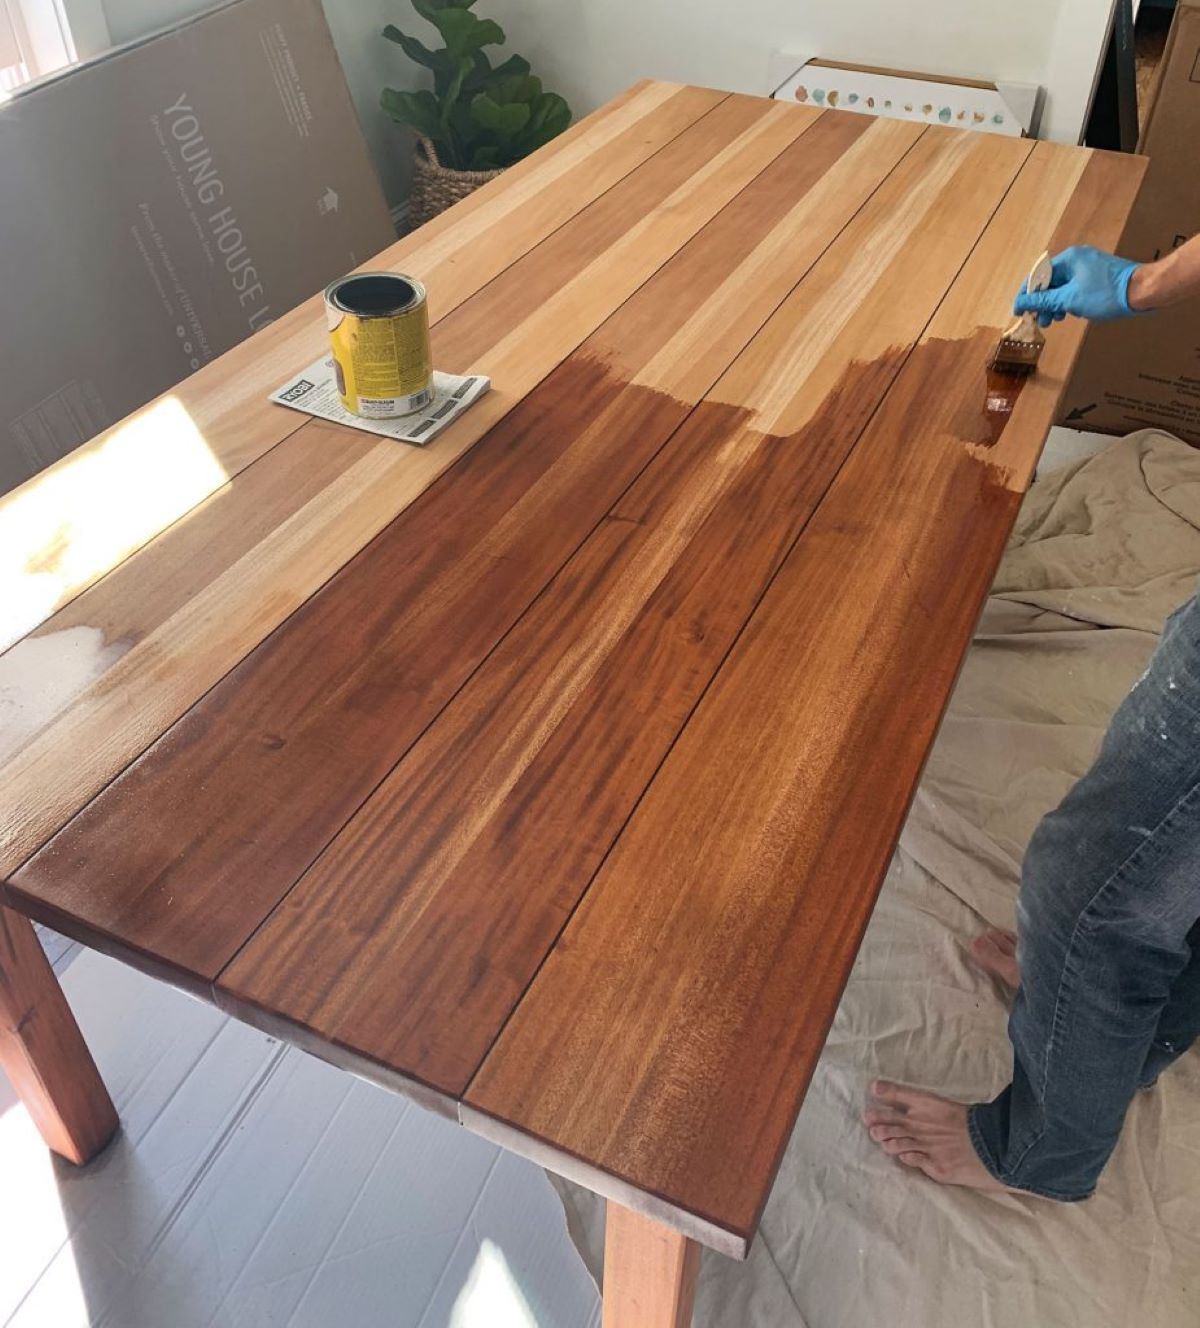
Step 6: Apply the new finish
With the imperfections filled and the table surface smoothed, it’s time to apply the new finish to your dining room table. The finish you choose will depend on your desired look and the level of protection you want for your table. Follow these steps to ensure a successful application of the new finish:
- Choose the right finish: Decide whether you want to use a stain or paint to achieve your desired look. Stains enhance the natural beauty of the wood while adding color, while paints provide a solid and opaque finish. Consider the style of your dining room and the overall aesthetic you want to achieve.
- Prepare the finish: If you’re using a stain, make sure to stir it well to evenly distribute the color pigments. For paint, follow the manufacturer’s instructions for proper mixing or shaking. Ensure that your chosen finish is at the right consistency for easy application.
- Apply the finish: Use a large paintbrush or a foam brush to apply an even coat of the finish to the table surface. Work in small sections, starting at one end and moving systematically across the table. Apply the finish in the direction of the wood grain, following its natural flow.
- Smooth out the finish: After applying the finish, use a clean brush or a foam brush to gently smooth out any brush strokes or uneven areas. This will help create a seamless and professional-looking finish. Take your time to ensure an even application.
- Allow the finish to dry: Follow the manufacturer’s instructions for the drying time of your chosen finish. This can range from a few hours to overnight. Make sure to keep the table in a clean and dust-free environment during the drying process to achieve a smooth surface.
- Assess the finish: Once the first coat of the finish is completely dry, assess the appearance and level of coverage. Depending on the desired outcome and the type of finish used, you may need to apply additional coats for a more vibrant or opaque finish. Follow the same application process for subsequent coats.
Applying the new finish is a crucial step in transforming the look of your dining room table. Take your time during this step to ensure a smooth and even application. The finish will bring your table to life and protect it for years to come.
Step 7: Let the finish dry
After applying the new finish to your dining room table, it’s important to allow it sufficient time to dry and cure. This step ensures that the finish fully sets and provides the desired level of durability and protection. Follow these guidelines to allow the finish to dry properly:
- Refer to the manufacturer’s instructions: Different finishes have varying drying times, so it’s essential to consult the instructions provided by the manufacturer. They will specify the recommended drying period based on the type of finish used.
- Create optimal drying conditions: To facilitate proper drying, it’s important to create optimal conditions in your workspace. Ensure adequate ventilation by opening doors and windows to allow proper airflow. Controlling the room temperature and humidity levels will also contribute to ideal drying conditions.
- Avoid touching or placing objects on the table: While the finish is drying, refrain from touching the table surface or placing any objects on top of it. This prevents any unwanted marks or smudges that can disrupt the smooth finish. Exercise caution and patience during this crucial drying period.
- Allow for ample drying time: Depending on the type of finish used, drying times can vary from a few hours to several days. It’s crucial to be patient and give the finish enough time to fully cure. Rushing the process may result in a compromised finish that is prone to damage.
- Perform a touch test: Before proceeding to the next step, perform a touch test to ensure the finish has fully dried. Gently touch a small inconspicuous area with a clean finger. If the finish feels dry, cool, and smooth to the touch, it is likely ready for the next step. However, if it feels sticky or tacky, give it additional drying time.
Properly allowing the finish to dry is essential for achieving a beautiful, long-lasting result. Taking the necessary time and precautions during this stage will ensure that your dining room table is fully protected and ready for use.
Step 8: Reassemble the table
Once the finish on your dining room table has fully dried and cured, it’s time to reassemble the table and prepare it to be back in use. Follow these steps to safely and effectively reassemble your newly refinished table:
- Gather the table components: Collect all the parts of your table, including the tabletop, legs, and any additional extensions or leaves. Ensure that all components are clean and free from dust or debris.
- Inspect and clean the components: Take a close look at each component of the table to ensure it is in good condition. Clean any dirt or residue using a mild cleaner and a soft cloth, making sure not to damage the newly finished surface.
- Reattach the legs: If you removed the table legs during the refinishing process, carefully reattach them following the manufacturer’s instructions or the original method of attachment. Use any necessary screws, bolts, or brackets to secure the legs in place.
- Reinstall any extensions or leaves: If your table has extensions or leaves, carefully align them with the table and secure them according to the manufacturer’s instructions. Make sure they are secure and stable to prevent any wobbling or instability.
- Adjust the table if needed: Check the levelness and stability of the table. If it is unbalanced or unstable, adjust the legs or supports until it sits evenly on the floor. This will provide a solid and comfortable dining experience.
- Protect the table and maintain its appearance: Consider placing protective pads or coasters underneath dishes, glasses, and other items to prevent scratches or stains on the newly refinished surface. Regularly clean the table with a gentle cleaner and avoid harsh chemicals that can damage the finish.
By carefully reassembling your refinished dining room table, you can ensure that it is stable, functional, and ready to be enjoyed for years to come. Take your time during this step to ensure that all the components are securely and properly put back together.
Read more: How To Refinish A Veneer Dining Table
Conclusion
Refinishing a dining room table can be a rewarding and transformative project that breathes new life into an old piece of furniture. By following the step-by-step guide outlined above, you can confidently tackle the refinishing process and achieve a beautiful result. From gathering the necessary supplies to reassembling the table, each step plays a crucial role in achieving a professional finish.
Remember to take your time throughout the process, ensuring that each step is completed thoroughly and with care. Whether you’re removing the existing finish, sanding the surface, filling imperfections, or applying the new finish, attention to detail will make a significant difference in the final outcome.
Once your table is refinished, it will become the centerpiece of your dining room, showcasing your creativity and adding a fresh look to your space. Take pride in your work and enjoy the satisfaction of transforming an old piece of furniture into something beautiful and functional once again.
Lastly, maintaining your refinished table’s beauty requires regular cleaning and proper care. Use gentle cleaners, avoid harsh chemicals, and protect the surface from scratches and stains. By doing so, your refinished dining room table will continue to impress and bring joy to your dining area for years to come.
Frequently Asked Questions about How To Refinish A Dining Room Table
Was this page helpful?
At Storables.com, we guarantee accurate and reliable information. Our content, validated by Expert Board Contributors, is crafted following stringent Editorial Policies. We're committed to providing you with well-researched, expert-backed insights for all your informational needs.


0 thoughts on “How To Refinish A Dining Room Table”