Articles
How To Remove Metal Electrical Box From Wall
Modified: August 27, 2024
Learn how to safely remove a metal electrical box from your wall with our step-by-step guide. Expert articles provide helpful tips and techniques for a seamless DIY project.
(Many of the links in this article redirect to a specific reviewed product. Your purchase of these products through affiliate links helps to generate commission for Storables.com, at no extra cost. Learn more)
Introduction
Removing a metal electrical box from a wall can be a daunting task if you do not have the necessary knowledge and tools. Whether you are replacing the box, renovating the space, or making repairs, knowing how to safely and efficiently remove the box is essential.
In this article, we will guide you through the step-by-step process of removing a metal electrical box from a wall. By following these instructions and taking proper safety precautions, you can successfully remove the box without causing any damage to the surrounding area.
Before we begin, it’s important to note that if you’re not comfortable working with live electrical connections, it is highly recommended to consult a licensed electrician for assistance. It’s always better to prioritize safety over saving a few dollars.
Now, let’s dive into the process and learn how to remove a metal electrical box from a wall.
Key Takeaways:
- Prioritize safety by gathering the necessary tools, cutting off power, and following proper precautions. Consult a professional if uncomfortable with electrical work to ensure a smooth and secure removal process.
- Successfully remove a metal electrical box by carefully disconnecting wiring, detaching the box from the wall, and patching the area. Confidence, caution, and attention to detail are key for a seamless project completion.
Read more: How To Remove Metal Wall Anchors From Brick
Step 1: Gather the necessary tools
Before you start the process of removing a metal electrical box from a wall, it’s important to gather all the necessary tools and equipment. Having the right tools at hand will make the job easier and more efficient.
Here are the tools you will need:
- Screwdriver (Phillips or flathead, depending on the type of screws)
- Needle-nose pliers
- Wire cutters/strippers
- Utility knife
- Hammer
- Drywall saw
- Pry bar or chisel
- Patch kit and joint compound (for repairing the wall)
Make sure to have these tools readily available before you begin the removal process. It’s always better to be prepared and avoid any unnecessary delays or interruptions.
Additionally, it’s important to consider your safety during the process. Wear protective gloves and safety goggles to protect your hands and eyes from any potential hazards.
Once you have gathered the necessary tools and ensured your safety, you are ready to move on to the next step: ensuring safety precautions.
Step 2: Ensure safety precautions
Prioritizing safety is of utmost importance when working with electrical systems. Before proceeding with the removal of a metal electrical box, take the following safety precautions:
- Turn off the power: Locate the circuit breaker or fuse box and turn off the power to the electrical circuit you’ll be working on. Double-check that the power is indeed off by testing the circuit with a non-contact voltage tester. This will ensure that you’re not at risk of coming into contact with live wires.
- Use proper personal protective equipment (PPE): Put on safety glasses, work gloves, and any other necessary protective gear to shield yourself from potential hazards such as flying debris or accidental electrical contact.
- Work in a well-ventilated area: In case there are any electrical sparks or fumes as you remove the box, ensure that you are working in a properly ventilated area to minimize any potential health risks.
- Keep the work area clear: Remove any objects or obstacles from around the electrical box to ensure easy access and prevent tripping hazards during the removal process.
- Work with a partner: Having an extra set of hands can be helpful when removing a metal electrical box. They can help stabilize the box and provide assistance if needed, enhancing safety and efficiency.
By following these safety precautions, you can significantly reduce the risk of accidents or injuries while removing a metal electrical box from the wall.
Once you have taken all the necessary safety measures, you are ready to proceed to the next step: cutting power to the electrical box.
Step 3: Cut power to the electrical box
Before you begin working on removing the metal electrical box, it is crucial to cut off the power supply to ensure your safety. Here’s how you can do it:
- Locate the electrical panel: Identify the electrical panel in your home where the circuit breaker or fuse box is located. Typically, it can be found in a basement, garage, or utility room.
- Identify the correct circuit: Ascertain which circuit is connected to the electrical box you’re planning to remove. This can be done by either referencing the circuit diagram or using a circuit tracer tool.
- Turn off the circuit breaker: Locate the breaker switch or fuse corresponding to the circuit and switch it to the “off” position. If you have a fuse box, remove the fuse that controls the circuit entirely.
- Test the circuit: Use a non-contact voltage tester to double-check that the power to the electrical box has been successfully cut off. It’s essential to make sure there is no electricity flowing through the wires before proceeding with the removal.
Once you have confirmed that the power is off, you can proceed to the next step: removing the cover plate and screws from the electrical box.
Step 4: Remove the cover plate and screws
With the power to the electrical box turned off, you can now remove the cover plate and screws that secure it. Follow these steps:
- Inspect the cover plate: Take a close look at the cover plate to identify the type of screws holding it in place. It could be secured with either Phillips or flathead screws.
- Choose the appropriate screwdriver: Select the correct screwdriver that matches the screw type. This ensures that you have the right tool for easily removing the cover plate.
- Loosen and remove the screws: Insert the screwdriver into the screwhead and turn it counterclockwise to loosen and remove the screws. Place the screws in a safe spot to avoid misplacing them.
- Remove the cover plate: Once the screws are removed, gently pull the cover plate away from the electrical box. It should come off easily, exposing the wiring connections inside.
Keep in mind that there may be multiple screws holding the cover plate in place. Make sure to remove all of them before attempting to remove the plate.
With the cover plate removed, you can now proceed to the next step: disconnecting the wiring connections from the electrical box.
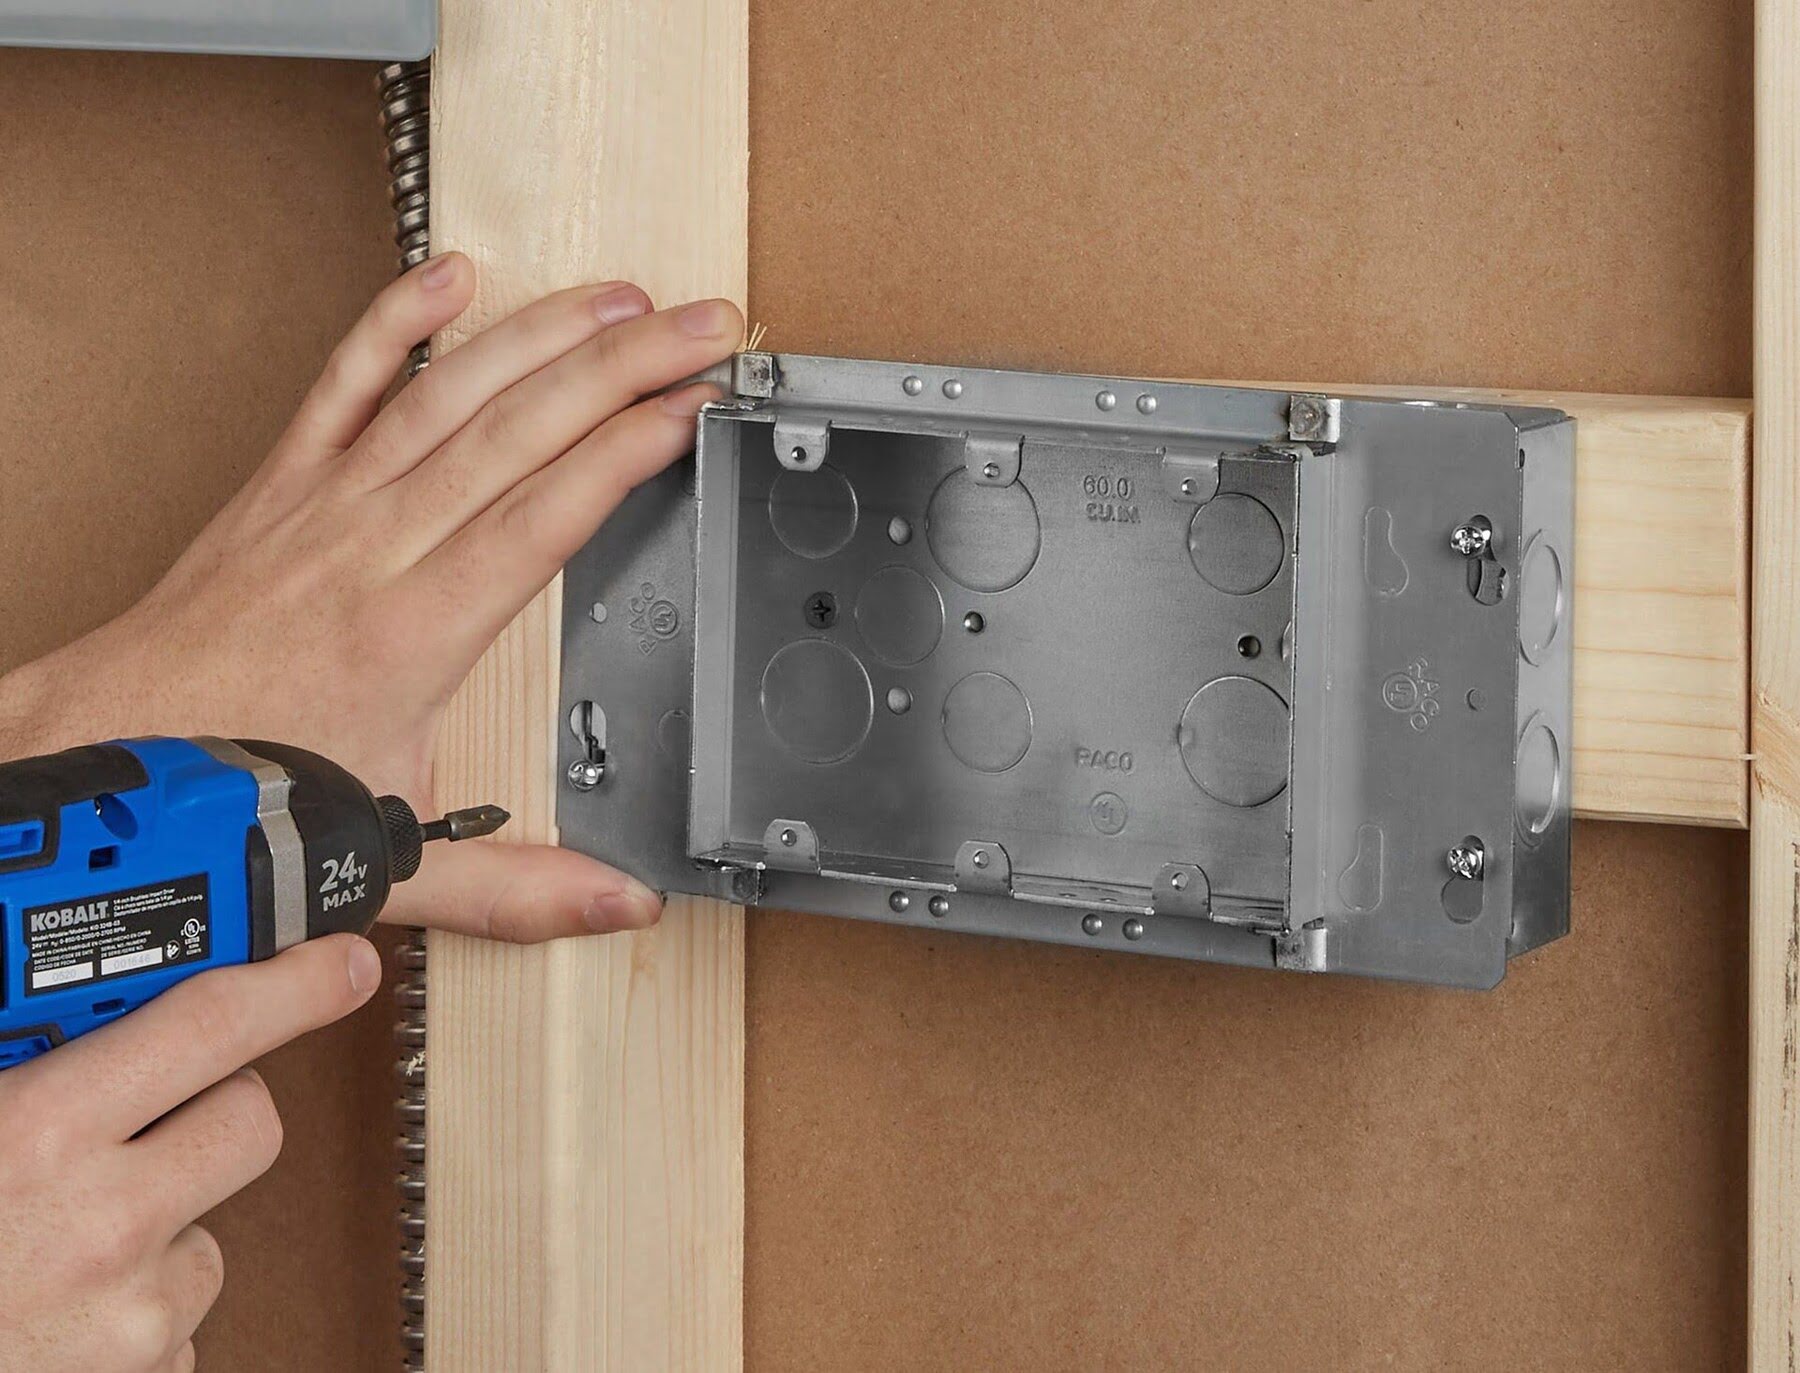
Use a screwdriver to remove the screws holding the electrical box in place. Disconnect the wires and gently pull the box out of the wall. Be sure to turn off the power before starting.
Read more: How To Attach Metal Electrical Box To Stud
Step 5: Disconnect the wiring connections
After removing the cover plate, the next step is to disconnect the wiring connections from the metal electrical box. Follow these steps:
- Evaluate the wiring connections: Take a careful look at the wiring connections inside the electrical box. Identify the different types of wires, such as black (hot), white (neutral), and green/bare (ground).
- Turn off power to the circuit: It is important to reconfirm that the power to the circuit is turned off by using a non-contact voltage tester to ensure your safety.
- Label the wires: To make reinstallation easier, label the wires with tape or use a permanent marker to indicate their respective connections. This will help you remember which wire goes where when connecting the new electrical box.
- Disconnect the wires: Using needle-nose pliers or wire cutters/strippers, carefully disconnect the wires one by one. Loosen the wire nuts securing the wires together and untwist them in a counterclockwise direction. Once the wires are untwisted, separate them and keep them away from each other.
- Inspect the wires: Take a moment to visually inspect the wires for any signs of damage or wear. If you notice any issues, it is recommended to consult a licensed electrician for further guidance or repair.
Remember to handle the wiring connections with caution and avoid touching any exposed wires. Ensuring that the power is turned off to the circuit will mitigate the risk of electrical shock.
With the wiring connections safely disconnected, you can now move on to the next step: detaching the metal electrical box from the wall.
Step 6: Detach the metal electrical box from the wall
Now that the wiring connections are disconnected, you can proceed with detaching the metal electrical box from the wall. Follow these steps:
- Remove any screws or nails: Inspect the sides and back of the metal electrical box for any screws or nails that may be securing it to the wall. If you find any, use a screwdriver or claw end of a hammer to remove them.
- Insert a pry bar or chisel: Gently insert a pry bar or chisel between the metal electrical box and the wall. Be cautious not to damage the surrounding wall surface.
- Apply pressure and pry the box away: Apply controlled pressure with the pry bar or chisel to slowly pry the metal electrical box away from the wall. Gradually work your way around the box, using leverage to detach it completely.
- Remove the box from the wall: Once the metal electrical box is fully detached, carefully pull it away from the wall. Be cautious not to damage any nearby wiring or wall surfaces.
If you encounter any resistance while removing the electrical box, stop and re-evaluate the situation. It’s possible that there may be additional screws or other attachments holding it in place. Take your time and proceed with caution to avoid any unnecessary damage.
With the metal electrical box successfully removed, you can now proceed to the next step: patching and repairing the wall.
Step 7: Patch and repair the wall
After removing the metal electrical box, it’s important to patch and repair the wall to restore it to its original condition. Follow these steps:
- Clean the area: Use a broom or vacuum to remove any dust, debris, or loose drywall particles from the wall surface around the opening left by the electrical box.
- Prepare the patching materials: Mix the joint compound according to the manufacturer’s instructions. You can also use a ready-mixed joint compound for convenience.
- Apply the joint compound: Using a putty knife or drywall trowel, apply a thin layer of joint compound over the hole or opening left by the electrical box. Smooth it out, ensuring the compound is level with the surrounding wall surface.
- Let the joint compound dry: Allow the joint compound to dry completely. This may take a few hours, depending on the manufacturer’s recommendations and the ambient temperature and humidity.
- Sand the repaired area: Once the joint compound is dry, lightly sand the repaired area with fine-grit sandpaper. This will help achieve a smooth finish and blend the repaired area with the surrounding wall.
- Apply a second coat (if necessary): If needed, apply a second coat of joint compound to further fill any imperfections or uneven areas. Repeat the drying and sanding process as before.
After completing the patching and repair process, the wall should be smooth and ready for further finishing, such as painting or wallpapering. Ensure that the repaired area seamlessly integrates with the rest of the wall, providing a seamless and polished finish.
Now that the wall is patched and repaired, you can proceed to the final step: installing a new electrical box (optional) or concluding the process.
Step 8: Install a new electrical box (optional)
If you are replacing the old electrical box or need to install a new one, you can follow these steps to ensure a proper installation:
- Select the appropriate electrical box: Choose a new electrical box that is suitable for your specific needs. Consider the size, material, and features required for your electrical setup.
- Position the new electrical box: Hold the new box against the wall, aligning it with the existing wiring and making sure it is level. Using a pencil, trace the outline of the box onto the wall as a guide.
- Cut an opening for the new box: Use a drywall saw or keyhole saw to carefully cut along the traced outline on the wall. Take caution to avoid cutting any existing wires or damaging the surrounding wall surface.
- Secure the new electrical box: Insert the new box into the opening, ensuring it fits snugly. Use screws or nails to secure the box to the wall, following the manufacturer’s instructions. Make sure the box is securely fastened and does not wobble.
- Reconnect the wiring: Reconnect the wiring connections to the new electrical box, following the labels or markings made during the disconnecting process. Twist the wires together and secure them with wire nuts, ensuring a tight connection.
- Install a new cover plate: Attach a cover plate suitable for the new electrical box, ensuring it aligns properly and is securely fastened with the appropriate screws.
Once you have completed the installation of the new electrical box, double-check all the connections to ensure they are secure and there are no loose or exposed wires. It’s always a good idea to have a licensed electrician inspect the installation to ensure compliance with electrical codes and safety standards.
Finally, if you do not need to install a new electrical box, you can conclude the process by ensuring that the wiring connections are secure, the wall is patched and repaired, and the area around the removed electrical box is clean and safe.
By following these steps, you will be able to successfully remove a metal electrical box from a wall and, if necessary, install a new one. Remember to prioritize safety at all times and consult a professional if needed.
Read also: 11 Amazing Metal Electrical Box for 2025
Conclusion
Removing a metal electrical box from a wall may seem like a daunting task, but with the right tools, knowledge, and safety precautions, it can be accomplished successfully. By following the step-by-step process outlined in this article, you can safely remove the box while preserving the integrity of the surrounding wall.
Remember, safety should always be your top priority. Cut off the power to the electrical box before starting any work and wear appropriate personal protective equipment. If you are unsure or uncomfortable working with electrical connections, it is best to consult a licensed electrician for assistance.
From gathering the necessary tools to detaching the metal electrical box from the wall, each step is crucial to ensure a smooth and hassle-free removal process. Take your time to label the wiring connections, inspect the box for any additional attachments, and patch and repair the wall once the box is removed.
If you’re replacing the box or need to install a new one, make sure to select a suitable electrical box and follow the proper installation steps. Always double-check the connections and seek professional help if necessary.
By following these guidelines, you can confidently remove a metal electrical box from a wall and complete your electrical project efficiently and safely. Remember to handle electrical work with caution and prioritize the well-being of yourself and others around you.
Now that you’re equipped with the knowledge and steps involved in removing a metal electrical box, you’re ready to tackle your next electrical project with confidence!
After mastering the removal of metal electrical boxes, why not expand your DIY skills with other projects around the house? Whether you're looking to tackle more complex tasks or just keep your space in tip-top shape, our guides have you covered. For a deep dive into various do-it-yourself projects, check out our comprehensive guide on DIY home improvements. If you're wondering about regular upkeep, our detailed article on essential home maintenance tasks will ensure your home stays healthy and well-maintained year-round.
Frequently Asked Questions about How To Remove Metal Electrical Box From Wall
Was this page helpful?
At Storables.com, we guarantee accurate and reliable information. Our content, validated by Expert Board Contributors, is crafted following stringent Editorial Policies. We're committed to providing you with well-researched, expert-backed insights for all your informational needs.


0 thoughts on “How To Remove Metal Electrical Box From Wall”