Articles
How To Remove The Hands From A Wall Clock
Modified: February 24, 2024
Learn how to remove the hands from a wall clock with our informative articles. Get step-by-step instructions and expert tips to complete the task easily.
(Many of the links in this article redirect to a specific reviewed product. Your purchase of these products through affiliate links helps to generate commission for Storables.com, at no extra cost. Learn more)
Introduction
Wall clocks are not only functional timepieces but also attractive decorative elements in our homes. Over time, you may feel the need to change the look of your wall clock by removing the hands and replacing them with new ones. Removing the hands from a wall clock may seem like a daunting task, but with the right tools and careful instructions, it can be done easily and safely.
In this article, we will guide you through the step-by-step process of removing the hands from a wall clock. Whether you want to change the hands for a new design or need to repair a malfunctioning clock mechanism, this guide will provide you with the necessary knowledge to perform the task confidently.
Before we dive into the details, it’s important to note that different clock mechanisms may vary in design and operation. Therefore, it’s always a good idea to consult the manufacturer’s instructions specific to your clock model if available. However, the general principles outlined here should apply to most wall clocks.
Now, let’s gather the necessary tools and materials before we begin removing the hands from a wall clock.
Key Takeaways:
- Easily and Safely Transform Your Wall Clock
With the right tools and step-by-step guidance, removing and replacing the hands of your wall clock can be a straightforward and rewarding process, allowing you to personalize your timepiece with ease. - Attention to Detail Yields Lasting Results
From preparing the work area to delicately handling the clock hands, each step in the process contributes to maintaining the functionality and aesthetics of your wall clock, ensuring its longevity and accurate timekeeping.
Read more: How Many Hands Are There In A Wall Clock
Tools and Materials Needed
Before you start the process of removing the hands from a wall clock, you will need the following tools and materials:
- Screwdriver (flathead or Phillips)
- Pliers
- Tweezers
- Soft cloth or microfiber cloth
- Masking tape or painter’s tape
- Optional: Clock hand puller (can make the process easier but is not always necessary)
The screwdriver is essential for loosening the nuts that hold the clock hands in place. Depending on the design of your clock, you may need a flathead or a Phillips screwdriver. Pliers are useful for providing grip and leverage while removing the nuts. Tweezers can come in handy for handling small components, especially if your clock hands are delicate or intricate.
A soft cloth or microfiber cloth is necessary to protect the clock face and hands from scratches during the removal process. Masking tape or painter’s tape can be used to create a protective barrier around the clock hands or to mark their positions before removal.
While not essential, a clock hand puller can make the process of removing the hands easier, especially if they are tightly secured. This tool helps to exert even pressure around the hand, minimizing the risk of damage during removal. If you don’t have a clock hand puller, don’t worry – the step-by-step instructions provided in this article can still be followed without it.
Now that you have all the necessary tools and materials gathered, let’s move on to the next step of the process – preparing the work area.
Step 1: Gather Necessary Supplies
Before diving into the process of removing the hands from a wall clock, it’s important to gather all the necessary supplies. Ensuring you have everything you need before starting will save you from having to make multiple trips, keeping the process efficient and hassle-free. Here’s what you’ll need:
- Screwdriver (flathead or Phillips)
- Pliers
- Tweezers
- Soft cloth or microfiber cloth
- Masking tape or painter’s tape
- Optional: Clock hand puller
First, make sure you have a screwdriver that is suitable for your clock’s screws. Depending on the clock’s design, you may need a flathead or Phillips screwdriver. Check the size of the screws and have the appropriate screwdriver on hand to avoid any difficulties during the removal process.
Next, have a pair of pliers ready. Pliers will provide grip and leverage when loosening the nuts that hold the clock hands in place. Opt for pliers that fit comfortably in your hand and allow for a good grip on the nuts.
Tweezers can be useful for handling small components, especially if your clock hands are delicate or intricate. They will help you maneuver the hands without putting undue pressure on them, reducing the risk of damage or bending.
To protect the clock face and hands from scratches or fingerprints, have a soft cloth or microfiber cloth on hand. This will allow you to handle the clock hands without leaving any marks or debris behind. A clean cloth will also help you see any dirt or dust on the hands that may need to be addressed during the cleaning process.
Additionally, consider using masking tape or painter’s tape during the removal process. You can create a protective barrier around the clock hands to prevent accidental scratches on the clock face or surrounding area. Alternatively, you can use tape to mark the positions of the hands before removal, ensuring their alignment when you later reattach them.
Lastly, consider obtaining a clock hand puller, although it is not always necessary. A clock hand puller can simplify the removal process, particularly if the hands are tightly secured. This tool exerts even pressure around the hand, reducing the risk of damage during removal. However, if you don’t have a clock hand puller, don’t worry – the following steps can still be performed without it.
With all the necessary supplies gathered, you are now ready to proceed to the next step: preparing the work area.
Step 2: Prepare the Work Area
Before you begin removing the hands from your wall clock, it’s important to prepare the work area to ensure an organized and safe process. By creating a clean and clutter-free environment, you’ll be able to work efficiently and reduce the risk of damage to the clock or its components. Follow the steps below to prepare your work area:
- Choose a flat and well-lit surface: Find a spacious surface where you can comfortably work on the clock. It could be a table, countertop, or a workbench. Ensure the area is well-lit, whether by natural light or using a desk lamp or overhead light.
- Gather any necessary tools: Gather all the tools you will need for the task. This includes the screwdriver, pliers, tweezers, cloth, tape, and clock hand puller if you have one. Having all your tools within reach will save you time and make the process smoother.
- Clean the work surface: Wipe down the work surface with a clean cloth to remove any dust or debris. A clean surface will help prevent any unwanted particles from getting into the clock mechanism or onto the clock hands as you work.
- Clear the area around the clock: Move any items or objects that are near the clock to create enough space to work comfortably. This will prevent anything from accidentally interfering with the removal process or knocking over the clock.
- Protect the clock face and surrounding area: Depending on the clock’s design and material, place a soft cloth or a piece of cardboard under the clock to protect the surface it is resting on. If desired, use masking tape or painter’s tape to create a protective barrier around the clock face, ensuring it is shielded from accidental scratches or damage.
By following these steps, you will create an optimized work area that allows for easy access to the clock and its components. A clean and well-organized space will not only help you complete the task more efficiently but also minimize the chances of any accidental damage to your wall clock.
Once your work area is prepared, you are now ready to move on to the next step: removing the clock from the wall.
Step 3: Remove the Clock from the Wall
Before you can begin the process of removing the hands from your wall clock, you’ll need to first take the clock down from the wall. This step ensures that you have unrestricted access to the clock mechanism and hands. Follow the steps below to safely remove the clock from the wall:
- Find a suitable location: Choose a safe and stable area where you can temporarily place the clock while you work on it. It should be a flat surface away from any potential hazards.
- Turn off the clock: If your clock is battery-operated, remove the batteries to turn it off. If your clock is powered by a wall outlet, ensure it is unplugged. This precaution will prevent any potential accidents while you handle the clock.
- Check for additional fastenings: Some wall clocks may have additional screws or brackets securing them to the wall. Carefully examine the clock, and if you notice any additional fastenings, remove them according to the manufacturer’s instructions.
- Detach the clock from the wall mount: Depending on the type of wall mount used for your clock, follow the appropriate steps to detach it from the wall. This could involve removing screws, releasing hooks, or sliding the clock off a mounting bracket. Be cautious and gentle to avoid any damage to the clock or the wall.
- Secure the clock: Once the clock is safely detached from the wall, place it in the designated location you previously selected. Ensure it sits securely and won’t be easily knocked over while you work on it.
By following these steps, you will be able to remove the clock from the wall and position it in a safe and accessible location for the next steps in the process. Now that the clock is off the wall, you can move on to inspecting the clock mechanism to prepare for removing the hands.
Note: If you are unsure or uncomfortable with removing the clock from the wall, it is recommended to seek assistance from a professional or refer to the manufacturer’s instructions specific to your wall clock model.
Let’s proceed to the next step: inspecting the clock mechanism.
Read more: How To Remove Beaters From Hand Mixer
Step 4: Inspect the Clock Mechanism
Before you embark on removing the hands from your wall clock, it is essential to inspect the clock mechanism. This step will help you familiarize yourself with the internal components and ensure that everything is in proper working order. Here’s how you can conduct a thorough inspection:
- Observe the movement: Take a close look at the clock mechanism and observe the movement of the gears, springs, and other components. Ensure that everything appears to be functioning correctly and that there are no signs of damage or excessive wear.
- Check for any loose parts: Gently wiggle or shake the clock mechanism to check for any loose or rattling parts. Loose parts can interfere with the movement of the clock hands or cause inaccuracies in timekeeping. If you notice any loose parts, consult the manufacturer’s instructions or consider seeking professional repair.
- Inspect the clock hands: Examine the condition of the clock hands. Look for any signs of damage, bending, or misalignment. If the clock hands are damaged, you may need to replace them, but we will cover that later in the process.
- Check for any obstructions: Look for any dust, debris, or foreign objects that may be obstructing the movement of the clock hands. These obstructions can affect the accuracy of the clock or prevent the hands from moving smoothly. Use a soft brush or compressed air to gently remove any debris you find.
- Verify the timekeeping: Set the clock to the correct time and observe how accurately it keeps time. Check if the second hand moves smoothly, without any skipping or hesitation. If you notice any issues with timekeeping, it may be necessary to adjust or repair the clock mechanism.
By thoroughly examining the clock mechanism, you can identify any potential issues or areas that require attention. This inspection will not only ensure a smoother process when removing the hands but also help maintain the overall functionality and performance of your wall clock.
Now that you have inspected the clock mechanism, you are ready to proceed further and locate the clock hands for removal in the next step.
Step 5: Locate and Access the Clock Hands
Now that you have inspected the clock mechanism, it’s time to locate and access the clock hands. The clock hands are typically found on the front side of the clock face, indicating the hours, minutes, and seconds. Follow the steps below to identify and gain access to the clock hands:
- Examine the clock face: Take a close look at the clock face and identify the different clock hands. Typically, there will be an hour hand, a minute hand, and sometimes a second hand. Each hand is attached to a central spindle that extends from the clock mechanism.
- Identify the fastening mechanism: Observe how the clock hands are secured to the spindle. Most clock hands are held in place by small nuts or retaining clips located in the center portion of the clock face.
- Access the clock hands: Depending on the design of your clock, you might need to remove the clock face cover or other components to access the clock hands. Check if there are any removable parts that need to be unscrewed, unhinged, or gently pried open to reach the clock hands.
- Review the manufacturer’s instructions: If you’re unsure about how to access the clock hands or if your clock has complex features, consult the manufacturer’s instructions specific to your clock model.
It’s important to take your time during this step to ensure that you accurately locate and access the clock hands. Rushing or applying excessive force can lead to damage or breakage of delicate components.
Once you have successfully located and gained access to the clock hands, you are ready to move on to the next step: loosening the nut holding the hour hand.
Step 6: Loosen the Nut Holding the Hour Hand
Now that you have located and accessed the clock hands, it’s time to begin removing them. We will start with the hour hand. Follow the steps below to loosen the nut holding the hour hand:
- Identify the nut: Locate the nut that is securing the hour hand to the clock mechanism. It is typically situated in the center of the clock face, directly above the hour hand.
- Use a suitable screwdriver: Select a screwdriver that fits the size and type of the nut. It may be a flathead or Phillips screwdriver depending on the design of your clock. Make sure the screwdriver is properly aligned with the slots on the nut for a secure grip.
- Rotate counterclockwise: With gentle yet firm pressure, rotate the screwdriver counterclockwise to loosen the nut. Be cautious not to apply excessive force or overtighten, as this could damage the nut or the clock hands.
- Loosen the nut without removing it: In most cases, it’s not necessary to completely remove the nut. Loosen it enough so that you can easily lift the hour hand off the spindle.
- Hold the minute hand steady: As you loosen the nut, use your other hand or a pair of pliers to hold the minute hand steady. This will prevent it from moving and maintain its alignment during the process.
Remember to work slowly and carefully during this step. Take your time to ensure that the nut is properly loosened and that you have a good grip on the screwdriver. If the nut feels particularly tight or stubborn, avoid using excessive force. Instead, consider applying some penetrating oil to the threads and allow it to work its way in before attempting to loosen the nut again.
With the hour hand’s nut loosened, you are ready to proceed to the next step: removing the hour hand from the clock mechanism.
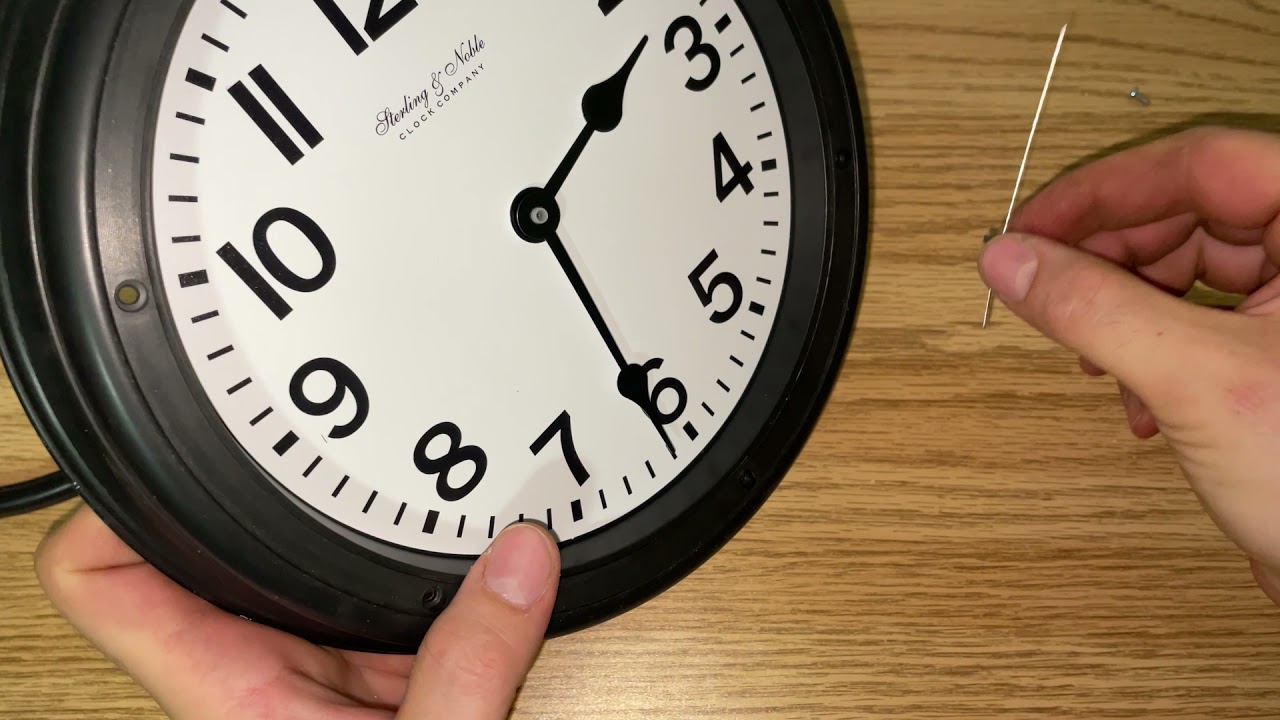
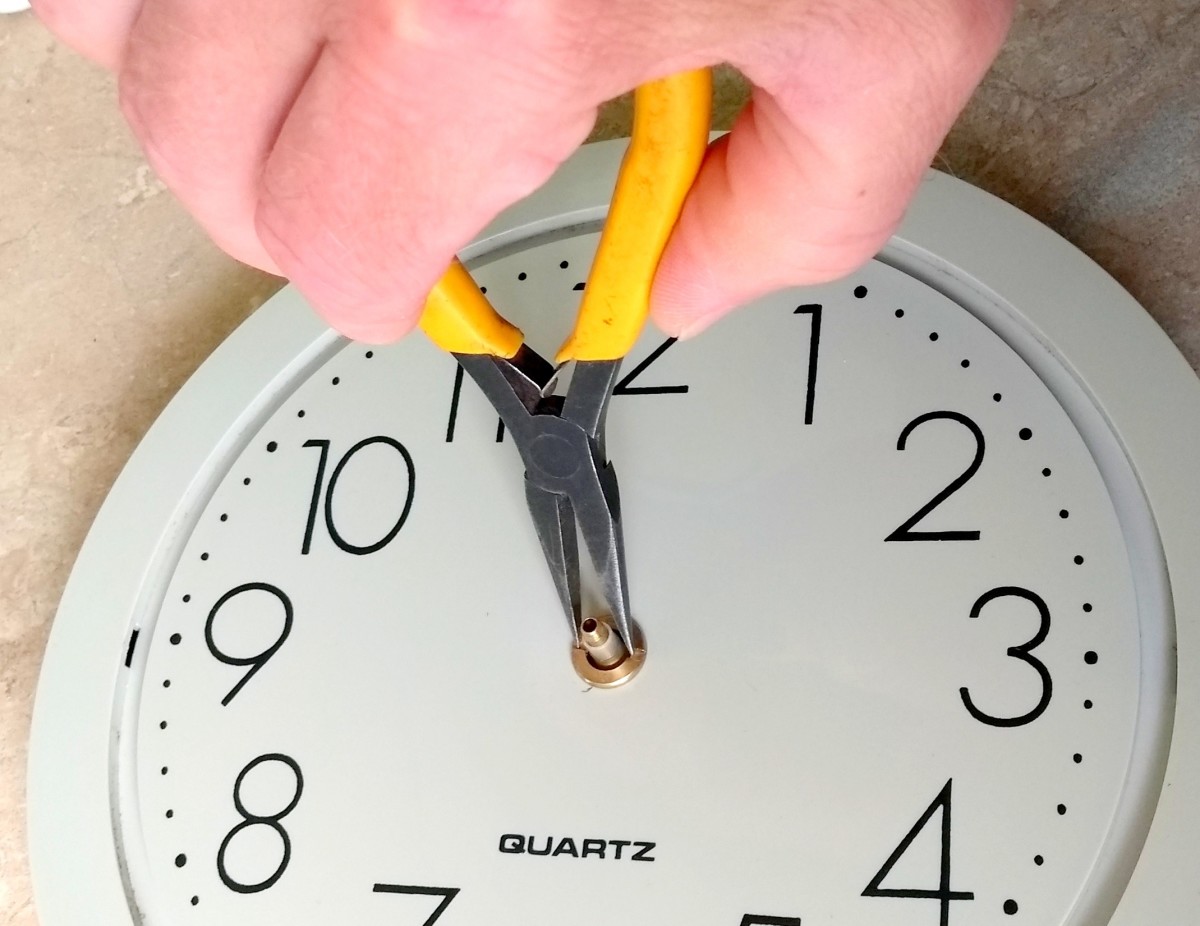
Use a small flathead screwdriver to carefully pry off the clock hands. Hold the clock mechanism in place to prevent damage. Be gentle to avoid bending the hands.
Step 7: Remove the Hour Hand
Now that you have loosened the nut holding the hour hand, it’s time to remove the hour hand from the clock mechanism. Follow the steps below to safely remove the hour hand:
- Gently lift the hour hand: Using your fingertips or a pair of tweezers, carefully lift the hour hand upwards. Be gentle to avoid bending or damaging the hand.
- Continue lifting until the hand is free: Lift the hour hand until it is completely free from the spindle. Take note of its positioning to ensure proper alignment when reattaching it later.
- Set the hour hand aside: Place the removed hour hand in a safe and secure location away from other objects, ensuring that it won’t get damaged or lost. You can lay it on a clean, soft cloth or place it in a small container to keep it organized.
- Inspect the hour hand: Take a moment to examine the hour hand for any signs of damage or wear. If it is in good condition, you can proceed with cleaning the hand. If it shows any issues, consider purchasing a replacement hand.
- Repeat the process for other clock hands: If your clock has a minute hand and a second hand, follow the same steps to remove them, loosening the respective nuts and lifting the hands carefully. Remember to handle each hand delicately to avoid any damage.
When removing the hour hand, take note of any resistance or stiffness. If the hand feels stuck or difficult to lift, double-check that the nut is properly loosened. If the hand still won’t budge, it is important to avoid applying excessive force, as this can lead to breakage or damage to the clock mechanism. In such cases, it may be best to seek guidance from a professional clock repairer.
With the hour hand successfully removed, you are now ready to move on to the next step: loosening the nut holding the minute hand.
Read more: How To Make A Wall Clock
Step 8: Loosen the Nut Holding the Minute Hand
With the hour hand removed, it’s time to loosen the nut holding the minute hand in place. Follow the steps below to successfully loosen the nut:
- Locate the nut: Identify the nut that is securing the minute hand to the clock mechanism. It is typically located just above the center of the clock, where the minute hand is attached.
- Choose the appropriate screwdriver: Select a screwdriver that matches the size and type of the nut. This may be a flathead or Phillips screwdriver, depending on the design of your clock.
- Turn the screwdriver counterclockwise: Apply gentle but firm pressure to the screwdriver, turning it counterclockwise to loosen the nut. Take care not to exert excessive force, as it may damage the nut or other delicate components.
- Loosen the nut without fully removing it: Unlike the hour hand, you typically don’t need to remove the nut completely. Loosen it enough to allow for easy removal of the minute hand.
- Hold the hour hand steady: As you loosen the nut, use your other hand or a pair of pliers to hold the hour hand steady. This will prevent any unintended movement or misalignment of the hour hand during the process.
It’s crucial to proceed slowly and cautiously while loosening the nut holding the minute hand. Take your time and ensure that the nut is sufficiently loosened before attempting to remove the minute hand. If the nut feels stubborn or difficult to loosen, consider applying some penetrating oil and allowing it to work its way into the threads before attempting to loosen it again.
Once the nut holding the minute hand is adequately loosened, you can proceed to the next step: removing the minute hand from the clock mechanism.
Step 9: Remove the Minute Hand
Now that you have loosened the nut holding the minute hand, it’s time to remove the minute hand from the clock mechanism. Follow the steps below to safely remove the minute hand:
- Gently lift the minute hand: Using your fingertips or a pair of tweezers, carefully lift the minute hand upwards. Be gentle to avoid bending or damaging the hand.
- Continue lifting until the hand is free: Lift the minute hand until it is completely detached from the spindle. Keep an eye on its positioning to ensure proper alignment when reattaching it later.
- Set the minute hand aside: Place the removed minute hand in a safe and secure location, away from any potential hazards or other objects. You can lay it on a clean, soft cloth or place it in a small container to ensure its protection and easy identification later.
- Inspect the minute hand: Take a moment to examine the minute hand for any signs of damage or wear. If the hand is in good condition, proceed to the next steps. However, if it shows any issues, consider purchasing a replacement hand.
- Repeat the process for the second hand (if applicable): If your clock has a second hand, follow the same steps to remove it, loosening the respective nut and lifting the hand with care.
During the removal of the minute hand, exercise caution to prevent any accidental damage. If you encounter resistance or stiffness when lifting the hand, double-check that the nut is sufficiently loosened. Avoid applying excessive force, as it may result in breakage or damage to the clock mechanism. If you encounter difficulties or the hand does not easily lift off, seek guidance from a professional clock repairer.
With the minute hand successfully removed, you’re now ready to move on to the next step: removing the second hand (if applicable) or proceeding to the next phase of the clock maintenance or repair process.
Step 10: Remove the Second Hand (if Applicable)
In this step, we will cover the process of removing the second hand from your wall clock, if your clock is equipped with one. Follow the steps below to safely remove the second hand:
- Locate the second hand: Identify the second hand, which is typically the thinnest and longest hand on the clock face. It is positioned above the minute hand and may have a red or contrasting color to differentiate it from the other hands.
- Inspect the fastening mechanism: Observe how the second hand is attached. Depending on the clock’s design, there may be a nut or a retaining clip holding the second hand in place.
- Loosen the securing mechanism: If there is a nut, use a suitable screwdriver to turn it counterclockwise, loosening it just enough to release the second hand. If there is a retaining clip, gently manipulate it to free the second hand.
- Remove the second hand: Once the securing mechanism is loosened or manipulated, carefully lift the second hand until it is completely detached from the spindle. Be cautious not to bend or distort the hand during removal.
- Keep the second hand secure: Place the removed second hand in a safe location, away from other objects, to prevent any damage or loss. You can choose to store it on a clean cloth or in a small container until it is time to reassemble the clock.
If your clock does not have a second hand or it is not applicable to your specific clock model, you can skip this step and proceed to the next phase of maintaining or repairing your clock.
It’s crucial to handle the second hand with care, as it is delicate and can easily bend or break if mishandled. Take your time during the removal process to ensure a smooth and safe operation.
Having successfully removed the second hand (if applicable), you can now proceed to the next step which is optional but recommended: cleaning the clock hands.
Step 11: Clean the Clock Hands (Optional)
While not necessary, cleaning the clock hands can help enhance their appearance and remove any dirt or grime that may have accumulated over time. Follow the steps below to clean the clock hands:
- Prepare a cleaning solution: Mix a gentle cleaning solution by combining a small amount of mild dish soap or a gentle glass cleaner with warm water in a bowl or basin. Avoid using harsh chemicals or abrasive cleaners, as they can damage the clock hands.
- Moisten a soft cloth: Dip a soft cloth or a microfiber cloth into the cleaning solution, making sure it is damp but not soaking wet. Excess moisture can seep into the clock mechanism or damage the hands.
- Gently wipe the clock hands: Carefully wipe each clock hand with the damp cloth, starting from the base and working towards the tip. Use gentle strokes and be mindful not to apply excessive pressure that may bend or damage the delicate hands.
- Pay attention to crevices and intricate details: If the clock hands have any intricate patterns or crevices, use a soft-bristled brush or a cotton swab lightly moistened with the cleaning solution to remove any dirt or grime trapped in those areas.
- Dry the clock hands: Once you have finished cleaning, use a dry, soft cloth to gently blot and dry the clock hands. Ensure that the hands are completely dry before reassembling them onto the clock mechanism.
While cleaning the clock hands is an optional step, it can help improve their appearance and maintain their functionality. If you notice any stubborn stains or discoloration that cannot be removed with mild cleaning, consider seeking professional assistance or exploring specialized clock cleaning solutions.
With the clock hands cleaned and dried, you are now ready to proceed to the next step: reassembling the clock hands.
Read more: How To Remove Bees From A Brick Wall
Step 12: Reassemble the Clock Hands
Now that you have cleaned the clock hands (if applicable) and ensured they are dry, it’s time to reassemble them onto the clock mechanism. Follow the steps below to reattach the clock hands:
- Start with the hour hand: Begin by aligning the hour hand with the spindle on the clock mechanism. Take note of its original position or refer to any markings or notches on the hand or clock face that indicate its proper placement.
- Slide the hour hand onto the spindle: Gently slide the hour hand onto the spindle, ensuring it fits securely and is positioned correctly. Avoid forcing the hand or applying excessive pressure that may cause it to bend or misalign.
- Tighten the nut holding the hour hand: Using your fingertips or a pair of pliers, tighten the nut holding the hour hand. Take care not to overtighten the nut, as it may result in damage to the hand or other components.
- Move on to the minute hand: Next, align the minute hand with the spindle, making sure it corresponds to the correct time indication on the clock face.
- Slide the minute hand onto the spindle: Carefully slide the minute hand onto the spindle, ensuring it sits securely and is properly aligned. Take your time to position it accurately, as the minute hand plays a crucial role in indicating the time.
- Secure the nut holding the minute hand: Using your fingertips or a pair of pliers, tighten the nut holding the minute hand. Again, exercise caution not to overtighten and risk damaging the hand or other components.
- Repeat the process for the second hand (if applicable): If your clock has a second hand, align and carefully slide it onto the spindle, taking note of its proper positioning. Secure the nut or retaining clip, being mindful not to overtighten.
Throughout the reassembling process, pay attention to the alignment and positioning of each hand. Ensure they are accurately indicating the desired time on the clock face and do not interfere with one another’s movement. Take your time and exercise patience to achieve the best results.
With the clock hands properly reassembled, you are now ready to move on to the final step: reinstalling the clock on the wall.
Step 13: Reinstall the Clock on the Wall
After successfully reassembling the clock hands, the final step is to reinstall the clock on the wall. Follow the steps below to securely mount the clock:
- Choose the desired location: Decide on the ideal spot to hang your wall clock. Ensure it is easily visible and complements the overall aesthetic of the room.
- Prepare the mounting hardware: Depending on the type of wall clock and mounting mechanism, gather any necessary hardware such as screws, wall anchors, or brackets.
- Mark the mounting location: Position the clock against the wall in the desired location. Use a pencil or masking tape to mark the spots where the mounting hardware will be attached. Ensure the markings are level and properly aligned.
- Mount the clock: Depending on the mounting hardware provided, securely attach it to the wall using the appropriate tools and techniques. Follow the manufacturer’s instructions for your specific wall clock model.
- Hang the clock: Carefully hang the clock on the mounted hardware, ensuring it is secure and level. Take a moment to adjust the positioning if necessary.
- Double-check stability: Gently give the clock a light shake to confirm its stability on the wall. Ensure it is securely mounted and won’t come loose or fall.
- Set the correct time: Finally, set the correct time on the clock, ensuring that the hour, minute, and (if applicable) second hand are in the proper position.
By following these steps, you can confidently reinstall your wall clock and bring a functional and decorative element back to your space.
It’s worth noting that the specific mounting instructions may vary based on the make and model of your wall clock. If you’re unsure or encounter any difficulties during the reinstallation process, it’s recommended to refer to the manufacturer’s instructions or seek assistance from a professional.
Congratulations! You have successfully removed, cleaned (if applicable), and reassembled the hands of your wall clock. Enjoy the refreshed appearance and accurate timekeeping of your newly revamped timepiece!
Remember to periodically check the clock mechanism and hands for any signs of wear or malfunction. Regular maintenance can help prolong the life and performance of your wall clock.
That concludes our comprehensive guide on removing the hands from a wall clock. We hope it has been informative and helpful throughout your clock maintenance journey.
Conclusion
Removing the hands from a wall clock can seem like a challenging task, but with the right tools and guidance, it can be accomplished easily and safely. Whether you want to change the hands for a new design or need to repair a malfunctioning clock mechanism, following the step-by-step process outlined in this guide will help you achieve your goal.
Throughout the process, we covered important steps such as gathering necessary supplies, preparing the work area, removing the clock from the wall, inspecting the clock mechanism, locating and accessing the clock hands, and removing each hand with precision. We also discussed optional steps like cleaning the clock hands for enhanced appearance and functionality.
Remember to handle the clock and its components delicately, ensuring not to apply excessive force or bend the hands. While cleaning the clock hands is optional, it can help maintain their appearance and preserve their accuracy.
Finally, reinstalling the clock on the wall is the last step of the process. Take the time to choose a suitable location, properly mount the clock hardware, and set the correct time to enjoy your rejuvenated wall clock.
By following these instructions, you can successfully remove, clean (if desired), and reassemble the hands of your wall clock. However, always consult the manufacturer’s instructions specific to your clock model for any additional guidance or precautions.
Remember to periodically inspect and maintain your clock for optimal performance. With proper care, your wall clock will continue to adorn your space while accurately keeping time for years to come.
We hope this comprehensive guide has provided you with the knowledge and confidence to tackle the task of removing the hands from a wall clock. Enjoy the process of transforming your clock and creating a personalized touch in your living space!
Frequently Asked Questions about How To Remove The Hands From A Wall Clock
Was this page helpful?
At Storables.com, we guarantee accurate and reliable information. Our content, validated by Expert Board Contributors, is crafted following stringent Editorial Policies. We're committed to providing you with well-researched, expert-backed insights for all your informational needs.


0 thoughts on “How To Remove The Hands From A Wall Clock”