Articles
How To Store Doors
Modified: August 16, 2024
Discover the best ways to store doors with our informative articles. Proper door storage techniques to prevent damage and save space.
(Many of the links in this article redirect to a specific reviewed product. Your purchase of these products through affiliate links helps to generate commission for Storables.com, at no extra cost. Learn more)
Introduction
Welcome to the comprehensive guide on how to store doors. Whether you’re a homeowner who needs to store doors during a renovation project or a contractor looking to keep doors in top shape until they’re ready for installation, proper storage is essential. Doors are vulnerable to damage from moisture, extreme temperatures, and mishandling, so it’s crucial to take the necessary steps to protect them.
In this article, we will walk you through the process of storing doors effectively. We’ll cover everything from preparing the doors for storage to choosing a suitable storage location and implementing climate control measures. By following these steps, you can ensure that your doors remain in excellent condition until you’re ready to use them.
Key Takeaways:
- Properly preparing and storing doors is crucial to protect them from damage. Follow steps such as cleaning, wrapping, and climate control to ensure doors remain in excellent condition until ready for use.
- Regular inspection and maintenance of stored doors are essential for long-term preservation. Address issues promptly, monitor climate conditions, and keep the storage area clean to prolong the doors’ lifespan.
Read more: How To Store Door Mats
Step 1: Prepare the doors for storage
Before you start storing your doors, it’s essential to properly prepare them to minimize the risk of damage. Follow these steps to ensure your doors are ready for storage:
- Remove hardware: Begin by removing any hardware attached to the doors, such as handles, hinges, and locks. These components can damage the doors or become damaged themselves if left attached during storage.
- Clean the doors: Thoroughly clean the doors to remove any dirt, dust, or debris. Use a gentle cleanser and a soft cloth or sponge to avoid scratching the surface. Ensure that the doors are completely dry before moving on to the next step.
- Inspect for damage: Carefully inspect the doors for any signs of damage, such as cracks, dents, or warping. If you notice any issues, it’s best to address them before storing the doors. Repairing any damages now can prevent further deterioration while in storage.
- Apply protective coating: Consider applying a protective coating, such as a wood sealer or paint, to the doors. This additional layer can help guard against moisture and other environmental factors that may cause damage. Ensure that you follow the manufacturer’s instructions for the specific coating you choose.
- Label the doors: To keep track of the doors and easily identify them later, label each door with its location or purpose. You can use removable labels or painter’s tape to avoid leaving residue on the doors. This step will make it easier to locate specific doors when you need them.
By taking the time to properly prepare your doors for storage, you can protect them from potential damage and make the retrieval process more efficient. Once you have completed the preparation steps, you are ready to move on to the next phase: choosing a suitable storage location.
Step 2: Choose a suitable storage location
Selecting the right storage location for your doors is crucial to ensure their safety and preservation. Follow these guidelines to choose a suitable storage location:
- Avoid areas prone to moisture: Moisture is one of the primary factors that can damage doors. Avoid storing doors in basements, garages, or areas with high humidity levels. If you must store doors in a potentially damp location, consider using moisture-absorbing products like desiccant packs or dehumidifiers to minimize moisture damage.
- Ensure proper ventilation: Good airflow is essential for preventing humidity buildup, which can lead to mold and mildew growth. Choose a storage area with proper ventilation, such as a dry and well-ventilated room or a storage unit with ventilation options. This will help maintain the optimal conditions for your doors.
- Protect from direct sunlight: Prolonged exposure to sunlight can cause fading, warping, and other damage to doors. When selecting a storage location, ensure that it is away from direct sunlight. If sunlight is unavoidable, consider using blinds or curtains to block the rays.
- Consider security measures: If you’re storing valuable or high-end doors, it’s essential to prioritize security. Choose a storage location that has secure locks, alarms, or surveillance systems to protect your doors from theft or vandalism.
- Opt for a dedicated space: Whenever possible, dedicate a specific area solely for door storage. This will help keep the doors organized and prevent any damage that may occur from being stored alongside other items.
By carefully considering these factors, you can select a suitable storage location that minimizes the risk of damage to your doors. A well-chosen storage area sets the foundation for maintaining the quality and integrity of the doors while they are in storage.
Step 3: Clean the doors before storing
Before you proceed to store your doors, it’s crucial to clean them thoroughly. Cleaning the doors not only helps maintain their appearance but also prevents dirt, dust, and grime from causing damage while in storage. Follow these steps to clean your doors effectively:
- Dust removal: Start by removing any loose dust or debris from the surface of the doors. Use a soft brush or a vacuum cleaner with a brush attachment to gently remove the dust. Pay attention to the corners and crevices where dust tends to accumulate.
- Wipe down: Prepare a mild cleaning solution by mixing a few drops of a gentle detergent or dish soap with warm water. Dip a clean cloth or sponge into the solution and wring out the excess liquid. Wipe down the doors, working in small sections, to remove any remaining dirt or grime. Be gentle to avoid scratching the surface of the doors.
- Pay attention to details: Use a soft-bristled brush or a toothbrush to clean hard-to-reach areas, such as intricate carvings or panel designs on the doors. Gently scrub these areas to ensure they are free from dust and grime.
- Rinse: After cleaning, dampen a clean cloth with plain water and wipe down the doors to remove any soapy residue. Ensure that the cloth is not dripping wet, as excessive moisture can be detrimental to the doors. Wipe the doors dry with a separate clean cloth.
- Apply a protective finish: Consider applying a thin layer of furniture polish or beeswax to the doors to provide an extra protective barrier. This step is particularly beneficial for wooden doors, as it helps maintain their luster and adds an additional layer of protection against moisture.
By thoroughly cleaning your doors before storing them, you remove dirt and grime that can potentially cause staining or damage over time. Clean doors not only look better but are less prone to deterioration while in storage.
Step 4: Protect the doors from damage
To ensure the doors remain in excellent condition while in storage, it’s essential to take measures to protect them from potential damage. Follow these steps to safeguard your doors:
- Wrap in protective material: Start by wrapping the doors individually in a protective material such as bubble wrap, moving blankets, or furniture blankets. This will provide a cushioning effect and prevent any scratches or dents during handling or storage.
- Use edge protectors: Attach edge protectors, such as foam or cardboard corners, to the corners of the doors. This extra layer of protection helps prevent damage to the edges of the doors, which are particularly vulnerable during transportation and storage.
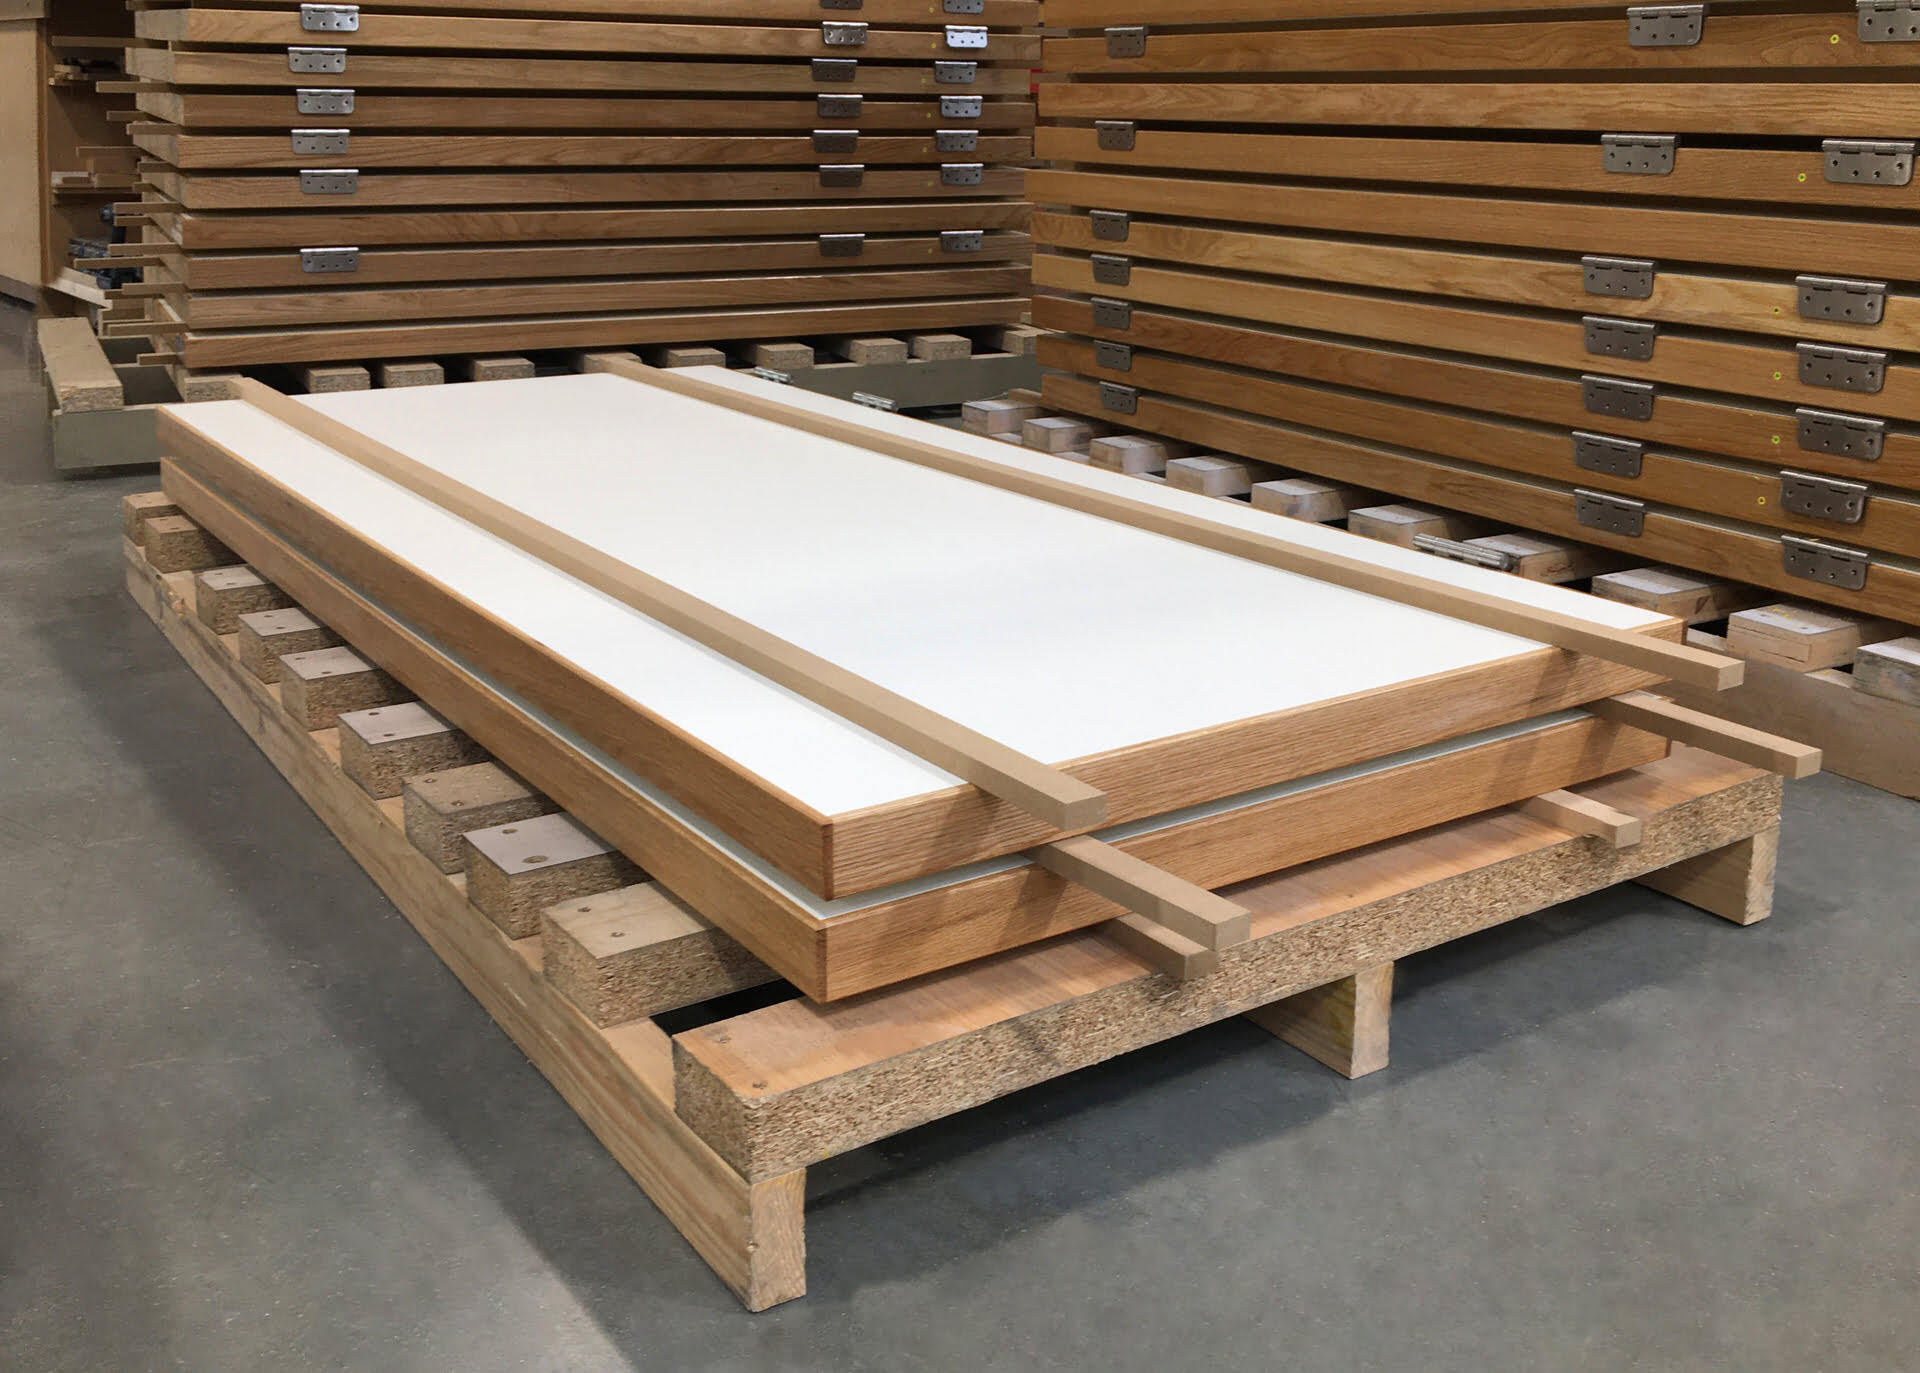
- Avoid stacking: If you need to stack the doors, place a layer of cardboard or wooden planks between each door to distribute the weight evenly and prevent any crushing or warping. Avoid stacking too many doors to avoid excessive pressure.
- Store doors upright: Whenever possible, store the doors in an upright position rather than laying them flat. This helps maintain their shape and minimizes the risk of warping or bending. If vertical storage is not feasible, consider storing them at a slight angle to mitigate the pressure on the hinges and avoid stress on the doors.
- Secure the doors: Use straps or sturdy ropes to secure the wrapped doors together or anchor them to prevent shifting during transportation or storage. This adds an extra layer of stability and minimizes the risk of accidents or damage.
- Avoid contact with the floor: When storing the doors, ensure they are raised off the ground to prevent moisture absorption or contact with potentially damaging substances. Place pallets, wooden blocks, or shelves under the doors to keep them elevated.
By implementing these protection measures, you can significantly reduce the risk of damage to your doors while they are in storage. Remember to handle the doors with care during the storing process to avoid any accidental bumps or drops that could lead to damage.
Store doors in a dry, well-ventilated area to prevent warping. Keep them flat and off the ground to avoid damage. If storing vertically, support them at the top and bottom to prevent bending.
Read more: What Is Self Storing Storm Door
Step 5: Consider climate control options
Climate control plays a crucial role in preserving the quality and condition of your stored doors, especially if you live in an area with extreme temperatures or high humidity. Follow these steps to ensure that your doors are stored in the optimal climate conditions:
- Temperature regulation: Extreme temperatures can cause warping, cracking, or damage to your doors. Choose a storage location that maintains a consistent temperature between 50°F (10°C) and 80°F (27°C) to prevent any adverse effects on the doors. Avoid storing them in areas susceptible to temperature fluctuations, such as attics or basements.
- Humidity control: High levels of humidity can lead to mold growth, swelling, or rotting of the doors. Invest in a dehumidifier or moisture-absorbing products, such as silica gel packs, to keep the humidity level below 50%. This helps prevent moisture-related damage to the doors, especially if you live in a humid climate.
- Air circulation: Proper air circulation is essential to prevent stagnant air and the buildup of moisture. Avoid packing the storage area too tightly and leave some space for airflow around the doors. This will help prevent condensation and maintain a healthy storage environment for the doors.
- Insulation: Ensure that the storage location is well-insulated to protect the doors from extreme external temperatures. Proper insulation helps maintain a stable climate within the storage area, minimizing the impact of weather fluctuations on the doors.
- Monitor conditions: Regularly check the temperature and humidity levels inside the storage area. Consider investing in a hygrometer or a climate monitor to keep track of the conditions. If you notice any significant deviations from the recommended ranges, take appropriate measures to adjust the climate control settings.
By implementing climate control measures, you can mitigate the potential damage caused by extreme temperatures and high humidity. Creating a stable and controlled environment for your stored doors ensures their long-term preservation and reduces the need for repairs or replacements in the future.
Step 6: Arrange the doors properly in the storage area
Organizing the doors properly in the storage area is crucial for easy access, reduced risk of damage, and efficient use of space. Follow these steps to arrange your doors effectively:
- Create a layout plan: Before storing the doors, create a layout plan to determine the best arrangement. Take measurements of the storage area and consider the sizes and shapes of the doors. This will help you optimize the space and ensure easy retrieval of specific doors when needed.
- Group similar doors together: Group doors with similar sizes, styles, or materials together. This makes it easier to locate a specific type of door, especially if you have a large collection. Use labels or color-coded tags to identify each group.
- Leave clear pathways: Ensure there are clear pathways between the rows or stacks of doors. This allows for easy navigation and avoids potential damage when moving or accessing the doors. Leave enough space to open and close doors without obstruction.
- Use storage racks or shelves: If possible, consider using storage racks or shelves to stack and organize the doors vertically. This maximizes the use of vertical space and minimizes the risk of doors being damaged by weight or pressure from other items.
- Protect vulnerable areas: Take extra care to protect vulnerable areas of the doors, such as glass panels or delicate finishes. Use protective coverings or separate storage bins to shield these areas from potential damage from nearby objects.
- Keep an inventory: Maintain a detailed inventory of the doors you have stored, including their location, condition, and any additional notes. This helps keep track of your inventory, making it easier to find specific doors when needed.
By arranging your doors in a systematic and organized manner, you create a storage area that is both functional and safe. Proper arrangement not only protects the doors from damage but also optimizes the space, allowing for easier accessibility and retrieval as and when required.
Step 7: Regularly inspect and maintain the stored doors
Regular inspection and maintenance of your stored doors are essential to ensure their long-term preservation and prevent any issues that could arise. Follow these steps to keep your doors in optimal condition during storage:
- Inspect doors periodically: Set a schedule to inspect the stored doors regularly. Look for any signs of damage, such as cracks, dents, or warping. Pay attention to the condition of the protective coverings and ensure they are still providing adequate protection.
- Address any issues promptly: If you notice any damage or deterioration during the inspection, take immediate action to address the issue. Repair or replace any damaged protective coverings and address any structural or cosmetic damage to the doors to prevent further deterioration.
- Check for pests: Regularly check for signs of pests, such as insects or rodents, in the storage area. Pests can cause significant damage to the doors. If you notice any infestation, take appropriate measures to eliminate the pests and prevent future occurrences.
- Monitor climate conditions: Continue to monitor the temperature and humidity levels in the storage area. Adjust climate control measures if necessary to maintain optimal conditions for the doors. Keep track of any fluctuations that may impact the doors’ condition.
- Rotate doors: If you have multiple doors in storage, consider rotating them periodically. This helps ensure even exposure to the storage environment and prevents any single door from being in prolonged storage for extended periods.
- Keep the storage area clean: Regularly clean the storage area to remove any debris, dust, or potential contaminants. A clean storage space promotes a healthier environment for the doors and reduces the risk of damage from external factors.
- Update inventory: Keep your inventory documentation up to date with any changes or additions to the stored doors. This ensures accurate tracking and easier retrieval when needed.
By regularly inspecting and maintaining the stored doors, you can detect and address any issues promptly, ensuring their long-term preservation. Consistent monitoring and maintenance help prolong the doors’ lifespan and minimize the need for repairs or replacements in the future.
Conclusion
Properly storing your doors is essential for their preservation and protects them from damage during periods of non-use. By following the steps outlined in this comprehensive guide, you can ensure that your doors remain in excellent condition until you’re ready to use them again.
Start by preparing the doors for storage, removing any hardware, cleaning them thoroughly, and inspecting for any damage. Choose a suitable storage location that provides climate control and proper ventilation to prevent moisture-related issues. Protect the doors from damage by wrapping them in protective materials and arranging them properly in the storage area. Consider implementing climate control options and regularly inspect and maintain the doors to address any issues promptly.
Remember to label the doors, keep an inventory, and handle them with care during the storage process. By taking these steps, you can ensure that your doors are protected from moisture, extreme temperatures, and other potential risks that could cause damage or deterioration.
By properly storing and maintaining your doors, you can prolong their lifespan and ultimately save money by reducing the need for repairs or replacements. Ensure that these valuable assets remain in top shape, ready to serve their purpose whenever you need them.
So, whether you’re storing doors for a short period during a renovation project or for an extended duration, following these guidelines will help you protect your doors and ensure that they remain in excellent condition until you’re ready to install them once again.
Frequently Asked Questions about How To Store Doors
Was this page helpful?
At Storables.com, we guarantee accurate and reliable information. Our content, validated by Expert Board Contributors, is crafted following stringent Editorial Policies. We're committed to providing you with well-researched, expert-backed insights for all your informational needs.


0 thoughts on “How To Store Doors”