Articles
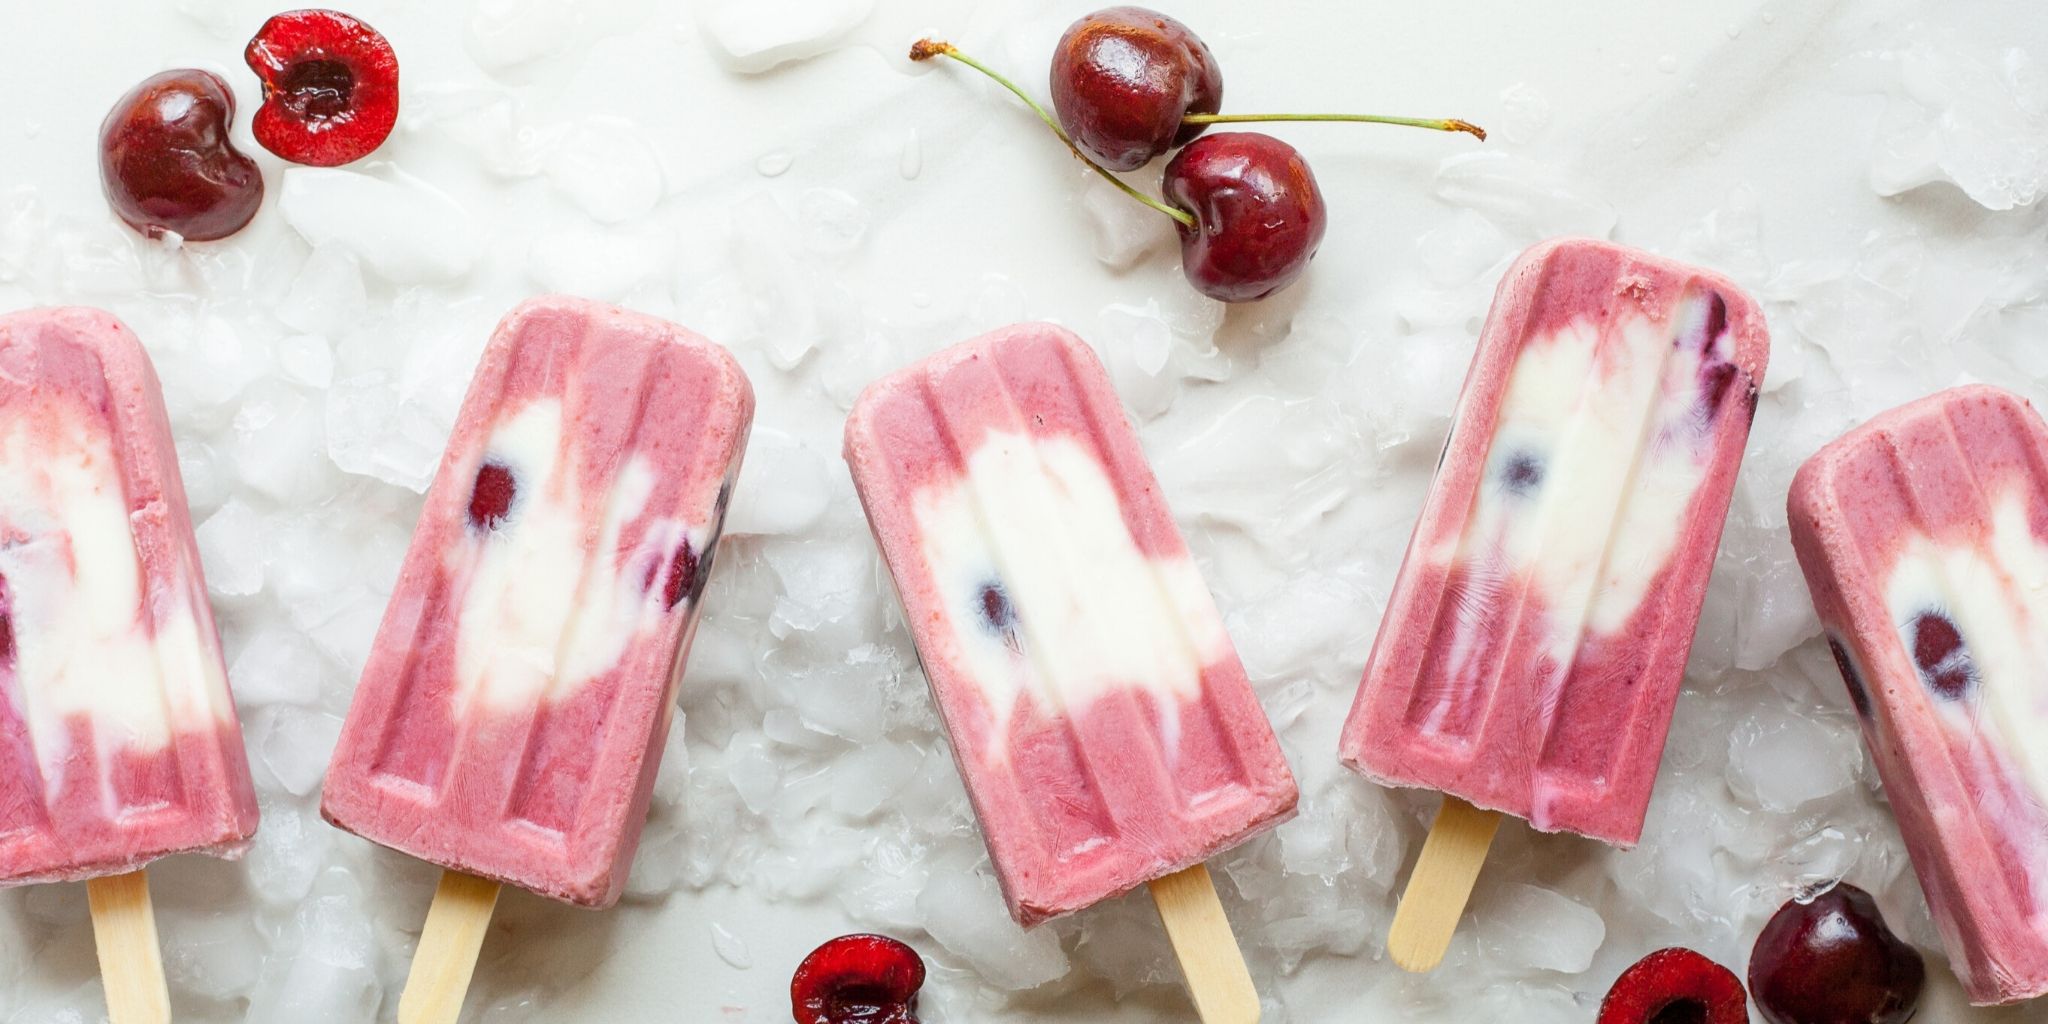
How To Store Homemade Popsicles
Modified: August 17, 2024
Learn how to properly store your homemade popsicles with these helpful articles. Keep your frozen treats fresh and delicious for longer!
(Many of the links in this article redirect to a specific reviewed product. Your purchase of these products through affiliate links helps to generate commission for Storables.com, at no extra cost. Learn more)
Introduction
Summer is the perfect time to indulge in homemade popsicles. Whether you’re experimenting with bold flavors or creating healthy fruit-based treats, making your own popsicles gives you the freedom to customize the ingredients and enjoy a refreshing treat whenever you want. However, once you’ve crafted these delightful frozen treats, it’s crucial to understand how to properly store them to maintain their texture and flavor.
Proper storage is vital to ensure that your homemade popsicles remain appetizing and enjoyable, allowing you to savor them for longer periods. In this article, we will discuss the importance of proper storage for homemade popsicles and provide insights into the best practices for storing them.
The Importance of Proper Storage for Homemade Popsicles
Popsicles are particularly vulnerable to changes in temperature and humidity, which can cause them to melt or develop freezer burn. If not stored correctly, the popsicles can lose their shape, become icy or too soft, and the flavors can get dull. By understanding the factors that affect the quality of your homemade popsicles and implementing proper storage techniques, you can ensure that they stay fresh, delicious, and ready to enjoy.
Factors to Consider Before Storing Homemade Popsicles
Before diving into the best practices for storing homemade popsicles, it’s essential to consider a few factors that can influence how well your frozen treats hold up. These factors include:
- Ingredients: Different ingredients may freeze at varying temperatures and have different effects on the texture of the popsicles. Understanding the ingredients you use will help you determine the best storage method.
- Popsicle molds: The type of molds you use can affect how easy it is to remove the popsicles and how well they hold their shape during storage.
- Freezer temperature: The temperature of your freezer can impact the texture and quality of your popsicles. A freezer that is too cold may cause them to become too icy, while a warmer freezer may result in a softer consistency.
- Storage duration: The length of time you plan to store your popsicles will also influence the storage method. Short-term storage may require different steps compared to long-term storage.
Now that we’ve covered the importance of proper storage and the key factors to consider, let’s explore the best practices for storing your homemade popsicles.
Key Takeaways:
- Proper storage is crucial for maintaining the freshness, texture, and flavor of homemade popsicles. Factors like ingredients, molds, and freezer temperature must be considered for optimal storage.
- Freezer burn can be avoided by using airtight containers, removing excess air from ziplock bags, and storing popsicles in the coldest part of the freezer. Proper storage ensures delightful frozen treats every time.
The Importance of Proper Storage for Homemade Popsicles
Popsicles are a delightful frozen treat enjoyed by people of all ages. Whether you’re indulging in a classic fruit-flavored popsicle or exploring unique combinations of flavors and ingredients, there’s no denying the satisfaction of biting into a refreshing, icy treat on a hot summer day. However, to fully enjoy the goodness of homemade popsicles, it’s crucial to understand the importance of proper storage.
Proper storage practices not only ensure that your popsicles maintain their enticing appearance and mouthwatering taste but also extend their shelf life. By taking the right steps to store your homemade popsicles, you can avoid common issues like freezer burn, loss of flavor, and a change in texture.
One of the primary goals of proper storage is to prevent the popsicles from melting or developing freezer burn, which can significantly affect their quality. Freezer burn occurs when ice crystals form on the surface of the popsicles due to improper packaging or exposure to air. This leads to a loss of moisture and a deterioration of flavor and texture.
Here are a few key reasons why proper storage is essential for homemade popsicles:
Maintain Freshness: Storing your homemade popsicles properly helps maintain their freshness and flavor. By preventing air exposure and excessive ice crystal formation, you can preserve the vibrant taste and texture of the popsicles for an extended period.
Preserve Texture: The texture of a popsicle is one of its most appealing attributes. Whether you prefer a smooth and creamy popsicle or a more ice-like texture, proper storage prevents the popsicles from becoming too hard, icy, or overly soft. This ensures that each bite delivers the perfect combination of flavors and a satisfying mouthfeel.
Prolong Shelf Life: Proper storage practices can extend the shelf life of your homemade popsicles. By minimizing exposure to air, moisture, and temperature fluctuations, you can enjoy your frozen treats for a more extended period. This is particularly beneficial if you have made a large batch or want to save some popsicles for later enjoyment.
Promote Food Safety: Homemade popsicles, like any food product, are susceptible to bacterial growth if not stored correctly. Bacteria can multiply rapidly at warm temperatures, potentially leading to foodborne illnesses. Properly storing your popsicles in a controlled, cold environment reduces the risk of bacterial contamination, ensuring that they remain safe for consumption.
Now that we understand the importance of proper storage for homemade popsicles, let’s dive into the best practices that will help you maintain the quality and deliciousness of your frozen creations.
Factors to Consider Before Storing Homemade Popsicles
Before you dive into storing your homemade popsicles, it’s essential to consider a few key factors that can impact their quality and longevity. By taking these factors into account, you can make informed decisions about the best storage methods for your frozen treats.
Ingredients:
The ingredients used in your homemade popsicles can play a significant role in their texture and freezing capabilities. Some ingredients, like fruits with high water content, may result in popsicles that are more prone to ice crystal formation. On the other hand, ingredients with higher fat content, such as cream or yogurt, can create a creamier texture. Consider the ingredients you use and how they may affect the freezing process and storage requirements.
Popsicle Molds:
The type of molds you use for your popsicles can impact both the freezing process and the ease of removing the popsicles from the molds. Silicone molds are often recommended because they are flexible and make it easier to release the popsicles without breaking or damaging them. Additionally, molds with built-in lids or handles can simplify the storage process.
Freezer Temperature:
The temperature of your freezer is crucial in maintaining the quality of your popsicles. Freezing your popsicles at a temperature between 0°F (-18°C) and -5°F (-20°C) is generally recommended. This range helps ensure that the popsicles freeze evenly and prevents them from becoming overly icy or too soft. Check the temperature of your freezer and adjust it if necessary to maintain optimal freezing conditions.
Storage Duration:
The length of time you plan to store your popsicles can also influence the storage method you choose. If you’re storing them for a short period, such as a few days, different techniques may be suitable compared to long-term storage for several weeks or months. It’s important to consider the intended duration of storage to select the most appropriate storage method.
Considering these factors before storing your homemade popsicles will help you make informed decisions about the best practices to follow. With these considerations in mind, let’s explore the top tips for storing your homemade popsicles to ensure they remain delicious and refreshing for as long as possible.
Best Practices for Storing Homemade Popsicles
Now that you understand the importance of proper storage and have considered the factors that can impact your homemade popsicles, it’s time to explore the best practices for storing them. By following these guidelines, you can ensure that your popsicles remain tasty, visually appealing, and enjoyable for whenever you’re ready to indulge.
Freezing Homemade Popsicles:
Before you can store your popsicles, you need to freeze them properly. Here are some tips for freezing homemade popsicles:
- Ensure that your popsicle mixture is properly chilled before pouring it into the molds. This will help speed up the freezing process and prevent the formation of ice crystals.
- Fill the molds to the indicated fill line, leaving a bit of space at the top to allow for expansion during freezing.
- Tap the mold gently on the countertop to release any trapped air bubbles and ensure that the mixture is evenly distributed.
- Place the filled molds in the freezer on a flat surface to prevent tilting or spilling.
- Allow the popsicles to freeze completely, usually for at least 4 to 6 hours, or follow the specific recipe instructions.
Storing Homemade Popsicles in the Freezer:
Once your popsicles are frozen, it’s time to store them properly in the freezer. Follow these tips:
- Transfer the frozen popsicles from the molds into an airtight container or resealable freezer bags to protect them from air exposure.
- Label the container or bags with the date and flavor of the popsicles for easy identification.
- Place the container or bags in a designated area of the freezer where they won’t get crushed or damaged.
- Avoid storing popsicles near the freezer door, as this area experiences temperature fluctuations every time the door is opened.
- For long-term storage, consider placing the container or bags in the back of the freezer, where the temperature is more stable.
Avoiding Freezer Burn:
Freezer burn is a common issue when it comes to storing frozen foods, and homemade popsicles are no exception. To prevent freezer burn:
- Ensure that your popsicles are properly wrapped or sealed to minimize air exposure. Air exposure can cause moisture loss and lead to the formation of ice crystals, resulting in freezer burn.
- Consider using airtight containers that are specifically designed for freezer storage. These containers create a barrier against moisture and air, keeping your popsicles fresh and free from freezer burn.
- If using freezer bags, squeeze out any excess air before sealing them tightly.
- Another option is to individually wrap each popsicle in plastic wrap or parchment paper before placing them in the container or bags. This provides an additional layer of protection against air and moisture.
Storing Homemade Popsicles in Ice Trays:
Freezing Homemade Popsicles
Freezing homemade popsicles is a crucial step in the process of preserving their flavor and texture. By following the right techniques, you can ensure that your popsicles freeze evenly, maintain their shape, and are ready for a refreshing treat whenever you desire. Here are some helpful tips for freezing homemade popsicles:
- Chill the mixture: Before pouring the popsicle mixture into the molds, make sure it has been properly chilled. This step helps speed up the freezing process and prevents the formation of large ice crystals. Refrigerate the mixture for at least an hour before pouring it into the molds.
- Fill the molds: Fill each popsicle mold to the indicated fill line. Leave a small gap at the top to allow for expansion during freezing. Be careful not to overfill the molds, as the mixture may expand and overflow during the freezing process.
- Tap out air bubbles: Gently tap the molds on the countertop a few times to release any trapped air bubbles. This ensures that the mixture is evenly distributed and prevents the formation of air pockets in the final popsicle.
- Insert sticks: Place the sticks or popsicle handles into the molds. Ensure they are positioned upright and centered in each popsicle cavity. The sticks should be long enough to extend out of the popsicles for easy removal later.
- Freeze until solid: Transfer the filled popsicle molds to the freezer. Lay them flat on a stable surface or use a popsicle mold stand, if available, to keep them upright. Allow the popsicles to freeze completely, usually for at least 4 to 6 hours. The exact freezing time may vary depending on the size and ingredients of your popsicles.
Additional Tips:
- For layered or swirled popsicles, freeze each layer for a short time before adding the next layer. This helps prevent bleeding or mixing of colors and flavors.
- If your popsicles have large chunks of fruit or other add-ins, consider partially freezing the mixture before adding them. This prevents the chunks from sinking to the bottom of the molds.
- If you encounter difficulty removing the popsicles from the molds, briefly run warm water over the bottom of the molds or gently twist the sticks to release them. Be careful not to keep them under warm water for too long, as it may cause the popsicles to melt.
- Once the popsicles are completely frozen, transfer them to an airtight container or resealable freezer bags for long-term storage.
By following these simple steps, you can freeze your homemade popsicles with confidence. The freezing process ensures that your popsicles retain their flavors, textures, and vibrant colors until you’re ready to enjoy them. Now that your popsicles are ready, it’s time to learn about the best practices for storing them in the freezer to maintain their quality for an extended period.
Read more: How To Store Homemade Boba
Storing Homemade Popsicles in the Freezer
Once your homemade popsicles are frozen and ready to be stored, it’s important to follow proper techniques to maintain their quality and prevent any potential issues. By storing your popsicles correctly in the freezer, you can ensure that they stay delicious and refreshing for as long as possible. Here are some best practices for storing homemade popsicles:
- Transfer to airtight containers: Remove the popsicles from their molds and transfer them to airtight containers or resealable freezer bags. These containers provide an extra layer of protection against air exposure, helping to prevent freezer burn and maintain the popsicles’ taste and texture.
- Label the containers: Take a moment to label the containers or bags with the date and flavor of the popsicles. This will make it easier to identify and select the desired popsicles without having to open every container or bag.
- Choose a suitable location: Store the popsicles in a designated area of your freezer where they won’t get crushed or damaged by other items. Placing them in the back of the freezer, away from the door, helps maintain a more stable temperature, minimizing the chances of temperature fluctuations that could affect the popsicles’ texture and quality.
- Avoid frequent thawing and refreezing: Try to avoid repeatedly taking out and returning popsicles to the freezer. Frequent thawing and refreezing can lead to a loss of texture and compromise the integrity of the popsicles. If you need to remove a few popsicles, take out only what you need and promptly return the rest to the freezer.
- Organize and stack carefully: Arrange the popsicles in a way that allows for easy access while minimizing the risk of them sticking together or toppling over. If needed, you can use dividers or separators between the popsicles to keep them separate and prevent them from touching.
- Consider using a popsicle mold stand: If you have a popsicle mold stand or holder, use it to store your popsicles upright. This will help maintain their shape and prevent any bending or warping of the sticks.
By following these best practices, you can ensure that your homemade popsicles are stored properly in the freezer, maximizing their freshness and preserving their flavor. Proper storage techniques will help maintain the integrity of the popsicles, allowing you to enjoy them at their best whenever you’re ready.
Next, we’ll explore how to avoid freezer burn, a common issue when storing frozen treats, and provide alternative methods for storing homemade popsicles, such as using ice trays or popsicle molds. Let’s dive in!
Store homemade popsicles in an airtight container or freezer bag to prevent freezer burn. Place a piece of parchment paper between each popsicle to keep them from sticking together.
Avoiding Freezer Burn
Freezer burn is a common concern when it comes to storing frozen foods, including homemade popsicles. It occurs when moisture evaporates from the popsicles’ surface and is replaced by icy crystals, leading to a deterioration in texture and flavor. To ensure your homemade popsicles remain free from freezer burn, follow these tips:
- Use airtight containers: Properly store your popsicles in airtight containers or resealable freezer bags. This helps create a barrier between the popsicles and the cold air in the freezer, preventing excessive moisture evaporation.
- Remove excess air: When using resealable freezer bags, squeeze out as much excess air as possible before sealing the bags. This reduces the chance of ice crystals forming on the popsicles’ surface.
- Wrap individually: For added protection, you can individually wrap each popsicle in plastic wrap or parchment paper before placing them in the container or bag. This creates an extra layer of insulation against air and moisture.
- Seal containers tightly: Ensure that your airtight containers are securely sealed to prevent air from entering. Loose or improperly sealed containers can expose the popsicles to the circulating air in the freezer, contributing to freezer burn.
- Store in the coldest part of the freezer: Place your popsicles in the coldest part of the freezer, usually towards the back or bottom. These areas typically experience less temperature fluctuation, helping to maintain a consistent freezing environment and reduce the likelihood of freezer burn.
- Rotate your popsicles: If you have multiple containers of popsicles in the freezer, periodically rotate them. This ensures that older popsicles are consumed first, reducing the chance of freezer burn due to prolonged storage.
- Avoid prolonged storage: Homemade popsicles are best enjoyed within a reasonable time frame to maintain their quality. While properly stored popsicles can last for several weeks, it’s ideal to consume them within a month to avoid the risk of freezer burn and flavor degradation.
By following these strategies, you can significantly reduce the risk of freezer burn and extend the shelf life of your homemade popsicles. Freezer burn not only affects the taste and texture but may also cause the popsicles to become unappetizing and less enjoyable. So, take the necessary steps to protect your frozen treats and ensure that each bite remains as delightful as the first.
Now, let’s explore alternative methods for storing homemade popsicles, such as using ice trays or popsicle molds. These methods offer convenience and different options for enjoying your frozen treats. Let’s dive in!
Storing Homemade Popsicles in Ice Trays
If you don’t have popsicle molds or prefer a different storage method, using ice trays can be a convenient and practical option for storing homemade popsicles. Here’s how you can store your popsicles in ice trays:
- Select suitable ice trays: Choose ice trays that have individual compartments large enough to hold the desired amount of popsicle mixture. Silicone ice trays or those with removable silicone bottoms work well for this purpose.
- Prepare the popsicle mixture: Mix and prepare your popsicle ingredients according to your preferred recipe. Ensure that the mixture is well-cooled before pouring it into the ice trays.
- Pour the mixture into the ice trays: Pour the popsicle mixture carefully into each compartment of the ice tray. Leave a small space at the top to account for expansion during freezing.
- Insert popsicle sticks: Insert a popsicle stick or a small wooden stick into each compartment of the ice tray. Position the sticks upright, ensuring they are centered in each popsicle cavity.
- Freeze until solid: Place the filled ice trays in the freezer and allow the popsicles to freeze until they are completely solid, usually for about 4 to 6 hours.
- Remove the popsicles: Once frozen, gently twist or tap the ice tray to release the popsicles from their compartments. If needed, run warm water over the bottom of the ice tray to loosen the popsicles.
- Store in an airtight container: Transfer the released popsicles to an airtight container or resealable freezer bags for long-term storage. Label the container with the date and flavor for easy identification.
- Stack carefully: Arrange the popsicles in the container, stacking them carefully to avoid damaging their shape or texture. Consider adding dividers or parchment paper between layers to prevent them from sticking together.
- Place in the freezer: Store the container of popsicles in the coldest part of the freezer, away from areas that experience frequent temperature fluctuations.
Storing homemade popsicles in ice trays offers the advantage of individual, bite-sized treats that can be enjoyed conveniently. It’s a great alternative if you don’t have popsicle molds or prefer a different shape and size for your popsicles. Just remember to use suitable ice trays, insert the sticks properly, and ensure the popsicles are transferred to an airtight container for proper storage.
If you’re interested in exploring other storage methods for your homemade popsicles, such as using popsicle molds or ziplock bags, we’ll cover those next. Each method has its own benefits and considerations, so let’s continue our journey to find the best fit for your needs!
Using Popsicle Molds for Storage
Using popsicle molds for storage is a popular and practical method for preserving homemade popsicles. Popsicle molds are specifically designed to create perfectly-shaped frozen treats and offer a convenient way to store and enjoy them. Here’s how you can use popsicle molds for storing your homemade popsicles:
- Select the right popsicle molds: Choose popsicle molds that suit your preferences in terms of size, shape, and material. Consider options such as silicone, plastic, or stainless steel molds.
- Prepare the popsicle mixture: Mix and prepare your popsicle ingredients following your chosen recipe. Ensure that the mixture is well-chilled before pouring it into the molds.
- Pour the mixture into the molds: Carefully pour the popsicle mixture into each mold cavity, filling them to the indicated fill line. Leave a small space at the top for expansion during freezing.
- Insert popsicle sticks: Insert the popsicle sticks into the molds, making sure they are centered in each cavity. Some molds come with built-in handles or sticks, while others require you to insert separate sticks.
- Freeze until solid: Place the filled popsicle molds in the freezer and allow the popsicles to freeze until they are completely solid. The freezing time will vary depending on the size of the popsicles and your freezer’s temperature.
- Remove the popsicles from the molds: Once the popsicles are frozen, remove the molds from the freezer and let them sit at room temperature for a few minutes. Gently twist or pull the popsicle sticks to release the popsicles from the molds.
- Store in an airtight container: Transfer the released popsicles to an airtight container for storage. Label the container with the date and flavor of the popsicles for easy identification.
- Stack and store in the freezer: Stack the popsicles in the container, taking care not to damage their shape or texture. Place the container in the coldest part of the freezer, away from areas that may experience temperature fluctuations.
Storing homemade popsicles in popsicle molds offers several advantages. The molds provide a ready-to-eat shape and size, making it convenient to enjoy the popsicles. Additionally, popsicle molds often come with built-in lids or handles, making them easy to store and handle in the freezer.
Remember to always transfer the popsicles from the molds into an airtight container for long-term storage. This will help maintain the popsicles’ texture, prevent freezer burn, and keep the flavors intact. With proper storage, your homemade popsicles will be ready to satisfy your cravings for a refreshing and delicious treat whenever you desire.
If you’re interested in exploring other storage methods, such as using ziplock bags or other containers, we’ll cover those next. Each method has its own unique benefits, so let’s continue our exploration to find the best storage option for your homemade popsicles!
Read more: How To Store Homemade Pies
Storing Homemade Popsicles in Ziplock Bags
Another convenient and space-saving option for storing homemade popsicles is to use ziplock bags. Ziplock bags provide a simple and effective way to keep your popsicles protected and organized in the freezer. Here’s how you can store your homemade popsicles in ziplock bags:
- Prepare the popsicle mixture: Mix and prepare the popsicle ingredients according to your desired recipe. Make sure the mixture is well-chilled before moving on to the next step.
- Pour the mixture into the molds: Pour the popsicle mixture into your popsicle molds, filling each cavity to the indicated fill line. Leave a small space at the top to allow for expansion during freezing.
- Insert popsicle sticks: Insert popsicle sticks into the molds, making sure they are centered in each popsicle cavity. Allow the popsicles to freeze completely.
- Remove the popsicles from the molds: Once frozen, remove the popsicles from the molds by gently twisting or pulling on the sticks. Place the popsicles on a baking sheet lined with parchment paper.
- Transfer to ziplock bags: Take a ziplock bag and carefully place the popsicles inside. If you’re making multiple popsicles, you can separate them with parchment paper to prevent them from sticking together.
- Remove excess air and seal: Squeeze out any excess air from the ziplock bag before sealing it tightly. This step helps minimize air exposure and reduces the risk of freezer burn.
- Label and stack in the freezer: Label the ziplock bag with the date and flavor of the popsicles. Then, stack the bags neatly in the freezer, placing them in a designated area to prevent any accidental crushing or damage.
Using ziplock bags for storing homemade popsicles offers several advantages. They take up minimal space in the freezer, allowing you to store more popsicles in a smaller area. Ziplock bags also provide a barrier against air and moisture, helping to preserve the popsicles’ quality and taste.
When it’s time to enjoy a popsicle, simply remove a bag from the freezer, let it sit at room temperature for a few minutes to soften slightly, and then savor the deliciousness of your homemade creation.
Remember to properly seal the ziplock bags to prevent air from entering. This will contribute to maintaining the popsicles’ freshness and preventing freezer burn. By storing your homemade popsicles in ziplock bags, you can conveniently access your frozen treats and enjoy their refreshing flavors whenever the craving strikes.
Now that you’re familiar with storing homemade popsicles in ziplock bags, let’s summarize what we’ve learned and conclude our discussion on proper storage techniques for these delightful frozen treats.
Conclusion
Proper storage is key to maintaining the quality and enjoyment of your homemade popsicles. By following the best practices outlined in this article, you can ensure that your frozen treats stay delicious, visually appealing, and refreshing for an extended period.
We discussed the importance of proper storage for homemade popsicles, highlighting the significance of maintaining freshness, preserving texture, prolonging shelf life, and promoting food safety. Ensuring that your popsicles are stored correctly will help you maintain their vibrant flavors and enticing textures, allowing you to enjoy them to the fullest.
Before storing your popsicles, consider factors such as the ingredients you use, the popsicle molds you choose, the temperature of your freezer, and the intended duration of storage. These factors will guide your decision-making process and help you select the most appropriate storage method.
We explored different storage methods, including freezing popsicles, storing them in the freezer using airtight containers or ziplock bags, utilizing ice trays, or opting for popsicle molds. Each method comes with its own benefits and considerations, allowing you to choose the one that suits your preferences and circumstances best.
Remember to take steps to prevent freezer burn, such as using airtight containers, properly sealing ziplock bags, and avoiding frequent thawing and refreezing. These measures will help keep your popsicles at their best and ensure a delightful frozen treat every time you indulge.
Whether you’re enjoying a fruity popsicle, a decadent creamy concoction, or a healthy homemade creation, the proper storage techniques discussed in this article will help preserve the flavors, textures, and overall appeal of your popsicles. By implementing these practices, you can ensure that your homemade popsicles are always ready to bring a smile to your face during those hot summer days or anytime you crave a frozen treat.
So, get creative in the kitchen, make your favorite popsicles, and store them with care. With proper storage, you can make the most of your homemade popsicles and enjoy the refreshing delights they offer. Cheers to delicious homemade treats and happy freezing!
Frequently Asked Questions about How To Store Homemade Popsicles
Was this page helpful?
At Storables.com, we guarantee accurate and reliable information. Our content, validated by Expert Board Contributors, is crafted following stringent Editorial Policies. We're committed to providing you with well-researched, expert-backed insights for all your informational needs.


0 thoughts on “How To Store Homemade Popsicles”