Articles
How To Test Thermocouple On Water Heater
Modified: October 22, 2024
Learn how to test a thermocouple on your water heater with our informative articles. Improve your troubleshooting skills and save money on repairs.
(Many of the links in this article redirect to a specific reviewed product. Your purchase of these products through affiliate links helps to generate commission for Storables.com, at no extra cost. Learn more)
Introduction
A water heater is an essential appliance in any household, providing hot water for various daily activities like showering, washing dishes, and doing laundry. One of the key components in a water heater is the thermocouple. The thermocouple is responsible for sensing the temperature of the water and regulating the gas flow to maintain the desired temperature.
In some cases, the thermocouple may malfunction, resulting in issues such as insufficient hot water or a completely non-functional water heater. It is vital to identify and diagnose any problems with the thermocouple to ensure the smooth functioning of your water heater.
This article will provide you with a comprehensive guide on how to test a thermocouple on a water heater. We will walk you through step-by-step instructions, covering the necessary tools and materials required for testing. Additionally, we will explore alternative methods for testing the thermocouple and share troubleshooting tips.
By following the instructions and guidelines outlined in this article, you can confidently diagnose and resolve thermocouple-related issues in your water heater, saving both time and money on unnecessary repairs or replacements. So, let’s dive in and learn how to effectively test a thermocouple on your water heater!
Key Takeaways:
- Ensure your water heater’s thermocouple is functioning properly by following a step-by-step testing procedure using a multi-meter and alternative methods like visual inspection and flame testing.
- Troubleshoot common thermocouple issues with tips on securing connections, checking wiring, and referring to the owner’s manual for guidance. Keep your water heater running efficiently and save on unnecessary repairs.
Read more: How To Clean Water Heater Thermocouple
Overview of Thermocouples
Before we dive into the testing process, let’s first understand what a thermocouple is and how it functions in a water heater. A thermocouple is a device that consists of two different conductors joined together at one end. When there is a temperature difference between the joined ends, a voltage is generated.
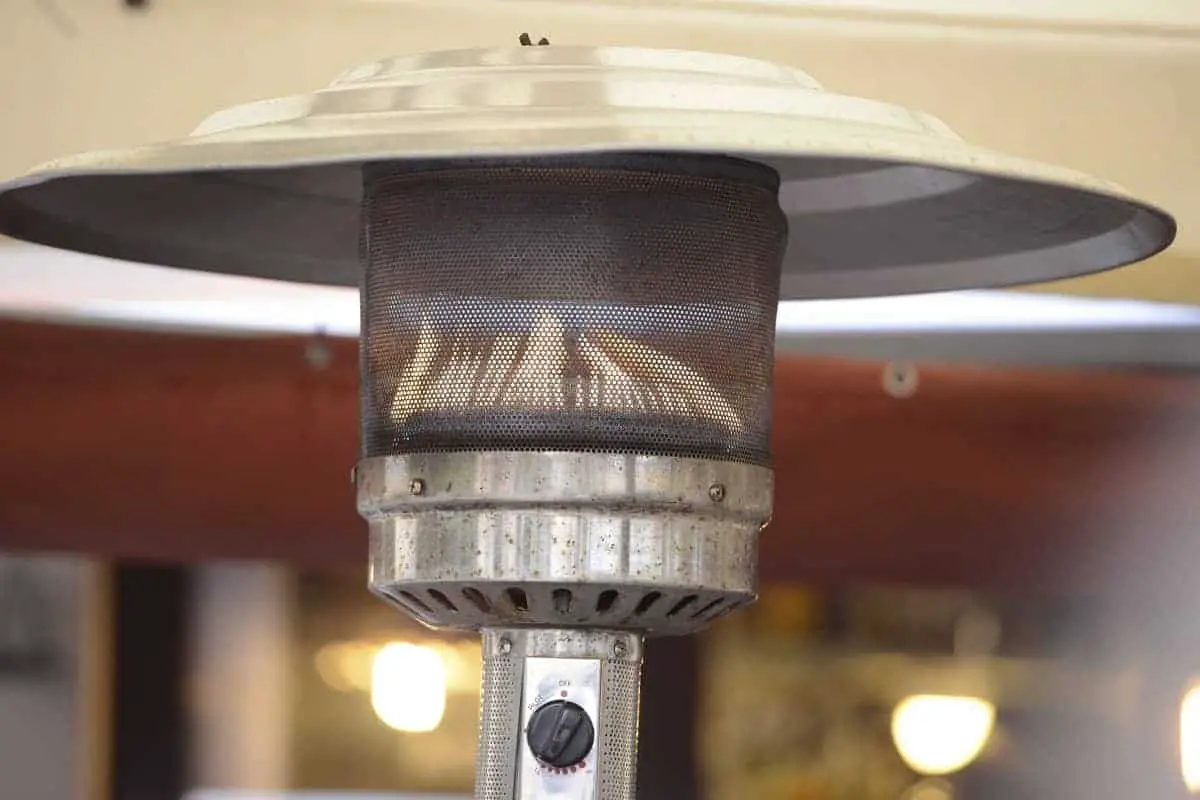
In a water heater, the thermocouple is typically located near the pilot light. It plays a crucial role in ensuring that the pilot light remains lit. When the pilot flame is ignited, it produces heat, which is conducted through the thermocouple. The temperature difference between the hot junction (near the pilot flame) and the cold junction (connected to the gas control valve) generates a small electric current that keeps the gas valve open.
If the pilot light goes out or the flame becomes too weak, the temperature difference decreases, and the thermocouple fails to generate sufficient current. As a safety measure, the gas valve automatically closes, preventing the release of gas into the water heater. This feature ensures that there is no risk of gas leakage and potential hazards.
Thermocouples are durable and reliable components, but like any other part, they can deteriorate over time due to usage or wear and tear. Common issues with thermocouples include accumulation of dirt or debris, corrosion, or a faulty connection. These issues can cause the thermocouple to malfunction, resulting in a water heater that fails to ignite or maintain a consistent temperature.
Now that we have a basic understanding of thermocouples and their role in water heaters, let’s move on to the testing process to identify any issues with the thermocouple.
Common Issues with Thermocouples in Water Heaters
Thermocouples in water heaters can experience several issues that can affect their performance. By recognizing these common problems, you can effectively diagnose and troubleshoot any thermocouple-related issues in your water heater.
- Pilot Light Fails to Stay Lit: One of the most common issues with thermocouples is a pilot light that constantly goes out. This can be caused by a faulty thermocouple that fails to generate enough current to keep the gas valve open. If the pilot light goes out immediately after being lit or fails to stay lit, it is likely due to a malfunctioning thermocouple.
- Inconsistent Hot Water: Another sign of a faulty thermocouple is inconsistent hot water temperature. If you notice that the water heater is producing hot water intermittently or the temperature fluctuates, it may be due to a thermocouple that is not sensing the temperature accurately or maintaining a stable connection with the gas valve.
- Gas Valve Does Not Open: A malfunctioning thermocouple can also prevent the gas valve from opening, resulting in a water heater that does not ignite at all. If you try to light the pilot light but the gas valve does not open, it indicates a possible issue with the thermocouple.
- Corrosion and Buildup: Over time, thermocouples can accumulate dirt, debris, or corrosion, which can affect their ability to function properly. If the thermocouple is covered in a layer of dirt or shows signs of corrosion, it may cause poor performance or a complete failure.
- Loose Connections: Loose or faulty connections between the thermocouple and the gas valve can also lead to issues. If the connection is not secure, it may result in an unreliable flow of current, causing the pilot light to go out or the gas valve to malfunction.
It is essential to identify and address these common issues to ensure the efficient and uninterrupted operation of your water heater. In the next section, we will discuss the tools and materials required for testing the thermocouple.
Tools and Materials Required for Testing
Before you begin testing the thermocouple on your water heater, it is important to gather the necessary tools and materials. Having these items on hand will ensure a smooth and efficient testing process.
Here are the tools and materials you will need:
- Screwdriver: You will need a screwdriver to remove the access panel or cover on your water heater. The type of screwdriver required can vary depending on the specific model of your water heater, so make sure to have a set of flathead and Phillips head screwdrivers available.
- Wire cutter/stripper: This tool will come in handy if you need to cut or strip any wires during the testing process.
- Multi-meter: A multi-meter is a device used to measure voltage, current, and resistance. It will be crucial for accurately testing the thermocouple and determining if it is functioning correctly.
- Replacement thermocouple: In case your thermocouple is found to be defective and needs to be replaced, it is advisable to have a replacement thermocouple readily available. Make sure to purchase a thermocouple that is compatible with your water heater model.
- Owner’s manual or manufacturer’s instructions: It is always helpful to have the owner’s manual or manufacturer’s instructions of your water heater on hand. These documents can provide specific guidelines and troubleshooting steps for your particular model.
- Safety equipment: Lastly, ensure you have appropriate safety equipment when working with your water heater. This includes gloves, safety glasses, and protective clothing.
By gathering these tools and materials before starting the testing process, you will have everything you need to accurately diagnose and address any issues with the thermocouple on your water heater.
Now that you have all the necessary tools and materials, let’s move on to the step-by-step procedure for testing a thermocouple on a water heater.
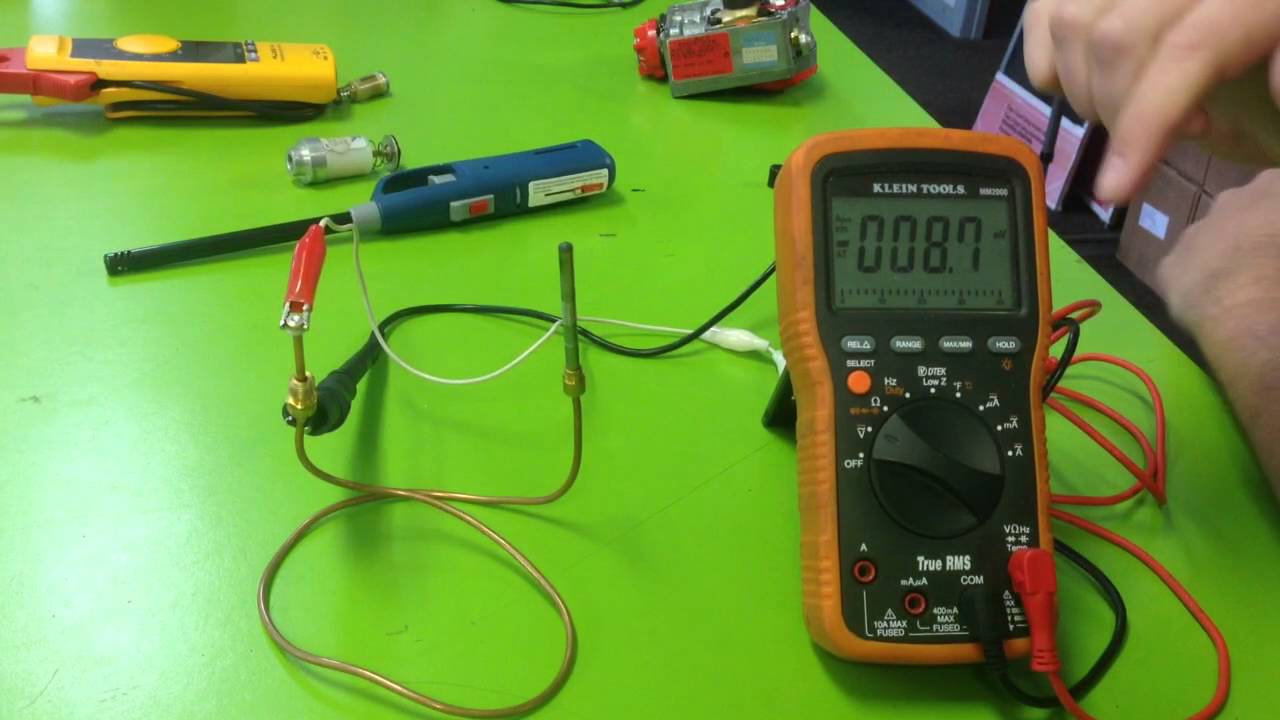
Use a multimeter to test the thermocouple for continuity. Disconnect the thermocouple and place the multimeter probes on each end. If there is no continuity, the thermocouple needs to be replaced.
Step-by-Step Procedure for Testing a Thermocouple on a Water Heater
Testing a thermocouple on a water heater requires a systematic approach to ensure accurate results. Follow these step-by-step instructions to properly test the thermocouple:
- Turn off the gas supply: Begin by turning off the gas supply to the water heater. Locate the gas valve, usually located near the bottom of the water heater, and turn it to the off position.
- Remove the access panel: Use a screwdriver to remove the access panel or cover from the water heater. This will give you access to the pilot light and the thermocouple.
- Locate the thermocouple: Locate the thermocouple, which is typically positioned near the pilot light. Trace the thermocouple back to where it connects to the gas control valve.
- Inspect the thermocouple: Take a close look at the thermocouple for any signs of dirt, debris, or corrosion. If you notice any buildup or damage, it may be contributing to the malfunction.
- Disconnect the thermocouple: Carefully disconnect the thermocouple from the gas control valve. The method of disconnection can vary depending on your water heater model. Refer to the owner’s manual or manufacturer’s instructions if needed.
- Prepare the multi-meter: Set your multi-meter to the appropriate setting for measuring millivolts. Typically, this will be the low millivolt setting.
- Test the thermocouple: With the multi-meter prepared, touch the meter’s red probe to the end of the thermocouple that connects to the gas control valve. Then, touch the black probe to the other end of the thermocouple, closer to the pilot light. Observe the reading on the multi-meter. A functioning thermocouple should produce a stable reading of around 25-35 millivolts.
- Compare the reading to specifications: Compare the reading from the multi-meter to the specifications provided by the manufacturer. If the reading falls within the recommended range, the thermocouple is functioning properly. However, if the reading is significantly lower or non-existent, it indicates a faulty thermocouple that needs to be replaced.
- Replace the thermocouple (if necessary): If the thermocouple is found to be defective, replace it with a new one. Follow the guidelines provided by the manufacturer to install the replacement thermocouple properly.
- Reassemble and test: Reconnect the thermocouple to the gas control valve and reassemble the access panel or cover. Once everything is securely in place, turn on the gas supply and relight the pilot light. Test the functionality of the water heater to ensure that the thermocouple replacement resolved the issue.
Following these step-by-step instructions will enable you to effectively test the thermocouple on your water heater and determine if it is functioning correctly or requires replacement.
In the next section, we will explore alternative methods for testing thermocouples.
Alternative Methods for Testing Thermocouples
In addition to using a multi-meter, there are a few alternative methods you can try to test the functionality of a thermocouple on a water heater. These methods can give you a general idea of whether the thermocouple is working properly or if it requires further investigation.
Here are a few alternative methods for testing thermocouples:
- Visual Inspection: Start by visually inspecting the thermocouple for any signs of damage or corrosion. Look for any visible defects such as frayed wires, loose connections, or excessive buildup of dirt or debris. While not foolproof, a visual inspection can provide initial insights into the condition of the thermocouple.
- Flame Testing: Another method involves observing the behavior of the pilot flame. Ignite the pilot light and observe the flame. If the pilot flame is weak, flickering, or fails to envelop the thermocouple properly, it could indicate a faulty thermocouple. A strong, steady pilot flame is necessary to generate the voltage required to keep the gas valve open.
- Pilot Light Sputtering: If the pilot light sputters or goes out when the hot water faucet is turned on, it could indicate a weak or malfunctioning thermocouple. The flow of hot water causes a drop in temperature near the thermocouple, and a working thermocouple should sense this temperature change and maintain the gas flow.
- Tapping the Thermocouple: Carefully tap the thermocouple with a screwdriver or a similar tool. If tapping the thermocouple causes the pilot light to go out, it suggests a loose connection or a faulty thermocouple that needs to be addressed.
While these alternative methods can provide some insights into the performance of the thermocouple, it is important to note that they may not provide precise and accurate results like using a multi-meter. If you suspect a significant issue with the thermocouple or need to obtain accurate measurements, it is best to rely on a multi-meter for testing.
Now that you are familiar with alternative testing methods for thermocouples, we will provide some troubleshooting tips in the next section to help address common issues that may arise during testing.
Troubleshooting Tips for Thermocouple Testing
While testing a thermocouple on a water heater, you may encounter certain challenges or unexpected issues. Here are some troubleshooting tips to help you overcome common obstacles and ensure accurate testing:
- Ensure a secure connection: When testing the thermocouple with a multi-meter, make sure the probes are securely touching the appropriate ends of the thermocouple. A loose or unreliable connection can result in inaccurate readings or a false diagnosis.
- Check the multi-meter batteries: If you are experiencing inconsistent or erratic readings on the multi-meter, check the batteries to ensure they have enough power. Replace the batteries if necessary, as weak or dying batteries can affect the accuracy of the measurements.
- Clean the thermocouple: If the thermocouple is covered with dirt or debris, use a clean, soft cloth to gently remove any buildup. Cleaning the thermocouple can help improve its performance and accuracy during testing.
- Inspect the wiring: Check for any frayed or damaged wires connected to the thermocouple or gas control valve. Damaged wiring can lead to faulty readings or a thermocouple that fails to function correctly. If you notice any issues with the wiring, consider replacing it or seeking professional assistance.
- Refer to the owner’s manual: If you are unsure about any step in the testing process or encounter any difficulties, refer to the owner’s manual or manufacturer’s instructions for specific guidance. Each water heater model may have unique instructions or troubleshooting tips that can help resolve issues.
- Double-check gas supply and connections: Before concluding that the thermocouple is faulty, verify that the gas supply is turned on and that the connections between the gas control valve and the thermocouple are secure. Sometimes, an issue with the gas supply or loose connections can mimic thermocouple-related problems.
By applying these troubleshooting tips, you can address common challenges and ensure accurate testing of the thermocouple on your water heater. If you are still unable to resolve the issue or if you are uncertain about any aspect of the testing process, it is advisable to consult a professional plumber or contact the manufacturer for further assistance.
Now that we have covered troubleshooting tips, let’s summarize the key points discussed in this article.
Conclusion
Testing the thermocouple on a water heater is an essential step in diagnosing and addressing issues that may arise with the functioning of the water heater. By following the step-by-step procedure outlined in this article and using the recommended tools and techniques, you can effectively test the thermocouple and determine if it is functioning properly or if it requires replacement.
We explored the overview of thermocouples and their role in water heaters, as well as common issues that can affect their performance. We also discussed the tools and materials required for testing and provided a detailed step-by-step procedure to guide you through the testing process.
In addition to the main testing method using a multi-meter, we introduced alternative methods such as visual inspection, flame testing, and tapping the thermocouple to gain insights into its functionality. However, it is important to note that using a multi-meter provides the most accurate and precise results for testing thermocouples.
We also shared troubleshooting tips to help you overcome common challenges and ensure accurate testing. By following these tips, you can address issues related to connections, wiring, cleanliness, and more.
Remember, if you encounter any difficulties, always consult the owner’s manual or seek professional assistance. Safety should be a top priority when working with gas appliances and electrical components.
By understanding how to test a thermocouple on a water heater, you can save time and money by identifying and rectifying thermocouple-related issues efficiently. Maintaining a properly functioning thermocouple ensures a reliable supply of hot water for various daily activities in your home.
We hope that this comprehensive guide has provided you with the knowledge and confidence to test the thermocouple on your water heater effectively. Whether it’s troubleshooting, replacing, or maintaining the thermocouple, you now have the tools to keep your water heater running smoothly.
Frequently Asked Questions about How To Test Thermocouple On Water Heater
Was this page helpful?
At Storables.com, we guarantee accurate and reliable information. Our content, validated by Expert Board Contributors, is crafted following stringent Editorial Policies. We're committed to providing you with well-researched, expert-backed insights for all your informational needs.


0 thoughts on “How To Test Thermocouple On Water Heater”