Articles
How To Use A Bosch GCL 25 Laser Level
Modified: March 1, 2024
Learn how to efficiently use a Bosch GCL25 laser level with these insightful articles. Get expert tips and tricks for accurate leveling and measuring in your projects.
(Many of the links in this article redirect to a specific reviewed product. Your purchase of these products through affiliate links helps to generate commission for Storables.com, at no extra cost. Learn more)
Introduction
Welcome to the world of precision leveling with the Bosch GCL25 Laser Level. Whether you’re a professional contractor or a DIY enthusiast, this powerful tool is designed to make your leveling tasks easier and more accurate. With its high-quality construction and advanced features, the Bosch GCL25 is a reliable companion for any project that requires precise leveling, alignment, or squaring.
In this article, we will guide you through the various features and functions of the Bosch GCL25 Laser Level. We will explain how to set it up, calibrate it, and use it for horizontal leveling, vertical alignment, and squaring. We will also provide troubleshooting tips for common issues and offer guidance on proper maintenance and care.
Before we dive into the specific details, it’s important to understand the importance of safety when using any power tools. Always follow the manufacturer’s instructions and guidelines, wear appropriate safety gear, and exercise caution throughout the entire process.
Now without any further ado, let’s explore the capabilities of the Bosch GCL25 Laser Level and discover how it can elevate your leveling tasks to new heights of precision.
Key Takeaways:
- Elevate your leveling tasks to new heights of precision with the Bosch GCL25 Laser Level, designed for professionals and DIY enthusiasts. Follow safety precautions, proper setup, calibration, and maintenance for optimal performance.
- Simplify horizontal leveling, vertical alignment, and squaring tasks with the versatile Bosch GCL25 Laser Level. Troubleshoot common issues, prioritize safety, and achieve remarkable precision in your projects.
Read more: How To Use A Bosch Laser Level
Safety Precautions
When using the Bosch GCL25 Laser Level, it is crucial to prioritize safety to avoid accidents and injuries. Follow these safety precautions to ensure a safe working environment:
- Read the Manual: Familiarize yourself with the user manual provided by Bosch. It contains essential safety instructions and guidelines specific to the GCL25 Laser Level.
- Protective Gear: Always wear appropriate personal protective equipment (PPE) such as safety goggles, gloves, and ear protection. This will protect you from potential hazards, including laser exposure.
- Laser Safety: The GCL25 Laser Level emits a laser beam. Avoid direct eye contact with the laser beam and never aim it at anyone. Refrain from looking directly at the laser beam, even with protective eyewear.
- Secure Work Area: Make sure the work area is clear of any obstacles or tripping hazards. Secure loose items and ensure a stable surface for the laser level to prevent accidental falls or damage.
- Power Source Safety: When using the GCL25, ensure that the power source is compatible and in good condition. Avoid using damaged or frayed cables, and always unplug the laser level when not in use or during maintenance.
- Use Proper Mounts and Tripods: When mounting the Bosch GCL25 Laser Level, use appropriate mounting brackets or tripods recommended by the manufacturer. This will provide stability and prevent the laser level from falling or slipping during operation.
- Avoid Wet Conditions: Refrain from using the laser level in wet or damp conditions to prevent electrical hazards. Keep the device dry and away from water sources.
- Store Safely: When not in use, store the Bosch GCL25 Laser Level in a secure and dry place, away from children and unauthorized individuals.
- Regular Maintenance: Conduct regular maintenance checks on the laser level to ensure proper functioning. Inspect cables, brackets, and laser modules for signs of wear or damage.
- Follow Local Regulations: It is important to adhere to local regulations regarding the use of laser devices. Familiarize yourself with any restrictions or guidelines enforced in your area.
By following these safety precautions, you can work confidently and minimize the risk of accidents or injuries while using the Bosch GCL25 Laser Level. Your safety should always be the top priority when operating any power tool.
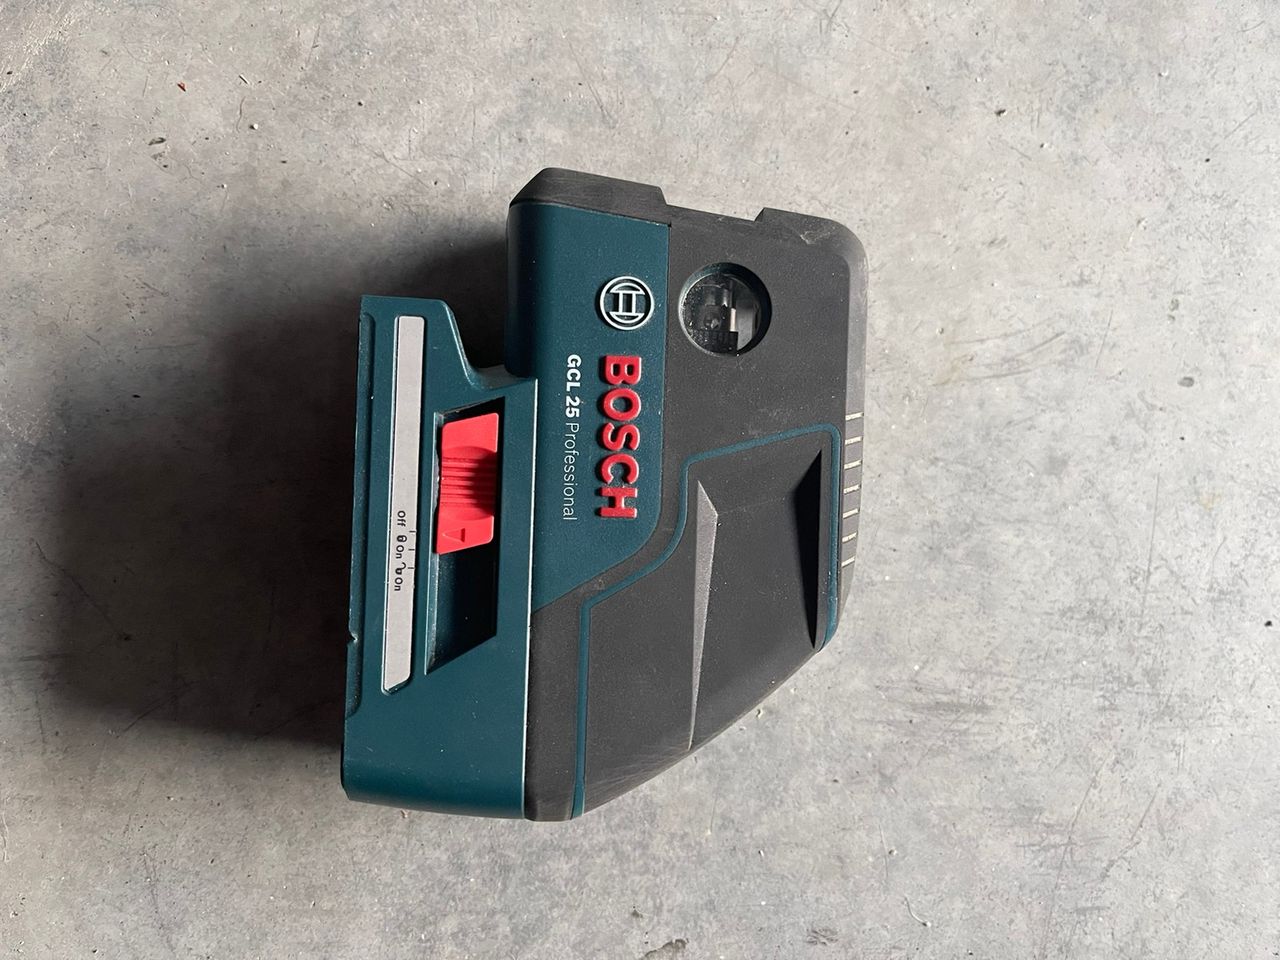
Understanding the Bosch GCL25 Laser Level
Before diving into the setup and operation of the Bosch GCL25 Laser Level, let’s gain a deeper understanding of its key features and components.
The Bosch GCL25 is a self-leveling laser level that provides highly accurate leveling, alignment, and squaring capabilities. It is equipped with both horizontal and vertical laser lines, allowing for precise leveling and alignment in both directions.
Here are some important features of the Bosch GCL25 Laser Level:
- Self-Leveling: The GCL25 automatically levels itself within a certain range, typically within a few degrees. This feature ensures that the laser lines are always straight and level, saving you time and effort in manual adjustments.
- Dual Laser Lines: The GCL25 emits two laser lines – one horizontal and one vertical. This allows for simultaneous horizontal leveling and vertical alignment, making it ideal for tasks such as installing drop ceilings, laying tiles, or aligning drywall.
- Precision: The laser lines produced by the GCL25 have a high level of accuracy, typically within a few millimeters over a large working range. This accuracy ensures that your leveling and alignment tasks are done with precision and confidence.
- Visible Laser Range: The Bosch GCL25 Laser Level has a visible laser range of up to 100 feet (30 meters) indoors, depending on lighting conditions. This wide range allows you to work in large spaces without the need for frequent repositioning.
- Manual Mode: In addition to the self-leveling mode, the GCL25 also has a manual mode that allows you to set it at a specific angle or position. This is useful for tasks that require non-level lines or angles.
- Magnet Mount: The GCL25 comes with a magnetic mounting base that allows you to easily attach it to metal surfaces such as steel studs or pipes. This ensures stability during operation and frees your hands for other tasks.
- Optional Tripod Mount: For added versatility, the GCL25 can be mounted on a tripod using a compatible tripod mount. This allows for higher elevation and allows you to work at different heights.
Understanding these features will help you make the most of the Bosch GCL25 Laser Level and utilize its capabilities effectively. Now that we have a clear understanding of the tool, let’s move on to setting it up for use.
Setting Up the Bosch GCL25 Laser Level
Setting up the Bosch GCL25 Laser Level correctly is essential for ensuring accurate and reliable leveling and alignment. Follow these steps to set up the laser level:
- Choose a Suitable Location: Select a stable surface or platform for the laser level. Ensure that it is secure and level, as any instability can affect the accuracy of the laser lines.
- Insert Batteries: Open the battery compartment on the back of the laser level and insert the required batteries according to the manufacturer’s instructions. Make sure the batteries are properly inserted and securely in place.
- Power On the Laser Level: Press the power button to turn on the Bosch GCL25 Laser Level. The laser lines should become visible once it is powered on.
- Adjust the Height: If you are using the laser level on a tripod or mounting it at an elevated position, adjust the height of the tripod legs or the mounting bracket accordingly. Ensure that the laser level is at a suitable working height for your specific task.
- Secure the Laser Level: Attach the Bosch GCL25 Laser Level to a tripod or a magnetic mounting base, depending on your setup. Ensure that the laser level is securely fastened and stable.
- Position the Laser Level: Place the laser level at the desired location in the work area, ensuring that it is in the center of the space where you need to project the laser lines.
- Verify Levelness: Check if the Bosch GCL25 is properly leveled. The self-leveling feature should automatically level the laser lines within a few seconds. If the laser lines are not level, use the manual mode to adjust and fine-tune the levelness manually.
- Rotate and Lock the Laser: If your task requires rotating the laser lines, rotate the laser housing until the desired position is achieved. Once you have the appropriate alignment, lock the laser level in place to prevent any accidental movement.
- Test the Laser Lines: Before starting your project, verify the laser lines by checking their alignment and visibility. Make any necessary adjustments to ensure they are aligned properly and clearly visible.
By following these steps, you can easily set up the Bosch GCL25 Laser Level for your leveling and alignment needs. Once you have completed the setup, you are ready to calibrate the laser level for optimal accuracy, which we will cover in the next section.
Calibrating the Bosch GCL25 Laser Level
Calibrating the Bosch GCL25 Laser Level is crucial to ensure precise and accurate leveling and alignment. Calibration should be performed regularly, especially when starting a new project or if you suspect any deviations in the laser lines. Follow these steps to calibrate the laser level:
- Find a Level Surface: Locate a flat and level surface where you can place the laser level. This surface should be stable and free from any disturbances.
- Mark a Reference Point: Choose a point on the surface where you want to project the laser lines. Mark this point as a reference for calibration.
- Set the Laser Level: Position the Bosch GCL25 Laser Level on the marked reference point. Make sure that it is secured and stable.
- Activate Self-Leveling Mode: Ensure that the laser level is in self-leveling mode. This will enable the laser lines to adjust automatically based on the levelness of the surface.
- Observe the Laser Lines: Once the self-leveling mechanism is activated, observe the laser lines projected by the GCL25. They should align with the reference point.
- Adjust if Necessary: If the laser lines are not aligned with the reference point, use the manual mode to manually adjust the leveling of the laser level. Fine-tune the leveling until the laser lines align with the reference point perfectly.
- Verify Calibration: After making the necessary adjustments, verify the calibration by checking the alignment of the laser lines at different points on the surface. They should remain level and accurate throughout.
- Repeat if Needed: If you notice any deviations or inconsistencies in the laser lines, repeat the calibration process until you achieve the desired accuracy and alignment.
By calibrating the Bosch GCL25 Laser Level, you ensure that the laser lines are accurate and aligned properly for your leveling and alignment tasks. Regular calibration will help you maintain the performance and reliability of the laser level. Now that you’ve successfully calibrated the laser level, let’s move on to understanding its basic operation.
Read more: How To Use Bosch Laser Level GLL 50
Basic Operation of the Bosch GCL25 Laser Level
Operating the Bosch GCL25 Laser Level is straightforward and user-friendly. Whether you’re a beginner or an experienced user, understanding the basic operation of the laser level will help you maximize its capabilities. Here’s a step-by-step guide on how to use the GCL25:
- Power On the Laser Level: Press the power button to turn on the Bosch GCL25 Laser Level. The laser lines will become visible, indicating that it is ready for use.
- Select the Mode: Choose the desired mode by pressing the corresponding button on the laser level. The available modes typically include horizontal, vertical, and combined modes for both horizontal and vertical lines.
- Leveling: If the GCL25 is not already self-leveling, use the manual mode to level the laser lines. Adjust the leveling screws or knobs until the lines appear level and aligned with the reference point.
- Position the Laser: Adjust the position and orientation of the laser level to project the laser lines accurately onto the desired surface. Take into consideration the distance, angle, and placement to achieve the desired leveling or alignment.
- Verify Visibility: Check the visibility and clarity of the laser lines. In well-lit areas, you may need to use a target plate or laser enhancement glasses to enhance the visibility of the lines.
- Work with Laser Lines: Once the laser lines are projected onto the surface, use them as a guide for your leveling or alignment task. They provide a visual reference for installing fixtures, aligning objects, or determining straightness and plumbness.
- Adjust as Needed: During your work, if you need to reposition or readjust the laser level, make sure to turn off the laser before making any changes. This will prevent accidental movement or misalignment of the laser lines.
- Power Off the Laser Level: After completing your task, press the power button to turn off the Bosch GCL25 Laser Level. This will preserve battery life and keep the laser level in standby mode for future use.
Remember to handle the laser level with care and avoid any direct contact with the laser beams. Always refer to the user manual for any specific recommendations or additional features that may be available on your particular model.
Now that you have a good understanding of the basic operation of the Bosch GCL25 Laser Level, let’s explore how to use it for various leveling and alignment tasks.
When using the Bosch GCL25 laser level, make sure to calibrate it on a stable surface before use to ensure accurate and precise measurements.
Using the Bosch GCL25 Laser Level for Horizontal Leveling
The Bosch GCL25 Laser Level is a highly capable tool for achieving precise horizontal leveling. Whether you’re installing baseboards, aligning shelves, or hanging pictures, the laser level can greatly simplify the process. Here’s how to use the GCL25 for horizontal leveling:
- Set Up: Follow the setup instructions previously mentioned to ensure the laser level is properly positioned and stable.
- Power On and Select Mode: Turn on the GCL25 Laser Level and select the horizontal mode. This will activate the laser line that will act as a reference for horizontal leveling.
- Find a Starting Point: Identify a starting point on one side of the surface or area you want to level. This can be a corner or an edge where you want your horizontal line to align.
- Align the Laser Line: Rotate the laser housing or adjust the leveling screws/knobs to align the laser line with the desired starting point.
- Extend the Laser Line: Once the laser line is aligned with the starting point, carefully extend it across the surface or area where you want to achieve horizontal leveling. Keep an eye on the bubble vials or digital indicator on the laser level for precise leveling.
- Mark the Level Line: Using a pencil or marker, make small marks along the laser line to indicate the desired level. These marks will guide your installation or alignment process.
- Repeat as Needed: Depending on the length or size of the surface, you may need to reposition the laser level multiple times to extend the horizontal line and ensure the entire area is accurately leveled.
- Verify Levelness: Double-check the accuracy of the leveled line by using a spirit level or measuring tool. This will confirm that your horizontal leveling is achieved precisely.
- Proceed with Installation: With the level line marked, you can now confidently proceed with installing baseboards, aligning shelves, or hanging pictures. Simply use the marked line as a guide for achieving straight and level positioning.
By using the Bosch GCL25 Laser Level for horizontal leveling, you can ensure accurate and consistent results in various applications. Remember to always work carefully and double-check the levelness before proceeding with any installations or adjustments.
Next, let’s explore how to use the Bosch GCL25 Laser Level for vertical alignment tasks.
Using the Bosch GCL25 Laser Level for Vertical Alignment
The Bosch GCL25 Laser Level is an invaluable tool for achieving precise vertical alignment. Whether you’re hanging artwork, installing cabinets, or aligning tiles, the laser level can simplify the process and ensure accurate results. Here’s how to use the GCL25 for vertical alignment:
- Set Up: Follow the setup instructions mentioned earlier to ensure the laser level is properly positioned and stable.
- Power On and Select Mode: Turn on the GCL25 Laser Level and select the vertical mode. This will activate the laser line that will act as a reference for vertical alignment.
- Identify a Starting Point: Determine a starting point on the surface where you want to achieve vertical alignment. This can be a corner, an edge, or a predetermined reference point.
- Align the Laser Line: Adjust the position and orientation of the laser level to align the laser line with the desired starting point. Ensure that the line is straight and parallel to the vertical surface you want to align with.
- Extend the Laser Line: Once the laser line is aligned with the starting point, extend it vertically along the surface where you want to achieve alignment. Use the bubble vials or digital indicator on the laser level for accurate vertical positioning.
- Mark the Alignment Points: Use a pencil or marker to mark the alignment points along the laser line. These marks will serve as guides for your installation or alignment process.
- Repeat as Needed: Depending on the height or size of the surface, you may need to reposition the laser level multiple times to extend the vertical line and ensure the entire surface is accurately aligned.
- Verify Alignment: Double-check the accuracy of the alignment points using a spirit level or measuring tool. This will confirm that your vertical alignment is achieved precisely.
- Proceed with Installation: With the alignment points marked, you can confidently proceed with hanging artwork, installing cabinets, or aligning tiles. Simply use the marked points as a guide for achieving straight and plumb positioning.
Using the Bosch GCL25 Laser Level for vertical alignment ensures that your installations or alignments are precise and visually pleasing. Always double-check the alignment before proceeding with any installations to ensure accurate results.
Next, let’s explore how to use the Bosch GCL25 Laser Level for squaring tasks.
Using the Bosch GCL25 Laser Level for Squaring
The Bosch GCL25 Laser Level is a versatile tool that can also be used for squaring tasks. Squaring involves creating precise right angles, which is essential for various construction, woodworking, and layout projects. The laser level can simplify the process and ensure accurate results. Here’s how to use the GCL25 for squaring:
- Set Up: Begin by setting up the Bosch GCL25 Laser Level on a stable surface or mounting it on a tripod. Ensure that the laser level is positioned securely and level.
- Power On and Select Mode: Turn on the GCL25 Laser Level and select the appropriate mode for your squaring task. This can be either the horizontal, vertical, or combined mode.
- Find a Starting Point: Identify a starting point where you want to create a right angle or square corner. This can be a corner of a room, the intersection of two walls, or any reference point you want to square off.
- Align the Laser Lines: Adjust the position and orientation of the laser level to align both the horizontal and vertical laser lines with the desired starting point. Ensure that both lines are straight and level.
- Extend the Laser Lines: Once the laser lines are aligned with the starting point, carefully extend them to create a cross or “L” shape. The intersection of the laser lines will represent the square corner.
- Verify the Square Corner: Use a measuring tool, such as a tape measure or a framing square, to verify the accuracy of the square corner created by the laser lines. Adjust the laser level if needed until the corner is perfectly squared.
- Mark the Square Corner: Once the square corner is confirmed, mark it using a pencil or marker. This mark will serve as a guide for your subsequent construction or layout tasks.
- Repeat as Needed: If your project requires multiple square corners, reposition the laser level to the desired locations and repeat the alignment and extension process to create additional right angles.
- Proceed with Construction or Layout: With the square corners marked, you can confidently proceed with your construction or layout tasks, such as framing walls, building cabinets, or laying out tiles. The laser lines will act as visual guides for achieving accurate and square alignments.
Using the Bosch GCL25 Laser Level for squaring tasks simplifies the process and ensures precise right angles. Always double-check the accuracy of the square corners before proceeding with further construction or layout work.
Now that you’re familiar with using the Bosch GCL25 Laser Level for various leveling, alignment, and squaring tasks, let’s move on to troubleshooting common issues that may arise during its use.
Read more: How To Use Bosch Laser Level GPL2
Troubleshooting Common Issues with the Bosch GCL25 Laser Level
The Bosch GCL25 Laser Level is a reliable tool, but like any electronic device, it may encounter occasional issues. Here are some common issues you may encounter while using the GCL25 and how to troubleshoot them:
- Inaccurate Laser Lines: If the laser lines appear to be off or misaligned, ensure that the laser level is placed on a stable and level surface. Check the leveling vials or digital indicator to make sure the laser level is properly leveled. If necessary, recalibrate the laser level using the calibration steps mentioned earlier.
- Weak Laser Visibility: If the laser lines are not clearly visible, check the lighting conditions in the work area. In bright or well-lit environments, you may need to use a target plate or laser enhancement glasses to improve visibility. Additionally, make sure the batteries are properly inserted, and they have enough charge. Replace the batteries if needed.
- Interference with Other Laser Devices: If you are experiencing interference from other laser devices in the vicinity, try adjusting the position or orientation of the GCL25 to minimize the interference. You can also change the operating frequency of the GCL25, if applicable, to reduce conflicts with other devices.
- Uneven or Unstable Mounting: If the laser level is not securely mounted, it can result in inaccurate readings and unstable laser lines. Ensure that the mounting base or tripod is properly attached and tightened. If using a magnetic mounting base, make sure it is securely placed on a metal surface.
- Excessive Battery Drain: If you notice that the batteries drain quickly, double-check that you are using high-quality batteries and that they are inserted correctly. Low-quality or weak batteries can result in faster power depletion. Consider using rechargeable batteries to ensure a longer battery life.
- Erratic Self-Leveling: If the self-leveling function is not working properly, make sure the laser level is placed on a level surface during the initial startup. Check the leveling vials or digital indicator to ensure they are not obstructed or damaged. If the issue persists, consult the user manual or contact Bosch customer support for assistance.
- Malfunctioning Power Button: If the power button is not functioning correctly, check for any debris or obstructions around the button. Gently clean the area if necessary. If the issue persists, contact Bosch customer support for further guidance.
- General Maintenance: Regularly clean the laser level’s lenses and housing with a soft, lint-free cloth to maintain proper functioning. Inspect the cables and connections for any signs of damage or wear. Store the laser level in a dry and secure location when not in use.
If you encounter any issues with the Bosch GCL25 Laser Level that you cannot resolve through troubleshooting, refer to the user manual or contact Bosch customer support for further assistance. They will be able to provide specific guidance and solutions tailored to your situation.
With proper troubleshooting and maintenance, you can ensure the optimal performance and longevity of your Bosch GCL25 Laser Level.
Now that we’ve covered troubleshooting, let’s move on to discussing maintenance and care of the laser level.
Maintenance and Care of the Bosch GCL25 Laser Level
Maintaining and caring for your Bosch GCL25 Laser Level is essential to ensure its continued performance and longevity. By following these maintenance and care tips, you can maximize the lifespan of your laser level and keep it in optimal condition:
- Regular Cleaning: Clean the laser level regularly to remove any dust, dirt, or debris that may accumulate on the lenses and housing. Use a soft, lint-free cloth to gently wipe the surfaces. Avoid using harsh chemicals or abrasive materials that can damage the laser level.
- Inspect for Damage: Regularly inspect the laser level for any signs of damage or wear. Check the cables, connectors, and buttons for any fraying, cracks, or other damage. If you notice any issues, discontinue use and contact Bosch customer support for guidance.
- Protective Case: When transporting or storing the laser level, use the provided protective case or a padded carrying bag to prevent accidental damage. This will protect the laser level from bumps, impacts, and exposure to extreme temperatures.
- Keep Dry: Avoid exposing the laser level to moisture or water. When working in damp or wet conditions, take extra precautions to protect the device. If the laser level does get wet, dry it thoroughly before use to prevent any potential damage.
- Store Properly: When not in use, store the Bosch GCL25 Laser Level in a dry and secure location. Keep it away from children and unauthorized individuals. Store it in a position where it is least likely to be accidentally knocked or damaged.
- Battery Replacement: If you notice a decrease in battery life or the laser lines become weaker, it may be time to replace the batteries. Use high-quality batteries recommended by the manufacturer and follow the battery replacement instructions provided in the user manual.
- Regular Calibration: Perform regular calibration of the laser level to ensure accurate leveling and alignment. Calibrate the laser level whenever you start a new project or suspect any deviations in the laser lines’ accuracy. Refer to the user manual for specific calibration instructions.
- Firmware Updates: Check for firmware updates for your Bosch GCL25 Laser Level. Periodically updating the firmware can provide performance enhancements and address any known issues or bugs. Refer to the Bosch website or contact customer support for information on firmware updates.
- Refer to User Manual: Always refer to the user manual for any specific maintenance recommendations or guidelines provided by Bosch. The manual contains valuable information on the proper care and maintenance of your Bosch GCL25 Laser Level.
By following these maintenance and care tips, you can ensure that your Bosch GCL25 Laser Level remains in excellent condition and performs optimally throughout its lifespan. Regular maintenance and proper care will contribute to accurate and reliable leveling and alignment for your various projects.
Now that we’ve covered maintenance and care, let’s wrap up our discussion.
Conclusion
The Bosch GCL25 Laser Level is a powerful and versatile tool that brings precision and accuracy to your leveling, alignment, and squaring tasks. By understanding its features and following proper setup, calibration, and operation techniques, you can achieve remarkable results in your projects.
Throughout this article, we’ve covered the various aspects of using the Bosch GCL25 Laser Level. We explored its key features, safety precautions, setup process, calibration steps, basic operation, and its applications in horizontal leveling, vertical alignment, and squaring. We also discussed common troubleshooting issues that may arise and provided maintenance and care tips to ensure the longevity of your laser level.
Remember to prioritize safety at all times when using the Bosch GCL25 Laser Level. Follow the manufacturer’s instructions, wear appropriate protective gear, and handle the tool with caution to avoid accidents or injuries.
Whether you’re a professional contractor, a DIY enthusiast, or simply someone looking to achieve precise leveling and alignment, the Bosch GCL25 Laser Level is an indispensable tool. It is designed to simplify your tasks and deliver consistent and accurate results.
By utilizing the Bosch GCL25 Laser Level with confidence and maintaining it properly, you can elevate your projects to new levels of precision and professionalism. Enjoy the benefits of this exceptional tool and make your leveling, alignment, and squaring tasks a breeze.
With the knowledge gained from this article, you’re well-equipped to make the most of your Bosch GCL25 Laser Level. So go ahead and take on your next project with confidence and precision!
Frequently Asked Questions about How To Use A Bosch GCL 25 Laser Level
Was this page helpful?
At Storables.com, we guarantee accurate and reliable information. Our content, validated by Expert Board Contributors, is crafted following stringent Editorial Policies. We're committed to providing you with well-researched, expert-backed insights for all your informational needs.


0 thoughts on “How To Use A Bosch GCL 25 Laser Level”