
Articles
How To Use A Five Point Layout Laser Level
Modified: October 27, 2024
Learn how to use a five point layout laser level with our informative articles. Gain accuracy and efficiency in your projects.
(Many of the links in this article redirect to a specific reviewed product. Your purchase of these products through affiliate links helps to generate commission for Storables.com, at no extra cost. Learn more)
Introduction
A five-point layout laser level is an essential tool for professionals and DIY enthusiasts alike. It provides accurate and efficient alignment for various construction and renovation projects. Whether you’re installing cabinets, hanging shelves, or laying tiles, a layout laser level ensures that your work is precise and aligned.
In this article, we will explore the functionality and usage of a five-point layout laser level. We will guide you through the step-by-step process of setting up the laser level, adjusting the leveling base, turning on the laser, aligning the laser with the first point, marking the remaining points, and utilizing additional features.
With these instructions, you’ll be able to use a five-point layout laser level effectively and efficiently, improving the accuracy and quality of your projects.
Key Takeaways:
- Mastering the setup and alignment of a five-point layout laser level is crucial for achieving precise measurements and accurate project outcomes. Utilize the self-leveling feature and take time to adjust the leveling base for optimal results.
- In addition to basic functionality, explore the additional features of your laser level, such as pulse mode and intensity adjustment, to enhance productivity and accuracy. Always prioritize safety by wearing protective eyewear and following manufacturer’s guidelines.
Read also: 15 Best Point Laser Level for 2025
Overview of Five Point Layout Laser Level
A five-point layout laser level is a versatile tool designed to help professionals and DIYers achieve accurate and precise measurements in various construction and renovation projects. It features five laser beams arranged in a cross pattern, with an additional plumb dot laser located below the cross lines.
The five laser beams provide horizontal, vertical, and cross-line reference points, allowing users to establish precise alignment for layout and installation purposes. The beams are typically self-leveling, meaning they automatically adjust to ensure accurate measurements even on uneven surfaces.
The plumb dot laser provides a vertical reference point, useful for tasks such as plumbing, aligning poles, and determining the straightness of walls.
One of the key advantages of a five-point layout laser level is its efficiency. It eliminates the need for manual measurement techniques such as chalk lines, tape measures, or string lines. With the laser beams projected onto the surface, users can easily mark points and lines with precision, saving time and effort.
Furthermore, the visibility of the laser beams is a crucial consideration when choosing a layout laser level. Many models offer high visibility beams that can be easily seen even in bright lighting conditions or from a distance. This enhances accuracy and allows for hassle-free working environments.
Five-point layout laser levels may include additional features such as pulse mode, which enables the laser beams to be detected by a receiver, extending the working range. Some models also offer the option to adjust the beam intensity or switch between different modes, providing further versatility.
Overall, a five-point layout laser level is an indispensable tool for professionals in the construction industry, as well as for DIYers tackling home renovation projects. Its accuracy, ease of use, and range of functionalities make it an essential addition to any toolbox.
Step 1: Setting up the Laser Level
Before you can start using a five-point layout laser level, you need to properly set it up. Follow these simple steps to ensure a stable and accurate setup:
- Choose a stable surface: Place the laser level on a flat and stable surface, such as a tripod or a table. Ensure that the surface is level and won’t shift during operation.
- Check the battery: Make sure the laser level has fresh batteries or is properly charged. A low battery can affect the accuracy and stability of the laser beams.
- Mount the laser level: Depending on the model, you may need to mount the laser level onto a tripod or a wall mount. Follow the instructions provided with your specific laser level to securely attach it.
- Adjust the leveling base: Most five-point layout laser levels have a leveling base that allows you to fine-tune the horizontal alignment. Use the built-in bubble vials or digital level indicators to ensure the laser level is level on both the X and Y axis.
- Secure the laser level: Once you’ve adjusted the leveling base, tighten the locking mechanism to secure the laser level. This will prevent any accidental movement during operation.
- Protective eyewear: Before turning on the laser, it is essential to protect your eyes. Put on safety glasses or goggles specially designed for laser use to prevent any potential harm.
By following these steps, you are setting the foundation for accurate and reliable measurements with your five-point layout laser level. Taking the time to set up the laser level correctly will ensure optimal performance and precise results throughout your project.
Step 2: Adjusting the Leveling Base
Once you have set up your five-point layout laser level, the next step is to adjust the leveling base to ensure precise alignment. Here’s how you can adjust the leveling base:
- Activate the self-leveling mode: Most five-point layout laser levels have a self-leveling feature. Activate this mode, and the laser beams will automatically adjust to ensure accurate alignment even on uneven surfaces.
- Observe the leveling indications: Look for the leveling indicators on your laser level. These could be bubble vials or digital level displays. They will help you determine if the laser level is leveled correctly.
- Adjust the leveling screws: Use the leveling screws or controls provided on the laser level to fine-tune the horizontal alignment. Turning the screws clockwise or counterclockwise will move the laser level accordingly.
- Refer to the leveling indicators: Keep an eye on the leveling indicators as you adjust the screws. The goal is to center the bubble vials or level displays, indicating that the laser level is perfectly horizontal.
- Double-check the level: After making adjustments, it’s essential to double-check the level by looking at the leveling indicators again. Make any additional adjustments if needed until the laser level is properly leveled.
- Lock the leveling base: Once you have achieved the desired leveling, lock the leveling base to secure the position. This will prevent any unintentional movement that could affect the accuracy of the laser beams.
Properly adjusting the leveling base is crucial for accurate measurements and aligning the laser beams correctly. Take your time in this step to ensure the best results throughout your project.
Step 3: Turning on the Laser
Now that you have set up and adjusted the leveling base of your five-point layout laser level, it’s time to turn on the laser and prepare it for use. Follow these steps to safely and effectively turn on the laser:
- Locate the power button: Depending on the model of your laser level, the power button could be located on the side, back, or top of the device. Look for the designated power button and ensure it is easily accessible.
- Press and hold the power button: Press and hold the power button for a few seconds until the laser level powers on. Some models may require a quick press or a series of button presses to activate the laser.
- Wait for self-leveling: After the laser level is turned on, it may take a few moments for it to self-level. During this time, the laser beams may move or blink as the leveling mechanism adjusts to ensure accuracy.
- Verify self-leveling completion: Once the laser beams stabilize, check the leveling indicators on the laser level. Confirm that they indicate the laser level is perfectly leveled. This ensures accurate measurements and alignment.
- Choose beam projection: Depending on your project’s requirements, you may need to select which laser beams to project. Most five-point layout laser levels have individual switches or buttons to control the beams’ activation.
- Activate the laser beams: Use the designated switches or buttons to activate the desired laser beams. You can choose to project only horizontal, vertical, or cross-line beams based on your specific needs.
By following these steps, you will safely and effectively turn on the laser of your five-point layout laser level and be ready to align and measure with precision. Always refer to the manufacturer’s instructions for your specific model, as the process may vary slightly.
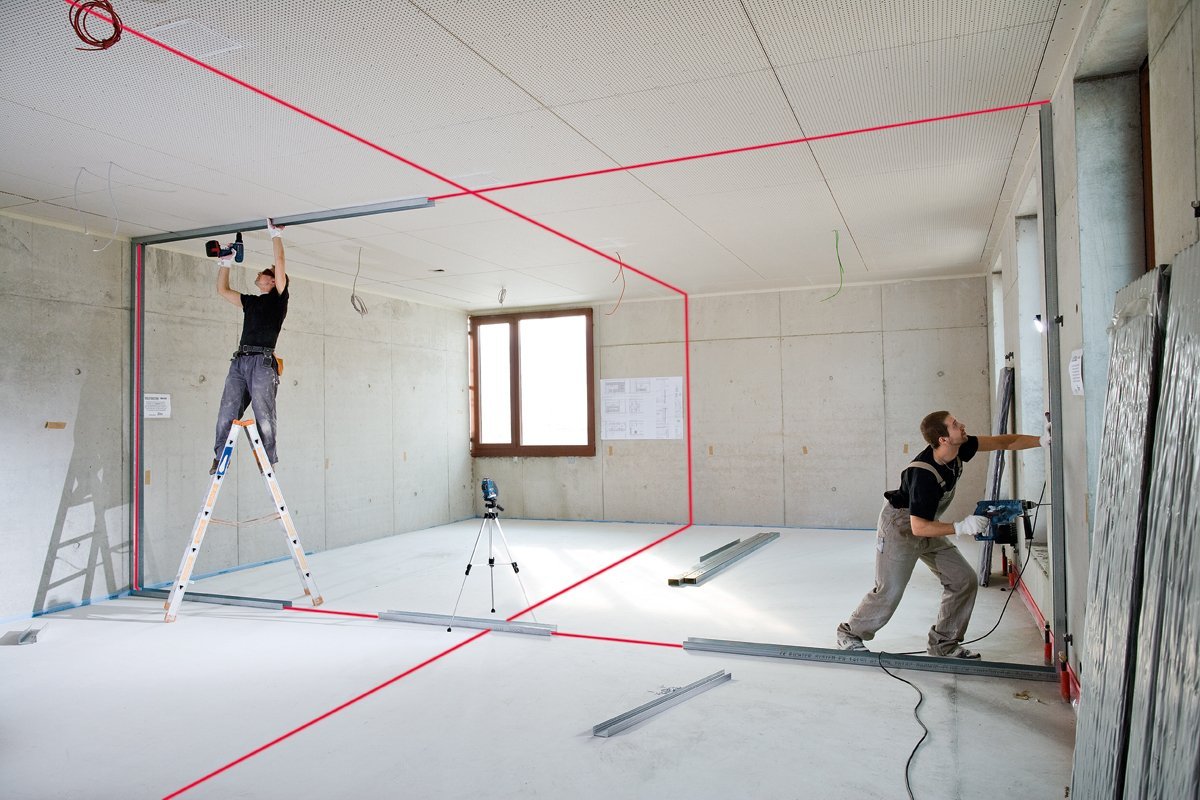
When using a five point layout laser level, always ensure that the device is placed on a stable surface and that the laser lines are clearly visible. This will help you achieve accurate and precise measurements for your layout.
Read more: How To Use A Laser Level
Step 4: Aligning the Laser with the First Point
Now that the laser is turned on, it’s time to align it with the first point of your project. Follow these steps to ensure accurate alignment:
- Identify the reference point: Determine the location of the first point you want to align with the laser beams. This could be a corner, an edge, or a specific mark on the surface you’re working on.
- Position the laser level: Place the laser level near the reference point, ensuring it is stable and securely mounted. Make any necessary adjustments to the leveling base to ensure the laser level is level.
- Adjust the beam direction: Use the adjustable knobs, dials, or toggles on the laser level to position the laser beams towards the first point. You may need to rotate or tilt the laser level to align the beams accurately.
- Fine-tune the alignment: Look for the point where the laser beams intersect with the first point. If it doesn’t align perfectly, make minor adjustments to the laser level’s position or beam direction until the beams are precisely on the reference point.
- Confirm alignment: Once you are satisfied with the alignment, use a pencil or marker to mark the first point on the surface. This mark will serve as a guide for the rest of your project.
It’s important to take your time when aligning the laser with the first point. By ensuring precise alignment at the beginning, you can trust that the subsequent measurements and markings will be accurate and in line with your project’s requirements.
Step 5: Marking the Remaining Points
With the laser aligned to the first point, it’s time to mark the remaining points of your project. Follow these steps to ensure accurate and consistent markings:
- Identify the remaining points: Determine the locations of the remaining points you need to mark. These could be corners, edges, or specific measurements along the surface.
- Position the laser level: Move the laser level to the next desired position, aligning it with the reference point for the next marking.
- Confirm alignment: Check the alignment of the laser beams with the reference point. Make any necessary adjustments to the laser level’s position or beam direction to ensure precise alignment.
- Mark the point: Once the laser beams align with the reference point, use a pencil or marker to mark the desired point on the surface. Take care to ensure accurate and clear markings.
- Repeat for remaining points: Continue these steps for all the remaining points that need to be marked. Each time, position the laser level, confirm alignment, and mark the point before moving on to the next.
By following this process, you can consistently mark the remaining points of your project with precision and accuracy. The laser beams of the five-point layout laser level serve as reliable guides to ensure your markings are aligned and correctly placed.
Take your time during this step and double-check the alignment and markings to ensure accuracy throughout your project. This will save you time and minimize errors in subsequent steps, resulting in a more professional and well-executed final product.
Step 6: Utilizing the Additional Features
Aside from its basic functionality, a five-point layout laser level may also offer additional features that can enhance your productivity and accuracy. Here are some common additional features and how to use them:
- Pulse mode: Some laser levels have a pulse mode that allows the laser beams to be detected by a receiver. This extends the working range of the laser level and enables its use in bright outdoor settings or over longer distances. Activate the pulse mode and use a compatible receiver to detect the laser beams.
- Intensity adjustment: Certain laser levels offer the flexibility to adjust the intensity of the laser beams. This can be useful when working in different lighting conditions, as you can increase or decrease the brightness of the laser beams to enhance visibility and accuracy.
- Mode selection: Depending on the model, your five-point layout laser level might have various modes that allow you to project different combinations of laser beams. This enables you to adapt the laser level to different layout and measurement requirements. Refer to the user manual to understand and select the appropriate mode for your specific needs.
- Plumb dot laser: In addition to the cross-line lasers, some layout laser levels include a plumb dot laser. This vertical reference point is useful for plumbing tasks, aligning poles, and verifying the straightness of walls. Activate the plumb dot laser if needed and align it with the desired reference point.
- Remote control: Certain laser levels come with a remote control that allows you to adjust settings and operate the laser level from a distance. Take advantage of this feature to have more flexibility and convenience during your project.
Make sure to consult the user manual for your specific laser level model to understand and utilize its additional features effectively. These features are designed to enhance your workflow, improve accuracy, and make your construction or renovation project more efficient.
Conclusion
A five-point layout laser level is a valuable tool that provides accurate alignment and measurements for various construction and renovation projects. By following the steps outlined in this guide, you can effectively utilize a five-point layout laser level and achieve precise results.
Setting up the laser level correctly, adjusting the leveling base, and turning on the laser are crucial initial steps. Aligning the laser with the first point and marking the remaining points ensure consistent and accurate measurements. Additionally, taking advantage of the additional features of your laser level can further enhance productivity and accuracy.
Throughout the process, it is important to refer to the manufacturer’s instructions specific to your laser level. This will ensure that you understand its unique functionalities and how to utilize them properly.
By using a five-point layout laser level, you can save time and effort by eliminating the need for manual measurement techniques. The laser beams provide a precise reference point, allowing you to align and mark points with confidence, whether you’re installing cabinets, hanging shelves, or laying tiles.
Remember to prioritize safety by wearing protective eyewear when operating the laser level and following all safety guidelines provided by the manufacturer.
In conclusion, a five-point layout laser level is a valuable tool for professionals and DIYers alike. By understanding its features and mastering its usage, you can elevate the accuracy, efficiency, and quality of your construction and renovation projects.
Frequently Asked Questions about How To Use A Five Point Layout Laser Level
Was this page helpful?
At Storables.com, we guarantee accurate and reliable information. Our content, validated by Expert Board Contributors, is crafted following stringent Editorial Policies. We're committed to providing you with well-researched, expert-backed insights for all your informational needs.


0 thoughts on “How To Use A Five Point Layout Laser Level”