Articles
How To Use A Laser Level For Tile
Modified: October 27, 2024
Discover the step-by-step process of using a laser level for tile installation in this informative article. Unlock tips, tricks, and expert advice to achieve precise and professional results.
(Many of the links in this article redirect to a specific reviewed product. Your purchase of these products through affiliate links helps to generate commission for Storables.com, at no extra cost. Learn more)
Introduction
Installing tiles can be a daunting task, especially when it comes to achieving a perfectly level surface. Uneven tiles not only affect the visual appeal of your space but can also cause issues with water drainage and overall structural integrity. That’s where a laser level comes in handy. With its precision and accuracy, a laser level can make tile installation a breeze.
In this article, we will guide you through the process of using a laser level for tile installation. We will cover everything from getting familiar with your laser level to troubleshooting common issues. So let’s dive in and learn how to achieve professional-level tiling with the help of a laser level.
Key Takeaways:
- Achieve professional-level tiling with ease by using a laser level. Proper setup, alignment, and troubleshooting ensure precise and visually appealing tile installations for DIY enthusiasts and professionals alike.
- Laser levels simplify tile installation, providing precision and efficiency. From preparing the area to troubleshooting common issues, using a laser level elevates the quality of tile projects, ensuring stunning and durable results.
Read more: How To Use A Laser Level
Getting Familiar with your Laser Level
Before you begin using a laser level for tile installation, it’s important to understand its basic functions and features. Laser levels come in various types, including line laser levels and rotary laser levels. Line laser levels emit a straight horizontal or vertical laser beam, while rotary laser levels project a 360-degree laser line.
To get started, familiarize yourself with the different controls and settings on your laser level. Most laser levels have buttons for power on/off, mode selection, and self-leveling. Some models may also have additional features like pulse mode for outdoor use or remote control functionality.
Take the time to read the user manual provided with your laser level. This will provide you with specific instructions and safety guidelines for your particular model. It’s crucial to follow the manufacturer’s recommendations to ensure proper usage and longevity of your laser level.
Additionally, check the battery level of your laser level before starting any project. Running out of battery power in the middle of your tile installation can be frustrating. Make sure to have spare batteries or a charging cable ready to keep your laser level powered up.
Lastly, consider investing in a tripod or a laser level mount. These accessories will provide stability and allow you to position the laser level at different heights and angles. This is especially important when working on larger tile installation projects or in areas where it may be challenging to find a suitable surface to place the laser level.
Preparing the Tile Installation Area
Before you start using your laser level for tile installation, it’s crucial to prepare the area properly. Here are some essential steps to follow:
1. Clean the Surface: Ensure that the floor or wall where you’ll be installing the tiles is clean and free of debris. Remove any dust, dirt, or old adhesive to create a smooth and even surface.
2. Remove Existing Tile: If you are replacing old tiles, you’ll need to remove them before installing the new ones. Carefully remove the old tiles using a chisel and hammer, being cautious not to damage the underlying surface.
3. Level the Subfloor: It’s essential to have a level subfloor before installing tiles. Use a level tool to check for any high or low spots. If there are any uneven areas, you may need to use a leveling compound to create a smooth and level surface.
4. Plan the Tile Layout: Take measurements of the installation area and plan the tile layout accordingly. Consider factors like the size of the tiles, the pattern you want to create, and any obstructions in the area. Use a pencil and a straight edge to mark guidelines on the floor or wall that will help you align the tiles accurately.
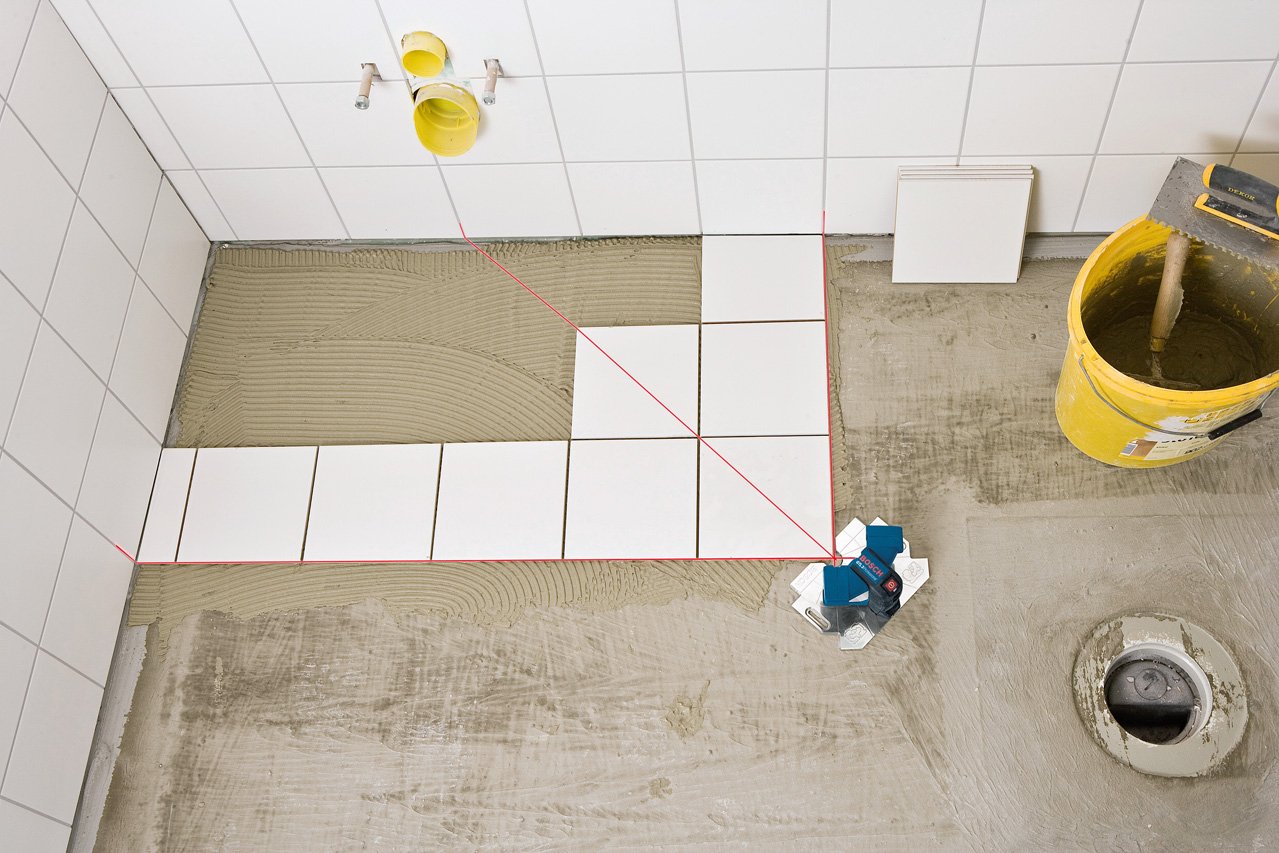
5. Find the Starting Point: Determine the starting point of your tile installation. It’s generally recommended to start from the center of the room or the middle of the wall. This will ensure a balanced and symmetrical installation. Use your laser level to project a horizontal or vertical reference line as a guide for the first row of tiles.
By properly preparing the tile installation area, you’ll create the foundation for a successful tile installation project. Taking the time to clean, level, and plan will ensure that your tiles are installed on a stable and even surface, enhancing their longevity and overall appearance.
Setting up the Laser Level
Once you have prepared the tile installation area, it’s time to set up your laser level. Follow these steps to ensure proper setup:
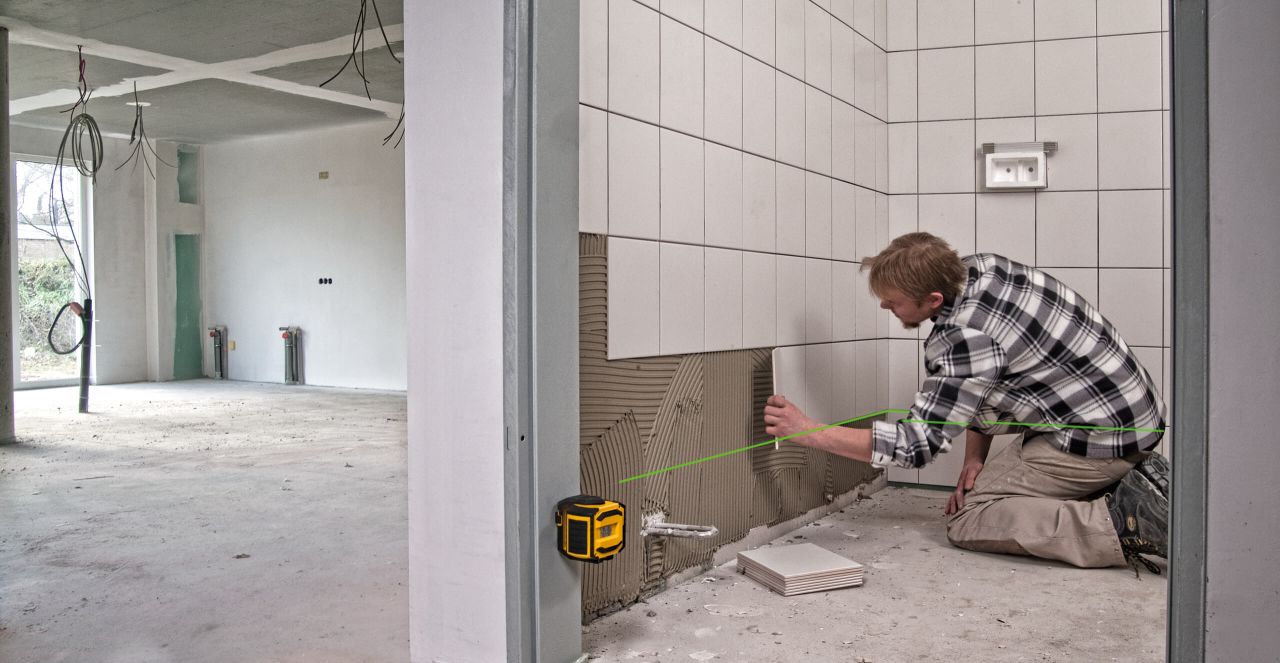
1. Choose the Right Mode: Depending on the type of tile installation you are doing, select the appropriate mode on your laser level. If you are installing floor tiles, the horizontal mode will be most useful. For wall tile installation, switch to the vertical mode. Some laser levels have a dual-axis mode that allows you to project both horizontal and vertical lines simultaneously.
2. Secure the Laser Level: Place the laser level on a stable surface or mount it on a tripod. Make sure it is positioned at a suitable height and angle to project the laser line across the installation area. If using a tripod, ensure that it is securely tightened to prevent any movement or wobbling.
3. Activate Self-Leveling: Many laser levels have a self-leveling feature, which automatically adjusts the laser line to be perfectly horizontal or vertical. Activate this feature if available on your laser level. Allow the laser level a few seconds to level itself properly. Be sure to place the laser level on a surface that is initially close to level to ensure accurate self-leveling.
4. Project the Laser Line: Once the laser level is set up and leveled, project the laser line onto the installation area. Use the guidelines you marked during the preparation stage to align the laser line with the starting point for the tiles. The laser line will serve as a reference for laying the tiles straight and level.
5. Confirm Positioning: Take a moment to double-check the accuracy and positioning of the laser line. Use a level tool or a straight edge to verify that the laser line is indeed level or vertical, depending on your installation needs. Make any necessary adjustments to the positioning of the laser level or the tripod to ensure accuracy.
Setting up your laser level correctly is crucial for achieving precise tile installation. By choosing the right mode, securing the laser level properly, activating self-leveling, and projecting the laser line accurately, you will set the stage for a successful and efficient tile installation process.
Checking and Adjusting the Level
Once you have set up your laser level and projected the laser line onto the installation area, it’s important to check the levelness and make any necessary adjustments before proceeding with tile installation. Follow these steps to ensure the laser level is accurately aligned:
1. Use a Level Tool: Take a level tool, such as a bubble level or a digital level, and hold it against the laser line. Check if the bubble or digital display indicates that the laser line is truly level (horizontal) or vertical, depending on your installation needs. If the laser line is not perfectly level, adjustments are required.
2. Adjust the Height: If the laser line is not level, carefully adjust the height of the laser level or tripod until the line aligns with the level tool. Gradually raise or lower the laser level and check the levelness after each adjustment. Continue this process until the laser line is perfectly level or vertical.
3. Fine-Tune the Positioning: If the laser line is level, but not aligned with the intended guidelines, you may need to fine-tune the positioning of the laser level or tripod. Gently rotate or move the laser level until the laser line aligns with your marked guidelines. Use a level tool to confirm the accuracy of the laser line after each adjustment.
4. Verify Multiple Points: It’s important to check the levelness or verticality of the laser line at multiple points along the installation area. This helps ensure consistency and accuracy throughout the tile installation process. Take the level tool and verify the laser line at various spots, adjusting as needed to maintain a level line.
5. Double-Check Regularly: As you proceed with tile installation, periodically double-check the levelness or verticality of the laser line. This will help catch any potential drift or misalignment that may occur during the process. Make any necessary adjustments to maintain a straight and level line.
By regularly checking and adjusting the level of your laser line, you can ensure precise tile installation. Taking the time to verify the levelness or verticality and making necessary adjustments will result in a visually appealing and professional-looking tile project.
When using a laser level for tiling, make sure to set it up on a stable surface and adjust the height to match the layout of your tiles. This will ensure a straight and even installation.
Read more: What Is The Best Laser Level For Tiling
Installing the First Tile
With your laser level accurately aligned and the surface prepared, it’s time to begin the actual tile installation process. Follow these steps to install the first tile:
1. Prepare the Adhesive: Mix the tile adhesive according to the manufacturer’s instructions. Ensure that the adhesive has the right consistency for proper bonding.
2. Apply the Adhesive: Use a notched trowel to spread the adhesive evenly on the installation area. Start at the reference line projected by the laser level. Apply enough adhesive to cover an area that is suitable for placing the first tile.
3. Place the Tile: Carefully place the first tile onto the adhesive, aligning it with the reference line. Press down firmly to ensure proper adhesion and to create a level surface. Use a slight twisting motion as you place the tile to help it settle into the adhesive evenly.
4. Check for Levelness: Use a level tool to check if the tile is level in all directions. Place the level on top of the tile and adjust it as needed to achieve a level surface. Pay attention to both the tile itself and its alignment with adjacent tiles or guidelines.
5. Check for Spacing: Use tile spacers to maintain consistent gaps between the first tile and the surrounding tiles. Adjust the position of the first tile if necessary to ensure proper spacing.
6. Continue with Additional Tiles: Once the first tile is properly installed, continue placing additional tiles along the reference line, working outward. Use the laser level line as a guide to ensure straight alignment. Check each tile for levelness and spacing as you go.
Remember to periodically recheck the levelness and alignment of the tiles as you progress with the installation. This will ensure a professional-looking result and prevent any issues with the overall tile layout.
Properly installing the first tile sets the foundation for the rest of the tile installation project. By following these steps and paying attention to levelness and alignment, you will achieve a solid and visually pleasing tile installation.
Continuing Tile Installation
Once you have successfully installed the first tile using the laser level as a guide, you can continue with the rest of the tile installation process. Follow these steps to ensure a seamless and professional result:
1. Apply Adhesive in Small Sections: Work in small sections to prevent the adhesive from drying out before you can place the tiles. Apply the adhesive using a notched trowel, spreading it evenly and making sure to create uniform ridges for proper tile adhesion.
2. Align Tiles with the Laser Level Line: As you place each tile, align it with the laser level line projected onto the installation area. This will ensure that the tiles are straight and even. Use a slight twisting motion when placing each tile to ensure proper adhesion and to help it settle into the adhesive evenly.
3. Check for Levelness and Spacing: Regularly use a level tool to check that the tiles are level in all directions. Place the level on top of the tiles and adjust as needed to achieve a level surface. Also, use tile spacers to maintain consistent gaps between tiles, ensuring a uniform and professional finish.
4. Trim Tiles as Needed: You may need to trim tiles to fit around edges, corners, or obstacles. Use a tile cutter or a wet saw to make precise cuts and ensure a proper fit. Take measurements carefully and mark the tiles before cutting to minimize waste.
5. Clean Excess Adhesive: Wipe away any excess adhesive that may squeeze out between the tiles during installation. Use a damp sponge or cloth to clean the surface, ensuring a neat and clean finish.
6. Allow Adhesive to Cure: Follow the manufacturer’s instructions for the recommended curing time of the adhesive before applying grout. This will ensure that the tiles are fully set and secure.
By following these steps and using the laser level as a guide, you can achieve a consistent and professional tile installation. Remember to regularly check for levelness, maintain proper spacing, and make necessary adjustments as you continue installing the tiles.
Taking your time and paying attention to detail will result in a visually appealing and durable tile installation that will enhance the beauty and functionality of your space.
Troubleshooting Tips
Even with the use of a laser level, tile installation can sometimes present challenges. Here are some troubleshooting tips to help you overcome common issues:
1. Uneven Tiles: If you notice that the tiles are not sitting level despite following the laser level line, it could be due to an uneven surface. Check the subfloor or wall for any high or low spots and use a leveling compound to create a smooth and level surface before proceeding with tile installation.
2. Adhesive Drying Too Quickly: In hot and dry conditions, the adhesive may dry out faster than expected, making it difficult to properly place the tiles. To prevent this, work in smaller sections and only apply adhesive to areas you can tile within a reasonable timeframe. Consider using a rapid-setting adhesive for faster drying times.
3. Tiles Slipping or Moving: If the tiles are slipping or moving after being placed, it may indicate a lack of proper adhesion. Ensure that you are applying enough pressure when placing the tiles to create a strong bond. You can also use tile spacers to help hold the tiles in place while the adhesive sets.
4. Grout Cracking: If the grout between the tiles starts to crack or break, it could be due to improper mixing or application. Follow the manufacturer’s instructions for mixing grout properly, and ensure that the gaps between tiles are clean and free of excess adhesive before applying the grout. Allow the grout sufficient curing time before using the tiled area.
5. Uneven Grout Lines: To achieve consistent and even grout lines, use a grout float to apply the grout in a sweeping motion, filling the gaps between tiles. Remove excess grout from the tile surfaces using a damp sponge, being careful not to remove too much grout from the lines. Use a grout sealer after the grout has fully cured to enhance its durability and longevity.
6. Uneven Laser Level Line: If you notice that the laser level line is not straight or accurate, check the position and stability of the laser level or tripod. Ensure that it is securely tightened and placed on a stable surface. If the issue persists, consider calibrating or replacing the laser level if necessary.
Remember, patience and attention to detail are key when troubleshooting tile installation issues. Take your time to identify and address any problems that arise, ensuring a successful and professional-looking outcome.
Conclusion
Using a laser level for tile installation can greatly simplify the process and ensure professional results. By getting familiar with your laser level, preparing the tile installation area, setting up the laser level properly, and checking and adjusting the level as needed, you lay the groundwork for a successful project.
Installing the first tile using the laser level as a guide and continuing with the rest of the tile installation while maintaining levelness and spacing allows for a seamless and visually pleasing result. Troubleshooting common issues like uneven tiles, adhesive drying too quickly, or grout problems can help overcome any challenges that may arise.
Remember to follow the manufacturer’s instructions, take measurements accurately, and pay attention to the smallest details. Regularly check the levelness and alignment of the tiles, as well as the integrity of the laser level line, to ensure a flawless finish.
In conclusion, a laser level is an invaluable tool for achieving precise and professional tile installation. It eliminates guesswork, enhances efficiency, and ensures a stunning outcome. Whether you’re a DIY enthusiast or a professional installer, using a laser level will elevate your tile projects to new heights of precision and accuracy.
So, don’t hesitate to invest in a reliable laser level and put it to use. With proper preparation, setup, and attention to detail, you’ll be able to complete beautiful tile installations with confidence and ease.
Ready to spruce up your space further? Dive into our guide on home renovation, perfect for those looking to upgrade their living areas with the finest hardwood floors. For the hands-on enthusiasts, our comprehensive DIY home improvement tips will help you tackle projects with confidence and creativity. And if precision is your goal, don't miss our detailed laser level guide on using Black and Decker tools, ensuring every job is done right.
Frequently Asked Questions about How To Use A Laser Level For Tile
Was this page helpful?
At Storables.com, we guarantee accurate and reliable information. Our content, validated by Expert Board Contributors, is crafted following stringent Editorial Policies. We're committed to providing you with well-researched, expert-backed insights for all your informational needs.


0 thoughts on “How To Use A Laser Level For Tile”