Articles
How To Use Ryobi Rotary Tool
Modified: February 3, 2024
Learn how to effectively use the Ryobi rotary tool with our informative articles. Get tips, tricks, and step-by-step guides for various projects.
(Many of the links in this article redirect to a specific reviewed product. Your purchase of these products through affiliate links helps to generate commission for Storables.com, at no extra cost. Learn more)
Introduction
Welcome to the world of DIY and craftsmanship! Whether you’re a hobbyist or a professional, having the right tools is essential to tackle various tasks and projects. One such versatile tool is the Ryobi Rotary Tool, a power tool that can handle a wide range of applications with ease and precision. In this article, we will explore the ins and outs of using the Ryobi Rotary Tool, from understanding its features to mastering its techniques.
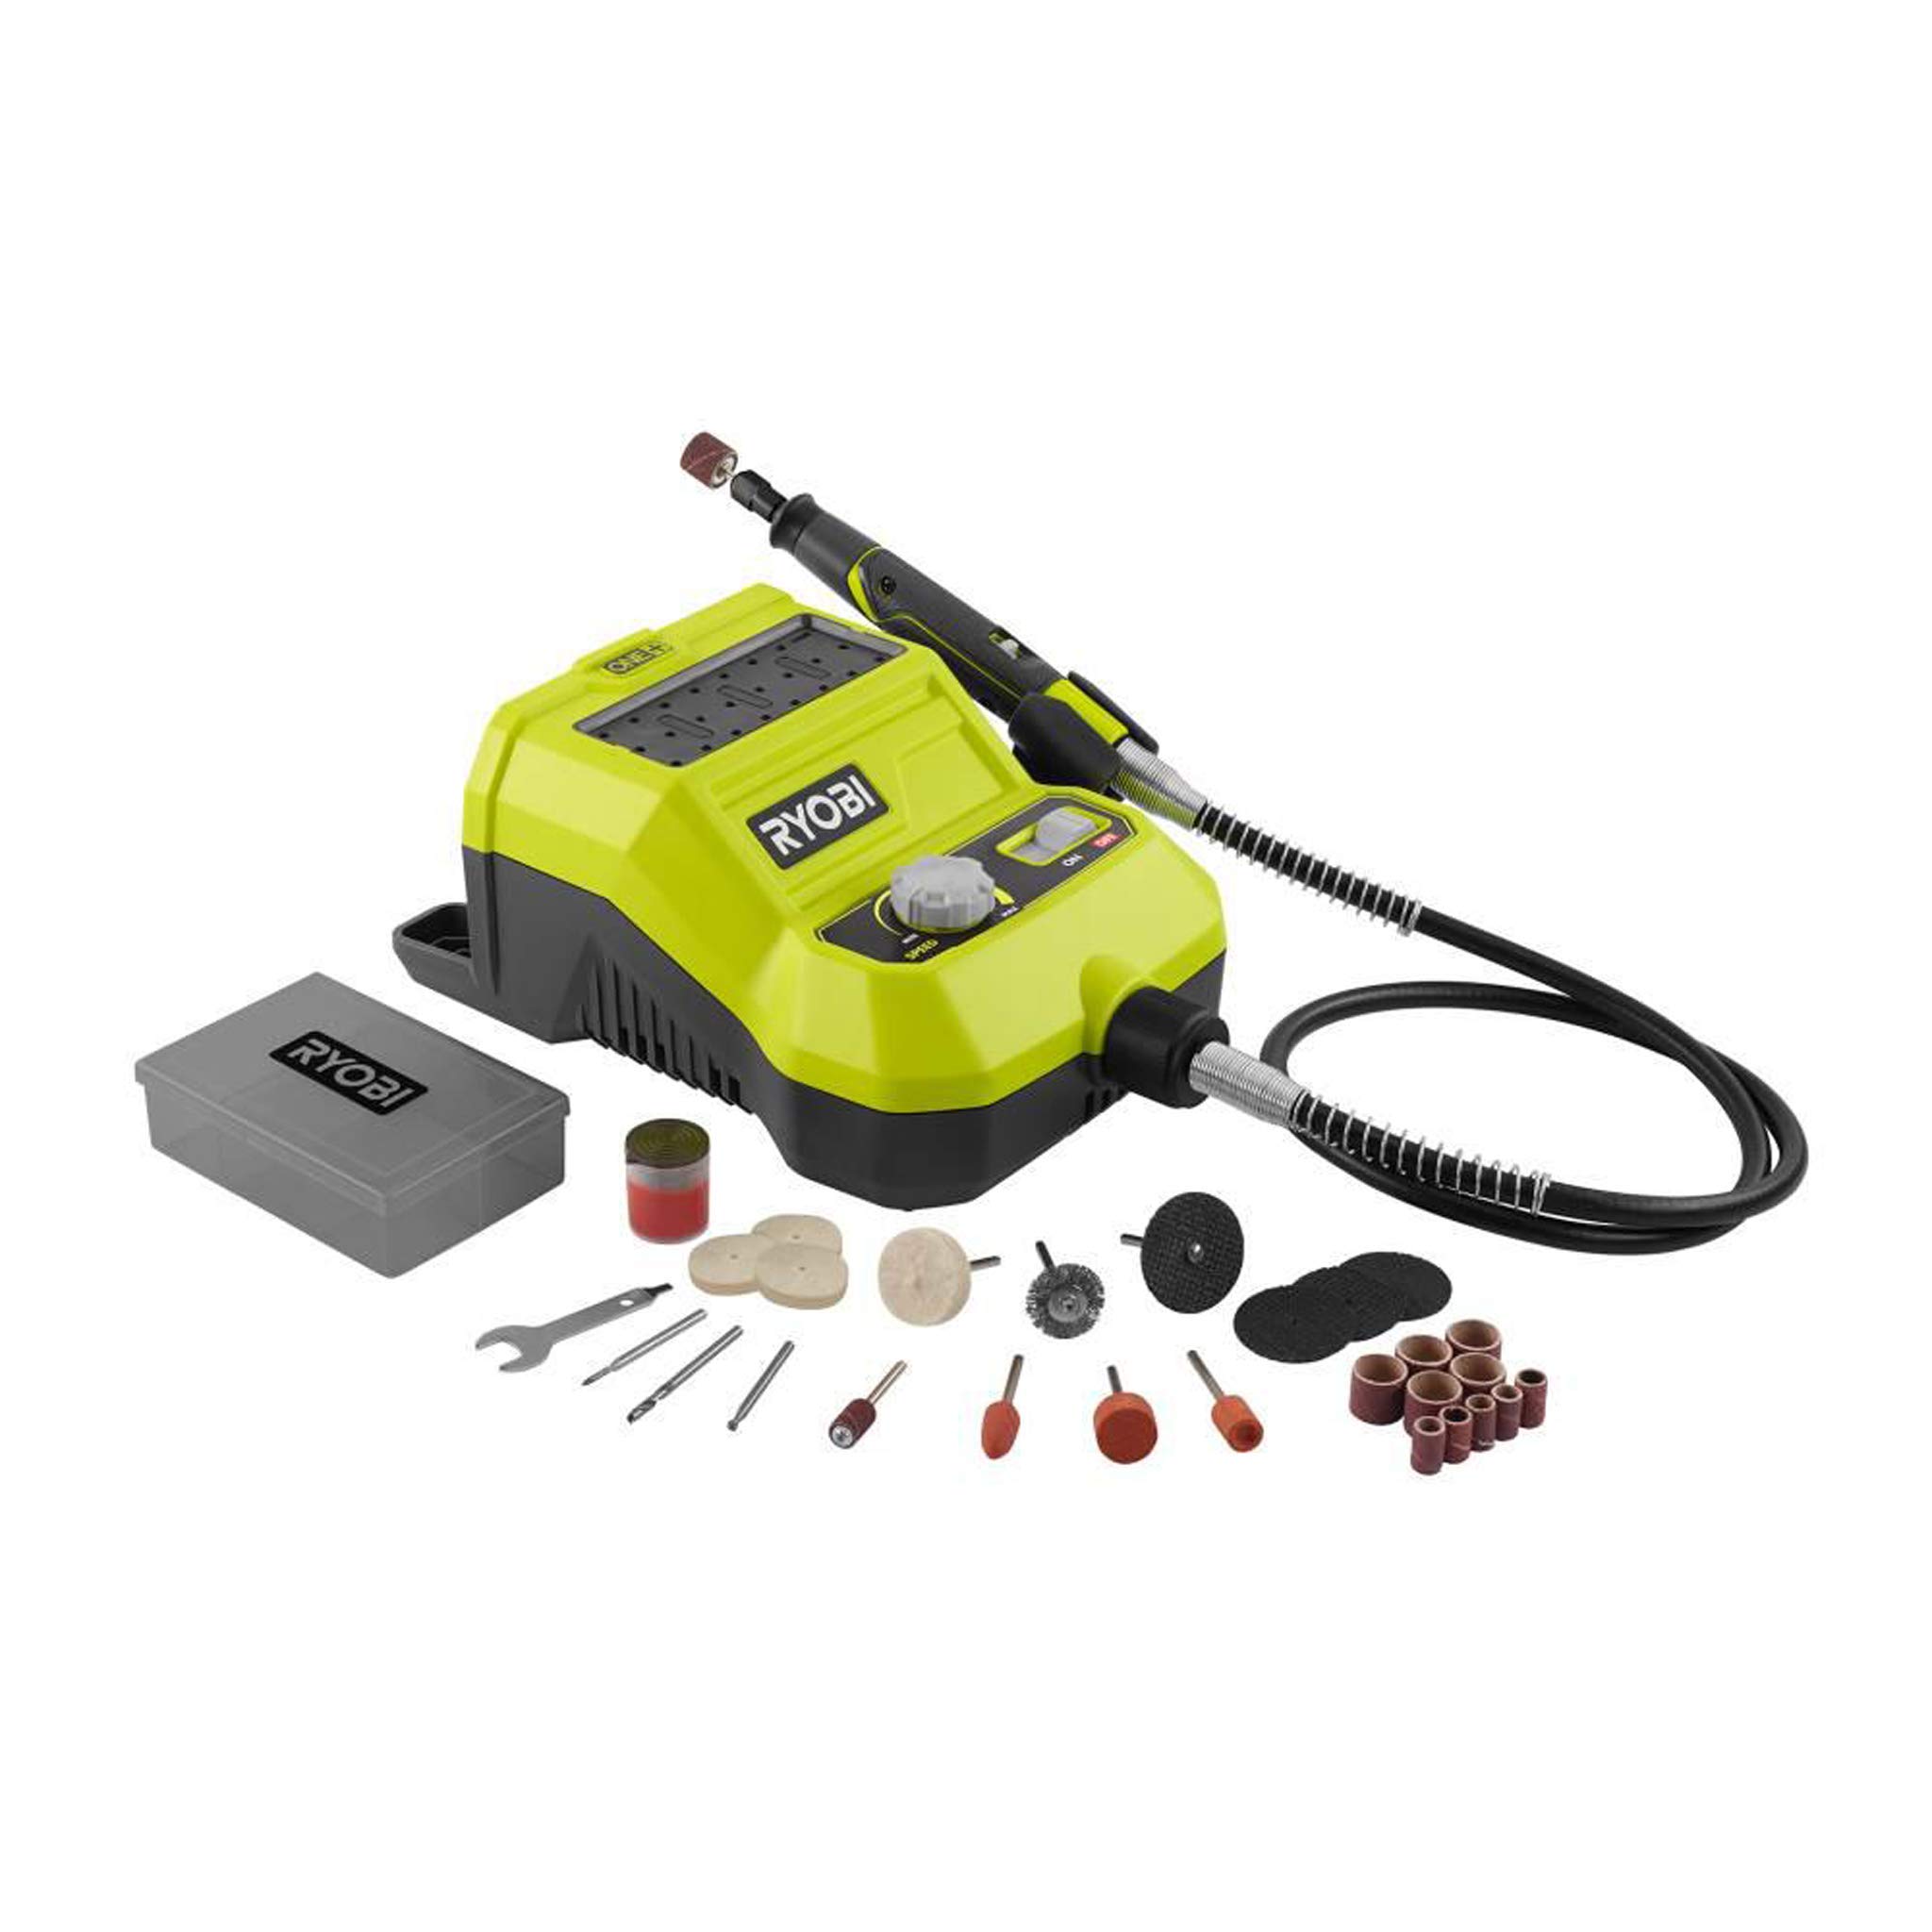
The Ryobi Rotary Tool is a compact and handheld power tool that operates by rotating a variety of interchangeable accessories. These accessories include grinding stones, sanding drums, cutting wheels, and many others, allowing you to accomplish tasks such as grinding, sanding, cutting, polishing, drilling, and engraving. With its ergonomic design, adjustable speed control, and interchangeable accessory system, the Ryobi Rotary Tool offers both convenience and versatility.
Before diving into the specifics of using the Ryobi Rotary Tool, it’s crucial to prioritize safety. Like any power tool, the rotary tool can pose risks if not used correctly. Therefore, it’s essential to follow safety precautions and wear appropriate protective gear, such as safety glasses, a dust mask, and gloves, to protect yourself from potential hazards.
Now that we’ve covered the basics, let’s move on to setting up the rotary tool and understanding its various features. By familiarizing yourself with the tool’s components, you’ll be able to maximize its performance and achieve optimal results in your projects. We’ll also discuss the importance of choosing the right accessories for different tasks and applications, so you can effectively accomplish your desired outcomes.
Once the setup is complete, we’ll delve into the basic techniques and practices for using the rotary tool. From mastering the grip and control to understanding the techniques for grinding, sanding, and cutting, you’ll gain the confidence to tackle a wide variety of projects. Additionally, we’ll explore advanced uses and applications of the rotary tool, including engraving, polishing, and drilling, empowering you to expand your craftsmanship skills.
Maintenance and cleaning are crucial aspects of ensuring the longevity and optimal performance of any tool, and the rotary tool is no exception. We’ll provide you with essential tips and guidelines on how to maintain and clean your Ryobi Rotary Tool, keeping it in top shape for years to come. Lastly, we’ll discuss some common troubleshooting techniques to address any issues you may encounter while using the rotary tool.
By the end of this article, you’ll have a comprehensive understanding of the Ryobi Rotary Tool and how to leverage its capabilities to accomplish various tasks and projects. So, let’s dive in and embark on an exciting journey of creativity and craftsmanship with the Ryobi Rotary Tool!
Key Takeaways:
- Unleash Your Creativity: Master the Ryobi Rotary Tool’s versatile features, from basic techniques to advanced applications, and elevate your craftsmanship with precision and confidence.
- Safety First, Craftsmanship Second: Prioritize safety, choose the right accessories, and maintain your Ryobi Rotary Tool to ensure longevity and optimal performance for all your DIY and professional projects.
Read more: How To Use Ryobi Drill
Understanding the Ryobi Rotary Tool
The Ryobi Rotary Tool is a powerful and versatile tool that can be used for a wide range of tasks and projects. It is designed to provide precision and control, allowing you to accomplish intricate work with ease. Let’s take a closer look at the key features and components of the Ryobi Rotary Tool.
One of the standout features of the Ryobi Rotary Tool is its compact and ergonomic design. It is lightweight and easy to hold, ensuring comfort and reducing fatigue during prolonged use. The slim body allows for precise control, making it ideal for intricate cuts, engravings, and detailing work.
The rotary tool is powered by a motor, which drives the rotation of the various accessories. The motor’s speed is adjustable, allowing you to choose the appropriate speed for different tasks. This flexibility is crucial when working with different materials or when you need to vary the cutting or grinding intensity.
The Ryobi Rotary Tool features a collet system to secure the accessories in place. The collet is a small chuck-like mechanism that holds the accessory firmly. It is essential to ensure that the accessory is properly inserted and tightened in the collet to avoid any accidents during operation. Most Ryobi Rotary Tools come with a collet wrench for easy installation and removal of accessories.
Another notable feature of the Ryobi Rotary Tool is the interchangeable accessory system. It allows you to switch between different types of accessories to perform various tasks. The accessories compatible with the Ryobi Rotary Tool include sanding drums, cutting wheels, grinding stones, polishing pads, drill bits, and many others. This versatility makes the rotary tool a valuable addition to any toolbox.
In addition to the accessories, the Ryobi Rotary Tool also offers a range of attachments that enhance its functionality. These attachments include a flexible shaft, a plunge base, a cutting guide, and a detailer’s grip. Each attachment is designed to provide additional control or to expand the applications of the rotary tool.
The Ryobi Rotary Tool is equipped with a variable speed control dial or switch, allowing you to adjust the speed of the motor according to your needs. This feature is especially useful when working with delicate materials or when you require precise control for intricate tasks.
Some models of the Ryobi Rotary Tool also come with built-in LED lights. These lights illuminate the work area, providing better visibility, especially when working in dimly lit spaces or when performing detailed tasks.
Understanding the features and components of the Ryobi Rotary Tool is crucial to maximize its potential and achieve optimal results. In the next section, we will explore the safety precautions you should take when using the rotary tool to ensure a safe and enjoyable experience.
Safety Precautions
When using the Ryobi Rotary Tool, it is essential to prioritize safety to avoid accidents and injuries. Here are some important safety precautions to keep in mind:
- Read the manual: Before operating the rotary tool, carefully read the manufacturer’s manual and familiarize yourself with the tool and its specific safety guidelines. Understanding the tool’s features and limitations will help you use it safely and effectively.
- Wear protective gear: Always wear appropriate protective gear when using the Ryobi Rotary Tool. This includes safety glasses to protect your eyes from flying debris, a dust mask to prevent inhalation of harmful particles, and gloves to protect your hands from sharp edges or heat generated during operation.
- Secure your workspace: Ensure that your work area is clean, well-organized, and free from any distractions or potential hazards. Remove any loose objects or clutter that may interfere with your work or cause accidents.
- Use the right accessories: Select the appropriate accessories for your specific task and ensure they are compatible with the rotary tool. Using incorrect or damaged accessories can lead to accidents and compromise the quality of your work.
- Inspect the tool: Before using the rotary tool, inspect it for any signs of damage or wear. Check the power cord for fraying or exposed wires and make sure the switch and speed control are functioning properly. If you notice any issues, do not use the tool and have it repaired or replaced as necessary.
- Securely grip the tool: Hold the rotary tool firmly with both hands, maintaining a stable grip. Keep a firm and comfortable grip on the tool to prevent it from slipping or being thrown off balance during operation.
- Avoid overexertion: Do not force the rotary tool or apply excessive pressure when using it. Let the tool’s speed and accessories do the work, and use gentle, controlled movements to achieve desired results.
- Keep bystanders at a safe distance: Ensure that there are no bystanders or distractions near your workspace. This will prevent accidents caused by others accidentally bumping into you or being hit by flying debris.
- Disconnect power when not in use: When not using the rotary tool, always disconnect it from the power source. This reduces the risk of accidental start-up or unauthorized use.
- Follow manufacturer’s instructions: Lastly, follow the instructions provided by the manufacturer for specific tasks and applications. Different materials and projects may require different techniques or precautions. Following the guidelines will help you work safely and achieve the best results.
By adhering to these safety precautions, you can minimize the risk of accidents and injuries while using the Ryobi Rotary Tool. Remember, your safety should always be the top priority when working with power tools.
Setting Up the Rotary Tool
Before you can start using the Ryobi Rotary Tool, it’s important to properly set it up for optimal performance and safety. Here are the steps to follow when setting up your rotary tool:
- Choose the right workspace: Find a well-lit and spacious area where you can comfortably work with the rotary tool. Make sure you have a stable work surface and enough room to move around freely.
- Check the power source: Ensure that your power source is compatible with the rotary tool’s voltage requirements. Most Ryobi Rotary Tools are electric-powered and require a standard electrical outlet. Double-check the voltage and make sure it matches your power source to avoid any electrical issues.
- Attach the desired accessory: Depending on your specific task or project, select the appropriate accessory for the Ryobi Rotary Tool. Follow the manufacturer’s instructions to securely attach the accessory to the collet. Use the collet wrench, if necessary, to tighten it properly.
- Adjust the speed: Determine the suitable speed for your task by adjusting the speed control dial or switch on the rotary tool. Start with a low speed setting and gradually increase it as needed. Remember to match the speed to the material and the type of work you are doing for optimal results.
- Secure the workpiece: If you’re working on a specific workpiece, make sure it is securely held or clamped down to prevent movement during operation. This will help maintain accuracy and prevent accidents caused by the piece shifting unexpectedly.
- Check for clearance: Before powering on the rotary tool, ensure that there is enough clearance around the work area. Remove any obstructions or objects that could interfere with the tool’s movement or create a safety hazard.
- Power on and test: Once you have completed the setup steps, power on the rotary tool and give it a quick test. Listen for any unusual sounds or vibrations that could indicate a problem. If everything seems to be in order, you’re ready to start using the Ryobi Rotary Tool!
It’s important to note that the setup process may vary slightly depending on the specific model of the Ryobi Rotary Tool you’re using. Always refer to the manufacturer’s manual for detailed instructions and any additional setup steps specific to your tool.
By following these setup guidelines, you can ensure that your Ryobi Rotary Tool is properly prepared for use, allowing you to work efficiently and with peace of mind. In the next section, we will explore different accessories available for the rotary tool and how to choose the right one for your project.
Choosing the Right Rotary Tool Accessories
One of the key advantages of the Ryobi Rotary Tool is its versatility, thanks to the wide range of accessories available. Choosing the right accessories for your specific task or project is crucial to achieving the desired results. Here are some factors to consider when selecting rotary tool accessories:
- Task or application: Determine the specific task or application you will be working on. Are you planning to cut, grind, sand, polish, or engrave? Different accessories are specifically designed for each task, so knowing what you want to achieve will help you narrow down your options.
- Material compatibility: Consider the material you will be working with. Accessories are designed to work best with specific materials, such as wood, metal, plastic, or ceramics. Make sure to choose accessories that are compatible with the material you are working on for optimal performance and results.
- Size and shape: Assess the size and shape requirements of your project. Accessories come in various shapes and sizes, such as cutting wheels, grinding stones, sanding drums, and polishing pads. Select the accessory that best suits the scale and intricacy of your work for accurate and efficient results.
- Quality and durability: Look for accessories that are made from high-quality materials. Opt for reputable brands and ensure that the accessories are durable and can withstand the demands of your project. Investing in quality accessories will provide better performance and a longer lifespan.
- Versatility: Consider accessories that offer versatility and compatibility with the Ryobi Rotary Tool. Some accessories may have interchangeable parts or additional attachments that expand their functionality, allowing you to accomplish a wider range of tasks without the need for multiple accessories.
- Accessories kit: If you’re new to using the rotary tool or if you have a variety of tasks planned, consider purchasing an accessories kit. These kits typically include a range of accessories suited for different tasks and materials. It’s a cost-effective option and provides you with a wide selection to choose from.
- User reviews and recommendations: Conduct some research and read reviews from other users to get an idea of the performance and quality of the accessories you are considering. Pay attention to feedback regarding durability, ease of use, and overall satisfaction to make an informed decision.
Remember, it’s always a good idea to have a variety of accessories on hand to tackle different projects and tasks. As you gain more experience with the Ryobi Rotary Tool, you’ll become familiar with which accessories work best for specific applications. Don’t be afraid to experiment and try out different accessories to expand your creative possibilities.
Now that you have an idea of how to choose the right rotary tool accessories, we can move on to exploring the basic techniques for using the Ryobi Rotary Tool in the next section. Stay tuned!
When using a Ryobi rotary tool, always wear safety goggles to protect your eyes from flying debris. Additionally, make sure to secure your workpiece before starting the tool to prevent any accidents.
Basic Techniques for Using the Rotary Tool
Now that you have your Ryobi Rotary Tool set up and the right accessories selected, it’s time to dive into the basic techniques for using the tool. With these techniques, you will be able to tackle a wide variety of tasks and projects with precision and confidence. Let’s explore the fundamental techniques for using the rotary tool:
- Grip and control: Start by ensuring a firm and comfortable grip on the rotary tool. Hold it with both hands, with one hand on the body and the other on the additional grip if available. This will provide better control and stability during operation.
- Grinding: For grinding tasks, such as shaping, smoothing, or removing material, use grinding stones or abrasive wheels. Hold the rotary tool at a specific angle against the workpiece and move it back and forth or in circular motions to achieve the desired result. Pay attention to the speed and pressure applied for precise and even grinding.
- Sanding: Sanding involves using sanding drums or sanding discs to smooth surfaces or remove imperfections. Start with a coarse-grit sanding accessory and gradually work your way to finer grits for a polished finish. Move the rotary tool in smooth and even strokes, applying light, consistent pressure for uniform sanding.
- Cutting: When cutting through materials, such as wood, plastic, or metal, use cutting wheels or cutting bits. Position the accessory at the desired cutting line and slowly guide the rotary tool along the path. Take care not to put excessive pressure on the accessory and let it do the work with the tool’s rotation.
- Engraving: Engraving involves creating intricate designs or patterns on various surfaces. Utilize high-speed engraving accessories, such as diamond-coated or carbide-tipped engraving bits. Apply a steady hand and move the rotary tool with controlled motions to achieve precise and personalized engravings.
- Polishing: For polishing tasks, such as shining metals or restoring luster to surfaces, employ polishing pads or polishing attachments. Apply a polishing compound or wax to the accessory and move the rotary tool smoothly over the surface in circular motions. Gradually increase the speed for a glossy and reflective finish.
- Drilling: With the right drill bits, the rotary tool can function as a mini drill for creating holes in various materials. Select the appropriate drill bit for the material and place it at the desired drill point. Apply consistent pressure and let the rotating accessory penetrate the material gradually.
Remember, practice makes perfect, and proficiency with the rotary tool techniques develops over time. Start with simple projects and gradually progress to more complex tasks as you become more comfortable and confident with the tool. Always prioritize safety and take breaks when needed to prevent fatigue.
Now that you have mastered the basics, in the next section, we will explore advanced uses and applications of the Ryobi Rotary Tool. Get ready to push the boundaries of your craftsmanship!
Advanced Uses and Applications
Once you have a solid understanding of the basic techniques for using the Ryobi Rotary Tool, it’s time to explore its advanced uses and applications. With its versatility and precision, the rotary tool can be utilized in a wide range of projects and tasks. Let’s dive into some advanced uses of the tool:
- Engraving intricate designs: Using fine engraving bits, you can create complex designs on materials like metal, glass, or wood. Experiment with different techniques, such as shading or cross-hatching, to add depth and dimension to your engravings.
- Carving or sculpting: With specialized carving or sculpting bits, the rotary tool can be used to create intricate designs or sculptures in materials like wood or soft stone. Gradually sculpt and shape the material with controlled movements and varying speed settings.
- Jewelry making: The rotary tool is a valuable tool for jewelry makers. From polishing and finishing metal components to engraving intricate patterns or setting stones, the tool offers precise control for creating stunning jewelry pieces.
- Etching or glass engraving: Utilize diamond-coated engraving bits or abrasive wheels to etch designs on glass or mirrors. Explore different techniques, such as freehand engraving or using stencils, to create beautiful and personalized glass art.
- Restoring or refinishing furniture: The rotary tool can be a game-changer when it comes to restoring or refinishing furniture. Use sanding drums or abrasive accessories to remove old paint or finishes. Then, polish, buff, or add intricate details to revitalize the piece.
- Modifying or customizing electronics: The rotary tool with fine cutting or grinding accessories can be used for modifying or customizing electronic devices. Create precise openings for connectors or switches, or trim plastic cases to fit new components.
- Automotive repair or detailing: From removing rust and oxidation to polishing chrome or repairing plastic components, the rotary tool is a valuable asset in automotive repair or detailing. Invest in specific accessories for automotive applications to achieve professional results.
- Art and crafts projects: Let your creativity soar by using the rotary tool in various art and craft projects. From woodworking to mixed media art, the tool can be used for intricate detailing, shaping, or adding texture to your creations.
These are just a few examples of the advanced uses and applications of the Ryobi Rotary Tool. With its versatility, precision, and range of accessories, the tool empowers you to explore new possibilities and take your craftsmanship to the next level. Don’t be afraid to experiment and push the boundaries of what you can achieve with this versatile tool.
In the next section, we will discuss essential maintenance and cleaning tips to keep your Ryobi Rotary Tool in excellent working condition. Let’s ensure its longevity and optimal performance!
Maintenance and Cleaning Tips
To ensure the longevity and optimal performance of your Ryobi Rotary Tool, it’s essential to properly maintain and clean the tool. Regular maintenance not only extends the tool’s lifespan but also ensures its reliability and effectiveness. Here are some important maintenance and cleaning tips to keep your rotary tool in excellent condition:
- Unplug or remove the battery: Before performing any maintenance or cleaning, always unplug the rotary tool or remove its battery if it is cordless. This prevents accidental start-ups and keeps you safe during the process.
- Clean the tool after use: After each use, take a few moments to clean the tool. Use a brush or compressed air to remove any dust, debris, or residue that may have accumulated on the tool’s body. This prevents build-up and keeps the tool functioning properly.
- Clean and lubricate the collet: Over time, dust and debris can accumulate in the collet, affecting the secure holding of accessories. Clean the collet regularly using a small brush or compressed air to remove any build-up. Additionally, apply a small amount of lubricant to the collet to ensure smooth operation.
- Inspect the power cord: Regularly check the power cord for any signs of damage, such as fraying or exposed wires. If you notice any issues, it is important to replace the power cord to prevent electrical hazards.
- Keep the vents clear: The rotary tool’s motor needs proper ventilation to prevent overheating. Check the vents regularly and ensure they are free from dust and debris. Use a brush or compressed air to remove any blockages that may hinder the tool’s performance.
- Check the accessories: Periodically inspect the accessories for any signs of wear or damage. Replace any worn-out or damaged accessories to maintain the tool’s efficiency and achieve the best results in your projects.
- Store the tool properly: When not in use, store the rotary tool in a dry and secure place. Use the tool’s original case or a dedicated storage container to protect it from dust, moisture, and potential damage. Keep it out of reach from children or unauthorized users.
- Follow the manufacturer’s maintenance guidelines: Read the manufacturer’s manual and follow their recommended maintenance guidelines. Different models of rotary tools may have specific maintenance requirements, so it’s important to adhere to the instructions to ensure proper care.
By incorporating these maintenance and cleaning tips into your routine, you can prolong the life of your Ryobi Rotary Tool and maintain its reliable performance. Regular maintenance not only keeps the tool in top shape but also ensures safety and enhances the quality of your work.
In the next section, we will discuss common issues and troubleshooting techniques for the rotary tool to help you overcome any challenges you may encounter during its use. Let’s equip ourselves with the knowledge to tackle any potential problems!
Troubleshooting Common Issues
While the Ryobi Rotary Tool is a reliable and durable tool, you may encounter some common issues during its use. Understanding these issues and being able to troubleshoot them will help you overcome any challenges and continue working smoothly. Here are some common issues and their troubleshooting techniques:
- The tool doesn’t start: If the rotary tool doesn’t start when you press the power button, check if it is properly plugged in or if the battery is charged and inserted correctly. If everything is in order and the tool still doesn’t start, there may be an issue with the power source or the tool’s motor. In such cases, it is recommended to consult a professional for further inspection and repair.
- Reduced speed or power: If you notice a decrease in the tool’s speed or power, it could be due to several reasons. First, check if the accessory is securely tightened in the collet. Loose accessories can cause an inefficient transfer of power. Additionally, check if the accessory is worn out or damaged. A worn-out accessory may not perform at its optimal level. Replace the accessory if necessary. If the issue persists, the tool’s motor might need cleaning or repair. Refer to the manufacturer’s manual for instructions or seek assistance from a professional.
- Excessive vibration or noise: If the rotary tool starts vibrating excessively or making unusual noises, it could indicate an issue with the accessory or the tool itself. Check if the accessory is properly aligned and securely tightened. A misaligned or loose accessory can cause excessive vibration. If the issue persists, there may be a problem with the tool’s gears or bearings. In such cases, it is recommended to have the tool inspected and repaired by a professional.
- Overheating: If the rotary tool becomes excessively hot during use, it could be a sign of overuse or a problem with the motor. It is important to take breaks during prolonged use to allow the tool to cool down. If the tool continues to overheat even with breaks, it could indicate a motor issue or a problem with the ventilation. Ensure that the ventilation vents are clean and free from obstruction. If the problem persists, consult a professional for further evaluation and potential repair.
- Poor accuracy or performance: If you notice a decrease in accuracy or performance, it could be due to a variety of factors. Check if the accessory is suitable for the task at hand and if it is in good condition. Ensure that you are using the appropriate speed setting for the material and task. Also, double-check your technique and grip to ensure proper control. If all these factors are in order and the issue persists, it may be beneficial to practice and improve your skills or seek guidance from experienced users.
Remember, safety is paramount, and if you are unsure about any troubleshooting techniques or if the issue persists, always seek assistance from a professional or contact the manufacturer’s customer support for guidance and support.
Now that you are equipped with troubleshooting techniques, you are well-prepared to address common issues that may arise while using the Ryobi Rotary Tool. In the final section, we will conclude our comprehensive guide, summarizing the key points and celebrating the versatility and craftsmanship possibilities that this tool offers.
Read more: Who Uses Rotary Laser Level
Conclusion
Congratulations! You have reached the end of our comprehensive guide on how to use the Ryobi Rotary Tool. We have covered a lot of ground, from understanding the tool’s features to exploring advanced uses and troubleshooting. Let’s recap the key points we have learned throughout this guide:
The Ryobi Rotary Tool is a versatile and powerful tool that can handle a wide range of tasks and projects. Its compact design, interchangeable accessories, and adjustable speed control make it a valuable addition to any toolbox.
Safety should always be a priority when using the rotary tool. Prioritize wearing protective gear, secure your workspace, and follow the manufacturer’s safety guidelines to prevent accidents and injuries.
Setting up the rotary tool involves choosing the right workspace, ensuring a compatible power source, attaching accessories securely, and adjusting the speed for different tasks.
Choosing the right accessories is crucial for achieving optimal results. Consider the task, material compatibility, size and shape, quality, versatility, and user reviews when selecting accessories for your projects.
Mastering the basic techniques is essential for using the rotary tool effectively. Practice your grip and control, and learn the techniques for grinding, sanding, cutting, engraving, polishing, and drilling.
Once you’ve grasped the basics, you can explore advanced uses and applications such as intricate engraving, carving, jewelry making, etching, furniture restoration, electronics modification, automotive repair, and various art and craft projects.
To keep your rotary tool in top shape, perform regular maintenance and cleaning. Clean the tool after each use, inspect the power cord, clear the vents, check the accessories, and store the tool properly.
When encountering common issues, troubleshoot them by checking the power source, accessory tightness, alignment, and condition. Seek professional help if needed.
With all this knowledge at your disposal, you are now well-equipped to unleash your creativity and craftsmanship with the Ryobi Rotary Tool. Whether you are a DIY enthusiast or a professional, this versatile tool will assist you in accomplishing a wide range of tasks with precision and confidence.
Remember, each project and task is an opportunity to sharpen your skills and explore new possibilities. Embrace the versatility of the Ryobi Rotary Tool, stay curious, and let your creativity flourish.
Thank you for joining us in this journey of mastering the Ryobi Rotary Tool. Happy crafting!
Frequently Asked Questions about How To Use Ryobi Rotary Tool
Was this page helpful?
At Storables.com, we guarantee accurate and reliable information. Our content, validated by Expert Board Contributors, is crafted following stringent Editorial Policies. We're committed to providing you with well-researched, expert-backed insights for all your informational needs.


0 thoughts on “How To Use Ryobi Rotary Tool”