Home>Articles>What Do I Need To Hook Up An Outdoor Showerhead To A Hose?
Articles
What Do I Need To Hook Up An Outdoor Showerhead To A Hose?
Modified: October 20, 2024
Discover the essentials for connecting an outdoor showerhead to a hose. Read our informative articles to learn what you'll need for a refreshing outdoor shower experience.
(Many of the links in this article redirect to a specific reviewed product. Your purchase of these products through affiliate links helps to generate commission for Storables.com, at no extra cost. Learn more)
Introduction
Adding an outdoor shower to your backyard or patio area is a fantastic way to enjoy the refreshing feeling of a cool shower in the open air. Whether you want to rinse off sand after a trip to the beach, cool down after a workout, or simply indulge in a unique bathing experience, setting up an outdoor shower can provide you with convenience and relaxation.
One of the key components of an outdoor shower is the hose connection. The hose allows you to bring water from a nearby source to the showerhead, enabling you to enjoy a steady flow of water. In this article, we will guide you through the process of hooking up an outdoor showerhead to a hose.
Before we dive into the steps, let’s take a look at the basic materials you will need for this project.
Key Takeaways:
- Enjoy the convenience and relaxation of an outdoor shower by selecting a durable showerhead and hose, ensuring a secure connection, and testing the water flow for optimal performance.
- Embrace the refreshing experience of an outdoor shower in your backyard, complete with stable installation, water-saving features, and proper water conservation practices.
Basic Materials
To hook up an outdoor showerhead to a hose, you will need the following materials:
- A showerhead: Choose a showerhead that is specifically designed for outdoor use to withstand the elements. Look for a model with a water-saving feature to conserve water.
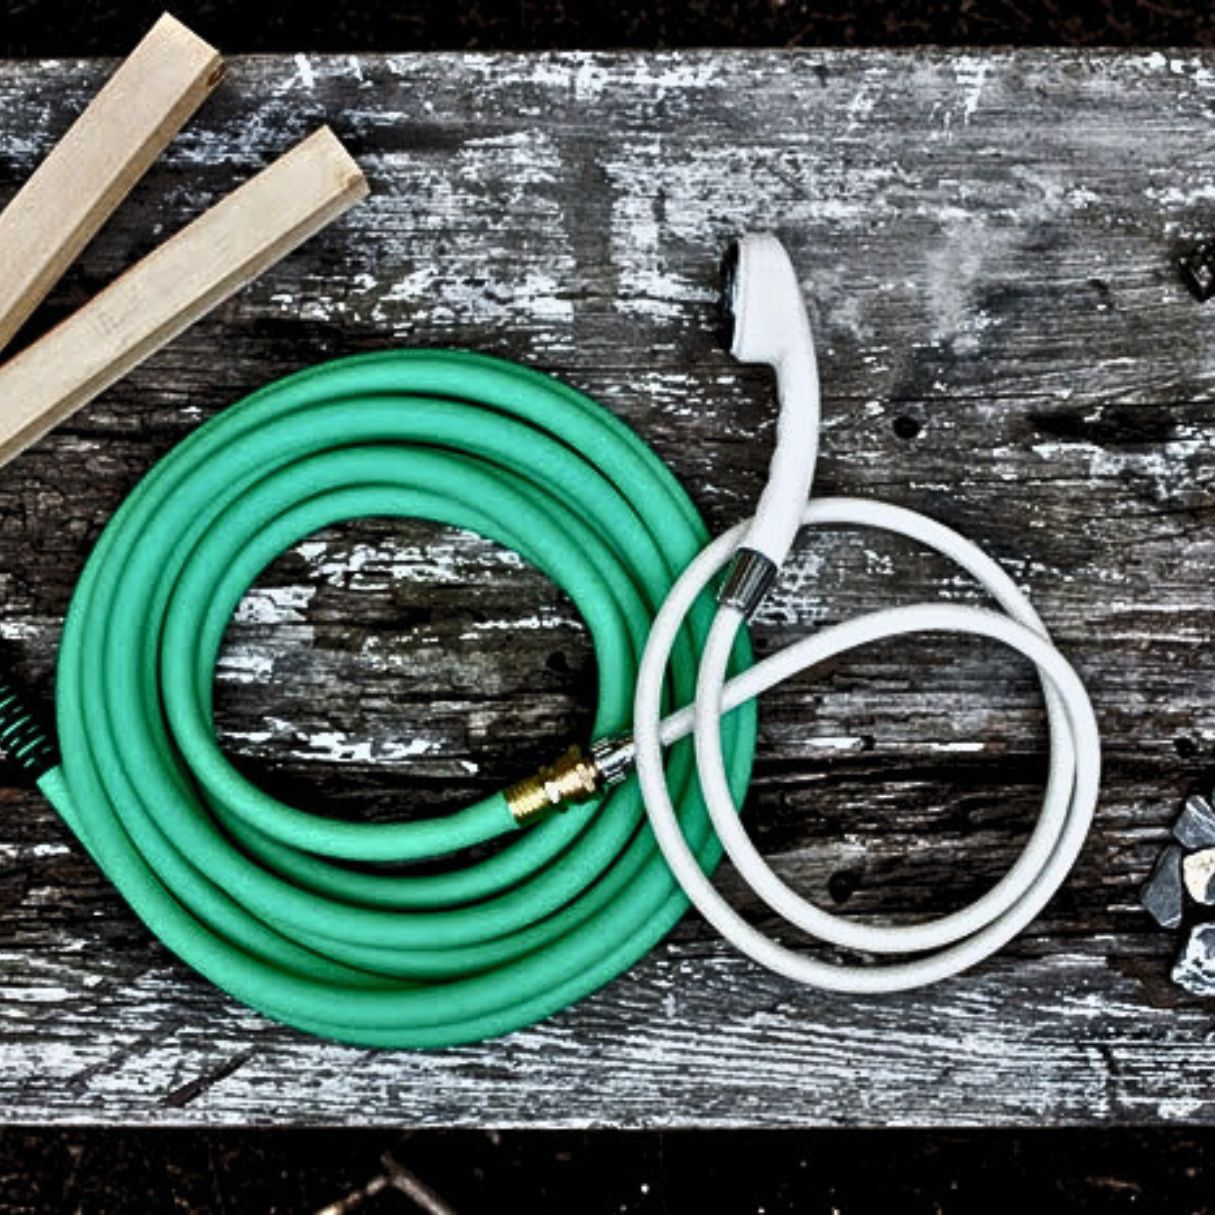
- A garden hose: Select a hose that is long enough to reach from the water source to the shower area. Consider the material of the hose, such as rubber or reinforced vinyl, to ensure durability.
- A hose connector: This connector will be used to attach the hose to the showerhead. It should have the appropriate size and threading to fit both the showerhead and the hose.
- A showerhead holder: This is a mounting bracket or hook that will keep the showerhead in place. Look for a holder that is suitable for outdoor use and can be securely attached to a wall or post.
- Teflon tape: This tape will help create a watertight seal between the showerhead and the hose connector. It is essential for preventing any leaks.
- Adjustable wrench or pliers: These tools will be necessary for tightening and securing the hose connector and showerhead.
- A water source: You will need access to a water source, such as an outdoor faucet or a nearby hose spigot.
With these basic materials in hand, you are ready to begin the process of hooking up your outdoor showerhead to a hose. The following steps will guide you through the installation process.
Step 1: Choosing a Showerhead
The first step in hooking up an outdoor showerhead to a hose is selecting the right showerhead. It’s important to choose a showerhead that is specifically designed for outdoor use, as it will be exposed to the elements.
When selecting a showerhead, consider the following factors:
- Material: Look for a showerhead that is made from durable materials such as stainless steel, brass, or plastic that is designed to withstand outdoor conditions.
- Water-saving feature: Opt for a showerhead with a water-saving feature to help conserve water. This is especially important if you plan to use the outdoor shower regularly.
- Spray pattern: Decide on the desired spray pattern for your showerhead. Whether you prefer a gentle rain-like shower or a more powerful spray, choose a showerhead that meets your preferences.
- Mounting options: Consider how you want to mount the showerhead. Some showerheads come with adjustable brackets or hooks that can be mounted on a wall or post, while others may need to be attached to a fixed structure.
Take your time to research and find a showerhead that suits your needs and preferences. Once you have chosen a showerhead, you are ready to move on to the next step of the installation process.
Step 2: Selecting a Hose
After choosing a suitable outdoor showerhead, the next step is to select the right hose to connect it to the water source. Consider the following factors when selecting a hose:
- Length: Determine the distance between the water source and the shower area to choose a hose with the appropriate length. Ensure that the hose is long enough to reach without any tension or strain.
- Material: Opt for a hose made of durable materials such as rubber or reinforced vinyl. These materials are resistant to UV rays, moisture, and outdoor elements, making them suitable for prolonged outdoor use.
- Diameter: Check the diameter of the hose to ensure a strong and consistent water flow. A hose with a larger diameter will allow for better water pressure.
- Flexibility: Look for a hose that is flexible and easy to maneuver. This will make it simpler to position the showerhead and adjust the water flow as desired.
- Compatibility: Ensure that the hose has the proper fittings and connections to attach to the showerhead and the water source. Consider the threading and size requirements to ensure a tight and secure fit.
Take into consideration your specific needs and the layout of your outdoor shower area when selecting a hose. Measure the distance and determine the ideal hose length, and choose a hose that is made of durable materials to withstand outdoor conditions.
Once you have selected a hose, it’s time to move on to the next step of the installation process, which involves connecting the hose to the showerhead.
Step 3: Hose Connection Options
With the showerhead and hose selected, the next step is to connect the hose to the showerhead. There are a few different hose connection options available, depending on the design of the showerhead and your personal preference.
Here are some common hose connection options:
- Direct connection: Some showerheads have a built-in connector that allows you to attach the hose directly without any additional adapters. Simply screw the hose onto the showerhead until it is tight and secure.
- Hose connector adapter: If your showerhead does not have a built-in connector, you can use a hose connector adapter. This adapter typically screws onto the showerhead, providing a connection point for the hose. Ensure that the adapter is compatible with both the showerhead and the hose.
- Quick-connect system: Another option is to use a quick-connect system, which allows you to easily attach and detach the hose from the showerhead. This system typically involves two separate pieces—a male connector that attaches to the showerhead and a female connector that attaches to the hose. The connectors can then be quickly and securely connected and disconnected.
Choose the hose connection option that best fits your showerhead and personal preference. Make sure to tighten the connection securely to prevent any leaks or water loss.
Once the hose is connected to the showerhead, you’re ready to move on to the next step and install a showerhead holder for added convenience and stability.
You will need a hose with a threaded end, an outdoor showerhead with a compatible thread size, and possibly a hose adapter if the showerhead and hose have different thread sizes. Make sure to use waterproof tape to secure the connections and prevent leaks.
Read more: How To Hook Up A Washer Drain Hose
Step 4: Installing a Showerhead Holder
To ensure stability and convenience, it is recommended to install a showerhead holder for your outdoor shower. This holder will keep the showerhead securely in place, allowing you to adjust the height and angle as needed. Here’s how to install a showerhead holder:
- Select a suitable location: Choose a location on a wall, post, or other sturdy structure near the shower area. Make sure it is within reach of the hose and provides easy access to the showerhead.
- Prepare the surface: Clean the chosen surface and ensure it is dry and free from any debris. Use a level to ensure the holder will be installed straight and level.
- Mark the position: Hold the showerhead holder against the wall or post, and use a pencil or marker to mark the screw holes for installation. Make sure to space the marks according to the holes on the holder.
- Drill pilot holes: Use an appropriate-sized drill bit to create pilot holes in the marked locations. This will make it easier to screw in the screws and prevent any damage to the surface.
- Mount the holder: Align the screw holes on the holder with the pilot holes, and use a screwdriver or drill to screw in the screws until the holder is secure.
- Test the stability: Give the holder a gentle tug to ensure it is firmly attached to the wall or post. Adjust and tighten the screws if necessary.
Installing a showerhead holder will provide you with a stable and easily adjustable showerhead position. It will enhance the overall functionality and convenience of your outdoor shower experience.
Now that the showerhead holder is installed, it’s time to move on and attach the hose to the showerhead.
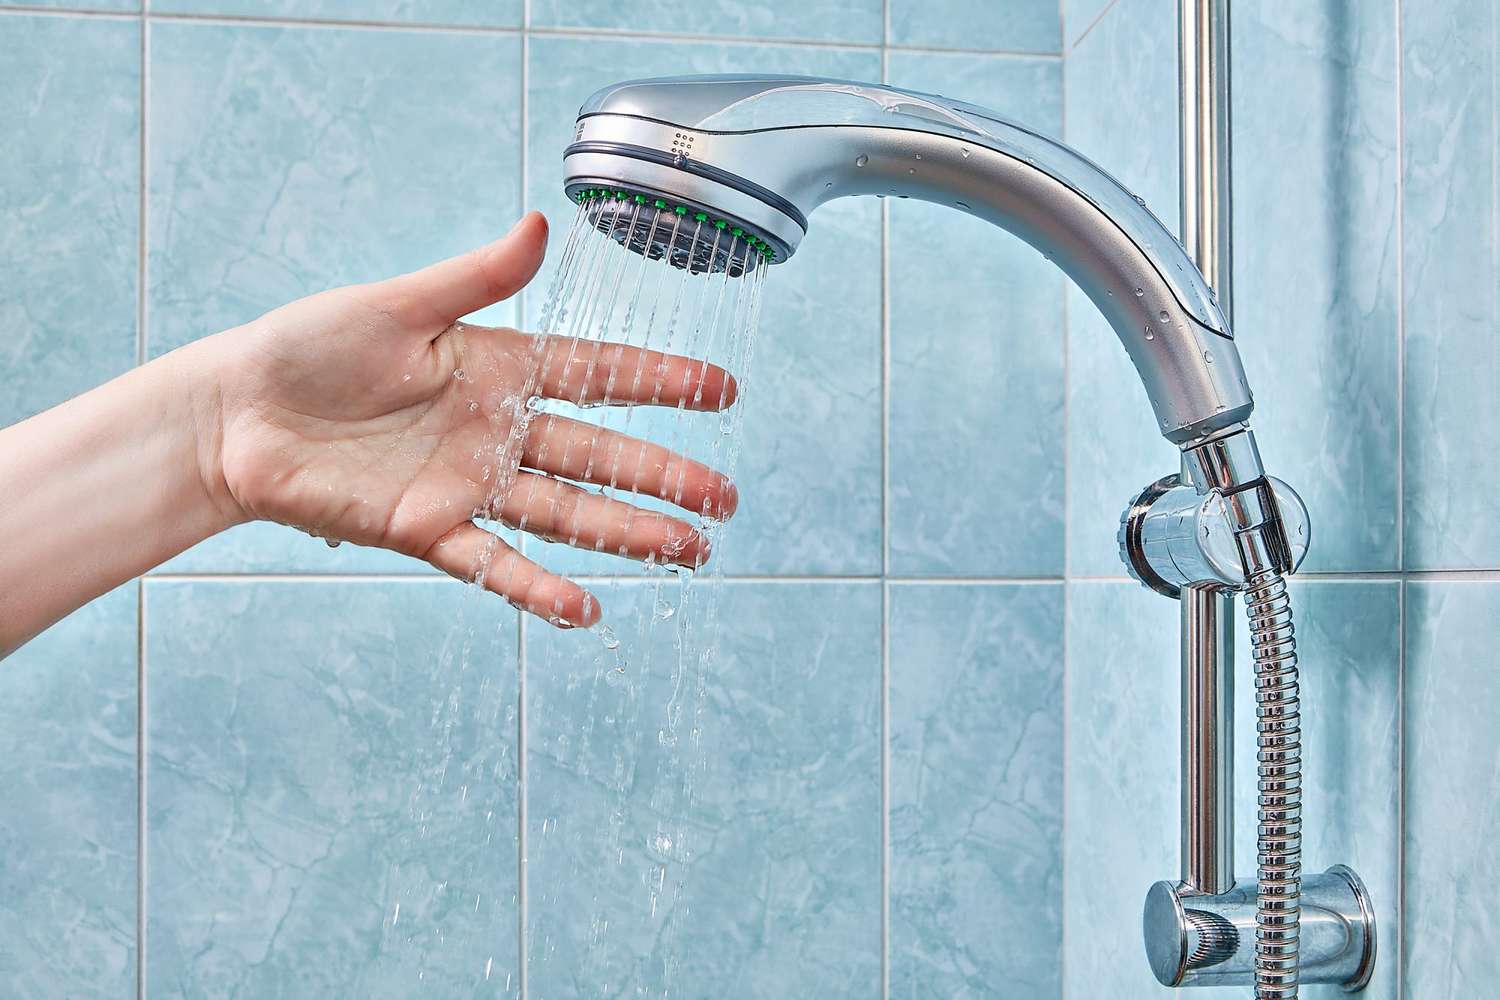
Step 5: Attaching the Hose to the Showerhead
Now that the showerhead holder is in place, it’s time to attach the hose to the showerhead. Follow these steps to ensure a secure and leak-free connection:
- Wrap Teflon tape around the threads: Take the end of the hose that will be connected to the showerhead and wrap a few layers of Teflon tape around the threads. This will help create a watertight seal and prevent any leaks.
- Screw on the hose connector: Take the end of the hose with the Teflon tape and screw it onto the showerhead connector. Twist it in a clockwise direction until it is tight and secure. Use an adjustable wrench or pliers to tighten it further if needed, but be careful not to overtighten and risk damaging the connection.
- Check for leaks: Once the hose is attached, turn on the water supply. Look for any signs of leaks around the connection between the showerhead and the hose. If you notice any leaks, double-check that the connection is tightly secured and make any necessary adjustments.
By properly attaching the hose to the showerhead, you ensure a steady water flow without any leaks or water loss. With this step complete, you’re almost ready to start using your outdoor shower. The next step involves connecting the other end of the hose to a water source.
Step 6: Attaching the Other End of the Hose to a Water Source
With the hose securely attached to the showerhead, the next step is to connect the other end of the hose to a water source. Whether you have an outdoor faucet or a nearby hose spigot, here’s how you can do it:
- Determine the water source: Identify the closest outdoor faucet or hose spigot that you will be using as the water source for your outdoor shower. Ensure that it is accessible and in working condition.
- Inspect the water source connection: Check the connection point on the water source to ensure it is clean and free from any debris. If there is an existing hose attached, disconnect it before proceeding.
- Attach the hose to the water source: Take the other end of the hose, without the showerhead, and connect it to the water source. Again, make sure to twist it in a clockwise direction until it is tightly secured. Use an adjustable wrench or pliers if necessary, but be cautious not to overtighten.
- Turn on the water supply: Once the hose is attached, turn on the water supply slowly to avoid any sudden pressure surges. Check for any leaks or drips at the connection point, and tighten it if needed.
By properly attaching the other end of the hose to a water source, you ensure a steady water supply to your outdoor shower. Take a moment to inspect the connection for any leaks before moving on to the final step of the installation process.
Step 7: Testing the Water Flow
With everything connected, it’s time to test the water flow in your outdoor shower. This step is crucial to ensure that the showerhead, hose, and water source are functioning properly. Here’s how you can test the water flow:
- Position the showerhead: Adjust the position and angle of the showerhead in the holder to your desired height and coverage area.
- Turn on the water supply: Slowly turn on the water supply from the outdoor faucet or hose spigot. Allow the water to flow through the hose and into the showerhead.
- Check the water flow: Examine the water flow from the showerhead. Ensure that the water is flowing evenly with the desired pressure and spray pattern. Make sure there are no leaks or drips along the hose or showerhead connection.
- Adjust and fine-tune: If needed, adjust the showerhead position, water flow, or spray pattern to your preference. Ensure that the water flow is consistent and comfortable for your outdoor shower experience.
By carefully testing the water flow, you can identify and address any issues such as leaks, low pressure, or uneven spray patterns. Make any necessary adjustments or tighten any connections to achieve optimal performance.
Once you are satisfied with the water flow from your outdoor shower, congratulations! You have successfully hooked up your outdoor showerhead to a hose. Now you can enjoy the refreshing experience of an outdoor shower in the comfort of your own backyard.
Remember to follow proper water conservation practices and turn off the water supply when you are finished using the outdoor shower to prevent unnecessary water waste.
Conclusion
Setting up an outdoor shower can enhance your outdoor living space and provide a refreshing and convenient way to rinse off and cool down. By following the steps outlined in this article, you can easily hook up an outdoor showerhead to a hose and enjoy the benefits of an outdoor shower.
Starting with choosing a suitable showerhead designed for outdoor use, ensure durability, and water-saving features. Select a hose that is long enough, made of durable materials, and has the appropriate diameter for optimal water flow. Consider different hose connection options, such as direct connection or hose connector adapters, to attach the hose to the showerhead securely.
Installing a showerhead holder adds stability and convenience to your outdoor shower experience. Connect the hose to the showerhead, ensuring a watertight seal with Teflon tape and tightening the connection securely. Attach the other end of the hose to a water source, such as an outdoor faucet or hose spigot, and test the water flow and pressure.
Throughout the installation process, be mindful of any leaks or drips and make any necessary adjustments. Ensure a consistent and comfortable water flow and adjust the showerhead position, spray pattern, or height as desired.
With your outdoor shower set up and functioning properly, you can now enjoy the invigorating experience of an outdoor shower in your own backyard. Remember to practice good water conservation habits and turn off the water supply when not in use.
Whether you’re rinsing off after a day at the beach, cooling down after a workout, or simply indulging in the novelty of an outdoor shower, having an outdoor showerhead hooked up to a hose adds both comfort and convenience to your outdoor living space.
So go ahead, embrace the outdoors, and enjoy the refreshing benefits of your new outdoor shower!
Frequently Asked Questions about What Do I Need To Hook Up An Outdoor Showerhead To A Hose?
Was this page helpful?
At Storables.com, we guarantee accurate and reliable information. Our content, validated by Expert Board Contributors, is crafted following stringent Editorial Policies. We're committed to providing you with well-researched, expert-backed insights for all your informational needs.


0 thoughts on “What Do I Need To Hook Up An Outdoor Showerhead To A Hose?”