Articles
Why Would Ceiling Fan Stop Working
Modified: October 19, 2024
Discover why your ceiling fan stops working and get helpful tips and articles to troubleshoot and fix the issue.
(Many of the links in this article redirect to a specific reviewed product. Your purchase of these products through affiliate links helps to generate commission for Storables.com, at no extra cost. Learn more)
Introduction
A ceiling fan is a vital component of many homes, providing comfort and airflow in hot and humid conditions. However, there may come a time when your ceiling fan suddenly stops working, leaving you frustrated and searching for answers. Understanding the common issues that can cause a ceiling fan to stop working is essential for troubleshooting and resolving the problem.
In this article, we will explore the various reasons why a ceiling fan may stop working and provide troubleshooting steps to help you regain functionality. By the end, you’ll have the knowledge and tools to diagnose and fix the issue, potentially saving you the cost of hiring a professional.
So, if you’re ready, let’s dive in and uncover the possible problems that may have caused your ceiling fan to stop working.
Key Takeaways:
- Troubleshooting power supply, capacitor, motor, switches, and wiring can help identify and fix common issues causing a non-functional ceiling fan.
- Regular maintenance, such as cleaning, lubricating, and inspecting the fan, can prevent future problems and increase the fan’s lifespan.
Read more: Why Would My Air Conditioner Stop Working
Common Issues that Cause a Ceiling Fan to Stop Working
A ceiling fan can experience various problems that can lead to it not working properly. Here are some of the most common issues:
- Power Supply Problems: One of the primary reasons why a ceiling fan may stop working is a power supply issue. This can be caused by a tripped circuit breaker, a blown fuse, or loose electrical connections. It’s essential to check the power source, ensuring that it is supplying electricity to the fan.
- Faulty Capacitor: The capacitor is responsible for initiating the motor’s electric currents. If it malfunctions, the fan may not start or run at the desired speed. Signs of a faulty capacitor include a humming noise coming from the fan and the blades not spinning properly.
- Motor Issues: The motor is the core component of a ceiling fan, and any problems with it can cause the fan to stop working. Motor issues can range from worn-out bearings, a burnt-out motor, or a defective winding. If you hear strange noises, experience a burning smell, or notice the fan not spinning as it should, there may be a motor problem.
- Faulty Switches or Controls: The switches and controls on a ceiling fan enable you to turn it on or off, adjust the speed, and control the lighting (if applicable). If these switches or controls become faulty, the fan may not respond to your commands or may not turn on at all.
- Blade or Fan Assembly Problems: Issues with the blades or fan assembly can also cause a ceiling fan to stop working. Bent or misaligned blades can create an imbalance, leading to fan wobbling or even complete failure. Additionally, a loose or damaged fan assembly can hinder the fan’s proper functioning.
- Overheating: Just like any electrical appliance, ceiling fans can overheat if they are running for prolonged periods or if there is inadequate ventilation in the room. Overheating can cause the fan’s motor to shut down as a safety measure, preventing further damage. It’s crucial to give the fan time to cool down before operating it again.
- Wiring Problems: Faulty wiring can interrupt the electrical connection between the fan and the power supply, resulting in a non-functional ceiling fan. Loose, damaged, or improperly connected wires can cause the fan to stop working and may even pose a safety hazard. It’s important to inspect the wiring and address any issues promptly.
Now that we have identified the common issues that can cause a ceiling fan to stop working, let’s move on to the next section to find out how to troubleshoot and fix these problems.
Power Supply Problems
The first issue to investigate when your ceiling fan stops working is the power supply. Without a proper electrical connection, the fan will not function. Here are a few things to check:
- Check the Circuit Breaker: Start by examining the circuit breaker box. Look for any tripped breakers and if you find one, reset it by flipping it all the way off and then back on. It is not uncommon for a circuit breaker to trip due to a power surge or overload.
- Inspect the Fuse: If your ceiling fan has a fuse, which is commonly found in older models, check if it has blown. A blown fuse can be replaced, but make sure to use the correct amperage rating for the replacement fuse.
- Test Other Electrical Outlets: Plug in a different electrical device into the outlet where the fan is installed. If the device does not work, then the problem lies with the outlet, not the ceiling fan. In this case, you may need to call an electrician to fix the issue.
- Check the Wiring Connections: Inspect the wiring connections in the fan’s junction box and ensure that they are tightly secured. Loose or disconnected wires can disrupt the electrical flow, resulting in a non-functional fan.
- Call an Electrician: If you are unsure or uncomfortable dealing with electrical connections, it’s best to call a licensed electrician. They have the expertise to diagnose and fix power supply issues, ensuring that your ceiling fan is back up and running safely.
By troubleshooting power supply problems, you can often resolve the issue and get your ceiling fan working again. However, if the power supply is not the culprit, you may need to investigate other potential causes, such as a faulty capacitor or motor issues, which we will cover in the next sections.
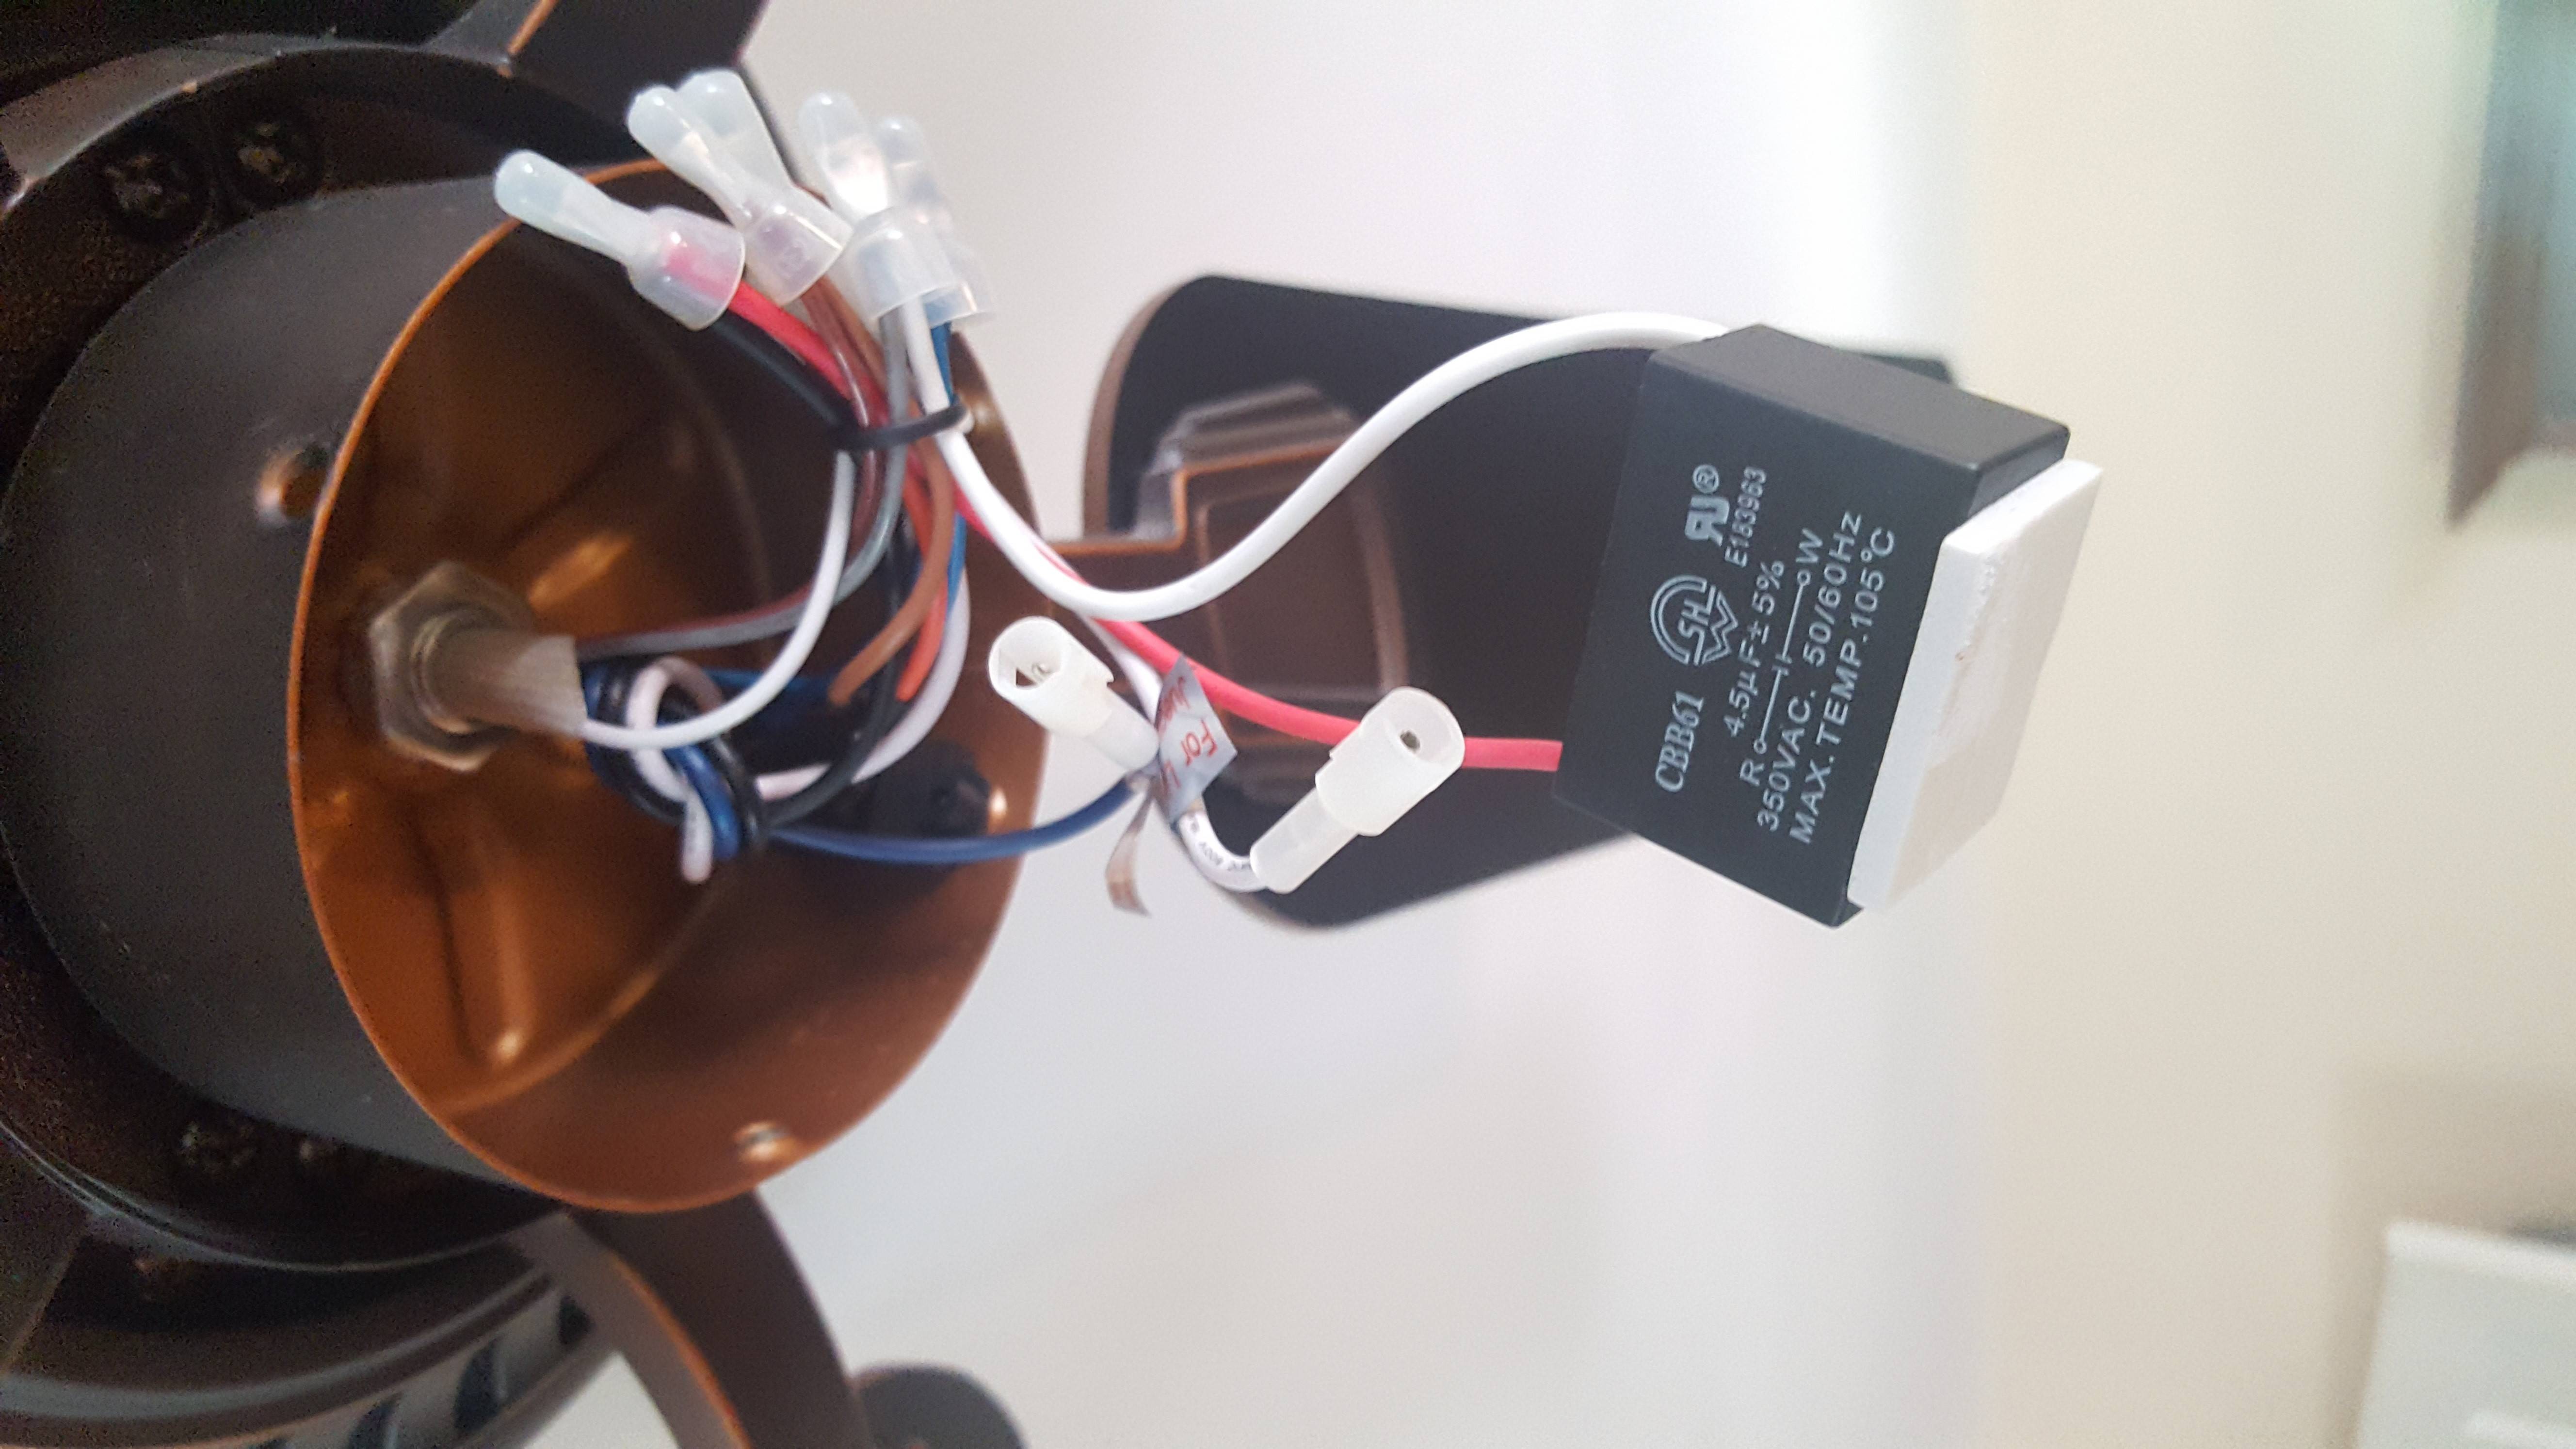
Faulty Capacitor
A faulty capacitor is another common reason why a ceiling fan may stop working. The capacitor is responsible for storing and releasing electrical energy to kick-start the motor. If it fails, the fan may not start or run at the desired speed. Here’s how to address a faulty capacitor:
- Identify the Capacitor: Locate the capacitor, which is usually found in the fan’s motor housing or attached to the motor itself. It is a cylindrical or oval-shaped component with wires connected to it.
- Visually Inspect the Capacitor: Carefully examine the capacitor for any visible signs of damage, such as bulging, leaking, or burning marks. These signs indicate that the capacitor is faulty and needs to be replaced.
- Test the Capacitor: If no visible damage is found, you can use a multimeter to test the capacitor’s functionality. Set the multimeter to the capacitance (F) or microfarad (µF) range and place the probes on the appropriate terminals of the capacitor. If the reading is significantly lower than the rated capacitance or there is no reading at all, the capacitor is likely defective.
- Replace the Capacitor: If the capacitor is found to be faulty, you will need to replace it. Make note of the specifications (voltage rating, capacitance value) and purchase an exact replacement from a hardware store or online. Ensure that the new capacitor matches the old one in terms of size and electrical characteristics.
- Safety Precautions: Before attempting any repairs, always turn off the power to the fan at the circuit breaker or fuse box. Capacitors can store an electrical charge, so it’s crucial to discharge it by touching the terminals with an insulated screwdriver to prevent any electric shock.
If you are uncomfortable replacing the capacitor yourself or not confident in your electrical knowledge, it’s best to seek the assistance of a professional electrician or a ceiling fan technician. They can accurately diagnose the capacitor issue and safely replace it, ensuring that your ceiling fan resumes optimal functionality.
Next, we will explore motor issues, which can also lead to a ceiling fan not working as it should.
Motor Issues
The motor is the heart of a ceiling fan, and any problems with it can cause the fan to stop working or operate inefficiently. Here are some motor-related issues to consider:
- Worn-out Bearings: Over time, the bearings inside the motor can wear out, leading to decreased performance or a completely non-functional fan. Signs of worn-out bearings include excessive noise, grinding sounds, or the fan not spinning smoothly. In such cases, the motor may need to be lubricated or replaced.
- Burnt-out Motor: Motors can overheat due to prolonged use, power surges, or electrical issues. A burnt-out motor will often emit a burning smell or cease to function altogether. If the motor is damaged beyond repair, replacing it may be necessary to restore the fan’s functionality.
- Defective Winding: The winding in a motor consists of electromagnets that generate the necessary magnetic field to rotate the fan blades. If the winding becomes damaged or faulty, the motor may not operate properly. This issue typically requires professional repair or motor replacement.
- Noise or Vibration: Excessive noise or vibration during operation can indicate an issue with the motor. Loose components, misalignment, or unbalanced fan blades can cause these disturbances. Tightening loose parts or realigning the motor can resolve the problem, but if the issue persists, further inspection or motor replacement may be required.
- Professional Assistance: Diagnosing and addressing motor issues can be complex, especially if you’re not familiar with electrical components. It’s advisable to seek the help of a professional technician who specializes in ceiling fan repair. They can accurately diagnose and perform repair or replacement tasks, ensuring that your ceiling fan operates smoothly once again.
Motor issues can arise due to various factors, including wear and tear, electrical problems, or manufacturing defects. By identifying and addressing these problems, you can restore your ceiling fan’s functionality and enjoy the benefits of improved airflow and comfort.
Next, we will explore issues related to faulty switches or controls, which can also cause a ceiling fan to stop working.
Read more: How A Ceiling Fan Works
Faulty Switches or Controls
The switches and controls on a ceiling fan allow you to turn it on or off, adjust the speed, and control any lighting features. If these switches or controls become faulty, the fan may not respond to your commands or may not turn on at all. Here’s what you can do to address this issue:
- Check the Wall Switch: Start by checking the wall switch that controls the fan. Ensure that it is properly turned on and that the breaker for the switch is not tripped. If the wall switch is not supplying power to the fan, it may need to be replaced or repaired.
- Inspect the Pull Chain Switch: If your ceiling fan has a pull chain switch, examine it for any damage or signs of wear. Sometimes, the chain can become tangled or broken, preventing the fan from operating. Replace the pull chain switch if necessary, ensuring that you match the new switch to the existing one in terms of functionality and wiring.
- Test Remote Control or Wall Control: If your ceiling fan operates using a remote control or wall control, troubleshoot these devices. Replace the batteries in the remote control and ensure proper connectivity between the remote and the fan. If using a wall control, check for loose connections and ensure that it is receiving power. If needed, reprogram the remote or replace faulty control units.
- Consider Replacement: If you have identified a faulty switch or control and it cannot be repaired, you may need to replace it. Consult the fan’s manual or contact the manufacturer to find the appropriate replacement parts. It’s important to ensure that the new switches or controls are compatible with your specific ceiling fan model.
- Consult a Professional: If you’re unsure about diagnosing or replacing faulty switches or controls, or if these troubleshooting steps did not resolve the issue, it may be best to consult a professional electrician or a ceiling fan technician. They have the expertise to identify and fix faulty switches or controls, ensuring that your ceiling fan operates smoothly.
By addressing issues related to faulty switches or controls, you can restore the proper functionality of your ceiling fan and regain control over its operation. However, if the switches and controls are not the cause of the problem, there may be other components, such as the blade or fan assembly, that require inspection and potential repair.
Next, we will discuss the potential problems related to the blade or fan assembly that can cause a ceiling fan to stop working.
Blade or Fan Assembly Problems
The blades and fan assembly of a ceiling fan play a crucial role in ensuring proper airflow and smooth operation. Issues with these components can result in a non-functional or poorly functioning fan. Let’s explore some common problems related to the blade or fan assembly:
- Bent or Misaligned Blades: Over time, the blades of a ceiling fan can become bent or misaligned, leading to imbalances that cause wobbling during operation. This can result in excessive noise and vibration, and in some cases, the fan may stop working altogether. Gently straighten any bent blades and ensure they are properly aligned for smooth operation.
- Loose Blade Screws: Check the screws that attach the blades to the fan’s motor housing. Loose screws can cause the blades to wobble and may lead to the fan not working properly. Ensure that all the screws are tightly secured, but be careful not to overtighten them, as it can damage the blade or motor housing.
- Faulty Fan Assembly: The fan assembly includes various components such as the motor, housing, and internal wiring. If any of these elements become damaged or defective, it can impact the fan’s functionality. Inspect the fan assembly for any visible signs of damage, and if found, consult a professional for repair or replacement.
- Balance Issues: A poorly balanced fan can cause it to stop working or operate inefficiently. Use a fan balancing kit to identify and correct any balance issues. This typically involves adding or removing weighted clips or adjusting the placement of the blades to ensure optimal balance and smooth rotation.
- Fan Blade Reversal Switch: Some ceiling fans have a blade reversal switch that allows the fan to operate in a clockwise or counterclockwise direction. If the fan has stopped working, check that the switch is in the correct position for the desired rotation. This simple oversight can sometimes be the cause of the problem.
If issues with the blades or fan assembly persist despite the troubleshooting steps mentioned above, it may be necessary to consult a professional or contact the manufacturer for further assistance. They can provide the expertise required to diagnose and resolve these problems, ensuring that your ceiling fan is in optimal working condition.
Next, we will explore the issue of overheating and how it can cause a ceiling fan to stop working.
Overheating
Overheating is a common issue that can cause a ceiling fan to stop working or shut down unexpectedly. It is important to address overheating promptly to prevent damage to the motor and ensure the fan’s proper functioning. Here’s what you need to know about dealing with overheating:
- Check the Fan’s Operating Time: Evaluate how long the fan has been operating continuously. Ceiling fans are designed to run for extended periods, but prolonged use can put stress on the motor and other components, leading to overheating. If the fan has been running for several hours, consider turning it off and allowing it to cool down.
- Ensure Adequate Ventilation: Insufficient ventilation in the room can contribute to the fan overheating. Check if the room has proper airflow, especially if it is a small or enclosed space. Opening windows, using a fan to circulate air, or installing a ventilation system can help dissipate heat and prevent overheating issues.
- Clean the Fan and Motor: Dust accumulation on the fan blades, motor, and vents can impede proper airflow and contribute to overheating. Regularly clean the fan and motor using a soft cloth or brush to remove dust and debris. Be sure to follow the manufacturer’s instructions for cleaning to avoid damaging any sensitive components.
- Inspect and Clean the Motor Bearings: Over time, the motor bearings can accumulate dirt and lose their lubrication, leading to friction and overheating. Carefully inspect the motor bearings and clean them using a mild solvent and lubricate them with a few drops of lightweight oil. This will help reduce friction and heat buildup within the motor.
- Consider a Motor Upgrade: In some cases, the ceiling fan’s motor may not be able to handle the load or operate efficiently, leading to overheating. If you frequently encounter overheating issues, it may be worth considering upgrading the motor to a more powerful and efficient model. Consult with a ceiling fan technician or an electrician for advice on suitable motor upgrades.
By addressing overheating issues, you can prevent motor damage and ensure the optimal performance of your ceiling fan. However, if the problem persists or if you suspect there may be underlying electrical issues, it is recommended to seek the assistance of a professional electrician or a ceiling fan technician.
Next, we will explore the potential wiring problems that can cause a ceiling fan to stop working.
Wiring Problems
Faulty or damaged wiring can disrupt the electrical connection between the ceiling fan and the power supply, resulting in a non-functional or malfunctioning fan. Here are some wiring issues that can cause a ceiling fan to stop working:
- Loose or Poorly Connected Wires: Inspect the wiring connections within the fan’s junction box and ensure that all wires are tightly secured. Loose or improperly connected wires can interrupt the flow of electricity, leading to a non-functional fan. Carefully tighten any loose connections and verify that each wire is securely fastened.
- Damaged or Frayed Wires: Examine the fan’s wiring for any signs of damage, such as frayed or exposed wires. Damaged wires can cause a short circuit or electrical arcing, leading to a loss of power or even a potential fire hazard. If you find any damaged wires, they should be repaired or replaced by a qualified professional.
- Incorrect Wiring: If you recently installed or replaced the ceiling fan, it’s possible that the wiring was not done correctly. Double-check that the wires are connected to the appropriate terminals in accordance with the fan’s wiring instructions. Incorrect wiring can prevent the fan from functioning properly. If in doubt, consult an electrician for guidance.
- Tripped GFCI Outlet: If your ceiling fan is installed in a bathroom, kitchen, or outdoor area, it may be connected to a Ground Fault Circuit Interrupter (GFCI) outlet. If the GFCI outlet trips, the ceiling fan may lose power. Locate the GFCI outlet and reset it by pressing the “Reset” button. This should restore power to the ceiling fan (and other GFCI-protected outlets if applicable).
- Circuit Overload: If the ceiling fan is connected to a circuit that is already overloaded with other electrical devices, it may cause the fan to stop working. This can happen if the circuit is unable to handle the combined electrical load. Consider redistributing the electrical load on different circuits or consult an electrician to upgrade the wiring to support the fan’s power requirements.
It’s important to exercise caution when dealing with electrical components. If you are unsure about any wiring problems or uncomfortable working with electrical connections, it is recommended to seek the help of a professional electrician. They have the expertise and knowledge to diagnose and fix wiring issues safely and accurately.
Now that we have explored the different issues that can cause a ceiling fan to stop working, let’s proceed to the next section, where we will outline troubleshooting steps to help you fix a non-functional ceiling fan.
Check the power supply to the fan, including the circuit breaker and wall switch. If the power supply is fine, the issue may be with the fan’s motor or capacitor, which may need to be replaced.
Read more: How To Stop A Ceiling Fan From Squeaking
Troubleshooting Steps to Fix a Ceiling Fan that has Stopped Working
If your ceiling fan has stopped working, there are several troubleshooting steps you can take to identify and resolve the issue. Follow these steps to get your fan back up and running:
- Step 1: Checking the Power Supply: Start by verifying that the fan is receiving power. Check the circuit breaker to ensure it is not tripped. If necessary, reset it. Additionally, inspect the fuse (if applicable) and test other electrical outlets to confirm that the power supply is not the problem.
- Step 2: Inspecting the Capacitor: Move on to inspecting the capacitor. Look for any visible signs of damage such as bulging, leaking, or burning marks. If the capacitor appears faulty, it may need to be replaced.
- Step 3: Examining the Motor: Proceed to examine the motor for any damage or issues. Look for signs of overheating, such as a burning smell or excessive heat. Also, check for loose connections and make sure the motor is properly lubricated.
- Step 4: Verifying Switches and Controls: Ensure that the switches and controls are functioning correctly. Check the wall switch, pull chain switch, remote control, or wall control for any damage or loose connections. Replace or repair any faulty switches or controls as needed.
- Step 5: Inspecting the Blade or Fan Assembly: Inspect the blades for any bending, misalignment, or loose screws. Straighten any bent blades and tighten loose screws. Also, examine the overall fan assembly for any visible damage or issues that could hinder proper operation.
- Step 6: Addressing Overheating Issues: If you suspect overheating, allow the fan to cool down for some time. Ensure proper ventilation in the room and clean any dust or debris from the fan and motor to improve airflow and prevent overheating.
- Step 7: Checking the Wiring: Finally, inspect the wiring connections within the fan’s junction box. Verify that all wires are securely connected and not damaged or frayed. Ensure that the wiring is done correctly and that the circuit is not overloaded.
If you have gone through these troubleshooting steps and the issue persists, it may be necessary to consult a professional electrician or a ceiling fan technician. They have the expertise and specialized equipment to diagnose and fix more complex problems with your ceiling fan.
Remember, safety should always be your top priority when dealing with electrical components. If you’re unsure or uncomfortable with any step of the troubleshooting process, do not hesitate to seek professional assistance.
Now that we have covered the troubleshooting steps, let’s conclude the article.
Checking the Power Supply
When your ceiling fan stops working, the first step in troubleshooting is to check the power supply. Power supply problems can easily cause a fan to lose functionality. Follow these steps to check the power supply:
- Inspect the Circuit Breaker: Start by locating the circuit breaker panel in your home. Check if any breakers related to the fan’s circuit are tripped. A tripped breaker will often be in the “off” position or somewhere between “off” and “on.” If you find a tripped breaker, switch it fully off and then back on to reset it.
- Check Other Outlets in the Room: Plug in a different electrical device, such as a lamp or phone charger, into the same outlet as your fan. If the device does not receive power, it indicates a problem with the outlet or the power source. You may need to reset a GFCI outlet if applicable or consult an electrician to address the issue.
- Inspect the Fan’s Power Cord: Examine the power cord connected to the fan for any visible damage or frayed wires. If the cord seems damaged or is not securely plugged into the wall outlet, it could be the cause of the power issue. Replace the power cord if necessary or ensure a proper connection to the power source.
- Verify the Wall Switch: If your fan is controlled by a wall switch, ensure that it is in the “on” position. Sometimes, the switch can accidentally be turned off, causing the fan to stop working. Make sure the switch is fully engaged and supplying power to the fan.
- Consider the Remote Control Batteries: If your fan operates with a remote control, check the batteries. Weak or dead batteries can prevent the fan from responding to remote commands. Replace the batteries and ensure a strong connection between the remote and the fan receiver.
By thoroughly checking the power supply, you can identify any issues that might be causing your ceiling fan to stop working. Addressing power supply problems can often resolve the issue and get your fan back up and running.
If the power supply is not the problem, proceed to the next troubleshooting step to inspect the capacitor, which can also contribute to a non-functional ceiling fan.
Inspecting the Capacitor
When troubleshooting a ceiling fan that has stopped working, it’s important to inspect the capacitor. The capacitor plays a crucial role in initiating the electrical currents that power the fan’s motor. If the capacitor is faulty or malfunctioning, it can prevent the fan from starting or running at the desired speed. Follow these steps to inspect the capacitor:
- Identify the Capacitor: The capacitor is a small cylindrical or oval-shaped component typically located in the fan’s motor housing or attached to the motor itself. It is responsible for providing the initial jolt of electrical energy to start the fan’s motor.
- Visually Inspect the Capacitor: Carefully examine the capacitor for any visible signs of damage or defects. Look for bulging, leaking, or any burning marks on the capacitor. These are indications that the capacitor is faulty and needs to be replaced.
- Test the Capacitor: If there are no visible signs of damage, you can further test the capacitor’s functionality using a multimeter. Set the multimeter to the capacitance (F) or microfarad (µF) range, and ensure the fan’s power is switched off. With the probes of the multimeter, touch the appropriate terminals on the capacitor. A reading close to the capacitance value specified on the capacitor should be displayed. If you get a significantly lower reading or no reading at all, the capacitor is likely defective.
- Replace the Capacitor: If the capacitor is found to be faulty, it is essential to replace it. Note down the specifications of the existing capacitor, including its voltage rating and capacitance value. Purchase a new capacitor with the same specifications from a hardware store or an online retailer. Ensure the replacement capacitor matches the dimensions and electrical characteristics of the original one.
- Safety Precautions: Before working on the capacitor, always turn off power to the fan at the circuit breaker or fuse box. Capacitors store electrical charge even when power is switched off, so it’s crucial to discharge it before handling. You can discharge the capacitor by using an insulated screwdriver to bridge the terminals and allow any stored charge to dissipate.
Inspecting the capacitor is an important troubleshooting step to determine if it is causing your ceiling fan to stop working. If you observe any signs of damage or if the capacitor fails the multimeter test, replacing it should restore proper functionality to your fan.
If the issue persists after inspecting the capacitor, proceed to the next step and examine the motor for any potential issues that may be causing the fan to malfunction.
Examining the Motor
If your ceiling fan has stopped working, it’s essential to examine the motor as it is the heart of the fan and can be a common source of problems. Here’s how to examine the motor to identify and potentially fix any issues:
- Visual Inspection: Begin by visually inspecting the motor. Look for any signs of damage, such as burnt or melted parts, loose connections, or accumulation of dust or debris. Pay close attention to the wiring connections and ensure they are intact and properly connected.
- Check for Overheating: If the motor feels excessively hot or emits a burning smell, it may be overheating. Overheating can occur due to prolonged use, lack of proper ventilation, or motor malfunction. In such cases, allow the motor to cool down before continuing any further troubleshooting.
- Test the Motor Windings: Using a multimeter set to the resistance (ohms) function, test the motor windings. Disconnect the power to the fan, then access the motor wiring and remove the connectors. Touch the multimeter probes to the appropriate motor terminals and check for continuity. Any significant deviation from the expected resistance values indicates a problem with the motor windings.
- Gently Rotate the Fan Blades: Attempt to rotate the fan blades by hand. If they don’t move smoothly or feel stuck, it could indicate a problem with the motor or bearings. Lubricating the motor bearings with a few drops of lightweight oil might help restore smooth operation. Remember to use a lubricant suitable for ceiling fan motors and follow the manufacturer’s instructions.
- Address Fan Motor Issues: If you have identified any motor-related issues, such as loose connections or damaged parts, try to address them accordingly. Tighten any loose connections, replace any faulty components if possible, or consult a professional if the motor’s condition is beyond repair.
Examining the motor can help you identify issues that may be preventing your ceiling fan from functioning correctly. By addressing any motor-related problems, such as loose connections or malfunctions, you may be able to repair the fan and restore its functionality.
If the motor examination does not uncover any apparent issues or if the fan still does not work after addressing them, move on to the next step and verify the switches and controls of your ceiling fan.
Read more: How Do Ceiling Fans Work
Verifying Switches and Controls
When troubleshooting a ceiling fan that has stopped working, it’s important to ensure that the switches and controls are functioning properly. Faulty switches or controls can prevent the fan from turning on or adjusting its speed. Here are the steps to verify the switches and controls:
- Wall Switch: Check the wall switch that controls the fan. Make sure it is in the “on” position and functioning correctly. Sometimes, the switch may appear to be on but isn’t making proper contact to complete the circuit. Toggle the switch several times to ensure it is making a firm connection.
- Pull Chain Switch: If your fan has a pull chain switch, inspect it for any damage, such as a broken chain or loose connections. Replace the pull chain switch if necessary, ensuring that it matches the original specifications of the fan.
- Remote Control or Wall Control: If your fan operates with a remote control or wall control, check the batteries in the remote and ensure they are functioning. Replace the batteries if needed. Verify that there is a proper connection between the remote control or wall control and the fan, ensuring that they are synced and communicating correctly.
- Receiver Unit: If your fan uses a remote control, it likely has a receiver unit that receives signals from the remote and relays them to the fan. Check the receiver unit for any loose or disconnected wires. Ensure that the receiver unit is securely connected to the wiring in the fan’s canopy or motor housing.
- Lights and Dimmer Switches: If your fan has lights or is connected to a dimmer switch, verify that the lights are functioning properly. Test the dimmer switch to ensure it is working correctly with the fan’s light settings. If there are issues with the lights, it could indicate a problem with the wiring or the light kit itself.
Verifying the switches and controls is an important step to determine if they are contributing to the fan’s malfunction. By ensuring that these components are in proper working order, you can eliminate potential issues and concentrate on other possible causes of the problem.
If the issue persists after verifying the switches and controls, continue to the next step and inspect the blades and fan assembly for any problems.
Inspecting the Blade or Fan Assembly
When troubleshooting a ceiling fan that has stopped working, it’s important to inspect the blades and fan assembly. Problems with the blades or fan assembly can cause the fan to be unbalanced or fail to function properly. Follow these steps to inspect the blade or fan assembly:
- Visual Inspection: Begin by visually inspecting the fan blades and assembly. Check for any visible signs of damage, such as cracks, chips, or warping. Pay close attention to any loose or misaligned parts and ensure that all screws and attachments are secure.
- Bent or Misaligned Blades: If you notice any bent or misaligned blades, straighten them carefully using gentle pressure. A fan blade balancing kit can also be used to adjust the balance by attaching weights to the blades as needed.
- Check Blade Screws: Examine the screws that attach the blades to the motor hub or blade holders. Ensure that all screws are tightly secured. Loose screws can cause imbalance and wobbling, leading to a non-functional fan. Carefully tighten any loose screws to ensure a secure attachment.
- Balance the Fan: Use a fan balancing kit to address any balance issues. The kit typically includes self-adhesive weights that can be attached to the blades. Start by placing a weight on one blade and turn the fan on. If the wobbling subsides, remove the weight and try another blade until the fan runs smoothly. Repeat this process until the fan is properly balanced.
- Inspect the Fan Assembly: Examine the overall fan assembly for any visible damage or problems. Check for loose parts, such as motor mounts or fan canopy, and tighten them if necessary. If you notice any significant damage or issues that you are unable to fix, consider consulting a professional for further assistance or potential repair or replacement.
Inspecting the blades and fan assembly is crucial for identifying any visible problems that could be affecting the functionality of your ceiling fan. By addressing issues such as misalignment, loose screws, or imbalance, you can restore the smooth operation of your fan.
If the issue persists after inspecting the blades and fan assembly, proceed to the next step and address any potential overheating issues that may be causing the fan to stop working.
Addressing Overheating Issues
When troubleshooting a ceiling fan that has stopped working, it’s important to consider overheating as a potential cause. Overheating can occur due to prolonged use, inadequate ventilation, or other factors, and can cause the fan to shut down for safety reasons. Follow these steps to address overheating issues:
- Allow the Fan to Cool Down: If the fan feels hot to the touch or emits a burning smell, immediately turn it off and allow it to cool down. In some cases, running the fan for extended periods without breaks can cause it to overheat. Give it ample time to cool down before attempting to use it again.
- Ensure Proper Ventilation: Lack of proper ventilation in the room can contribute to the fan overheating. Ensure that the room has sufficient airflow by opening windows, using fans to circulate air, or installing a ventilation system. Adequate ventilation helps dissipate heat and prevent the fan from overheating.
- Clean the Fan and Motor: Dust and debris can accumulate on the fan blades, motor, and vents, reducing airflow and causing overheating. Regularly clean the fan using a soft cloth or brush. Pay special attention to dust accumulation on the motor and vents. Clean any debris that may hinder proper airflow and ventilation.
- Lubricate the Motor: In some cases, lack of lubrication can cause the motor to overheat. Refer to the manufacturer’s instructions on how to lubricate the motor properly. Apply a few drops of lightweight oil to the motor’s lubrication ports or as instructed by the manufacturer to ensure smooth operation and prevent excessive friction.
- Properly Space Out Fan Usage: If you tend to use the fan continuously for long periods, consider giving it regular breaks to prevent overheating. Allow the fan to rest for a reasonable period before using it again. This helps prevent excessive heat buildup and prolongs the lifespan of the motor and other components.
By addressing overheating issues, you can prevent potential damage to the fan and ensure its proper functionality. Proper cooling and ventilation, regular cleaning, and maintenance can help keep the fan running smoothly and reduce the chances of overheating.
If the issue persists after addressing overheating concerns or you suspect there may be other underlying problems, proceed to the next step and inspect the wiring for potential issues.
Checking the Wiring
Checking the wiring is an essential step when troubleshooting a ceiling fan that has stopped working. Faulty or damaged wiring can disrupt the electrical connection and prevent the fan from functioning properly. Here’s how to check the wiring:
- Turn off Power: Before inspecting the wiring, ensure that the power to the fan is turned off at the circuit breaker or fuse box. This will prevent any chance of electric shock and ensure your safety during the inspection process.
- Inspect the Connections: Start by examining the wiring connections inside the fan’s junction box. Look for any loose or disconnected wires. Tighten any loose connections and ensure that all wires are securely attached to their respective terminals. Check for any signs of damage, such as frayed wires or burnt insulation, and address them accordingly.
- Verify the Switches: Test the switches and controls associated with the fan. Turn on the wall switch and check for any loose connections or faulty switches. Ensure that the wires connected to the switches are securely fastened. If necessary, replace the faulty switch with a new one that matches the original specifications.
- Check for Loose Junction Box: Verify that the junction box, which houses the wiring connections, is securely fastened to the ceiling. A loose junction box can cause the wiring inside to move around, potentially leading to loose or disconnected wires. Tighten any screws or mounting hardware to secure the junction box in place.
- Examine the Wiring Path: Inspect the wiring path from the fan to the ceiling and ensure that it is free from any entanglements or damage. Any sharp bends, pinches, or cuts in the wiring can disrupt the electrical flow. Carefully straighten any bent wires and use electrical tape or wire connectors to repair any damaged portions.
- Check for Circuit Overload: Assess whether the ceiling fan is connected to a circuit that may be overloaded with other electrical devices. An overloaded circuit can cause the fan to stop working as it cannot handle the additional load. Consider redistributing the electrical load on multiple circuits or consult an electrician to upgrade the wiring if needed.
Checking the wiring is crucial for identifying any issues that may be causing your ceiling fan to stop working. Ensure that all connections are secure, there is no damage to the wiring, and the wiring path is clear of any issues. If you are uncertain about any wiring-related problems or uncomfortable working with electrical components, it is always advisable to seek the assistance of a professional electrician.
Following these troubleshooting steps can help you identify and resolve common issues that cause a ceiling fan to stop working. However, if the problem persists or if you are unable to diagnose the issue, it is recommended to consult a professional electrician or a ceiling fan technician for further assistance.
With this comprehensive troubleshooting guide, you now have the knowledge and tools to address common issues and potentially repair your non-functional ceiling fan. Remember to prioritize safety and take appropriate precautions when working with electrical components.
Good luck with troubleshooting and getting your ceiling fan up and running again!
Read more: Why Did My Blender Stop Working
Conclusion
A ceiling fan that has stopped working can be frustrating, but with proper troubleshooting and maintenance, you can often diagnose and resolve the issue. By following the steps outlined in this guide, you can identify common problems that can cause a ceiling fan to malfunction, such as power supply issues, faulty capacitors, motor problems, defective switches or controls, blade or fan assembly issues, overheating, and wiring problems.
Start by checking the power supply, ensuring that the circuit breaker is not tripped and verifying the connections and components. Inspect the capacitor for signs of damage and test its functionality using a multimeter. Examine the motor for any visual issues, such as overheating or loose connections, and ensure that the blades and fan assembly are properly aligned and secured.
Verify the switches and controls, including wall switches, pull chain switches, and remote controls, to ensure they are functioning correctly. Address any overheating issues by allowing the fan to cool down, ensuring proper ventilation, and cleaning the fan and motor. Inspect the wiring for loose connections, damaged wires, or improper installation, and make necessary repairs or tighten any loose connections.
Remember to prioritize your safety throughout the troubleshooting process, and if you’re unsure or uncomfortable handling electrical components, it’s always best to seek the assistance of a professional electrician or a ceiling fan technician.
By systematically going through these troubleshooting steps, you can often pinpoint the cause of the problem and take appropriate measures to restore your ceiling fan to optimal functionality. Regular maintenance, such as cleaning, lubricating, and inspecting the fan, can also help prevent future issues and increase the lifespan of your ceiling fan.
With a little effort and attention to detail, you can enjoy the comfort and airflow provided by your ceiling fan once again. So, roll up your sleeves, dive into the troubleshooting process, and get ready to breathe new life into your non-working ceiling fan!
Got a ceiling fan that's giving you grief? Don't sweat it! For those ready to roll up their sleeves, our guide on ceiling fan repair provides step-by-step instructions to get your fan spinning again. And while you're up on that ladder, why not dive deeper into keeping your whole house in tip-top shape? Our comprehensive home maintenance checklist ensures everything under your roof stays in prime condition, saving you time and hassle down the road.
Frequently Asked Questions about Why Would Ceiling Fan Stop Working
Was this page helpful?
At Storables.com, we guarantee accurate and reliable information. Our content, validated by Expert Board Contributors, is crafted following stringent Editorial Policies. We're committed to providing you with well-researched, expert-backed insights for all your informational needs.


0 thoughts on “Why Would Ceiling Fan Stop Working”