Home>Dining>Table Decor>How Do I Make Balloon Centerpieces?
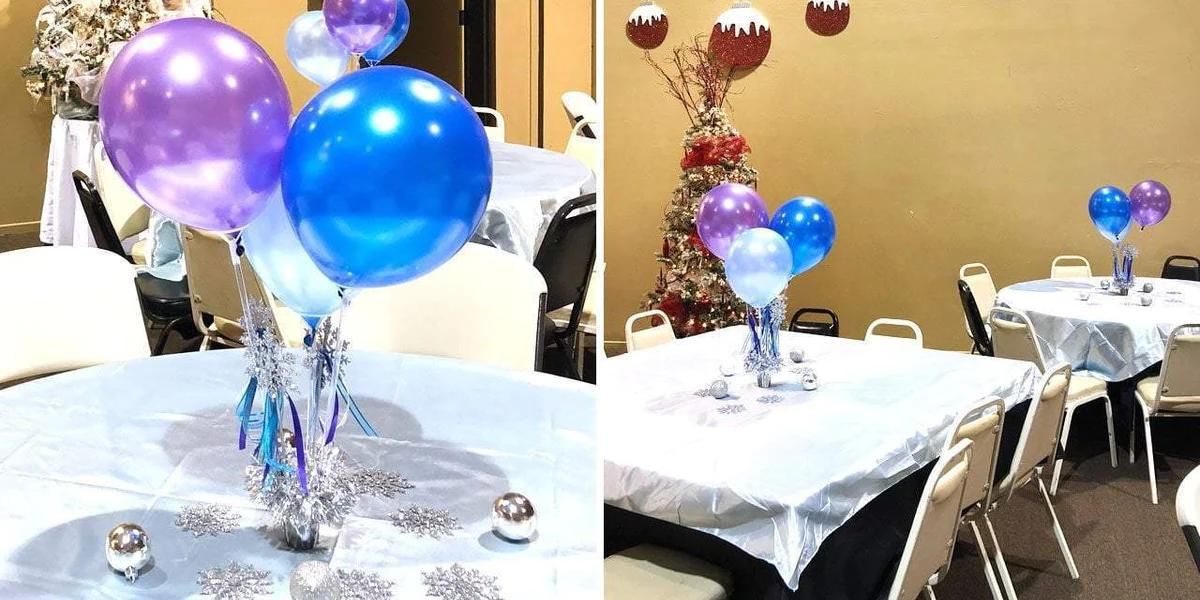
Table Decor
How Do I Make Balloon Centerpieces?
Modified: December 7, 2023
Learn how to make stunning balloon centerpieces for your table decor. Follow our step-by-step guide and create eye-catching arrangements with ease.
(Many of the links in this article redirect to a specific reviewed product. Your purchase of these products through affiliate links helps to generate commission for Storables.com, at no extra cost. Learn more)
Introduction
Welcome to the world of table decorations! Balloon centerpieces are a fantastic way to add a pop of color and fun to any event or occasion. Whether you are hosting a birthday party, a wedding reception, or even a corporate event, balloon centerpieces can instantly transform your tables into eye-catching displays. In this article, we will guide you through the step-by-step process of creating stunning balloon centerpieces that will wow your guests.
Creating balloon centerpieces is not only a great way to add visual appeal to your tables but also allows you to showcase your creativity. With a wide variety of balloon colors, shapes, and sizes available, the options are endless when it comes to designing unique and personalized centerpieces.
Before we dive into the steps, let’s take a look at the materials you will need to create your balloon centerpieces:
- Balloons: Choose balloons in various colors and sizes to create visual interest.
- Helium Tank: If you want your balloons to float, a helium tank is essential.
- Ribbon: Use ribbon to tie the balloons together and add decorative touches.
- Weighing Options: You’ll need something to hold your balloon arrangement in place, such as balloon weights or decorative bases.
- Extras: Consider adding extras like foil balloons, LED lights, or tulle for an extra touch of elegance.
Once you have gathered your materials, it’s time to get started on making your balloon centerpieces. Let’s proceed to the first step: choosing the balloons.
Key Takeaways:
- Create visually stunning balloon centerpieces by choosing the right balloons, inflating them carefully, and adding personalized touches and decorations to elevate your event decor.
- Secure your balloon centerpiece for stability and display it strategically with additional decor to create a captivating and memorable focal point at any event.
Read more: How To Make A Balloon Table Centerpiece
Materials Needed
Before you begin creating your balloon centerpieces, it’s important to gather all the necessary materials. Here’s a list of what you’ll need:
- Balloons: Choose balloons in various colors and sizes to create visual interest. Opt for high-quality latex or foil balloons that are less likely to pop.
- Helium Tank: If you want your balloons to float, you’ll need a helium tank. Helium is lighter than air and will give your balloons that gravity-defying effect.
- Ribbon: Use ribbon to tie the balloons together and add decorative touches. Choose a color that complements your balloons and the overall theme of your event.
- Weighing Options: You’ll need something to hold your balloon arrangement in place. Balloon weights, which come in various shapes, sizes, and colors, are a popular choice. Alternatively, you can use decorative bases or even heavy objects like flower pots.
- Extras: Consider adding some extra elements to enhance your balloon centerpieces. Foil balloons in shapes like hearts or stars can add a touch of elegance. LED lights can create a magical glow, especially for evening events. Tulle or other fabric can be used to create unique and textured designs.
It’s essential to gather all the materials before you start working on your balloon centerpieces. This way, you’ll have everything within reach and can create your masterpieces without any interruptions.
Now that you have everything you need let’s move on to the first step: choosing the balloons.
Step 1: Choosing the Balloons
Choosing the right balloons is crucial for creating stunning balloon centerpieces. Here are some tips to help you make the perfect selection:
1. Consider the Theme: Think about the theme or color scheme of your event. Choose balloons that match or complement the overall aesthetic. For example, if you’re hosting a baby shower with a jungle theme, opt for balloons in shades of green and animal print patterns.
2. Mix Colors and Sizes: Create visual interest by using balloons in different colors and sizes. A combination of large, medium, and small balloons will make your centerpiece more dynamic and eye-catching.
3. Don’t Forget Texture: Look for balloons with different finishes and textures. Metallic balloons can add a touch of glamour, while matte balloons create a more elegant and sophisticated look.
4. Consider the Venue: Take the event venue into account. If the space is small, avoid using oversized balloons that might overwhelm the tables. On the other hand, if you have a spacious venue, larger balloons can create a more dramatic effect.
5. Account for Lighting: Think about the lighting in the venue. If it’s dimly lit, consider using balloons in lighter colors to ensure they are visible. For well-lit spaces, you have more flexibility in choosing balloon colors.
6. Personalize with Printed Balloons: Consider adding printed balloons with custom messages or designs. These can be a great way to personalize your balloon centerpieces for special occasions like birthdays or anniversaries.
By considering these factors, you can select balloons that perfectly align with your event and create a visually stunning centerpiece. Once you have chosen your balloons, it’s time to move on to the next step: inflating the balloons.
Step 2: Inflating the Balloons
Now that you have chosen your balloons, it’s time to inflate them. Here are the steps to follow:
1. Prepare the Helium Tank: Make sure you have a properly set-up helium tank. Follow the manufacturer’s instructions to ensure safe and efficient operation.
2. Attach the Balloon: Take one balloon and stretch the opening. Carefully slide the neck of the balloon onto the nozzle of the helium tank. Ensure a tight fit to prevent any leakage of helium.
3. Inflate the Balloon: Gently press down on the nozzle or valve to release the helium into the balloon. Keep inflating until the balloon reaches the desired size. Be cautious not to overinflate the balloon, as it may burst.
4. Tie the Balloon: Once the balloon is inflated, carefully remove it from the helium tank’s nozzle. Pinch the neck of the balloon together to prevent any helium from escaping and tie a knot. Make sure the knot is tight and secure.
5. Repeat the Process: Repeat the above steps for each balloon, inflating them one by one. Take your time to ensure each balloon is properly inflated and tied off before moving on to the next.
Remember to adjust the amount of helium you fill in each balloon based on the size and desired effect. Larger balloons may require more helium to achieve a floating effect, while smaller balloons may need less.
Once all your balloons are inflated, you’re ready to proceed to the next step: creating the base for your balloon centerpiece.
Step 3: Creating the Base
Creating a sturdy and attractive base for your balloon centerpiece is essential to ensure its stability and visual appeal. Follow these steps to create the base:
1. Choose a Base Material: Decide on the material you want to use as the base for your centerpiece. Balloon weights, decorative bases, or even heavy objects like flower pots can work well.
2. Decorate the Base: If you’re using a plain base, consider decorating it to enhance the overall look of your centerpiece. You can cover the base with fabric, wrapping paper, or even paint it to match your event theme.
3. Secure the Balloon Weights: If you’re using balloon weights, attach them securely to the base. Make sure they are evenly spaced out to provide stability for the centerpiece.
4. Create a Grid: To arrange your balloons evenly, create a grid using thin ribbons or fishing line. Cut several pieces of ribbon and crisscross them over the base, creating a square or diamond pattern. Secure the ribbons to the base with tape or by tying them to the weight anchors.
5. Adjust the Grid: Ensure that the grid is tight and evenly spaced. This will help in maintaining the symmetry and stability of your balloon arrangement.
6. Apply Double-Sided Tape: If you’re using a decorative base, apply double-sided tape to the top surface. This will help hold the balloons in place and prevent them from sliding or moving around.
Creating a solid and visually appealing base is essential for the success of your balloon centerpiece. Once your base is ready, it’s time to move on to the exciting part: building the balloon centerpiece itself.
When making balloon centerpieces, use a sturdy base such as a weighted container or a balloon stand to anchor the balloons. This will help prevent the centerpiece from tipping over.Read more: How To Make Centerpieces With Candy
Step 4: Building the Balloon Centerpiece
With your base prepared, it’s time to start building your balloon centerpiece. Follow these steps to create a visually stunning arrangement:
1. Select a Centerpiece Balloon: Choose one balloon that will serve as the centerpiece of your arrangement. It can be larger, a different color, or have a unique shape to stand out.
2. Attach the Centerpiece Balloon: Tie a long piece of ribbon to the neck of the centerpiece balloon. Secure the other end of the ribbon to the center of the grid on the base. This will anchor the centerpiece balloon in place.
3. Add the Surrounding Balloons: Begin adding the surrounding balloons to create a balanced and visually appealing arrangement. Tie each balloon to a separate intersection point on the grid, allowing them to fan out around the centerpiece balloon.
4. Vary the Balloon Heights: To add depth and dimension to your centerpiece, vary the heights of the balloons. Tie some shorter balloons closer to the base, and let others hang down at different lengths.
5. Follow a Sequential Pattern: To create a cohesive look, follow a sequential pattern as you add the surrounding balloons. This can be a circular or spiral pattern, or any arrangement that pleases your eye.
6. Step Back and Evaluate: As you build your balloon centerpiece, step back frequently to assess the overall arrangement. Make any necessary adjustments to ensure the balloons are evenly spaced and the design is visually appealing.
7. Consider Balloon Groupings: To add more interest to your centerpiece, consider creating small groupings of balloons. Tie two or three balloons together and place them strategically within the arrangement.
Building a balloon centerpiece requires some experimentation and creativity. Don’t be afraid to try different arrangements and see what works best for your specific event and space.
Once your balloon centerpiece is complete, it’s time to add the finishing touches with decorations. Let’s move on to the next step: adding decorations.
Step 5: Adding Decorations
Now that your balloon centerpiece is taking shape, it’s time to add some decorative elements to make it even more visually appealing. Here are some ideas and steps to follow:
1. Foil Balloons: Consider incorporating foil balloons into your centerpiece. These come in a wide variety of shapes, sizes, and colors, and can add a touch of elegance or playfulness to your arrangement. Attach them to the grid or tie them to the ribbon of your centerpiece balloon.
2. LED Lights: If you’re hosting an evening event or want to create a magical ambiance, add LED lights to your centerpiece. These small battery-operated lights can be placed inside the balloons or wrapped around the ribbons to create a beautiful glow.
3. Tulle or Fabric: For a more sophisticated or romantic look, consider draping tulle or fabric around your balloon centerpiece. This adds texture and elegance, and can be tied at the base or strategically placed between the balloons to create a soft and flowing effect.
4. Confetti or Glitter: Add some sparkle to your centerpiece by sprinkling confetti or glitter over the balloons. This adds a festive touch and makes your arrangement stand out.
5. Personalized Touches: Consider adding personalized touches to your balloon centerpieces. Attach small cards or tags with guests’ names, special messages, or event details. This can be a thoughtful and unique way to make your guests feel special.
6. Floral Accents: Incorporate fresh or silk flowers into your centerpiece for a natural and elegant touch. Attach them to the ribbons or tuck them between the balloons to create a stunning floral balloon arrangement.
Remember to be creative and experiment with different decorations to achieve the desired look for your balloon centerpiece. Once the decorations are added, it’s time to move on to the next step: securing the balloon centerpiece.
Step 6: Securing the Balloon Centerpiece
Securing your balloon centerpiece is crucial to ensure it remains stable and intact throughout your event. Follow these steps to secure your centerpiece:
1. Check the Stability: Before securing the centerpiece, make sure it is well-balanced and stable on the base. Adjust any balloons or ribbons as needed to ensure it stands upright and doesn’t lean to one side.
2. Double-Check Knots and Ties: Take a moment to double-check all the knots and ties on the balloons, ensuring they are tightly secured. This will prevent any accidental deflation or detachment during your event.
3. Use Balloon Weights: If you are using balloon weights as the base for your centerpiece, check that they are securely attached to prevent the balloons from floating away. Make sure the weights are heavy enough to counterbalance the weight of the balloons.
4. Anchor Ribbons: If you have extended ribbons attached to your centerpiece balloons, anchor them to the base. You can tie them around the base or use tape to secure them in place. This will prevent the balloons from floating away or tangling together.
5. Consider Additional Anchors: In cases where you are using a decorative base or heavy objects as the centerpiece base, consider using additional anchors if needed. This could include adhesive putty, tape, or even sandbags to keep it secure and stable.
6. Test Stability: Give your centerpiece a gentle shake or slight push to test its stability. If anything feels loose or unsteady, make the necessary adjustments before your event starts.
By taking these steps to secure your balloon centerpiece, you can have peace of mind knowing that it will remain intact and visually appealing throughout your event.
Now that the centerpiece is secure, it’s time for the final step: displaying your beautiful balloon centerpiece.
Step 7: Displaying the Balloon Centerpiece
After all the hard work and attention to detail, it’s time to proudly display your stunning balloon centerpiece. Follow these steps to ensure it takes center stage:
1. Choose the Table Placement: Select the table where you want to display your centerpiece. Consider the overall layout of the venue and choose a table that is easily visible and accessible to guests.
2. Clear the Table: Clear the table of any unnecessary items or clutter to create a clean and inviting space for your centerpiece. This will allow your arrangement to stand out and become the focal point.
3. Center the Arrangement: Place the centerpiece in the center of the table, aligning it with the space and ensuring it is straight and symmetrical. This will create a visually pleasing display.
4. Consider Height: If you have multiple tables or levels, consider varying the height of your centerpieces. This adds visual interest and depth to the overall decor.
5. Surround with Additional Decor: Enhance the display by adding additional decorations around the centerpiece. This could include fresh flowers, candles, table runners, or themed props that complement the balloon arrangement.
6. Illuminate the Display: If your event takes place in the evening or in a dimly lit space, consider adding soft lighting around the centerpiece. This will create a warm and inviting ambiance.
7. Regularly Check and Maintain: Throughout your event, periodically check on your centerpiece to ensure it remains stable and visually appealing. Adjust any balloons or decorations as needed to keep it looking its best.
By carefully considering the table placement, arrangement, and additional decor, you can create a captivating and memorable display with your balloon centerpiece.
Congratulations! You have successfully completed all the steps to create and display a beautiful balloon centerpiece. By following this guide, you can easily bring a festive and eye-catching element to any event or occasion.
Remember to have fun with your creative choices and let your artistic side shine through as you design and showcase your unique balloon centerpiece!
Enjoy your event and the admiration your centerpiece will undoubtedly receive!
Read more: How To Make Centerpieces For Baptism
Conclusion
Creating balloon centerpieces is a fun and creative way to add a touch of magic to any event or occasion. With a few simple steps, you can transform a table into a visually stunning display that will captivate your guests. By choosing the right balloons, inflating them correctly, creating a sturdy base, building the centerpiece, adding decorations, securing it in place, and displaying it with care, you can create a show-stopping centerpiece that becomes the highlight of your event.
Throughout the process, sourcing high-quality balloons, carefully inflating them, and selecting a variety of colors, sizes, and textures will help create a visually appealing arrangement. Additionally, adding decorative elements such as foil balloons, LED lights, tulle, and personalized touches can elevate the centerpiece and make it unique to your event.
Securing the balloon centerpiece is essential to ensure it remains stable and intact throughout your event. Whether using balloon weights, decorative bases, or additional anchors, taking the time to secure the centerpiece will provide peace of mind and prevent any accidents.
Once the centerpiece is securely in place, placing it in a strategic and visible spot on the table, surrounded by additional decor, will draw attention and admiration. Varying the height, considering the table placement, and creating an inviting atmosphere with lighting will further enhance the display.
Creating a balloon centerpiece is not only a great way to add a pop of color and excitement to your event but also allows you to showcase your creativity and personal style. Each centerpiece is a unique work of art, reflecting your vision and contributing to the overall ambiance of the occasion.
So, whether it’s a birthday party, wedding reception, or corporate event, now you have the knowledge to create stunning balloon centerpieces that will leave a lasting impression. Enjoy the process, have fun experimenting with different designs, and let your creativity soar as you bring your balloon centerpiece dreams to life!
Frequently Asked Questions about How Do I Make Balloon Centerpieces?
Was this page helpful?
At Storables.com, we guarantee accurate and reliable information. Our content, validated by Expert Board Contributors, is crafted following stringent Editorial Policies. We're committed to providing you with well-researched, expert-backed insights for all your informational needs.


0 thoughts on “How Do I Make Balloon Centerpieces?”