Home>Dining>Table Decor>How To Make A Balloon Table Centerpiece
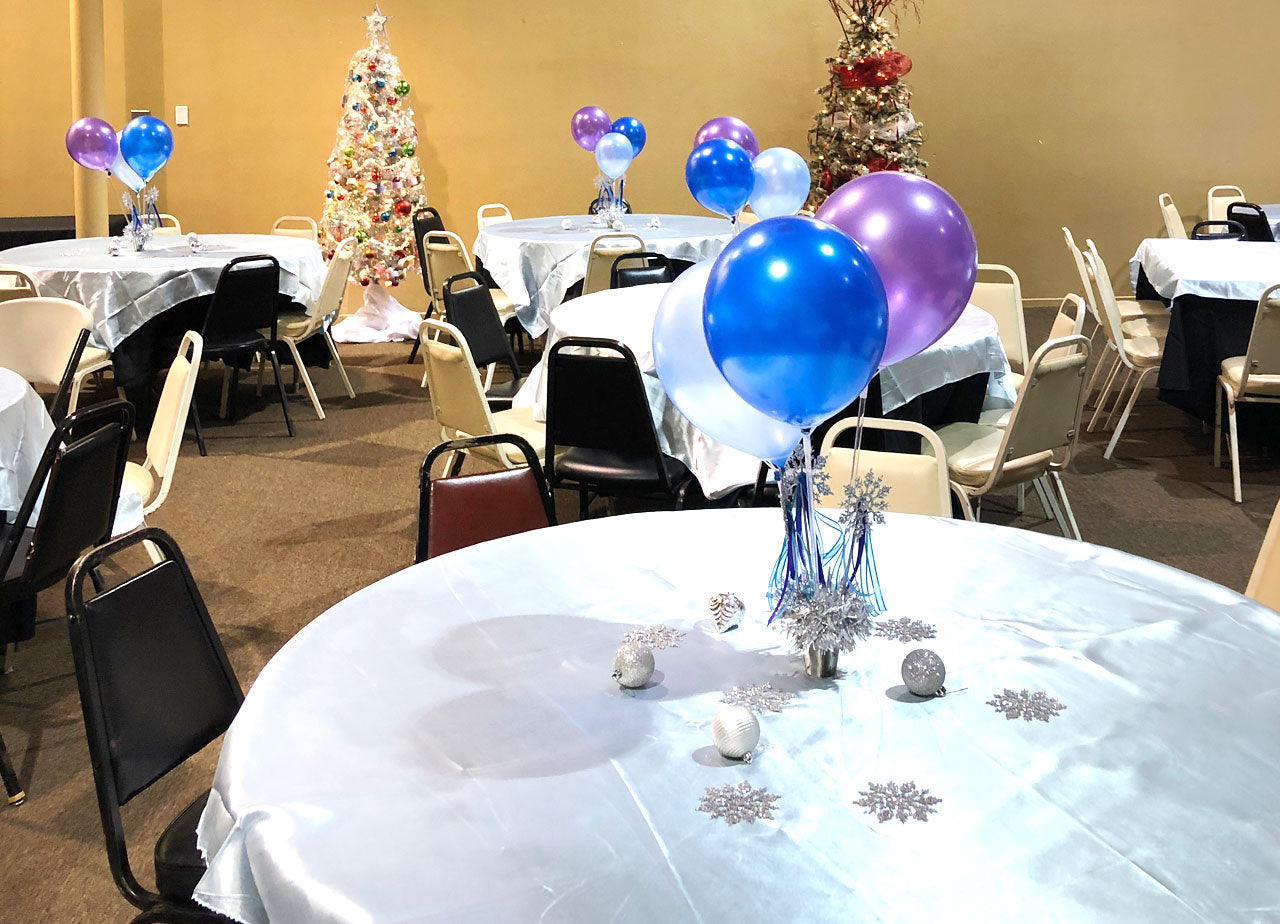
Table Decor
How To Make A Balloon Table Centerpiece
Modified: January 4, 2024
Learn how to create stunning balloon table centerpieces for your next event with our step-by-step guide. Elevate your table decor with our easy-to-follow tips and tricks.
(Many of the links in this article redirect to a specific reviewed product. Your purchase of these products through affiliate links helps to generate commission for Storables.com, at no extra cost. Learn more)
Introduction
When it comes to table decor, a balloon table centerpiece can be a vibrant and eye-catching addition to any event or party. Whether you’re planning a birthday celebration, a wedding reception, or a festive gathering, creating a stunning balloon table centerpiece can add flair and charm to your decor. In this guide, we’ll take you through the step-by-step process of making a balloon table centerpiece that will impress your guests and elevate your event to the next level.
Balloons have long been a popular choice for party decorations due to their versatility and ability to create a festive atmosphere. With a balloon table centerpiece, you can transform an ordinary table into a stunning focal point that will captivate your guests and set the tone for the entire event. Not only are balloon table centerpieces visually pleasing, but they can also be customized to match any theme or color scheme, making them a versatile choice for any occasion.
Not only can a balloon table centerpiece add visual appeal to your event, but it can also serve as a conversation starter and create a warm and inviting atmosphere for your guests. Whether you choose to use a single large balloon centerpiece or a cluster of smaller balloons, the vibrant colors and playful shapes are sure to inject a sense of joy and excitement into the celebration. Furthermore, balloons have a universal appeal that transcends age and cultural barriers, making them a popular choice for both formal and informal events.
In this guide, we will walk you through the materials you’ll need, as well as the step-by-step process of creating a stunning balloon table centerpiece. We’ll cover everything from inflating the balloons to assembling the centerpiece and adding the final touches. So gather your supplies, unleash your creativity, and get ready to wow your guests with a beautiful and captivating balloon table centerpiece.
Key Takeaways:
- Elevate any event with a vibrant balloon table centerpiece that captivates guests and sets the tone for a memorable celebration. Customizable and versatile, it’s a fun and creative way to add flair to your decor.
- Transform an ordinary table into a stunning focal point with a visually appealing balloon table centerpiece. From inflating balloons to adding final touches, unleash your creativity and wow your guests with a captivating centerpiece.
Read more: How Do I Make Balloon Centerpieces?
Materials Needed
Before you begin creating your balloon table centerpiece, it’s important to gather all the necessary materials. Here’s a list of items you’ll need to bring your centerpiece to life:
- Balloons: Choose high-quality latex or foil balloons in colors that match your event theme or decor. Consider using a mix of different sizes for visual interest.
- Balloon Pump: Using a balloon pump will make the inflation process faster and easier. A hand pump or electric pump will work well for this purpose.
- Table Base: You’ll need a sturdy base to hold the balloons in place. Options include a balloon weight, a flowerpot filled with sand or rocks, or a decorative container.
- Ribbon or String: This will be used to tie the balloons together and attach them to the base.
- Scissors: A sharp pair of scissors will be needed to cut the ribbon or string.
- Additional Decorations: Depending on your preference, you may want to add additional elements such as garlands, flowers, or themed embellishments to enhance the overall look of the centerpiece.
Ensure that you have all the materials on hand before you begin crafting your balloon table centerpiece. This will make the process smoother and more enjoyable, allowing you to focus on creating a stunning centerpiece that will impress your guests.
Step 1: Inflate the Balloons
The first step in creating your balloon table centerpiece is to inflate the balloons. Here’s how to do it:
- Prepare the balloons: Before you begin inflating the balloons, check them for any defects or holes. Discard any balloons with visible damage to ensure that your centerpiece will last without deflating prematurely.
- Choose the right inflation method: Depending on the number of balloons you’re using and your personal preference, you can inflate them manually using your mouth, or you can use a balloon pump. Using a pump will save you time and ensure consistent inflation.
- Inflate the balloons: Start by inserting the pump nozzle into the balloon opening and pumping air or helium until the balloon reaches the desired size. Be careful not to overinflate the balloons, as they may burst. Leave enough space at the end to tie a knot.
- Tie the balloons: Once inflated, tie a knot at the opening of each balloon to secure the air or helium inside. Make sure the knot is tight to prevent any air from escaping.
- Repeat until all balloons are inflated: Continue inflating and tying the balloons until you have the desired number for your centerpiece. It’s a good idea to inflate a few extra balloons in case any of them accidentally pop during the assembly process.
Inflating the balloons is an important step in creating your balloon table centerpiece. Take your time to ensure that each balloon is properly inflated and tied securely. This will help your centerpiece maintain its shape and fullness throughout your event.
Step 2: Create the Base
Now that you have your balloons inflated, it’s time to create the base for your balloon table centerpiece. The base will provide stability and support for the balloons. Here’s how to create the base:
- Choose a suitable base: There are several options for creating a base. A common choice is a balloon weight, which is a small decorative object specifically designed to hold balloons. You can also use a flowerpot filled with sand or rocks, or a decorative container that suits your event theme.
- Position the base: Place the chosen base in the center of the table where you want your centerpiece to be. Ensure that it is balanced and stable so that it can support the weight of the balloons.
- Secure the base: Depending on the type of base you’re using, you may need to secure it further. For example, if you’re using a balloon weight, you can tie it to the table with a ribbon or attach it using adhesive or double-sided tape.
Creating a sturdy base is essential for the stability and longevity of your balloon table centerpiece. Take the time to choose the right base and ensure that it is securely positioned on the table.
When creating a balloon table centerpiece, use a sturdy base such as a weighted container or a balloon stand to ensure stability and prevent tipping over.
Step 3: Assemble the Centerpiece
With the base in place, it’s time to assemble your balloon table centerpiece. Follow these steps to create a visually appealing arrangement:
- Plan your arrangement: Before attaching the balloons to the base, take a moment to plan how you want them to be positioned. Consider the size and color of the balloons and how they will complement each other when arranged together.
- Attach the first balloon: Start by selecting one balloon to be the centerpiece of the arrangement. Tie a long piece of ribbon or string to the knot of the balloon, ensuring that it is securely attached.
- Position the centerpiece balloon: Once the ribbon is attached, position the centerpiece balloon in the center of the base. This balloon will act as the focal point of your arrangement.
- Add the surrounding balloons: Take additional balloons and tie them to the same ribbon or string, positioning them around the centerpiece balloon. Vary the heights and spacing between the balloons to create a visually interesting and balanced arrangement.
- Secure the balloons to the base: Once you’re satisfied with the placement of the balloons, use the ribbon or string to tie them to the base. This will keep the balloons secure and prevent them from shifting or falling over.
- Adjust the balloons: Take a step back and assess the arrangement. Make any necessary adjustments to ensure that the balloons are evenly spaced and create a visually pleasing centerpiece.
Assembling the centerpiece requires a bit of creativity and a keen eye for design. Don’t be afraid to experiment with different balloon combinations and arrangements until you achieve the desired look. Remember to keep the centerpiece balanced and visually appealing from all angles.
Read more: How To Make Centerpieces With Candy
Step 4: Add Final Touches
Now that your balloon table centerpiece is assembled, it’s time to add the final touches to make it truly spectacular. Here are some ideas to enhance the overall appearance of your centerpiece:
- Trim the ribbon: If the ribbon or string used to tie the balloons is too long, you can trim it to your desired length. This will create a neater and more polished look for your centerpiece.
- Trim excess balloon strings: If there are any excess balloon strings hanging below the base, cut them to keep the focus on the balloons and the centerpiece as a whole.
- Add decorative elements: Consider adding additional decorations to complement the balloons and enhance the theme of your event. This could include garlands, flowers, or themed embellishments such as ribbons, bows, or glitter. Be creative and choose elements that will elevate the overall aesthetic of your centerpiece.
- Illuminate the centerpiece: For evening events or when you want to create a more dramatic effect, consider adding LED lights or submersible lights to the base of the centerpiece. This will add a soft glow and make your centerpiece even more captivating.
The final touches can make a significant difference in the overall impact of your balloon table centerpiece. Pay attention to details and add elements that will make your centerpiece unique and memorable for your guests.
Conclusion
Creating a balloon table centerpiece is a fun and creative way to elevate the decor of any event or party. By following these four simple steps, you can design a visually stunning centerpiece that will captivate your guests and add a touch of excitement to your celebration.
Start by inflating the balloons, taking care to choose high-quality balloons and ensuring they are properly tied and secured. Next, create a solid base for your centerpiece using options such as a balloon weight, a flowerpot filled with sand or rocks, or a decorative container. Once the base is set, you can assemble the centerpiece by carefully arranging the balloons and securing them to the base with ribbons or strings.
Remember to add your personal touch by trimming excess ribbons, adding decorative elements, or incorporating lighting to create a truly magical centerpiece. With a little creativity and attention to detail, you can transform an ordinary table into a stunning focal point that will leave a lasting impression on your guests.
Don’t be afraid to experiment with different colors, sizes, and arrangements to match the theme or mood of your event. Balloon table centerpieces are versatile and can be customized to suit any occasion, whether it’s a birthday party, wedding reception, or a festive gathering.
So, gather your materials, let your imagination soar, and create a balloon table centerpiece that will be the talk of your event. Enjoy the process and embrace the joy and excitement that balloons bring to any celebration. Your guests will be amazed by your creativity and attention to detail, and your event will be truly memorable.
Frequently Asked Questions about How To Make A Balloon Table Centerpiece
Was this page helpful?
At Storables.com, we guarantee accurate and reliable information. Our content, validated by Expert Board Contributors, is crafted following stringent Editorial Policies. We're committed to providing you with well-researched, expert-backed insights for all your informational needs.

0 thoughts on “How To Make A Balloon Table Centerpiece”