Home>Furniture & Design>Interior Design Trends>How To Replace A Pane Of Glass
Interior Design Trends
How To Replace A Pane Of Glass
Modified: October 19, 2024
Learn how to replace a pane of glass and stay updated on the latest interior design trends. Find expert tips and inspiration for your home renovation projects.
(Many of the links in this article redirect to a specific reviewed product. Your purchase of these products through affiliate links helps to generate commission for Storables.com, at no extra cost. Learn more)
Introduction
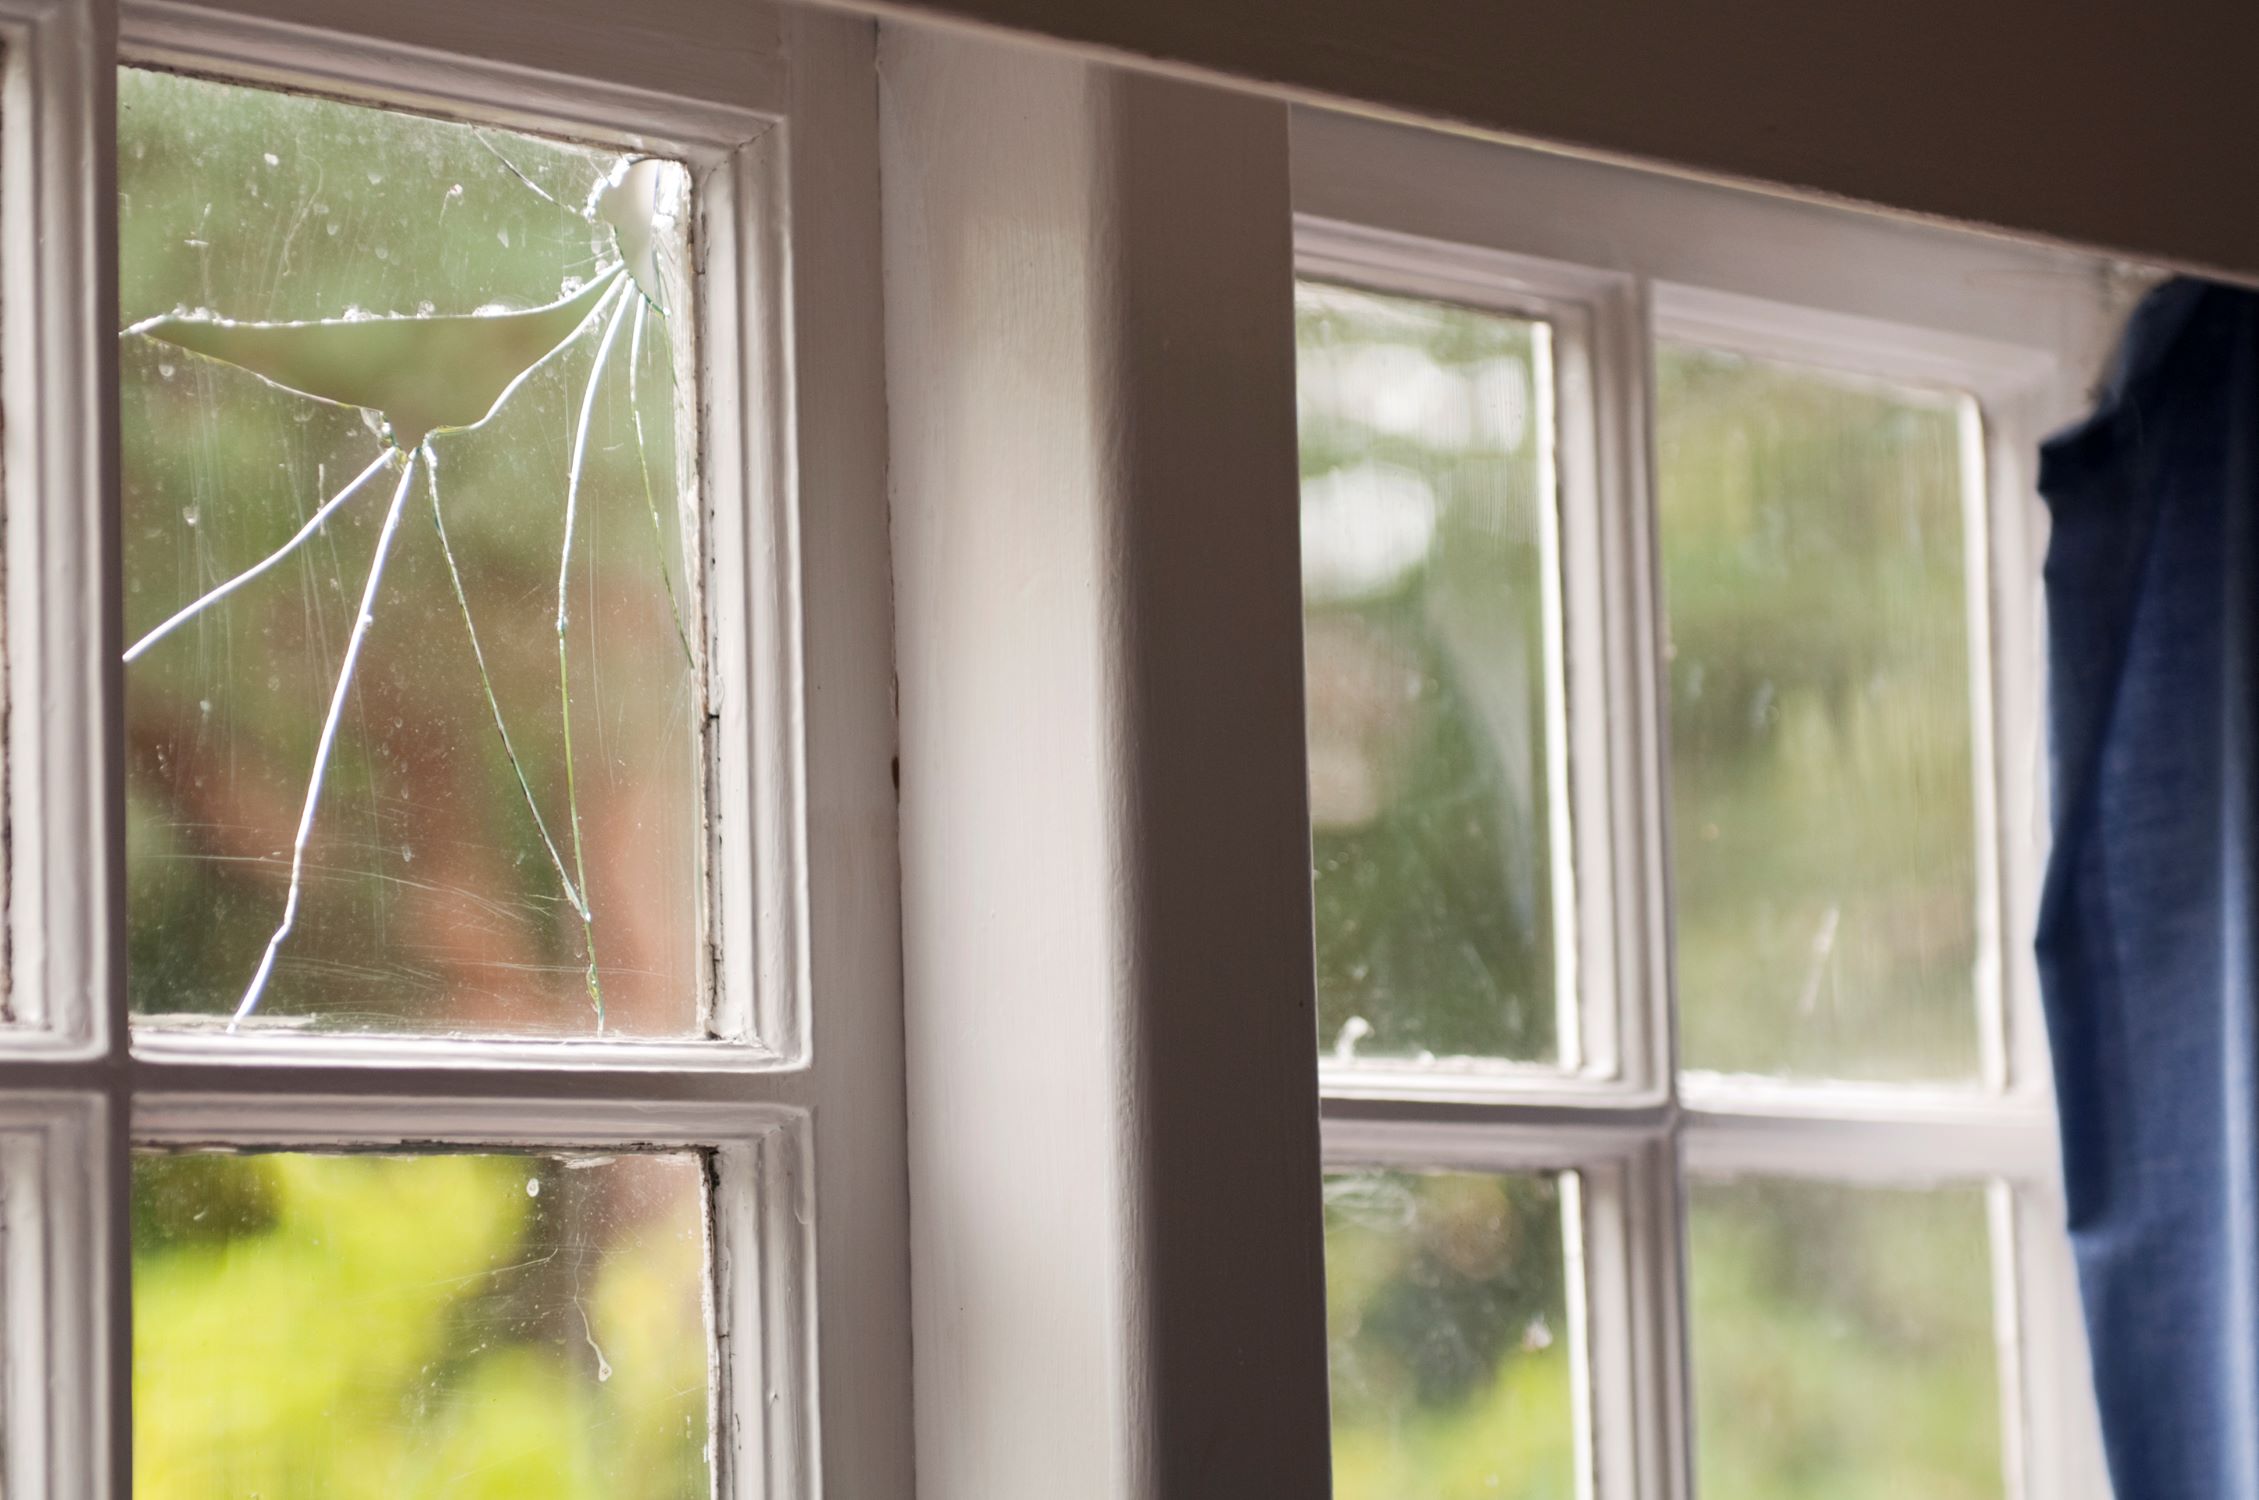
Replacing a pane of glass in a window may seem like a daunting task, but with the right tools, materials, and a step-by-step guide, it can be a manageable DIY project. Whether the glass is cracked, shattered, or simply needs an upgrade, knowing how to replace a pane of glass can save you time and money compared to hiring a professional. By following the outlined steps, you can restore the functionality and aesthetic appeal of your window.
Broken or outdated glass not only compromises the visual appeal of your home but also poses safety and security risks. Addressing this issue promptly is essential for maintaining a comfortable and secure living environment. Additionally, learning how to replace a pane of glass empowers you to take on home improvement projects with confidence, enhancing your DIY skills and saving on repair costs.
In this comprehensive guide, we will walk you through the process of replacing a pane of glass in a window, covering everything from gathering the necessary tools and materials to securing the new glass pane in place. By following these steps, you can effectively restore the functionality and appearance of your window, ensuring a seamless and secure fit for the new glass pane.
Now, let's dive into the step-by-step process of replacing a pane of glass in your window, equipping you with the knowledge and confidence to tackle this DIY project with ease.
Key Takeaways:
- Replacing a broken window pane is a manageable DIY project that saves time and money. With the right tools and steps, you can restore your window’s functionality and appearance, enhancing your DIY skills.
- After installing the new glass pane, thorough cleanup and testing ensure a polished finish. By inspecting for imperfections and testing window functionality, you can achieve a visually appealing and fully functional window.
Read more: How To Replace Double Pane Glass
Step 1: Gather the necessary tools and materials
Before embarking on the task of replacing a pane of glass in a window, it's crucial to gather all the essential tools and materials. Having the right equipment at your disposal will streamline the process and ensure a successful outcome. Here's a comprehensive list of what you'll need:
Tools:
- Safety goggles and gloves: Protect your eyes and hands from glass shards and debris.
- Putty knife: Used for removing old putty and glazing points.
- Glazier's points: Small metal pieces that secure the glass in the frame.
- Heat gun or propane torch: Helps soften old putty for easier removal.
- Paint scraper: Useful for scraping off old paint and putty.
- Measuring tape: Ensures accurate dimensions for the new glass pane.
- Glass cutter: For cutting the new glass pane to the required size.
- Caulk gun: Used to apply new putty or sealant.
- Hammer: For driving in glazier's points and tapping the glass into place.
- Screwdriver: May be needed to remove hardware from the window frame.
Materials:
- Replacement glass pane: Ensure it matches the dimensions and thickness of the original pane.
- Glazing compound or putty: Used to secure the new glass pane in the frame.
- Painter's tape: Helps protect the window frame from scratches and paint damage.
- Sandpaper: For smoothing rough edges on the window frame.
- Paint: If the window frame needs a fresh coat after the glass replacement.
- Mineral spirits: Used for cleaning up excess putty and adhesive.
By gathering these tools and materials, you'll be well-prepared to tackle the task of replacing a pane of glass in your window. Having everything at hand will minimize interruptions and ensure a smooth and efficient process, setting the stage for a successful window repair project.
Step 2: Remove the broken glass pane
Removing a broken glass pane from a window requires careful attention to safety and precision. Before starting this step, ensure that you are wearing safety goggles and gloves to protect yourself from glass shards and debris. Here's a detailed guide on how to remove the broken glass pane effectively:
-
Secure the area: Begin by clearing the immediate area around the window to create a safe and unobstructed workspace. Remove any furniture, curtains, or obstacles that may hinder your access to the window.
-
Remove the remaining glass: Carefully extract any remaining shards of glass from the window frame using a putty knife or gloved hands. Exercise caution to avoid injury, and dispose of the broken glass in a secure and appropriate manner.
-
Extract the glazing points: Locate and remove the glazing points, which are small metal pieces that hold the glass in place within the frame. Use a putty knife or a suitable tool to gently pry them out, taking care not to damage the surrounding frame.
-
Softening the old putty: If the window has old putty securing the glass, use a heat gun or propane torch to soften the putty. Apply heat carefully and intermittently, as excessive heat can damage the window frame. Once the putty becomes pliable, use a putty knife to remove it from the frame.
-
Clean the window frame: After removing the broken glass and any remaining putty, clean the window frame thoroughly. Use a vacuum or a damp cloth to remove debris and ensure a clean surface for the new glass pane.
By following these steps, you can safely and effectively remove the broken glass pane from your window, setting the stage for the next phase of the replacement process. Taking the time to complete this step meticulously will contribute to the overall success and quality of the glass replacement project.
Read more: How To Make Glass Panes
Step 3: Prepare the window frame
With the broken glass pane successfully removed, the next crucial step in replacing a pane of glass in a window is to prepare the window frame for the installation of the new glass pane. This phase involves ensuring that the frame is clean, smooth, and ready to accommodate the replacement glass. Here's a detailed guide on how to prepare the window frame effectively:
-
Inspect the Frame: Begin by carefully examining the window frame for any signs of damage, decay, or irregularities. Look for cracks, rot, or areas where the paint or sealant has deteriorated. Addressing these issues before installing the new glass pane is essential for ensuring a secure and long-lasting fit.
-
Repair Any Damage: If you identify any damage or deterioration in the window frame, take the necessary steps to repair it. This may involve filling in cracks, replacing rotted wood, or addressing any structural issues that could compromise the integrity of the frame. By addressing these issues proactively, you can create a stable and secure foundation for the new glass pane.
-
Smooth the Surface: Use sandpaper to smooth any rough or uneven areas on the window frame. This step is crucial for ensuring a snug and even fit for the replacement glass pane. By creating a smooth and level surface, you can minimize the risk of damage to the new glass and enhance the overall aesthetic appeal of the window.
-
Apply Primer and Paint (If Needed): If the window frame requires a fresh coat of paint, now is the time to apply it. Ensure that the paint is suitable for the material of the frame and that it complements the overall design of the window. Applying primer before the paint can enhance adhesion and provide a more durable finish.
-
Clean the Surrounding Area: As you prepare the window frame, take the opportunity to clean the surrounding area. Remove any dust, debris, or remnants of the old glass and putty. A clean workspace will contribute to a smoother and more efficient installation process.
By meticulously preparing the window frame, you can ensure that the new glass pane fits securely and seamlessly, enhancing the functionality and visual appeal of the window. Taking the time to address any issues and create a clean, stable foundation will contribute to the overall success of the glass replacement project.
Step 4: Install the new glass pane
Installing the new glass pane is a critical phase in the process of replacing a pane of glass in a window. This step requires precision, attention to detail, and a focus on ensuring a secure and seamless fit for the replacement glass. Here's a comprehensive guide on how to install the new glass pane effectively:
-
Measure and Cut the Glass: Begin by measuring the dimensions of the window frame accurately. Use a measuring tape to determine the precise length and width required for the new glass pane. Once the measurements are confirmed, use a glass cutter to cut the replacement glass to the exact size. It's essential to exercise caution and use appropriate safety gear when cutting the glass to prevent accidents and ensure clean, accurate cuts.
-
Apply Glazing Compound or Putty: With the replacement glass pane cut to size, apply a thin, even layer of glazing compound or putty along the edges of the window frame. This step is crucial for creating a secure seal and holding the glass pane in place. Ensure that the glazing compound or putty is applied uniformly to provide consistent support for the glass.
-
Position the Glass Pane: Carefully position the new glass pane within the window frame, ensuring that it fits snugly and aligns with the edges of the frame. Take care to handle the glass with caution to avoid smudges or fingerprints. Press the glass gently into the glazing compound or putty, allowing it to adhere securely to the frame.
-
Insert Glazier's Points: Once the glass pane is in place, insert glazier's points along the edges of the frame to secure the glass. These small metal pieces provide additional support and help hold the glass firmly in position. Use a putty knife or a suitable tool to press the glazier's points into the frame, ensuring that they are flush with the surface and effectively hold the glass in place.
-
Smooth the Edges: After securing the glass pane with glazier's points, use a putty knife to carefully remove any excess glazing compound or putty that may have squeezed out. This step helps create a clean, polished look and ensures that the glass fits seamlessly within the frame.
By following these steps, you can effectively install the new glass pane in your window, creating a secure and visually appealing fit. Taking the time to execute this phase with precision and care will contribute to the overall success of the glass replacement project, ensuring a durable and aesthetically pleasing outcome.
Step 5: Secure the glass pane in place
Securing the glass pane in place is a crucial step in the process of replacing a pane of glass in a window. This phase focuses on reinforcing the stability and durability of the newly installed glass, ensuring that it remains securely positioned within the window frame. By following a systematic approach and utilizing the appropriate techniques, you can effectively secure the glass pane, contributing to the overall success and longevity of the replacement project.
Apply Additional Sealant (If Needed)
After installing the new glass pane and inserting glazier's points, it's essential to assess the seal and stability of the glass within the frame. Depending on the type of window and the specific requirements, you may need to apply additional sealant or caulk around the edges of the glass pane. This step helps create an extra layer of protection against drafts, moisture, and external elements, enhancing the overall insulation and integrity of the window.
Read more: How To Dispose Of Glass Panes
Inspect and Adjust the Fit
Once the glass pane is secured in place, carefully inspect the edges and corners to ensure a uniform and secure fit. Verify that the glass sits evenly within the frame and that there are no gaps or areas of instability. If necessary, make minor adjustments to the positioning of the glass to achieve a balanced and secure placement.
Test for Stability and Functionality
After securing the glass pane, conduct a thorough stability test to ensure that the glass remains firmly in place. Gently press on different areas of the glass to assess its resistance and stability within the frame. Additionally, test the functionality of the window by opening and closing it to confirm that the glass remains secure and does not shift or rattle under normal usage conditions.
Clean and Polish the Glass Surface
As a final touch, clean and polish the surface of the newly installed glass pane to remove any smudges, fingerprints, or residual marks. Use a suitable glass cleaner and a lint-free cloth to achieve a clear and pristine finish. This step not only enhances the visual appeal of the window but also ensures that the glass is free from any blemishes that may have occurred during the installation process.
By meticulously securing the glass pane in place and attending to the finer details of the installation, you can achieve a durable, stable, and visually pleasing outcome. Taking the time to execute this step with precision and care contributes to the overall success of the glass replacement project, ensuring a secure and long-lasting fit for the new glass pane.
Step 6: Clean up and test the new pane of glass
After successfully installing the new glass pane in your window, the final step involves thorough cleanup and testing to ensure that the replacement process has been executed effectively. This phase focuses on removing any residual debris, verifying the functionality of the window, and achieving a polished, finished look for the newly installed glass pane.
Read more: How To Craft Glass Panes
Clearing Debris and Residues
Begin by carefully removing any leftover debris, putty, or glazing compound that may have accumulated during the installation process. Use a putty knife or a suitable tool to gently scrape away any excess materials, ensuring that the window frame and surrounding area are clean and free from obstructions. Additionally, use a vacuum or a damp cloth to eliminate any fine particles or dust, leaving the workspace tidy and ready for the final inspection.
Inspecting for Imperfections
Once the cleanup is complete, conduct a detailed inspection of the newly installed glass pane and the surrounding window frame. Look for any signs of imperfections, such as smudges, streaks, or uneven sealant application. Address any minor flaws by carefully wiping the glass surface with a lint-free cloth and making adjustments to the sealant if necessary. This meticulous inspection ensures that the replacement glass pane meets the desired standards of clarity and visual appeal.
Testing the Window Functionality
To validate the success of the glass replacement project, test the functionality of the window by opening and closing it multiple times. Pay attention to the smoothness of the operation, ensuring that the glass pane remains stable and secure within the frame. Listen for any unusual sounds or signs of instability, as these may indicate the need for further adjustments. By thoroughly testing the window, you can confirm that the new glass pane is securely positioned and functions as intended.
Final Touches and Polishing
As a final step, take the opportunity to polish the glass surface and the surrounding window frame to achieve a pristine, finished look. Use a high-quality glass cleaner to remove any remaining smudges or marks, and carefully wipe down the frame to ensure a clean and polished appearance. This attention to detail enhances the overall aesthetic appeal of the window and contributes to a professional, well-executed glass replacement project.
By completing the cleanup and testing process with diligence and care, you can ensure that the new pane of glass is not only securely installed but also visually appealing and fully functional. This final phase marks the culmination of the glass replacement project, leaving you with a restored window that enhances the comfort, security, and aesthetic appeal of your living space.
Frequently Asked Questions about How To Replace A Pane Of Glass
Was this page helpful?
At Storables.com, we guarantee accurate and reliable information. Our content, validated by Expert Board Contributors, is crafted following stringent Editorial Policies. We're committed to providing you with well-researched, expert-backed insights for all your informational needs.


0 thoughts on “How To Replace A Pane Of Glass”