Home>Furniture & Design>Interior Design Trends>How To Replace The Glass On Iphone 6
Interior Design Trends
How To Replace The Glass On Iphone 6
Modified: October 19, 2024
Learn how to replace the glass on iPhone 6 with our step-by-step guide. Stay updated on the latest interior design trends and ideas.
(Many of the links in this article redirect to a specific reviewed product. Your purchase of these products through affiliate links helps to generate commission for Storables.com, at no extra cost. Learn more)
Introduction
Replacing the glass on an iPhone 6 can be a daunting task, but with the right tools and a methodical approach, it is entirely achievable. Whether the glass is cracked, shattered, or scratched, restoring the sleek and flawless appearance of your iPhone 6 is a rewarding endeavor. This guide will walk you through the step-by-step process of replacing the glass on your iPhone 6, providing you with the confidence and knowledge to undertake this repair with precision and care.
The iPhone 6, known for its elegant design and advanced features, has a delicate display that requires careful handling during the glass replacement process. By following the instructions outlined in this guide, you can restore your iPhone 6 to its original state, saving the cost of a professional repair and gaining a sense of accomplishment in the process.
Before embarking on this repair journey, it's essential to gather the necessary tools and materials to ensure a smooth and efficient process. From screwdrivers to replacement glass, each item plays a crucial role in the successful completion of this task. With a clear understanding of the steps involved and the right resources at your disposal, you can breathe new life into your iPhone 6 and enjoy a pristine display once again.
As we delve into the intricacies of replacing the glass on the iPhone 6, it's important to approach this task with patience and attention to detail. Each step is designed to guide you through the process, from powering off the device to reassembling the iPhone with precision. By following these instructions diligently, you can navigate the complexities of this repair and emerge with a beautifully restored iPhone 6.
With a sense of determination and a willingness to engage in a hands-on experience, you can take control of the condition of your iPhone 6 and revitalize its appearance. Let's embark on this journey together, embracing the opportunity to restore your iPhone 6 to its former glory through the meticulous replacement of its glass.
Key Takeaways:
- Replacing the glass on an iPhone 6 is a meticulous but rewarding process that demands patience and precision. With the right tools and careful steps, you can restore your phone’s elegance and functionality with confidence and skill.
- By following the step-by-step guide, you can transform your iPhone 6’s appearance and gain a sense of accomplishment. Embrace the opportunity to engage in hands-on repair, showcasing your resourcefulness and dedication to excellence.
Read more: How To Replace Glass On Iphone 5
Tools and materials needed
Before initiating the process of replacing the glass on your iPhone 6, it's crucial to gather the essential tools and materials to ensure a seamless and successful repair. Each item serves a specific purpose in facilitating the meticulous disassembly and reassembly of the device, ultimately contributing to the restoration of its pristine appearance.
1. Precision Screwdriver Set
A precision screwdriver set is indispensable for removing the tiny screws securing the iPhone 6's display assembly. These specialized screwdrivers are designed to fit the unique screws used in electronic devices, ensuring that they can be extracted and reinserted with precision.
2. Replacement Glass
Acquiring a high-quality replacement glass specifically designed for the iPhone 6 is paramount to achieving a flawless finish. The replacement glass should be crafted with durability and clarity in mind, seamlessly integrating with the device's display to deliver a visually appealing and functional result.
3. Suction Cup Tool
A suction cup tool is instrumental in safely separating the iPhone 6's display assembly from the body of the device. By creating a secure grip on the display, the suction cup tool enables controlled separation, minimizing the risk of damage to the delicate components.
Read more: Which Iphones Have Glass Backs
4. Plastic Spudger Tool
The plastic spudger tool is a non-conductive instrument that aids in prying apart the components of the iPhone 6 without causing damage. Its gentle yet sturdy design allows for the careful disassembly of the device, ensuring that internal components remain unharmed during the glass replacement process.
5. Tweezers
Precision tweezers are indispensable for handling small components and delicate cables within the iPhone 6. Their fine tips enable the manipulation of intricate parts with accuracy, facilitating the safe removal and reinstallation of components during the repair.
6. Microfiber Cloth
A microfiber cloth is essential for maintaining a clean and dust-free work environment during the glass replacement process. Its soft and non-abrasive texture ensures that the iPhone 6's display and internal components remain free from debris and smudges, contributing to a professional and polished outcome.
7. Adhesive Strips
Adhesive strips are necessary for securing the replacement glass to the iPhone 6's display assembly. These specialized strips provide a secure bond, ensuring that the new glass remains firmly in place, aligning perfectly with the device's frame for a seamless and durable fit.
By assembling these essential tools and materials, you can embark on the glass replacement journey for your iPhone 6 with confidence and preparedness. Each item plays a vital role in facilitating a meticulous and successful repair, empowering you to restore your device to its original splendor with precision and care.
Read more: How To Replace Sunroof Glass
Step 1: Power off the iPhone
Before commencing the intricate process of replacing the glass on your iPhone 6, it is imperative to power off the device to ensure safety and prevent potential damage. This initial step sets the foundation for a controlled and secure environment in which the subsequent repair tasks can be executed with precision.
To power off the iPhone 6, begin by locating the power button, which is situated on the right side of the device. This button, also known as the sleep/wake button, serves as the primary control for turning the iPhone on and off. Gently press and hold the power button until the "slide to power off" prompt appears on the screen.
Once the "slide to power off" prompt is displayed, carefully swipe the on-screen slider from left to right to initiate the shutdown process. As the iPhone 6 powers down, the screen will gradually dim, indicating that the device is entering a powered-off state.
Verifying that the iPhone 6 is completely powered off is essential before proceeding with the glass replacement process. This ensures that the internal components are not active, minimizing the risk of electrical hazards and facilitating safe handling of the device during the subsequent steps.
By meticulously following this crucial first step and confirming that the iPhone 6 is fully powered off, you establish a secure foundation for the meticulous repair journey ahead. This deliberate approach prioritizes safety and sets the stage for a methodical and successful glass replacement process, laying the groundwork for the subsequent intricate tasks with confidence and precision.
Step 2: Remove the screws
With the iPhone 6 powered off and the necessary tools at your disposal, the next critical step in the glass replacement process involves delicately removing the screws that secure the device's display assembly. This step demands precision and patience, as the tiny screws must be carefully extracted to facilitate the subsequent disassembly of the iPhone 6.
Using the appropriate precision screwdriver from your set, identify and carefully remove the screws located on either side of the device's charging port. These screws are strategically positioned to secure the display assembly to the iPhone 6's frame, ensuring structural integrity while allowing for seamless disassembly during repairs.
As you embark on this meticulous task, it is essential to maintain a steady hand and exercise caution to prevent damage to the screws or surrounding components. The precision screwdriver's fine tip enables you to engage with the screws securely, applying controlled force to loosen and extract them without causing any undue strain on the device.
Upon successfully removing the screws from the charging port area, shift your focus to the top of the iPhone 6, where an additional set of screws secures the display assembly near the device's earpiece. Employing the same precision screwdriver, carefully extract these screws, taking care to keep them organized and separate from the screws removed earlier.
As each screw is delicately extracted, it is advisable to place them in a designated container or on a clean, well-lit workspace, ensuring that they remain secure and easily accessible for reassembly. This organized approach minimizes the risk of misplacing or mixing up the screws, streamlining the subsequent steps of the glass replacement process.
By methodically removing the screws that secure the iPhone 6's display assembly, you pave the way for the careful separation of the device's components, setting the stage for the precise removal of the broken glass and the seamless installation of the replacement glass. This deliberate and meticulous approach underscores the importance of attention to detail and sets the foundation for a successful glass replacement endeavor.
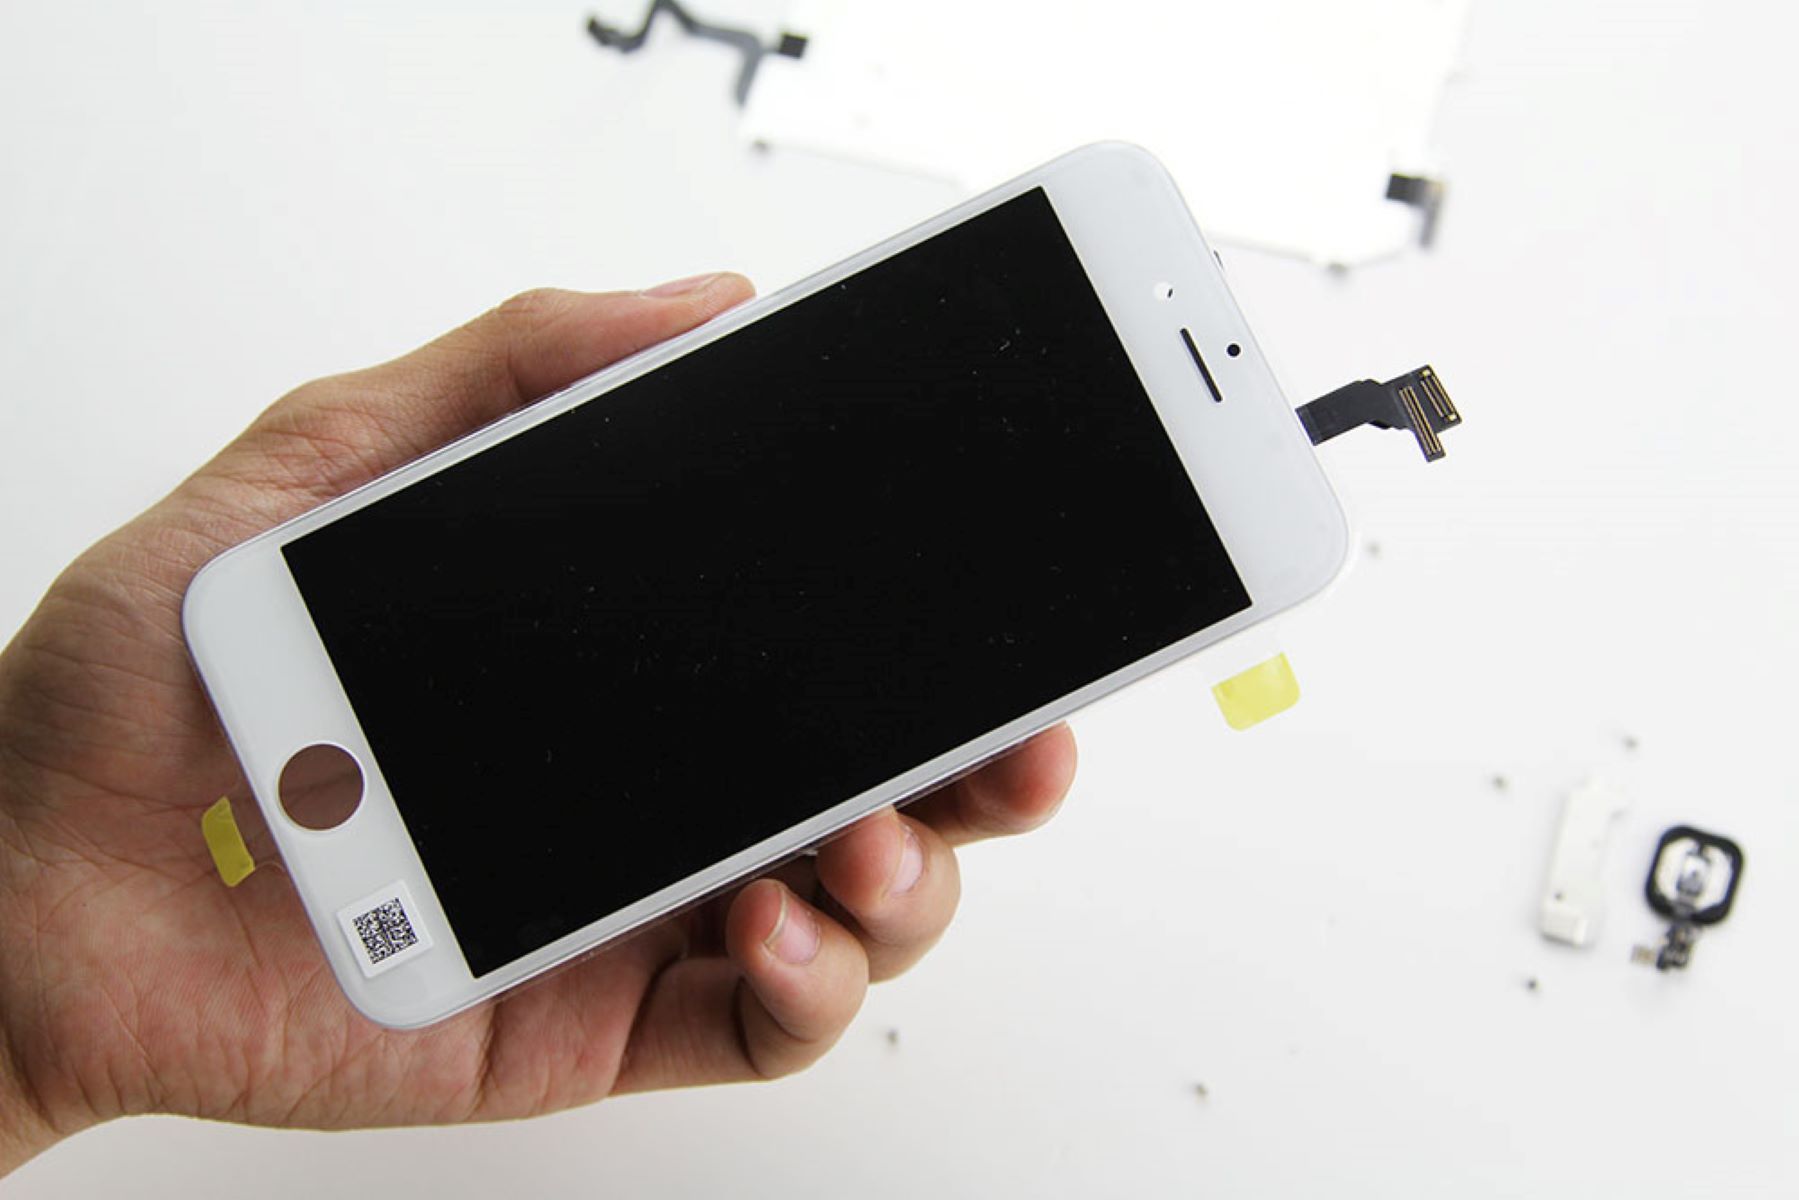
Step 3: Separate the display assembly
With the screws delicately removed and the iPhone 6 meticulously prepared, the next pivotal step in the glass replacement process involves the precise separation of the device's display assembly from its frame. This intricate task demands a methodical approach and a keen eye for detail, as the delicate components must be handled with care to ensure a seamless disassembly.
Begin by utilizing the suction cup tool to create a secure grip on the lower portion of the iPhone 6's display. Position the suction cup tool near the home button, ensuring that it adheres firmly to the glass surface. This strategic placement facilitates controlled separation, allowing for the gradual detachment of the display assembly from the device's frame.
Once the suction cup tool is securely in place, gently pull upward, exerting a consistent and even force to gradually lift the display assembly away from the iPhone 6's frame. As the display begins to separate, it is essential to proceed with caution, ensuring that the delicate cables connecting the display to the device's internal components are not strained or damaged during the separation process.
Simultaneously, employ the plastic spudger tool to carefully pry open the seam between the display assembly and the iPhone 6's frame. This non-conductive instrument enables precise manipulation, guiding the separation process while safeguarding the internal components from potential harm.
As the display assembly gradually loosens from the frame, exercise patience and attentiveness to ensure a smooth and controlled separation. Take care to navigate around the edges of the display, gently releasing any adhesive or clips that secure the assembly to the device's body.
Throughout this meticulous process, it is crucial to maintain a steady hand and a gentle touch, prioritizing the preservation of the delicate cables and components within the iPhone 6. By approaching the separation of the display assembly with precision and care, you lay the groundwork for the subsequent removal of the broken glass and the seamless installation of the replacement glass.
As the display assembly is delicately separated from the iPhone 6's frame, you set the stage for the transformative phase of the glass replacement process, poised to address the damaged glass and embark on the meticulous installation of the replacement component. This deliberate and methodical approach underscores the significance of attention to detail, guiding you toward a successful and rewarding glass replacement endeavor.
Step 4: Remove the broken glass
As you progress through the intricate process of replacing the glass on your iPhone 6, the pivotal step of removing the broken glass demands precision, patience, and a meticulous approach. The shattered or damaged glass, whether cracked or splintered, requires careful extraction to pave the way for the seamless installation of the replacement component.
Begin by delicately lifting the broken glass fragments and shards from the iPhone 6's display assembly, taking care to avoid any unnecessary pressure or force that could potentially damage the underlying components. Employing precision tweezers, gently grasp the larger pieces of broken glass, ensuring that they are safely removed from the display without causing any further harm.
As you navigate the removal of the broken glass, it is essential to maintain a keen focus on the delicate components beneath the shattered surface. Exercise caution and attentiveness, ensuring that the internal cables and components remain unharmed during the extraction process. Utilize the plastic spudger tool to carefully dislodge any remaining glass fragments, guiding them away from the display assembly with a gentle and methodical approach.
Simultaneously, employ a microfiber cloth to meticulously clean the display assembly, removing any residual glass particles, dust, or debris that may have accumulated during the removal process. The soft and non-abrasive texture of the microfiber cloth ensures that the display remains free from contaminants, setting the stage for the precise installation of the replacement glass.
By diligently removing the broken glass from the iPhone 6's display assembly, you prepare the device for the transformative phase of the glass replacement process. This meticulous and focused approach underscores the significance of careful handling and attention to detail, laying the groundwork for the seamless integration of the replacement glass and the restoration of your iPhone 6 to its original splendor.
Read more: How To Replace Glass In A Door
Step 5: Install the new glass
With the broken glass delicately removed and the iPhone 6's display assembly meticulously prepared, the transformative phase of the glass replacement process commences with the precise installation of the new glass. This pivotal step demands unwavering attention to detail, a steady hand, and a methodical approach to ensure the flawless integration of the replacement component, ultimately restoring the device to its original elegance.
Begin by carefully aligning the replacement glass with the display assembly, ensuring that it seamlessly fits into the designated area with precision. The replacement glass should align perfectly with the edges of the display, creating a seamless and uniform transition from the frame to the glass surface. Employing the utmost care and precision, gently position the replacement glass, taking care to avoid any undue pressure or force that could potentially compromise its integrity.
Once the replacement glass is meticulously aligned with the display assembly, employ adhesive strips specifically designed for the iPhone 6 to secure the new glass in place. These specialized adhesive strips provide a reliable and durable bond, ensuring that the replacement glass remains firmly affixed to the display, aligning seamlessly with the device's frame. Carefully apply the adhesive strips along the edges of the replacement glass, ensuring that they adhere securely to the display assembly, facilitating a robust and long-lasting bond.
As the adhesive strips are meticulously applied, exercise patience and precision to guarantee a uniform and secure attachment of the replacement glass. Take care to avoid any air pockets or uneven adhesion, ensuring that the new glass integrates seamlessly with the display assembly, presenting a flawless and visually appealing finish. Employ gentle pressure to ensure that the adhesive strips create a secure and uniform bond, safeguarding the replacement glass and facilitating its long-term stability.
By methodically installing the new glass with precision and care, you pave the way for the culmination of the glass replacement process, poised to reassemble the iPhone 6 with the restored display and renewed elegance. This deliberate and meticulous approach underscores the significance of attention to detail and precision, guiding you toward the successful integration of the replacement glass and the revitalization of your iPhone 6's appearance.
Step 6: Reassemble the iPhone
With the new glass meticulously installed and the iPhone 6's display assembly restored to its pristine state, the final phase of the glass replacement process entails the meticulous reassembly of the device. This pivotal step demands a methodical approach, unwavering attention to detail, and a keen focus on precision to ensure that the iPhone 6 is seamlessly reconstructed, ready to showcase its renewed elegance and functionality.
Begin by carefully aligning the display assembly with the iPhone 6's frame, ensuring that the delicate cables and connectors are meticulously guided into their respective positions. Exercise patience and attentiveness, taking care to avoid any undue strain on the internal components as the display assembly is delicately maneuvered into place. The precise alignment of the display assembly sets the stage for the seamless integration of the device's components, laying the foundation for the successful reassembly of the iPhone 6.
As the display assembly is meticulously positioned, delicately reinsert the screws that secure the assembly to the device's frame. Utilize the precision screwdriver from your set to carefully tighten the screws, ensuring a secure and stable connection between the display assembly and the iPhone 6's body. Exercise caution and precision, taking care to avoid over-tightening the screws, which could potentially damage the delicate components within the device.
Simultaneously, verify that the replacement glass is seamlessly integrated with the display assembly, aligning perfectly with the iPhone 6's frame to present a flawless and visually appealing finish. Employ a keen eye for detail, ensuring that the replacement glass is free from imperfections and aligns uniformly with the device's edges, showcasing the meticulous craftsmanship of the glass replacement process.
As the reassembly nears completion, power on the iPhone 6 to verify that the display functions flawlessly and presents a clear and vibrant visual experience. Confirm that the touch functionality is responsive and precise, ensuring that the replacement glass seamlessly integrates with the device's display, delivering a seamless and immersive user experience.
By methodically reassembling the iPhone 6 with precision and care, you culminate the transformative glass replacement process, poised to admire the device's renewed elegance and functionality. This deliberate and meticulous approach underscores the significance of attention to detail and precision, guiding you toward the successful reassembly of the iPhone 6 and the revitalization of its appearance.
When replacing the glass on an iPhone 6, make sure to use a heat gun or hair dryer to soften the adhesive before carefully prying off the old glass. Be patient and gentle to avoid damaging the phone.
Conclusion
In conclusion, the process of replacing the glass on an iPhone 6 is a meticulous and rewarding endeavor that demands patience, precision, and a methodical approach. By embarking on this journey, you have demonstrated a commitment to restoring your iPhone 6 to its original elegance and functionality, showcasing the transformative power of hands-on repair and attention to detail.
Throughout the intricate steps outlined in this guide, you have navigated the delicate disassembly, meticulous removal of broken glass, and precise installation of the replacement component with unwavering dedication. Each phase of the glass replacement process has underscored the significance of careful handling, precision, and a keen eye for detail, culminating in the successful reassembly of the iPhone 6 with its renewed display.
As you reflect on this journey, it is essential to acknowledge the sense of accomplishment that accompanies the restoration of your iPhone 6. The meticulous attention to detail and the unwavering commitment to precision have not only revitalized the device's appearance but have also instilled a profound sense of pride in your ability to undertake hands-on repair with confidence and skill.
Furthermore, the knowledge and experience gained from this endeavor serve as a testament to your capability to engage with intricate repair tasks, fostering a deeper understanding of the inner workings of the iPhone 6 and the intricacies of its display assembly. This newfound expertise positions you as a capable and resourceful individual, equipped to address similar repair challenges with confidence and proficiency in the future.
As you admire the flawlessly restored display of your iPhone 6, it serves as a tangible representation of your dedication to precision and your unwavering commitment to excellence. The seamless integration of the replacement glass, coupled with the device's renewed functionality, stands as a testament to your ability to navigate complex repair tasks with finesse and determination.
In essence, the journey of replacing the glass on your iPhone 6 transcends the restoration of a device; it embodies a testament to your resourcefulness, skill, and unwavering dedication to achieving excellence. The revitalized elegance and functionality of your iPhone 6 stand as a testament to your ability to engage with intricate repair tasks with confidence and precision, underscoring the transformative power of hands-on repair and the fulfillment derived from breathing new life into a cherished device.
Frequently Asked Questions about How To Replace The Glass On Iphone 6
Was this page helpful?
At Storables.com, we guarantee accurate and reliable information. Our content, validated by Expert Board Contributors, is crafted following stringent Editorial Policies. We're committed to providing you with well-researched, expert-backed insights for all your informational needs.


0 thoughts on “How To Replace The Glass On Iphone 6”