Home>Home Appliances>Kitchen Appliances>How To Replace Glass Stovetop
Kitchen Appliances
How To Replace Glass Stovetop
Published: February 4, 2024
Learn how to replace a glass stovetop with our step-by-step guide. Keep your kitchen appliances in top shape with our expert tips.
(Many of the links in this article redirect to a specific reviewed product. Your purchase of these products through affiliate links helps to generate commission for Storables.com, at no extra cost. Learn more)
Introduction
Replacing a glass stovetop can breathe new life into your kitchen and give it a fresh, modern look. Whether your current stovetop is damaged, outdated, or simply in need of an upgrade, installing a new glass stovetop is a rewarding project that can be accomplished with the right tools and a bit of know-how. In this comprehensive guide, we will walk you through the step-by-step process of replacing your glass stovetop, from gathering the necessary tools and materials to testing the new stovetop to ensure it functions perfectly.
A glass stovetop not only serves as a functional cooking surface but also adds an aesthetic appeal to your kitchen. Its sleek and smooth surface not only looks elegant but is also easier to clean compared to traditional coil or gas burners. When it comes to replacing a glass stovetop, it's essential to approach the task with careful planning and attention to detail. By following the instructions provided in this guide, you can successfully replace your glass stovetop and revitalize your kitchen space.
Whether you're a seasoned DIY enthusiast or a novice looking to take on a new home improvement project, replacing a glass stovetop is a manageable task that can yield impressive results. With the right guidance and a willingness to learn, you can tackle this project with confidence and achieve a professional-looking outcome. So, roll up your sleeves, gather your tools, and let's embark on this exciting journey to transform your kitchen with a brand-new glass stovetop.
Key Takeaways:
- Replacing a glass stovetop can give your kitchen a modern look and easier cleaning. Follow the steps to safely install and test the new stovetop for a rewarding DIY project.
- Prioritize safety by turning off the power before removing the old stovetop. Carefully install and test the new glass stovetop for a stylish and functional kitchen upgrade.
Read more: How To Clean Glass Stovetop
Step 1: Gather the necessary tools and materials
Before embarking on the journey of replacing your glass stovetop, it's crucial to gather all the essential tools and materials to ensure a smooth and efficient process. Here's a comprehensive list of what you'll need:
Tools:
- Screwdriver Set: A set of screwdrivers, including both flathead and Phillips head, will be necessary for removing the screws that secure the old stovetop in place.
- Putty Knife: This tool will come in handy for carefully prying up the old stovetop and removing any adhesive or sealant.
- Safety Gloves: It's important to protect your hands with a sturdy pair of gloves, especially when handling broken glass or sharp edges.
- Safety Goggles: To shield your eyes from any debris or glass particles during the removal process, safety goggles are a must.
- Measuring Tape: Accurate measurements are crucial when fitting the new stovetop into place, so a measuring tape will be indispensable.
- Vacuum Cleaner: Having a vacuum on hand to clean up any debris or glass remnants after removing the old stovetop will help maintain a clean work area.
Materials:
- Replacement Glass Stovetop: Ensure that you have the correct model and size to fit your specific stovetop configuration.
- Adhesive/Sealant: Depending on the manufacturer's recommendations, you may need a specific adhesive or sealant to secure the new stovetop in place.
- Electrical Tape: This will be necessary for securing and insulating electrical connections during the installation process.
- Cleaning Supplies: Have a supply of glass cleaner and microfiber cloths on hand to clean the new stovetop once it's installed.
- Electrical Wires and Connectors: In case any electrical wiring needs to be replaced or repaired, having extra wires and connectors available is advisable.
By ensuring that you have all the necessary tools and materials at your disposal, you'll be well-prepared to tackle the subsequent steps of turning off the power, removing the old stovetop, and installing the new glass stovetop with confidence and ease. With everything in place, you're ready to move on to the next phase of this exciting project.
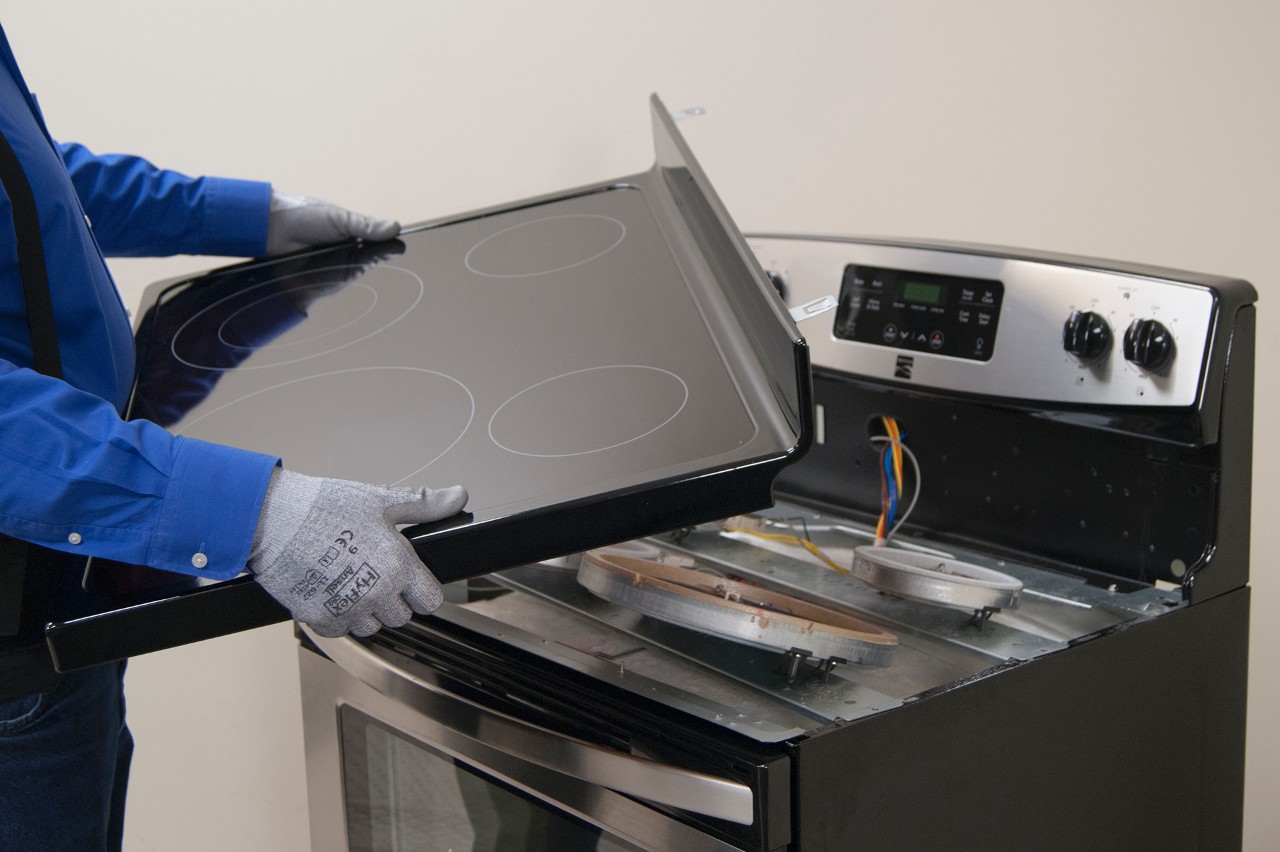
Step 2: Turn off the power and remove the old stovetop
Before beginning the removal process, it is crucial to prioritize safety by disconnecting the power supply to the stovetop. This step is essential to prevent any electrical hazards and ensure a secure working environment. Here's a detailed guide on how to turn off the power and remove the old stovetop:
Turning off the Power:
-
Locate the Circuit Breaker: Start by locating the circuit breaker that controls the power supply to the stovetop. In most homes, the circuit breaker panel is situated in the basement, garage, or utility room.
-
Identify the Correct Breaker: Once you've located the circuit breaker panel, identify the breaker that corresponds to the stovetop. The breakers are typically labeled, making it easier to pinpoint the one that controls the kitchen appliances.
-
Switch Off the Breaker: Carefully switch off the breaker that powers the stovetop. It's advisable to double-check that the power has been successfully disconnected by testing the stovetop controls to ensure they are non-operational.
Removing the Old Stovetop:
-
Clear the Surrounding Area: Before proceeding with the removal, clear the area around the stovetop to create a safe and unobstructed workspace. Ensure that there are no items or obstacles that could impede the removal process.
-
Disconnect the Electrical Wires: With the power turned off, carefully disconnect the electrical wires that are connected to the stovetop. It's essential to handle the wires with caution and use electrical tape to secure the loose ends and prevent any accidental contact.
-
Remove the Mounting Screws: Using the appropriate screwdriver, remove the mounting screws that secure the stovetop in place. These screws are typically located around the perimeter of the stovetop and may be concealed by trim pieces that need to be carefully removed.
-
Lift and Remove the Stovetop: Once the mounting screws have been removed, gently lift the old stovetop from its position. It's important to handle the stovetop carefully to avoid any damage or injury. If the stovetop is sealed with adhesive, use a putty knife to carefully loosen it from the countertop.
By following these detailed steps to turn off the power and remove the old stovetop, you can ensure a safe and systematic approach to the initial phase of the replacement process. With the old stovetop successfully removed, you're now ready to proceed to the next stage of installing the new glass stovetop and bringing a fresh, contemporary look to your kitchen.
Step 3: Install the new glass stovetop
With the old stovetop successfully removed, it's time to embark on the exciting phase of installing the new glass stovetop. This step-by-step guide will walk you through the process of fitting the new stovetop into place, ensuring a secure and seamless installation.
Fitting the New Stovetop:
-
Prepare the Countertop: Before placing the new stovetop, ensure that the countertop surface is clean and free from any debris or remnants of the old stovetop. Use a vacuum cleaner and a damp cloth to thoroughly clean the area, creating a smooth and tidy surface for the new installation.
-
Position the New Stovetop: Carefully position the new glass stovetop onto the designated area on the countertop. Ensure that it aligns perfectly with the opening and sits flush with the surrounding surface. Take accurate measurements to confirm that the stovetop is centered and properly positioned.
-
Secure the Stovetop: Depending on the manufacturer's recommendations, apply the appropriate adhesive or sealant around the perimeter of the stovetop to secure it in place. Follow the specific instructions provided with the new stovetop to ensure a secure and durable bond with the countertop.
-
Reconnect the Electrical Wires: With the new stovetop in position, carefully reconnect the electrical wires, ensuring that each wire is correctly attached and insulated with electrical tape. Double-check the connections to guarantee a safe and reliable electrical setup.
-
Test the Fit: Once the stovetop is secured and the electrical connections are in place, test the fit by gently pressing down on different areas of the stovetop. Ensure that it feels stable and does not shift or wobble, indicating a secure installation.
Final Adjustments and Clean-Up:
-
Make Any Necessary Adjustments: If the stovetop requires any minor adjustments to ensure a perfect fit, carefully make the necessary modifications. This may involve fine-tuning the positioning or addressing any alignment issues to achieve a seamless integration with the countertop.
-
Clean the Stovetop Surface: Use a high-quality glass cleaner and a microfiber cloth to clean the surface of the new stovetop, removing any fingerprints, smudges, or residue from the installation process. A sparkling, pristine stovetop will add the finishing touch to your kitchen upgrade.
By following these detailed steps, you can successfully install the new glass stovetop and elevate the functionality and aesthetic appeal of your kitchen. With the stovetop securely in place and the electrical connections reestablished, you're now ready to proceed to the final phase of reconnecting the power and testing the new stovetop to ensure it functions flawlessly.
Step 4: Reconnect the power and test the new stovetop
With the new glass stovetop securely installed, the final phase involves reconnecting the power supply and conducting thorough testing to ensure that the stovetop functions seamlessly. This critical step ensures that the installation has been completed successfully and that the new stovetop is ready for everyday use.
Reconnecting the Power:
-
Restore the Power: Return to the circuit breaker panel and locate the breaker that controls the stovetop. Carefully switch the breaker back on to restore power to the stovetop. It's essential to verify that the power has been successfully reinstated by testing the stovetop controls to ensure they are operational.
-
Check the Electrical Connections: Before proceeding, double-check all the electrical connections to confirm that they are secure and properly insulated. Ensure that there are no exposed wires or loose connections that could pose a safety hazard.
Testing the New Stovetop:
-
Power On: Turn on the new stovetop and verify that all the heating elements function correctly. Test each burner individually to ensure that they heat up evenly and reach the desired temperature.
-
Control Functions: Test the control knobs or touchpad to confirm that they respond accurately and allow for precise adjustment of the heat settings. Check for any irregularities in the control functions that may indicate a need for further adjustments.
-
Visual Inspection: Conduct a visual inspection of the stovetop to ensure that there are no signs of damage or defects. Look for any cracks, scratches, or abnormalities on the glass surface that may have occurred during the installation process.
-
Heat Distribution: Place a pot or pan on each burner and observe the heat distribution to ensure that it is uniform across the cooking surface. This step is crucial to guarantee that the stovetop provides consistent and reliable heat for cooking.
-
Safety Features: If the new stovetop is equipped with safety features such as automatic shutoff or overheating protection, test these functions to ensure that they operate as intended, providing an added layer of safety during use.
Read more: How To Replace Sunroof Glass
Final Verification:
After conducting the comprehensive testing process, take a moment to verify that the new stovetop meets your expectations in terms of performance, functionality, and appearance. Ensure that all the features and settings align with your cooking needs and preferences, providing a satisfying cooking experience.
By meticulously reconnecting the power supply and conducting thorough testing, you can confidently conclude the installation process, knowing that your new glass stovetop is ready to serve as a reliable and stylish centerpiece in your kitchen. With the project successfully completed, you can now enjoy the enhanced functionality and modern aesthetic that the new stovetop brings to your culinary space.
Conclusion
In conclusion, replacing a glass stovetop is a rewarding endeavor that not only enhances the functionality of your kitchen but also elevates its visual appeal. By following the comprehensive steps outlined in this guide, you have successfully navigated the process of replacing your old stovetop with a sleek and modern glass alternative. From gathering the necessary tools and materials to carefully installing the new stovetop and conducting thorough testing, you have demonstrated the dedication and skill required to undertake this home improvement project.
As you stand back and admire your newly installed glass stovetop, take pride in the transformation you have brought to your kitchen space. The smooth, elegant surface of the glass stovetop not only adds a touch of sophistication to your culinary environment but also offers practical benefits, such as easy cleaning and a contemporary aesthetic.
Furthermore, the successful completion of this project signifies your ability to take on DIY tasks with confidence and precision. By following the step-by-step instructions and exercising attention to detail, you have not only upgraded your kitchen but also expanded your repertoire of home improvement skills.
It's important to note that the installation of a glass stovetop represents a significant investment in your kitchen, and as such, it's essential to prioritize regular maintenance and care to preserve its pristine condition. By adhering to the manufacturer's guidelines for cleaning and maintenance, you can ensure that your new stovetop remains a focal point of your kitchen for years to come.
Lastly, the process of replacing a glass stovetop serves as a reminder of the transformative power of home improvement projects. Whether you're seeking to update the look of your kitchen, enhance its functionality, or simply take on a new DIY challenge, the installation of a new stovetop represents a tangible and gratifying accomplishment.
As you move forward with your newly upgraded kitchen, may the experience of replacing your glass stovetop inspire you to embark on future projects, infusing your living space with your personal touch and creating a home environment that reflects your unique style and preferences. With the completion of this project, you have not only enhanced your kitchen but also expanded your capabilities as a capable and resourceful homeowner.
Frequently Asked Questions about How To Replace Glass Stovetop
Was this page helpful?
At Storables.com, we guarantee accurate and reliable information. Our content, validated by Expert Board Contributors, is crafted following stringent Editorial Policies. We're committed to providing you with well-researched, expert-backed insights for all your informational needs.


0 thoughts on “How To Replace Glass Stovetop”