Home>Furniture & Design>Interior Design Trends>How To Transfer Image Onto Glass
Interior Design Trends
How To Transfer Image Onto Glass
Modified: August 17, 2024
Learn how to transfer images onto glass to create stunning interior design trends. Discover the step-by-step process for a unique and personalized touch.
(Many of the links in this article redirect to a specific reviewed product. Your purchase of these products through affiliate links helps to generate commission for Storables.com, at no extra cost. Learn more)
Introduction
Transferring images onto glass is a captivating and creative way to personalize your living space, create unique gifts, or add a touch of elegance to your home decor. This artistic technique allows you to immortalize cherished memories, showcase stunning artwork, or simply add a personal touch to everyday items. Whether you're a seasoned crafter or a novice DIY enthusiast, learning how to transfer images onto glass opens up a world of possibilities for expressing your creativity.
The process of transferring images onto glass is a delightful blend of art and science, requiring careful attention to detail and a touch of imagination. By mastering this technique, you can transform ordinary glass surfaces into captivating works of art that are sure to impress friends and family alike. With the right materials and a bit of patience, you can bring your vision to life and create stunning, one-of-a-kind pieces that reflect your unique style and personality.
In this comprehensive guide, we will explore the step-by-step process of transferring images onto glass, from preparing the glass surface to adding the finishing touches. Whether you're looking to adorn glassware with intricate designs, create custom photo coasters, or experiment with innovative home decor ideas, this guide will equip you with the knowledge and inspiration needed to embark on your creative journey.
So, gather your materials, unleash your creativity, and let's dive into the enchanting world of image transfer onto glass. With a few simple techniques and a dash of creativity, you'll soon be on your way to transforming plain glass surfaces into stunning, personalized masterpieces that are bound to leave a lasting impression.
Key Takeaways:
- Personalize glassware and decor with image transfer, creating unique, lasting art pieces that reflect your style and creativity. Embrace the process and enjoy the transformation of ordinary glass into captivating masterpieces.
- Prepare, print, and transfer images onto glass with care and precision to achieve stunning results. Add finishing touches for durability and visual appeal, creating personalized art pieces to cherish.
Read more: How To Store Screen Print Transfers
Materials Needed
To embark on the captivating journey of transferring images onto glass, you'll need a carefully curated selection of materials that are essential for achieving stunning results. From preparing the glass surface to executing the image transfer process, each item plays a crucial role in bringing your creative vision to life. Here's a comprehensive list of the materials you'll need to get started:
-
Glass Surfaces: Select the glass items or surfaces onto which you intend to transfer the images. This could include glassware such as tumblers, vases, or decorative plates, as well as flat glass panels for creating unique art pieces or personalized decor.
-
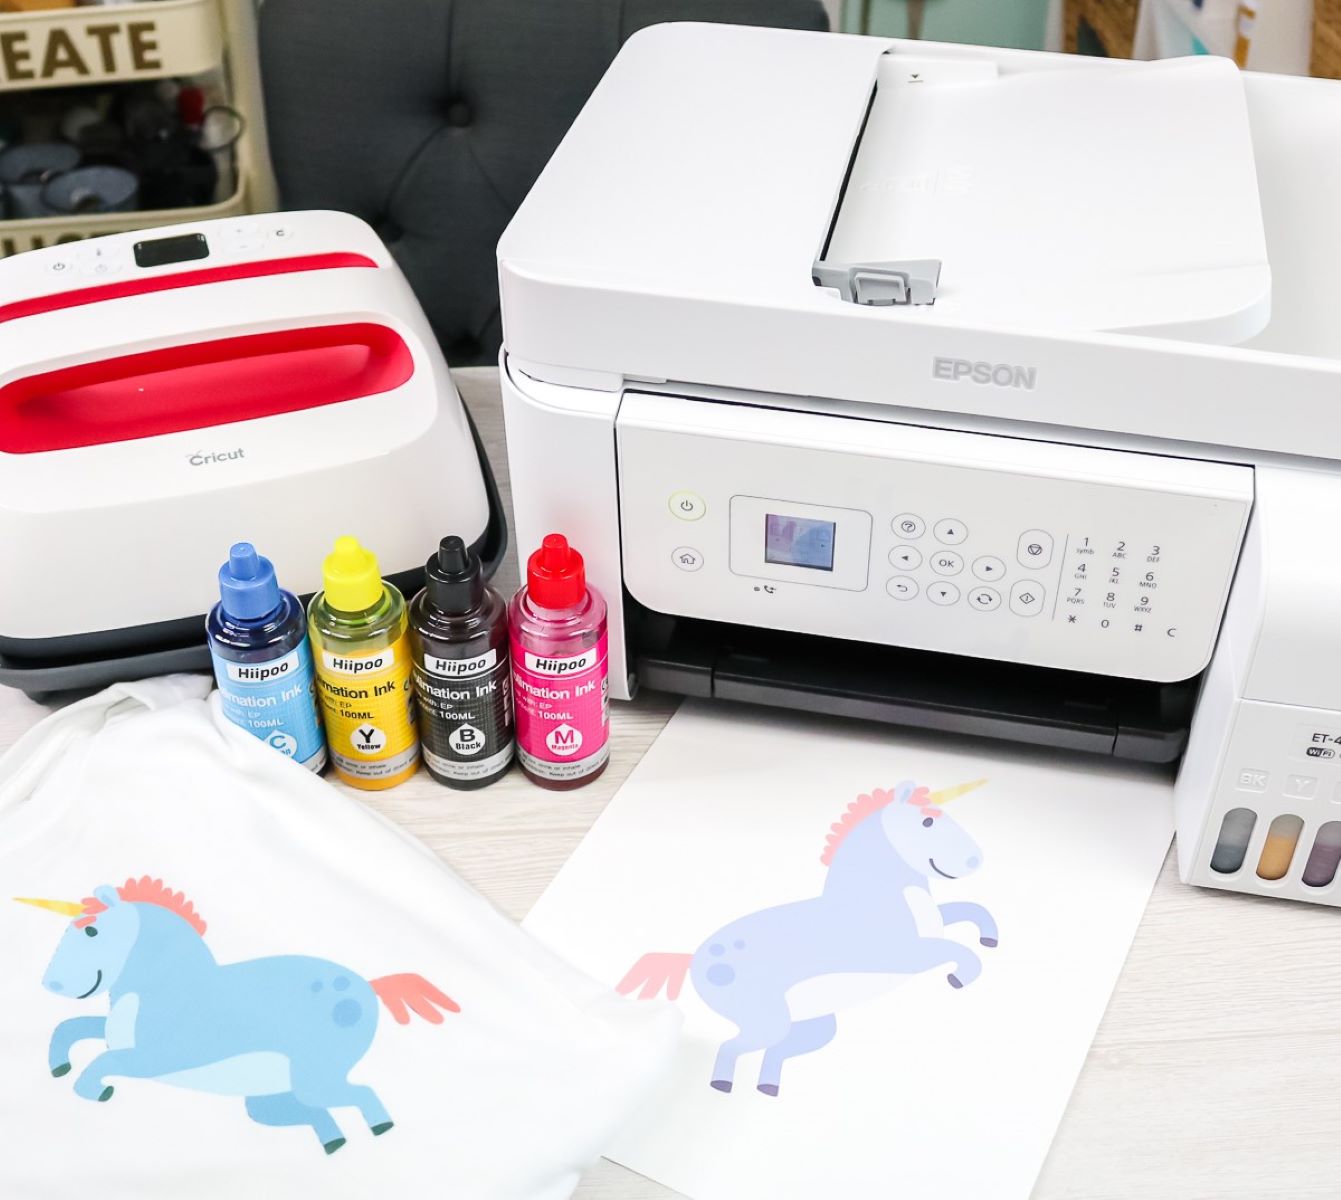
Images: Choose high-quality images or designs that you wish to transfer onto the glass. These could be photographs, digital artwork, or custom designs created specifically for this purpose. Ensure that the images are printed using a laser printer for optimal results.
-
Laser Printer: A laser printer is essential for producing the images that will be transferred onto the glass surfaces. The use of a laser printer is crucial, as inkjet printers may not yield the desired results due to the nature of the ink they use.
-
Transparency Film: Acquire transparency film sheets designed for laser printers. These specialized sheets are designed to hold the printed images and facilitate the transfer process onto the glass surfaces.
-
Mod Podge or Image Transfer Medium: Mod Podge or a specialized image transfer medium is used to adhere the printed images to the glass surfaces. This versatile adhesive and sealer is essential for achieving a smooth and durable image transfer.
-
Foam Brush or Squeegee: A foam brush or squeegee is necessary for applying the Mod Podge or image transfer medium onto the glass and ensuring that the images adhere seamlessly to the surface.
-
Soft Cloth: Have a soft, lint-free cloth on hand for gently smoothing out the images and removing any air bubbles during the transfer process.
-
Scissors: A pair of scissors will be needed to carefully trim the transparency film to fit the size of the glass surface onto which the image will be transferred.
-
Protective Sealant (Optional): Depending on the intended use of the glass item, a protective sealant may be required to safeguard the transferred image from wear and tear. Select a sealant suitable for glass surfaces to ensure long-lasting durability.
-
Workspace Protection: Consider using a protective covering for your workspace, such as a plastic tablecloth or disposable sheets, to safeguard surfaces from any potential spills or mess during the image transfer process.
By gathering these essential materials, you'll be well-equipped to embark on the exciting process of transferring images onto glass surfaces, unlocking a world of creative possibilities and personalized decor options. With these tools at your disposal, you're ready to bring your artistic vision to life and infuse ordinary glass surfaces with captivating images that reflect your unique style and creativity.
Preparing the Glass Surface
Before embarking on the image transfer process, it is crucial to prepare the glass surface to ensure optimal adhesion and a flawless outcome. Proper preparation sets the stage for a successful image transfer, allowing the transferred images to adhere seamlessly and withstand the test of time. Here's a detailed guide on how to prepare the glass surface for the image transfer process:
-
Clean the Glass Surface: Begin by thoroughly cleaning the glass surface using a gentle glass cleaner or a solution of water and mild dish soap. Ensure that the surface is free from dust, fingerprints, and any other debris that may hinder the adhesion of the transferred image.
-
Dry the Glass Surface: After cleaning, use a lint-free cloth to dry the glass surface completely. Any residual moisture or cleaning solution can interfere with the image transfer process, so it's essential to ensure that the surface is entirely dry before proceeding.
-
Remove Any Residue: If the glass surface has any stubborn residue or adhesive from stickers or labels, use a gentle adhesive remover or rubbing alcohol to eliminate it. A smooth, residue-free surface provides the ideal foundation for the image transfer process.
-
Protect the Surrounding Area: To prevent any accidental spills or mess during the image transfer process, consider protecting the surrounding area with a disposable covering or a designated workspace mat. This precautionary measure helps safeguard your workspace and ensures a clean, focused environment for the image transfer process.
-
Inspect for Imperfections: Carefully inspect the glass surface for any imperfections or blemishes. If there are any scratches or flaws, consider addressing them before proceeding with the image transfer. Smooth, flawless glass surfaces yield the best results when transferring images.
By meticulously preparing the glass surface, you set the stage for a successful image transfer process, laying the groundwork for stunning and enduring results. This thoughtful preparation ensures that the transferred images adhere seamlessly to the glass surface, creating captivating pieces of personalized art and decor. With the glass surface meticulously prepared, you're now ready to proceed to the next step of the image transfer process, bringing your creative vision to life on glass with confidence and precision.
To transfer an image onto glass, use a transfer gel or medium specifically designed for glass. Apply the gel to the image, place it on the glass, and let it dry. Then, gently remove the paper to reveal the transferred image.
Printing the Image
Printing the image is a crucial step in the process of transferring images onto glass, as it lays the foundation for the subsequent transfer process. To ensure optimal results, it is essential to approach the printing phase with precision and attention to detail. Here's a detailed guide on how to effectively print the images for seamless transfer onto glass surfaces:
-
Select High-Quality Images: Begin by selecting high-resolution images or designs that are well-suited for the intended glass surface. Whether you're transferring photographs, digital artwork, or custom designs, choosing high-quality images is paramount. The clarity and detail of the images will significantly impact the final result, so opt for images with sharp, vibrant details and a resolution suitable for the size of the glass surface.
-
Use a Laser Printer: It is imperative to use a laser printer for printing the images onto transparency film. Laser printers are preferred for this process due to their ability to produce sharp, waterproof prints that are well-suited for image transfer applications. Inkjet printers are not recommended, as the water-based ink they use may not adhere effectively to the glass surface during the transfer process.
-
Adjust Print Settings: Prior to printing, ensure that the print settings are optimized for the best results. Select the appropriate paper type setting on the printer to accommodate the transparency film, and adjust the print quality settings to achieve the desired level of sharpness and color saturation. Experiment with test prints on regular paper to fine-tune the settings before printing onto the transparency film.
-
Load Transparency Film: Load the transparency film into the printer's paper tray, ensuring that it is positioned correctly for printing. Transparency film sheets designed for laser printers are specifically formulated to hold the ink and facilitate the transfer process onto glass surfaces. Carefully follow the printer's instructions for loading specialty media to avoid any misfeeds or printing errors.
-
Print and Inspect: Once the printer is loaded with the transparency film, proceed to print the selected images. After printing, carefully inspect the prints for any imperfections, smudges, or inconsistencies. It's essential to ensure that the images are printed with precision and clarity, as any flaws in the prints can impact the quality of the image transfer onto the glass surface.
By following these detailed steps for printing the images, you set the stage for a successful image transfer process onto glass surfaces. The meticulous selection of high-quality images and the use of a laser printer, combined with precise print settings and careful inspection, lay the groundwork for achieving stunning results in the subsequent stages of the image transfer process. With the images expertly printed onto transparency film, you're now ready to proceed to the next phase of transferring the images onto glass, bringing your creative vision to life with finesse and artistry.
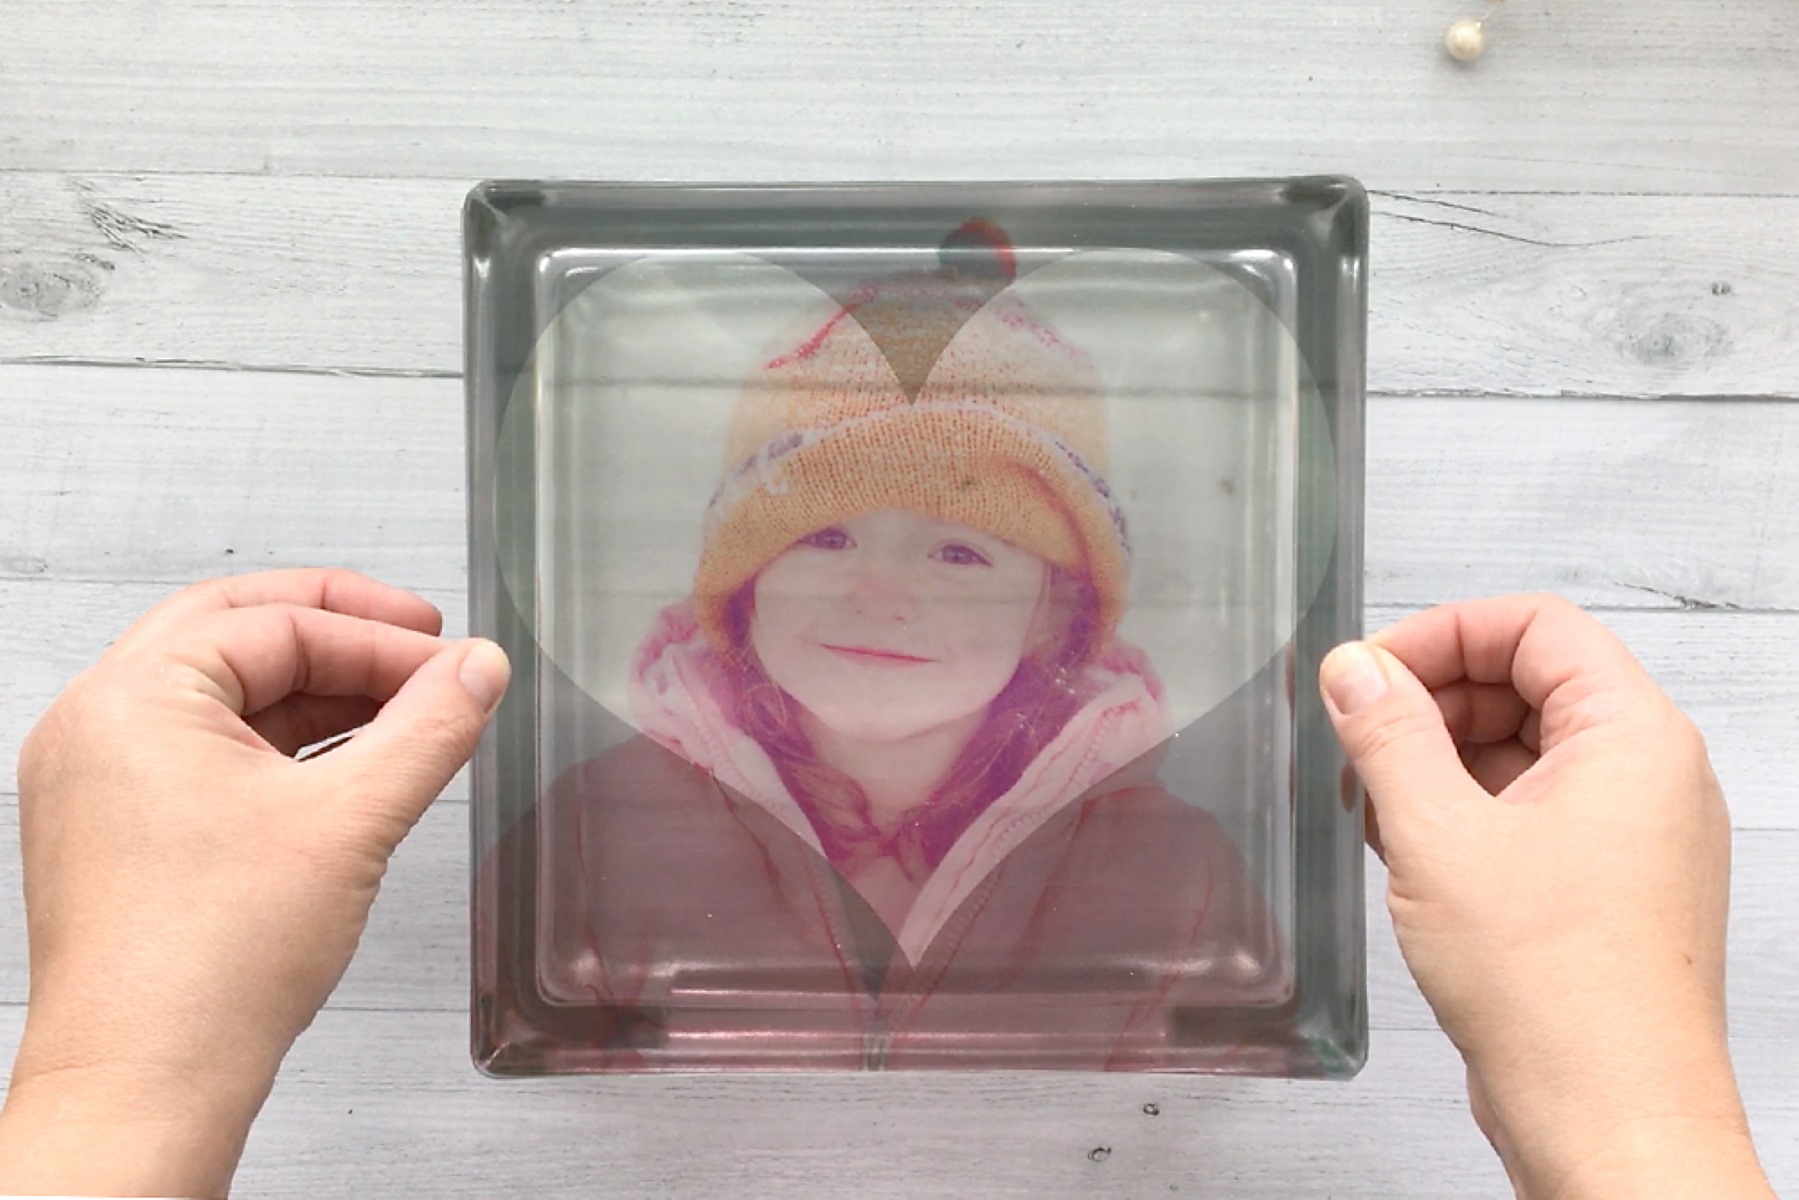
Transferring the Image onto Glass
With the glass surface meticulously prepared and the images expertly printed onto transparency film, it's time to embark on the captivating process of transferring the images onto the glass. This transformative phase infuses the glass surfaces with personalized art and designs, creating stunning pieces that reflect individual style and creativity. Here's a detailed guide on how to transfer the images onto glass surfaces with precision and finesse:
-
Apply the Image Transfer Medium: Begin by applying a generous layer of Mod Podge or the specialized image transfer medium onto the clean and dry glass surface. Use a foam brush or squeegee to ensure an even and smooth application, covering the entire area where the image will be transferred. The image transfer medium serves as the adhesive that will bond the printed images to the glass surface, so thorough and uniform application is essential.
-
Position the Image: Carefully place the printed transparency film with the image side down onto the glass surface coated with the image transfer medium. Take care to position the image accurately, aligning it with the desired orientation and ensuring that it adheres smoothly to the glass without any wrinkles or air bubbles.
-
Smooth Out the Image: Using a soft, lint-free cloth, gently smooth out the transparency film to remove any air bubbles and ensure that the image adheres seamlessly to the glass surface. Work from the center of the image outwards, applying gentle pressure to achieve a flawless transfer. Pay close attention to the edges and corners, ensuring that the entire image is firmly bonded to the glass.
-
Allow for Drying and Bonding: Once the image is smoothly positioned and free from air bubbles, allow the glass surface to dry and the image transfer medium to bond the printed image securely. Follow the manufacturer's recommended drying time for the specific image transfer medium used, ensuring that the transferred image sets and adheres firmly to the glass surface.
-
Remove the Transparency Film: After the drying period, carefully peel away the transparency film from the glass surface, revealing the transferred image beneath. Take care to peel the film slowly and steadily, ensuring that the transferred image remains intact and adheres seamlessly to the glass.
By meticulously following these steps, you'll successfully transfer the images onto glass surfaces, creating captivating pieces of personalized art and decor. The seamless fusion of the printed images with the glass yields stunning results, infusing ordinary surfaces with individuality and creativity. With the images expertly transferred onto the glass, you're now ready to add the finishing touches, bringing your artistic vision to life with elegance and flair.
Read more: How To Add Onto An Existing Shed
Finishing Touches
After successfully transferring the images onto the glass surfaces, adding the finishing touches elevates the pieces to a new level of sophistication and durability. These final steps not only enhance the visual appeal of the transferred images but also ensure that they withstand the test of time, allowing you to enjoy your personalized glass creations for years to come.
One essential aspect of the finishing touches is the application of a protective sealant, particularly for glass items that will be frequently handled or exposed to moisture. A high-quality sealant designed for glass surfaces acts as a safeguard, protecting the transferred images from scratches, fading, and water damage. When applying the sealant, ensure that the glass surface is clean and dry, and follow the manufacturer's instructions for optimal results. The sealant not only enhances the longevity of the transferred images but also adds a subtle sheen, accentuating the vibrancy of the designs and creating a polished, professional finish.
In addition to the protective sealant, consider incorporating decorative elements to further enhance the visual impact of the transferred images. This could involve embellishing the glass surfaces with metallic accents, such as gold or silver leaf, to create a striking contrast and add a touch of luxury to the designs. Alternatively, experimenting with translucent or iridescent paints can introduce captivating color variations and luminous effects, infusing the glass pieces with an ethereal and enchanting allure.
Furthermore, exploring creative display options for the personalized glass items can amplify their impact within your living space. Whether arranging the glassware in an artful vignette, showcasing the custom photo coasters on elegant trays, or incorporating the personalized glass panels into wall art or decorative installations, thoughtful presentation enhances the overall aesthetic and ensures that the transferred images take center stage in your home decor.
Finally, taking the time to admire and appreciate the completed glass pieces is a vital part of the finishing touches. Revel in the satisfaction of bringing your creative vision to life, and take pride in the unique, personalized artworks you've crafted. Whether gifting the glass creations to loved ones or integrating them into your home decor, the finishing touches solidify the transformation of ordinary glass surfaces into captivating, personalized masterpieces that reflect your individual style and creativity.
By embracing these final steps, you'll infuse your personalized glass creations with durability, visual allure, and a touch of artistry, ensuring that they become cherished focal points within your living space. With the finishing touches complete, your personalized glass pieces are ready to captivate and inspire, adding a touch of elegance and individuality to your home decor.
Frequently Asked Questions about How To Transfer Image Onto Glass
Was this page helpful?
At Storables.com, we guarantee accurate and reliable information. Our content, validated by Expert Board Contributors, is crafted following stringent Editorial Policies. We're committed to providing you with well-researched, expert-backed insights for all your informational needs.

0 thoughts on “How To Transfer Image Onto Glass”