Home>Furniture>Outdoor Furniture>How To Strip Your Decking
Outdoor Furniture
How To Strip Your Decking
Modified: March 7, 2024
Learn how to strip your outdoor furniture decking with our easy step-by-step guide, ensuring a fresh and clean look for your outdoor space.
(Many of the links in this article redirect to a specific reviewed product. Your purchase of these products through affiliate links helps to generate commission for Storables.com, at no extra cost. Learn more)
Introduction
Welcome to our comprehensive guide on how to strip your decking! If you have outdoor furniture made of wood, you know how important it is to maintain its beauty and condition. Over time, exposure to the elements can cause your decking to become worn, discolored, or covered in stubborn stains or coatings. Stripping your decking is a crucial step in restoring its natural beauty and preparing it for fresh treatments or finishes.
In this guide, we will take you through the process of stripping your decking, step by step. You’ll learn about the tools and materials you’ll need, as well as helpful tips and recommendations to ensure a successful stripping project. Let’s dive in!
Before we get started, it’s important to note that decking stripping is not a one-size-fits-all process. The specific method and products you’ll use may vary depending on the type of wood and existing coatings or stains on your decking. Always check the manufacturer’s recommendations for your specific decking material and follow all safety precautions.
Key Takeaways:
- Stripping your decking involves removing old finishes and coatings to restore its natural beauty. Whether using chemical or mechanical methods, proper preparation and thorough rinsing are essential for a successful project.
- After stripping your decking, applying a protective finish and establishing a regular cleaning routine are crucial for maintaining its durability and visual appeal. Remember to follow manufacturer’s instructions and environmental regulations for a beautiful outdoor space.
Read more: How To Sand Your Decking
Understanding Decking Stripping
Decking stripping is the process of removing old finishes, coatings, stains, or sealants from the surface of your decking. Over time, these protective layers can become worn, faded, or damaged, detracting from the natural beauty of the wood and compromising its structural integrity. Stripping your decking allows you to start fresh and apply new treatments or finishes, ensuring your outdoor furniture remains durable and visually appealing.
There are several reasons why you may need to strip your decking. Perhaps the previous finish has started to crack or peel, or you want to change the color or type of treatment on your decking. Additionally, if you notice discoloration, stubborn stains, or a buildup of coatings, stripping is necessary to remove these imperfections and restore the natural look of the wood.
When it comes to decking stripping, there are generally two methods: chemical stripping and mechanical stripping. Chemical stripping involves using a specialized stripping solution or solvent to dissolve the old finishes or coatings. This method is effective for removing multiple layers of paint or varnish. Mechanical stripping, on the other hand, involves using physical tools such as sanders or scrapers to mechanically remove the old finishes or coatings.
The choice between chemical and mechanical stripping depends on several factors, including the type of finish or coating on your decking, the condition of the wood, and personal preference. Chemical stripping is generally faster and more suitable for large areas, while mechanical stripping allows for more precision and control.
Before proceeding with any stripping process, it’s essential to assess the condition of your decking. Inspect for any structural damage, such as rot or decay, and address these issues before starting the stripping process. Additionally, ensure the decking is thoroughly cleaned and free of debris before proceeding, as this will enhance the effectiveness of the stripping process.
Now that we understand the importance and methods of decking stripping, let’s move on to the tools and materials you’ll need for the project.
Tools and Materials Needed
Before you begin stripping your decking, gather the necessary tools and materials to ensure a smooth and efficient process. Here’s a list of what you’ll typically need:
- Stripping Solution: Choose a high-quality stripping solution that is specifically designed for your type of decking material and the coatings or stains you are removing. Look for a non-toxic and eco-friendly option if possible.
- Protective Clothing and Gear: Wear appropriate protective clothing, including gloves, safety goggles, and a mask, to protect yourself from any harmful chemicals or debris during the stripping process.
- Scrub Brushes: Depending on the size of your decking and the method of stripping you choose, you may need both stiff bristle brushes and soft bristle brushes. Stiff bristle brushes are effective for scrubbing away stubborn stains, while soft bristle brushes are suitable for gentler cleaning.
- Pressure Washer: A pressure washer is an essential tool for thoroughly rinsing the decking after stripping. It helps remove any remaining debris, cleaning solution residue, or loosened coatings.
- Sanders or Scrapers: If you opt for mechanical stripping, you’ll need sanders or scrapers to physically remove the old finishes or coatings. Choose the appropriate type of sander or scraper based on the size and complexity of the project.
- Paint Trays and Brushes: If you plan to apply a new finish or treatment after stripping, have paint trays and brushes ready for the application process.
- Cleaning Supplies: Before and after stripping, you’ll need basic cleaning supplies such as a broom, mop, bucket, and mild detergent to ensure a clean and debris-free surface.
- Drop Cloths or Tarps: Protect surrounding areas and vegetation by covering them with drop cloths or tarps during the stripping and cleaning process.
It’s important to note that the specific tools and materials you’ll need may vary depending on the size of your decking, the type of wood, and the method of stripping you choose. Always refer to the instructions provided by the manufacturer of the stripping solution and follow their recommended tools and techniques.
Now that you have everything you need, it’s time to move on to preparing your deck for the stripping process.
Preparing the Deck
Properly preparing your deck before the stripping process is essential for achieving optimal results. Follow these steps to ensure your deck is ready:
- Clear the Deck: Remove all furniture, plants, and other items from the deck. This will give you a clear workspace and prevent any obstructions during the stripping process.
- Sweep the Surface: Use a broom to sweep away any loose dirt, leaves, or debris from the deck surface. Pay special attention to corners and crevices where dirt can accumulate.
- Protect Surrounding Areas: If you have nearby plants or delicate surfaces that need protection, cover them with drop cloths or plastic tarps. This will prevent any potential damage from the stripping solution or debris.
- Wet the Deck: Before applying the stripping solution, wet the deck surface with water. This helps to open up the wood’s pores and allows the stripping solution to penetrate more effectively. Use a hose or sprinkler to evenly wet the entire deck surface.
Once you’ve completed these preparation steps, you’re ready to move on to applying the stripping solution to your deck.
Applying the Stripping Solution
Now that your deck is prepared, it’s time to apply the stripping solution. Follow these steps to ensure proper application:
- Read the Instructions: Start by carefully reading and understanding the instructions provided by the manufacturer of the stripping solution. Different products may have specific application techniques or safety precautions.
- Mix the Solution: If the stripping solution needs to be mixed with water or any other diluent, follow the recommended ratios provided by the manufacturer. Use a bucket or sprayer to mix the solution thoroughly.
- Apply the Solution: Use a brush or sprayer to apply the stripping solution evenly onto the deck surface. Work in small sections, ensuring complete coverage of the wood. Be generous with the solution to ensure proper penetration.
- Allow Dwell Time: After applying the stripping solution, allow it to dwell on the deck surface for the recommended amount of time specified by the manufacturer. This allows the solution to work on breaking down the existing finishes or coatings.
- Avoid Direct Sunlight: If possible, try to apply the stripping solution on a cloudy day or when the deck is shaded. Direct sunlight can cause the solution to dry too quickly, reducing its effectiveness.
During the application process, be mindful of safety precautions. Wear protective clothing, gloves, goggles, and a mask to avoid any contact with the stripping solution. Keep children and pets away from the work area as well.
Once the dwell time has elapsed, it’s time to move on to the next step: scrubbing and pressure washing.
Use a pressure washer with a stripping solution to remove old stain or paint from your decking. Start with a low pressure setting and gradually increase as needed. Always follow the manufacturer’s instructions for the stripping solution.
Read more: How To Put Up Your Decking
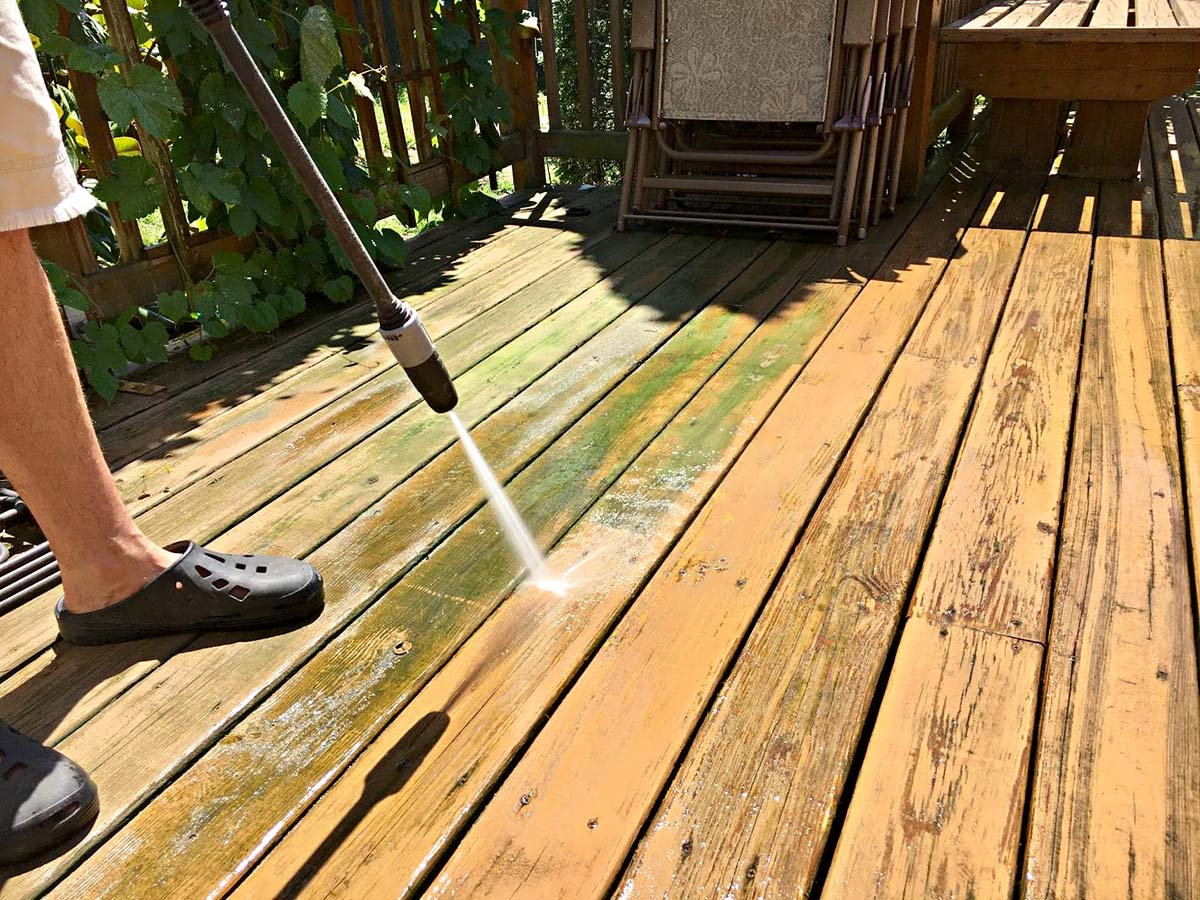
Scrubbing and Pressure Washing
After the stripping solution has had sufficient dwell time on your deck, it’s time to scrub and pressure wash the surface. Follow these steps to effectively remove the old finishes, coatings, and debris:
- Scrub the Deck: Begin by using a stiff bristle brush to scrub the deck surface. Work in small sections and scrub vigorously to remove any loosened finishes or coatings. Pay extra attention to stubborn stains or areas that require more effort.
- Work in the Grain: Always scrub in the direction of the wood grain to avoid causing any damage or scratches to the surface. This ensures a smooth and even finish when the stripping process is complete.
- Pressure Washing: Once you’ve completed the scrubbing process, it’s time to use a pressure washer to rinse the deck surface. Start from one end of the deck and work your way across, using even and sweeping motions. Keep the pressure washer nozzle at a safe distance from the wood to avoid damaging the surface.
- Adjust the Pressure: Depending on the condition of your deck, you may need to adjust the pressure setting on the pressure washer. Begin with a lower pressure setting and gradually increase if necessary. Be cautious not to use excessive pressure, as it can splinter or gouge the wood.
- Remove all Residue: Ensure that all stripping solution, loosened finishes, and coatings are thoroughly removed during the pressure washing process. Take your time and go over each section until the water runs clear.
As you go through the scrubbing and pressure washing steps, take breaks if needed. This allows you to assess your progress and ensure that you are achieving the desired results.
Next, we’ll discuss how to tackle stubborn stains or coatings that may require additional attention.
Removing Stubborn Stains or Coatings
While the stripping process is effective in removing most finishes or coatings, there may be stubborn stains or coatings that require extra attention. Here are some methods to tackle these stubborn areas:
- Spot Treatments: For localized stains or coatings, you can apply a bit of undiluted stripping solution directly to the affected area. Allow it to dwell for a few minutes, then use a scrub brush to agitate the stain. Rinse thoroughly with water to remove the solution and the stain.
- Sanding: If there are particularly stubborn areas that the stripping solution cannot remove, you may need to resort to sanding. Use a sander with medium-grit sandpaper to gently and evenly remove the stain or coating. Be cautious not to sand too aggressively, as it can damage the wood.
- Chemical Strippers: In cases where traditional stripping methods are not effective, you can consider using a stronger chemical stripper. These products are formulated to tackle tough coatings or stains. However, exercise caution and follow the manufacturer’s instructions carefully, as these products can be more potent and may require additional safety precautions.
- Multiple Applications: In some instances, multiple applications of the stripping solution may be necessary to fully remove stubborn coatings or stains. Apply the solution to the affected areas, allow it to dwell, and scrub or pressure wash as usual. Repeat the process as needed until the stubborn areas are resolved.
Remember to always test any spot treatments or chemical strippers in an inconspicuous area before applying them to the entire deck. This will ensure compatibility with your decking material and avoid any potential damage.
After addressing the stubborn stains or coatings, it’s time to rinse and dry the deck to complete the stripping process.
Rinsing and Drying the Deck
Once you’ve completed the stripping and cleaning process, it’s crucial to rinse and dry the deck properly to remove any remaining residue or moisture. Follow these steps to ensure a thorough rinse and effective drying:
- Clear the Work Area: Remove any equipment or tools from the deck and clear the surrounding area to make rinsing easier.
- Rinse with Water: Use a hose or pressure washer to thoroughly rinse the deck surface. Start from one end and work your way across, ensuring that all areas are rinsed adequately. Pay attention to corners and crevices to remove any trapped debris or residue.
- Check for Residue: After rinsing, inspect the deck surface to ensure that all stripping solution, cleaning agents, and debris have been completely removed. If any residue remains, repeat the rinsing process until the water runs clear.
- Dry the Deck: Allow the deck to air dry completely before proceeding with any further treatments or finishes. Depending on the weather conditions, this may take several hours or even a full day. Avoid walking on the deck while it is wet to prevent any slips or falls.
During the drying process, it’s essential to monitor the weather. If you expect rain or high humidity, consider covering the deck with a waterproof tarp to protect it from moisture. Ensure that the deck is fully dry before moving on to the next steps to prevent any damage or interference with the new finish or treatment.
Congratulations! You have successfully completed the stripping, cleaning, and drying process for your deck. Now, it’s time to proceed with the final steps and recommendations.
Final Steps and Recommendations
Now that your deck has been stripped, cleaned, and dried, it’s time to take the final steps to ensure its longevity and beauty. Here are some recommendations to complete your deck restoration project:
- Apply a Protective Finish: After the deck is completely dry, consider applying a protective finish or treatment to enhance its durability and appearance. Options include stains, sealers, or paints. Choose a product that is specifically designed for outdoor use and suits your aesthetic preferences.
- Follow Manufacturer’s Instructions: When applying the finish or treatment, carefully read and follow the manufacturer’s instructions for the best results. Take note of the recommended application tools, drying time, and any additional coats that may be necessary.
- Maintain Regular Cleaning: To prolong the life of your decking and keep it looking its best, establish a regular cleaning routine. Sweep away debris regularly, clean up spills promptly, and periodically wash the deck with a mild detergent and water solution to remove dirt and grime.
- Protective Measures: Consider using protective mats or furniture pads under heavy items or furniture to prevent scratches or indentations on the deck surface. Avoid dragging heavy objects to prevent unnecessary wear and tear.
- Monitor for Maintenance Needs: Keep an eye on your deck for any signs of wear, damage, or discoloration. Address issues promptly to prevent further damage and extend the lifespan of your deck. This may include spot treating stains, sanding and refinishing small areas, or addressing any structural issues.
- Follow Environmental Regulations: Ensure that any products used in the stripping, cleaning, or finishing process comply with local environmental regulations. Dispose of any waste or leftover materials properly and responsibly.
By following these final steps and recommendations, you can maintain a beautiful, well-protected deck that will provide you with years of enjoyment. Remember, regular maintenance and care are essential to keep your outdoor furniture looking its best.
Congratulations again on completing the stripping process and restoring the natural beauty of your deck! Enjoy your outdoor space to the fullest.
Read more: How To Install LED Strips In Your Car
Conclusion
Congratulations on completing the journey of stripping your decking and restoring its natural beauty! By following the steps outlined in this comprehensive guide, you’ve taken important strides towards ensuring the longevity and visual appeal of your outdoor furniture.
Understanding the process of decking stripping and having the right tools and materials at your disposal are key factors in achieving the best results. Whether you opted for chemical stripping or mechanical methods, you’ve learned how to effectively remove old finishes, coatings, stains, and sealants from your decking surface.
From preparing your deck and applying the stripping solution to scrubbing, pressure washing, and addressing stubborn stains, you’ve tackled each step with diligence and care. Lastly, you’ve rinsed and dried your deck, leaving it ready for the application of a protective finish or treatment that will enhance its durability and appearance.
Remember, maintaining your deck’s beauty doesn’t end here. Establishing a regular cleaning routine, protecting the surface from heavy items or furniture, and addressing any maintenance needs promptly are crucial for preserving the integrity of your decking over time.
Be sure to consult the manufacturer’s instructions for any products you use, follow local environmental regulations, and prioritize safety precautions throughout the process. As a responsible homeowner, you’ve taken the necessary steps to ensure a successful decking stripping project while being mindful of your impact on the environment.
Now, take a moment to appreciate your rejuvenated decking and the inviting outdoor space it provides. Enjoy the comfort and beauty it brings as you create lasting memories with family and friends.
Thank you for choosing our comprehensive guide on how to strip your decking. We hope it has been informative, helpful, and inspiring. May your outdoor furniture continue to bring joy and relaxation for many years to come!
Frequently Asked Questions about How To Strip Your Decking
Was this page helpful?
At Storables.com, we guarantee accurate and reliable information. Our content, validated by Expert Board Contributors, is crafted following stringent Editorial Policies. We're committed to providing you with well-researched, expert-backed insights for all your informational needs.


0 thoughts on “How To Strip Your Decking”