Home>Garden Essentials>How To Do Different Infill On Different Layers In Prusa
Garden Essentials
How To Do Different Infill On Different Layers In Prusa
Modified: August 20, 2024
Learn how to create stunning garden designs using different infill techniques on various layers with Prusa 3D printers. Enhance your gardening experience today!
(Many of the links in this article redirect to a specific reviewed product. Your purchase of these products through affiliate links helps to generate commission for Storables.com, at no extra cost. Learn more)
Introduction
When it comes to 3D printing, achieving the perfect balance between strength, structural integrity, and material usage is vital. This is where infill comes into play. Infill is the internal support structure that fills the empty space within a 3D print, providing strength and stability while reducing print time and material usage.
One interesting feature available in the Prusa Slicer software is the ability to create different infill patterns on different layers. This opens up a world of possibilities for enhancing the function and aesthetics of your 3D prints. Whether you want to reinforce specific areas, create unique designs, or experiment with infill densities, Prusa Slicer allows you to customize the infill settings for each individual layer of your print.
In this article, we will delve into the concept of infill in 3D printing, explore the different types of infill patterns, and guide you through the process of implementing different infill on different layers using Prusa Slicer. So let’s dive in and discover how you can take your 3D prints to the next level!
Key Takeaways:
- Customize infill patterns in Prusa Slicer to strengthen 3D prints and reduce material usage, unlocking endless design possibilities for personalized and functional objects.
- Experiment with different infill patterns and settings in Prusa Slicer to enhance 3D prints, balancing strength, flexibility, and design elements for unique and optimized creations.
Read more: What Is A Good Infill Layer Thickness
Understanding Infill in 3D Printing
Infill is an essential component of 3D printing that determines the internal structure and strength of your prints. It refers to the pattern of material that fills the empty space inside a 3D object, sandwiched between the outer walls or shells. The infill provides support to the print, preventing it from collapsing or being too fragile.
The infill pattern can vary, ranging from solid, dense structures to sparse, honeycomb-like designs. The choice of infill pattern depends on the specific requirements of the print. For example, if you need a lightweight object, you might opt for a low-density infill pattern. On the other hand, if strength is a priority, a 100% solid infill might be more suitable.
Aside from structural considerations, infill also influences print time and material usage. Generally, prints with higher infill percentages will take longer to complete and require more material. Balancing the infill percentage is crucial, as going too high may result in excessive printing time and wasted material, while going too low can compromise the strength and stability of the print.
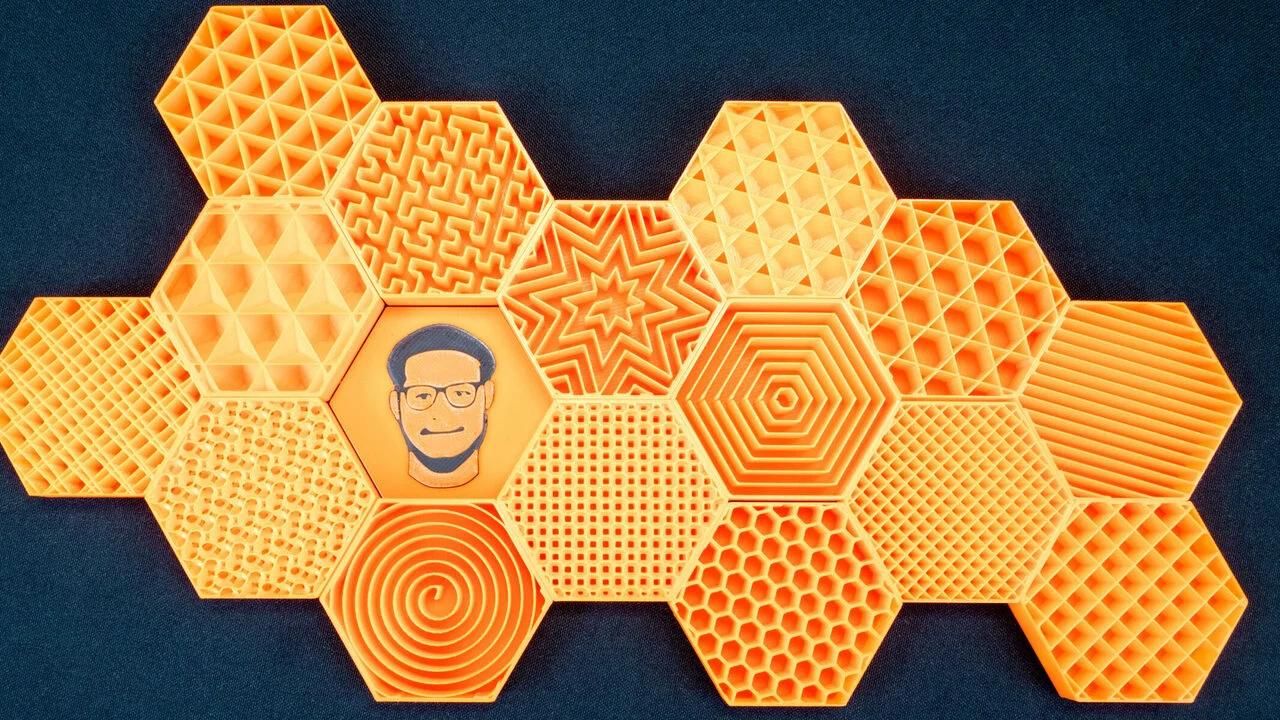
Most 3D printing software, including Prusa Slicer, offers a range of infill patterns to choose from, such as honeycomb, grid, triangles, and more. These infill patterns provide different levels of strength, flexibility, and material usage.
By understanding the concept of infill in 3D printing, you can make informed decisions when it comes to selecting the appropriate infill pattern for your specific print. The next step is to explore the various options available in Prusa Slicer and discover how to customize the infill settings for different layers of your prints.
Choosing the Right Infill Pattern
When it comes to selecting the right infill pattern for your 3D prints, it’s important to consider several factors, including the desired strength, print time, material usage, and even the aesthetic appeal of the final object. Here are a few commonly used infill patterns and their key characteristics:
Honeycomb Pattern:
The honeycomb pattern is one of the most popular infill patterns due to its balance of strength and material efficiency. It consists of repeating hexagonal cells that form a strong and lightweight structure. The honeycomb pattern offers excellent strength-to-weight ratio and is suitable for a wide range of applications.
Grid Pattern:
The grid pattern features a simple crisscross design, with lines running horizontally and vertically. It offers good strength and is relatively easy to print. The grid pattern is commonly used when a balance between strength and print time is desired.
Read more: How Do You Layer Rugs
Triangles Pattern:
The triangles pattern is composed of interconnected triangles, forming a stable and rigid structure. This pattern provides excellent strength while minimizing material usage. It is often used for parts that require high structural integrity.
Rectilinear Pattern:
The rectilinear pattern consists of straight lines running parallel and perpendicular to each other, creating a grid-like structure. This pattern is known for its simplicity and ease of printing. It provides decent strength and is suitable for general-purpose prints.
Custom Patterns:
In addition to the standard infill patterns, Prusa Slicer allows you to create custom infill patterns using various shapes and configurations. This gives you the freedom to experiment and design unique infill structures to meet your specific requirements.
When choosing the right infill pattern, consider the purpose of your print. If you need maximum strength, a solid infill or high-density pattern may be appropriate. For lightweight objects, low-density patterns like honeycomb or sparse infill can be used. Additionally, take into account the print time and material usage, as higher infill percentages typically increase both.
By understanding the characteristics of different infill patterns and considering your specific needs, you can choose the most suitable infill pattern to achieve the desired balance between strength, print time, and material usage.
Modifying Infill Settings in Prusa Slicer
Prusa Slicer offers a comprehensive set of options to modify and customize the infill settings for your 3D prints. These settings allow you to fine-tune the infill pattern, infill density, and other parameters to achieve the desired strength, flexibility, and material usage.
Read more: Why Can I See Infill Through Outer Layer
1. Infill Pattern:
Prusa Slicer provides a variety of infill patterns to choose from, including honeycomb, grid, triangles, rectilinear, and more. You can select your preferred pattern based on your specific requirements. Remember that each pattern has its own characteristics in terms of strength, rigidity, and material usage.
2. Infill Density:
The infill density determines the amount of infill material that will be printed inside the object. It is usually expressed as a percentage, with 100% being completely solid. Adjusting the infill density allows you to control the balance between strength and material usage. Higher infill densities will result in stronger prints but will require more time and material.
3. Infill Angle:
The infill angle refers to the orientation of the infill pattern relative to the print’s outer shells. By changing the infill angle, you can influence the strength and stability of the print. Experimenting with different angles can help optimize the print’s structural integrity.
4. Infill Overlap:
Infill overlap determines the degree to which the infill pattern overlaps with the outer walls of the print. This setting ensures proper adhesion and prevents gaps or weak points. Adjusting the infill overlap can enhance the overall strength of the print.
Read more: How To Do Infill Mask In Cura
5. Infill Prints:
Infill prints allow you to control the number of layers the infill pattern will be printed on. This setting is particularly useful when you want to reinforce specific regions of the print. By setting a higher number of infill prints, you can improve the strength and durability of those areas.
These are just a few of the many infill settings available in Prusa Slicer. Each option provides you with the flexibility to optimize your prints based on their intended use and your specific preferences. Take the time to experiment with different infill settings to find a combination that best suits your needs.
Configuring Different Infill on Different Layers
One of the unique features of Prusa Slicer is the ability to configure different infill patterns and settings on different layers of your 3D prints. This feature allows you to have more control over the strength, flexibility, and design aspects of your prints.
To configure different infill on different layers in Prusa Slicer, you can follow these steps:
1. Open Prusa Slicer:
Launch the Prusa Slicer software on your computer and import the 3D model or design you want to print.
2. Select the Layer View:
Switch to the Layer view in Prusa Slicer to visualize the layers of your print. This will allow you to easily identify the layers where you want to configure different infill.
Read more: When Do Guardrails Require Infill
3. Specify the Layer Height and Range:
Select the specific layer heights or layer range where you want to apply different infill settings. For example, you can set a range from layer 10 to layer 20 to define the layers where different infill will be applied.
4. Configure Infill Settings:
Once you have specified the layer heights or range, navigate to the Infill settings in Prusa Slicer. Here, you can change the infill pattern, infill density, infill angle, infill overlap, and other parameters specifically for the selected layers.
5. Apply the Changes:
Make the desired adjustments to the infill settings based on your requirements. You can experiment with different infill patterns, densities, and other settings to achieve the desired outcome. Ensure that you are applying the changes only to the selected layers or layer range.
6. Preview and Slice:
Before sending your print to the 3D printer, preview the sliced layers in Prusa Slicer to get a visual representation of how the different infill patterns will be applied on the selected layers. This step will help you verify that the desired infill configuration is implemented correctly.
7. Save and Print:
Once you are satisfied with the infill configuration, save the sliced file and send it to your 3D printer for printing. As the printer progresses through the layers, you will notice the different infill patterns being applied according to your specifications.
By configuring different infill on different layers, you can introduce variations in structural strength, flexibility, and design aesthetics within a single print. This feature opens up endless possibilities for creating complex and customized objects that meet your specific requirements.
Step-by-Step Guide to Implement Different Infill on Different Layers in Prusa
Implementing different infill patterns and settings on different layers of your 3D prints in Prusa Slicer can be done by following these step-by-step instructions:
Step 1: Open Prusa Slicer
Launch the Prusa Slicer software on your computer and import the 3D model or design that you want to print.
Step 2: Switch to Layer View
In Prusa Slicer, switch to the Layer view to visualize the layers of your print. This view will allow you to easily identify the specific layers where you want to implement different infill settings.
Read more: How To Do An Infill Plot Plan
Step 3: Specify the Layer Height Range
Select the specific layer heights or layer range where you want to apply different infill patterns and settings. For example, you can choose to modify the infill on layers 10 to 20.
Step 4: Configure Infill Settings
Navigate to the Infill settings in Prusa Slicer and make the desired changes specifically for the selected layers. Adjust the infill pattern, infill density, infill angle, infill overlap, and any other parameters to match your requirements for each layer range.
Step 5: Apply the Changes
Make sure that you are applying the changes only to the specified layer range by double-checking your settings. Ensure that the modifications are accurately assigned to the intended layers to achieve the desired effects.
Step 6: Preview and Slice
Preview the sliced layers in Prusa Slicer to get a visual representation of how the different infill patterns will be implemented on the selected layers. Verify that the changes are correctly applied before proceeding to the next step.
Read more: How To Layer Tablecloths
Step 7: Save and Print
Save the sliced file with the implemented different infill settings and send it to your 3D printer for printing. As the printer progresses through the layers, you will notice the different infill patterns being applied according to your specifications.
By following this step-by-step guide, you can successfully implement different infill patterns and settings on different layers of your 3D prints using Prusa Slicer. This allows for greater customization and fine-tuning of your prints to achieve the desired strength, flexibility, and design elements for specific sections of your objects.
Troubleshooting Common Issues
While implementing different infill patterns and settings on different layers in Prusa Slicer can enhance the quality and functionality of your 3D prints, it is not uncommon to encounter some common issues along the way. Here are a few troubleshooting tips for addressing these issues:
Infill Gaps or Weakness:
If you notice gaps or weakness in the infill pattern, it may be due to insufficient infill overlap. Increase the infill overlap setting to ensure proper adhesion between the infill and the outer walls of the print. Additionally, double-check that your infill density is sufficient for the intended use of the print.
Inconsistent Layer Bonding:
If you experience inconsistent layer bonding between different infill patterns or layers, check that your printer’s extrusion temperature is properly calibrated. Inconsistent extrusion temperature can lead to poor layer adhesion. Ensure that the printer is properly leveled to maintain an even print surface.
Read more: How To Spread Infill Without Infill Machine
Printing Errors or Failed Layers:
If you encounter printing errors or failed layers when implementing different infill on different layers, ensure that your print bed is clean and properly calibrated. Verify that the first layer adheres well to the build plate. If necessary, adjust the bed leveling or use a suitable adhesive, such as a bed adhesive or tape, to enhance bed adhesion.
Excessive Print Time or Material Usage:
If your print is taking longer than expected or using more material than desired, check your infill density setting. Higher infill percentages can increase print time and material consumption. Consider adjusting the infill density to achieve a balance between strength and efficiency.
Software Compatibility Issues:
In some cases, there may be compatibility issues between Prusa Slicer and your 3D printer. Ensure that you are using the latest version of both the software and firmware for optimal performance. If issues persist, consult the documentation or support resources for your printer to troubleshoot specific compatibility issues.
Remember, troubleshooting is an essential part of the 3D printing process. If you encounter any issues when implementing different infill patterns on different layers, staying patient and methodically addressing each problem will lead to better print results and a more satisfying 3D printing experience.
Conclusion
Implementing different infill patterns and settings on different layers in Prusa Slicer opens up a world of possibilities for enhancing the strength, flexibility, and design aesthetics of your 3D prints. By customizing the infill to meet your specific requirements, you can optimize the balance between structural integrity, print time, and material usage.
Throughout this article, we have explored the concept of infill in 3D printing and its importance in creating robust prints. We discussed different infill patterns, such as honeycomb, grid, triangles, and rectilinear, each offering unique benefits for varying applications.
Furthermore, we provided a step-by-step guide on configuring different infill patterns on different layers in Prusa Slicer, empowering you to unleash your creativity and create intricate prints with enhanced functionality. By following the guide, you can implement customized infill settings that meet your specific design and structural requirements.
It’s important to remember that troubleshooting is often part of the 3D printing journey. If you encounter any issues, such as gaps in infill or inconsistent layer bonding, refer to the troubleshooting tips provided to overcome common challenges and optimize your prints.
In conclusion, by harnessing the power of different infill patterns on different layers in Prusa Slicer, you have the ability to take your 3D prints to new heights. Whether you’re looking to reinforce certain areas, experiment with unique designs, or maximize material efficiency, customizing your infill settings can help you achieve your goals.
So, bring out your creativity and explore the capabilities of Prusa Slicer to create exceptional 3D prints with custom infill patterns. Embrace the endless possibilities and continue to refine your printing skills to unlock the full potential of this versatile technology.
Frequently Asked Questions about How To Do Different Infill On Different Layers In Prusa
Was this page helpful?
At Storables.com, we guarantee accurate and reliable information. Our content, validated by Expert Board Contributors, is crafted following stringent Editorial Policies. We're committed to providing you with well-researched, expert-backed insights for all your informational needs.


0 thoughts on “How To Do Different Infill On Different Layers In Prusa”