Home>Garden Essentials>How To Change The Infill In Slic3R
Garden Essentials
How To Change The Infill In Slic3R
Modified: August 20, 2024
Learn how to change the infill settings for your garden 3D prints with Slic3R, optimizing strength and material usage.
(Many of the links in this article redirect to a specific reviewed product. Your purchase of these products through affiliate links helps to generate commission for Storables.com, at no extra cost. Learn more)
Introduction
Welcome to the world of 3D printing! If you’re new to the hobby or just starting out with your 3D printer, you may have heard of a software called Slic3r. Slic3r is a powerful tool that allows you to convert your 3D models into printable files by slicing them into thin layers. One of the key settings you can adjust in Slic3r is the infill, which determines the internal structure of your prints. In this article, we will guide you through the process of changing the infill in Slic3r, allowing you to optimize your prints for strength, time, or material usage.
Before we dive into the specifics of changing the infill in Slic3r, it’s important to note that the infill plays a crucial role in the overall quality and functionality of your 3D prints. The infill is the internal structure that fills the empty spaces within your print, providing support and strength to the object. By adjusting the infill, you can achieve different characteristics in your prints, such as increased strength, reduced print time, or material savings.
To change the infill in Slic3r, you’ll need to follow a few simple steps. First, you’ll need to prepare your printer by ensuring it’s properly calibrated and set up. Then, you’ll launch Slic3r and load your 3D model. From there, you can adjust the infill settings, including the infill percentage and pattern. Finally, you’ll preview and save the sliced file, ready to be sent to your printer.
Now that we have a brief overview of what to expect, let’s get started on changing the infill in Slic3r!
Key Takeaways:
- Customize the infill in Slic3r to make 3D prints stronger, lighter, or more efficient by adjusting the infill percentage and pattern. Prepare your printer, launch Slic3r, and experiment with different settings to achieve optimal results.
- Master the art of changing infill in Slic3r to enhance 3D printing. Adjust the infill percentage and pattern to optimize strength, weight, and material usage. Experiment with different settings to unlock your printer’s full potential.
Read more: How To Set Purge To Infill In Slic3r PE
Preparing the Printer
Before you can start changing the infill in Slic3r, it’s essential to ensure that your 3D printer is properly calibrated and set up. Calibrating your printer ensures that it is accurately translating the digital instructions into physical movements, resulting in precise and reliable prints.
Here are a few steps to follow when preparing your printer:
- Bed leveling: Properly leveling the print bed is crucial for ensuring that the first layer adheres well and that subsequent layers are evenly deposited. Use a leveling tool or follow the instructions provided with your printer to achieve a level bed.
- Nozzle cleaning: Make sure that your printer’s nozzle is clean and free of any clogs or debris. A clean nozzle allows for smooth filament flow, reducing the chances of under-extrusion or other printing issues. Use a nozzle cleaning tool or follow the specific cleaning instructions for your printer.
- Filament loading: Load the filament into your printer’s extruder according to the manufacturer’s instructions. Make sure the filament is properly inserted and that it feeds smoothly into the extruder without any obstructions or tangles.
- Temperature settings: Set the nozzle and bed temperature according to the filament manufacturer’s recommendations. Different materials require different temperatures for optimal printing results. Consult the filament packaging or the manufacturer’s website for the recommended settings.
- Printer stability: Ensure that your printer is placed on a stable surface and that it is not subject to vibrations or movements during the printing process. This will help prevent print defects caused by unwanted shifts or wobbles.
By following these steps, you’ll ensure that your printer is ready to handle the changes you make to the infill settings in Slic3r. With a well-prepared printer, you’ll be on your way to achieving high-quality prints with your desired infill characteristics.
Launching Slic3r
Once you have prepared your 3D printer, it’s time to launch Slic3r and begin the process of changing the infill settings. Slic3r is a free and open-source software that allows you to generate the G-code necessary for your 3D printer to produce a physical object based on your 3D model.
Here’s how you can launch Slic3r:
- Download and install Slic3r: Visit the Slic3r website and download the software appropriate for your operating system. Follow the installation instructions to complete the setup process.
- Open Slic3r: Once the installation is complete, locate the Slic3r icon or shortcut and double-click to launch the software. Depending on your operating system, Slic3r may take a few moments to load.
- Configure printer settings: The first time you launch Slic3r, you’ll need to configure the printer settings. Click on the “Printer Settings” tab to access the configuration options. Here, you’ll need to input specific details about your 3D printer, such as the bed size, filament diameter, and nozzle size. Consult your printer’s documentation or manufacturer’s website for the accurate specifications.
- Select printing profile: In Slic3r, you can create and save different printing profiles to easily switch between different settings and configurations. To select a printing profile, click on the “Print Settings” tab and choose the appropriate profile from the dropdown menu. If you’re unsure which profile to select, you can start with the default profile and make adjustments as needed.
Once you have completed these steps, Slic3r is ready to use. You’re now ready to load your 3D model and begin adjusting the infill settings to achieve the desired results. In the next section, we’ll explore how to load the model into Slic3r.
Loading the Model
Now that you have launched Slic3r and configured your printer settings, it’s time to load your 3D model into the software. Slic3r supports various file formats, including STL, OBJ, and AMF, which are commonly used in 3D modeling software.
Here’s how you can load your 3D model into Slic3r:
- Select the “Add” button: In the Slic3r interface, look for the “Add” button, usually located near the top-left corner of the screen. Click on this button to open a file selection window.
- Browse for your 3D model file: Navigate to the location where your 3D model file is saved on your computer. Select the file and click “Open” to load it into Slic3r.
- Adjust the model position and scale: Once the model is loaded, it will appear in the Slic3r workspace. You can click and drag the model to reposition it within the build area. If necessary, you can also resize or scale the model by clicking and dragging on the handles around the model.
- Review the model settings: Before proceeding, take a moment to review the model settings in Slic3r. These settings include layer height, print speed, and other parameters that can affect the print quality and overall printing time. Make any necessary adjustments to these settings to align with your desired outcome.
With your 3D model successfully loaded into Slic3r, you’re ready to move on to the next step: adjusting the infill settings. In the following section, we’ll explore how you can customize the infill percentage to tailor the strength and density of your prints.
Adjusting Infill Settings
Now that your 3D model is loaded into Slic3r, you can start adjusting the infill settings. These settings will determine the density, strength, and internal structure of your print. Slic3r offers a range of options to customize the infill based on your preferences and requirements.
Here’s how you can adjust the infill settings in Slic3r:
- Access the infill settings: In Slic3r, navigate to the “Print Settings” tab and scroll down to find the “Infill” section. Click on this section to expand the infill settings.
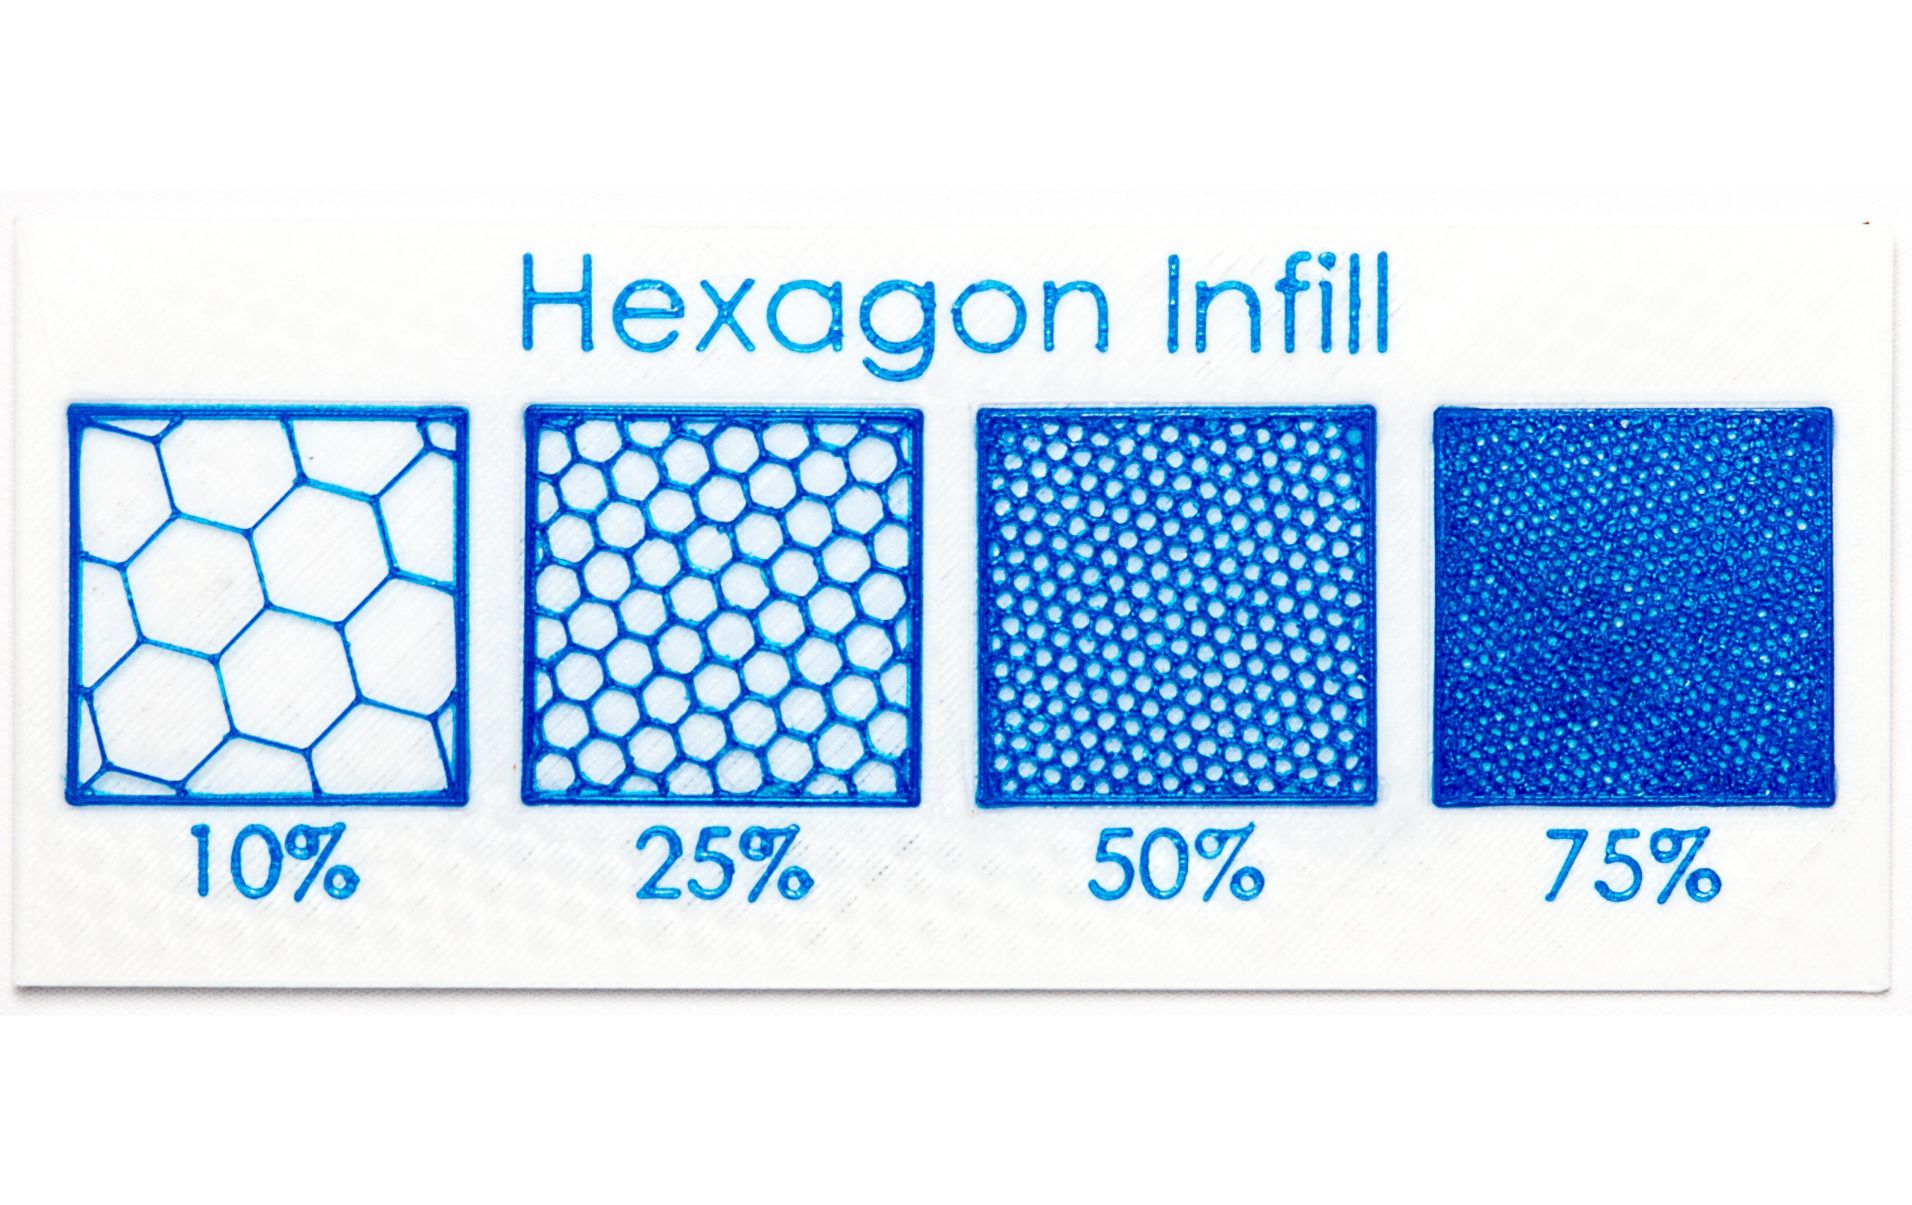
- Adjust the infill percentage: The infill percentage determines how much of the internal volume of the print will be filled with infill material. A higher percentage will result in a denser and stronger print, while a lower percentage will create a more hollow and lightweight object. Use the slider or input field to set the desired infill percentage.
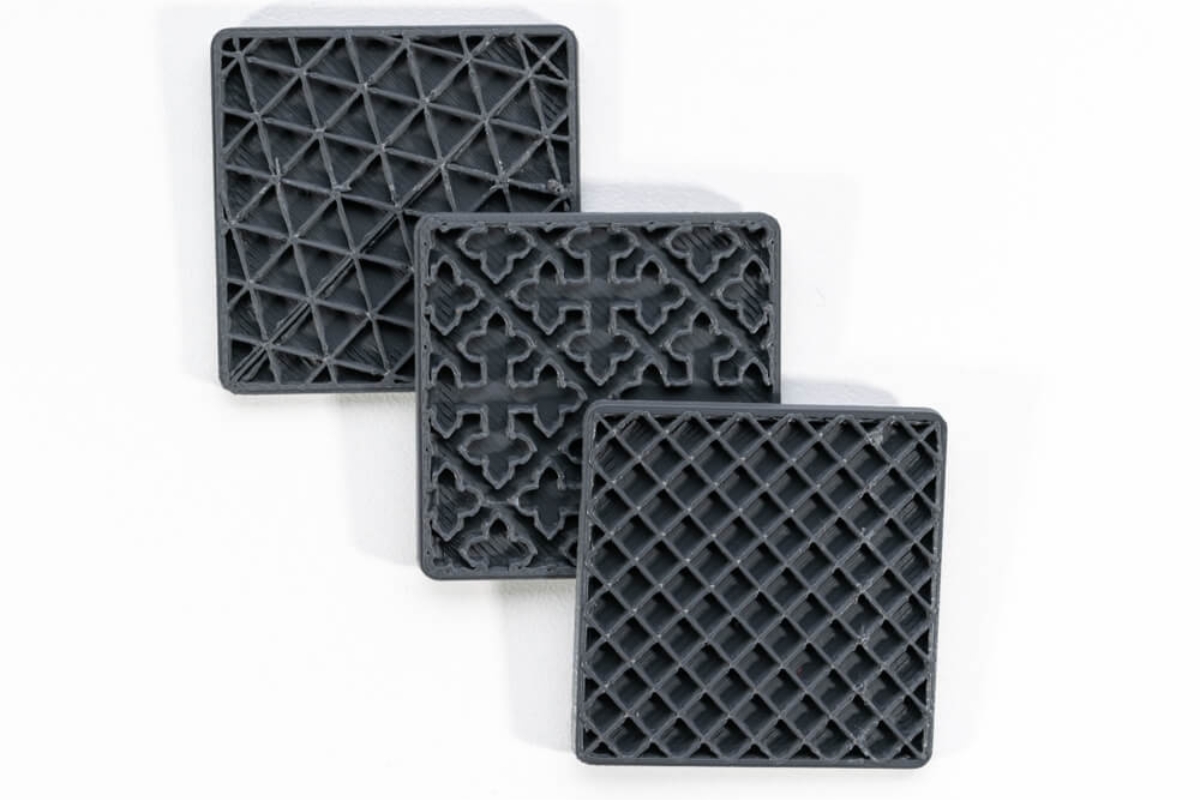
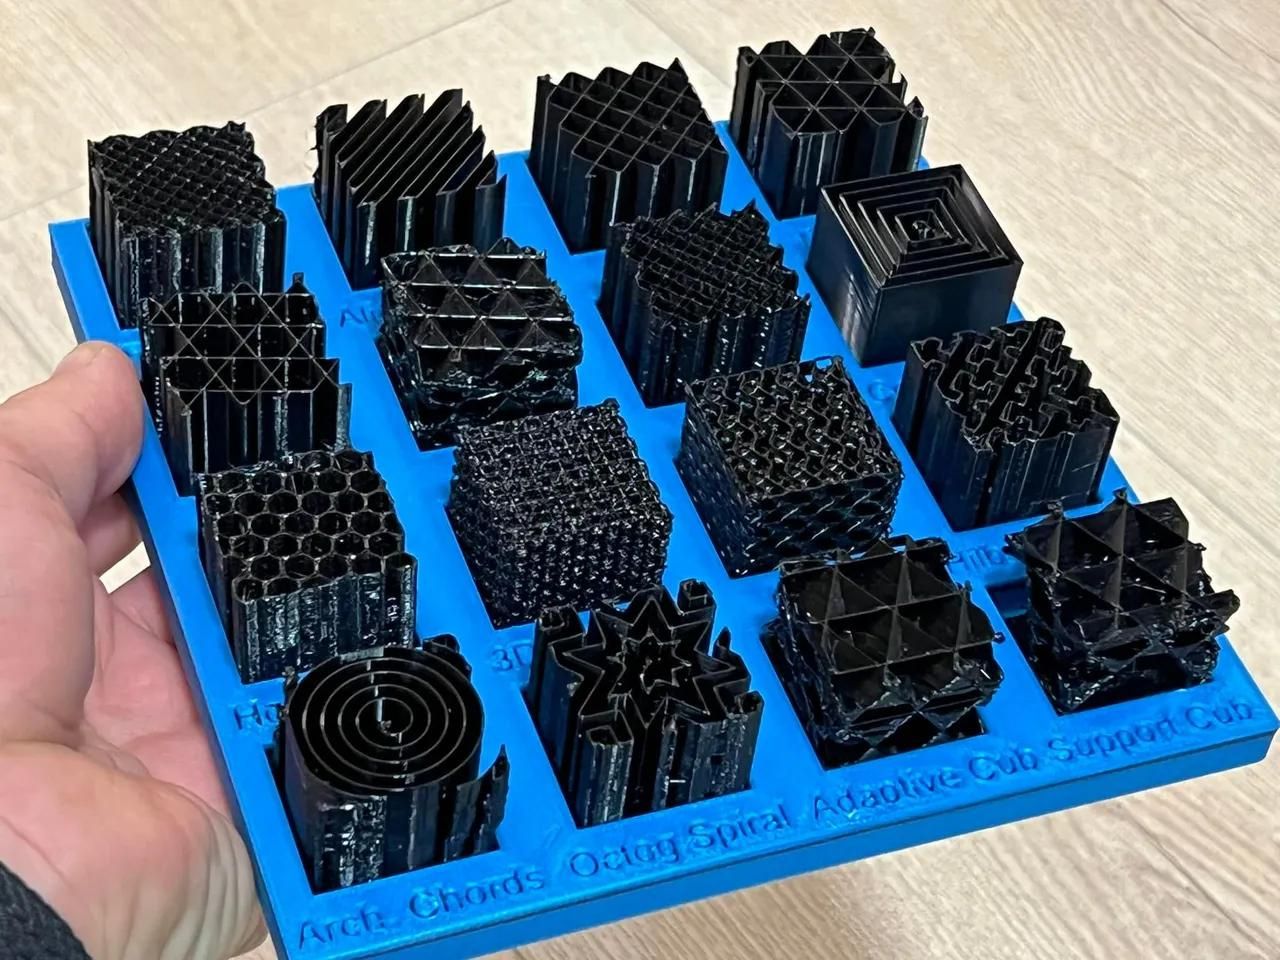
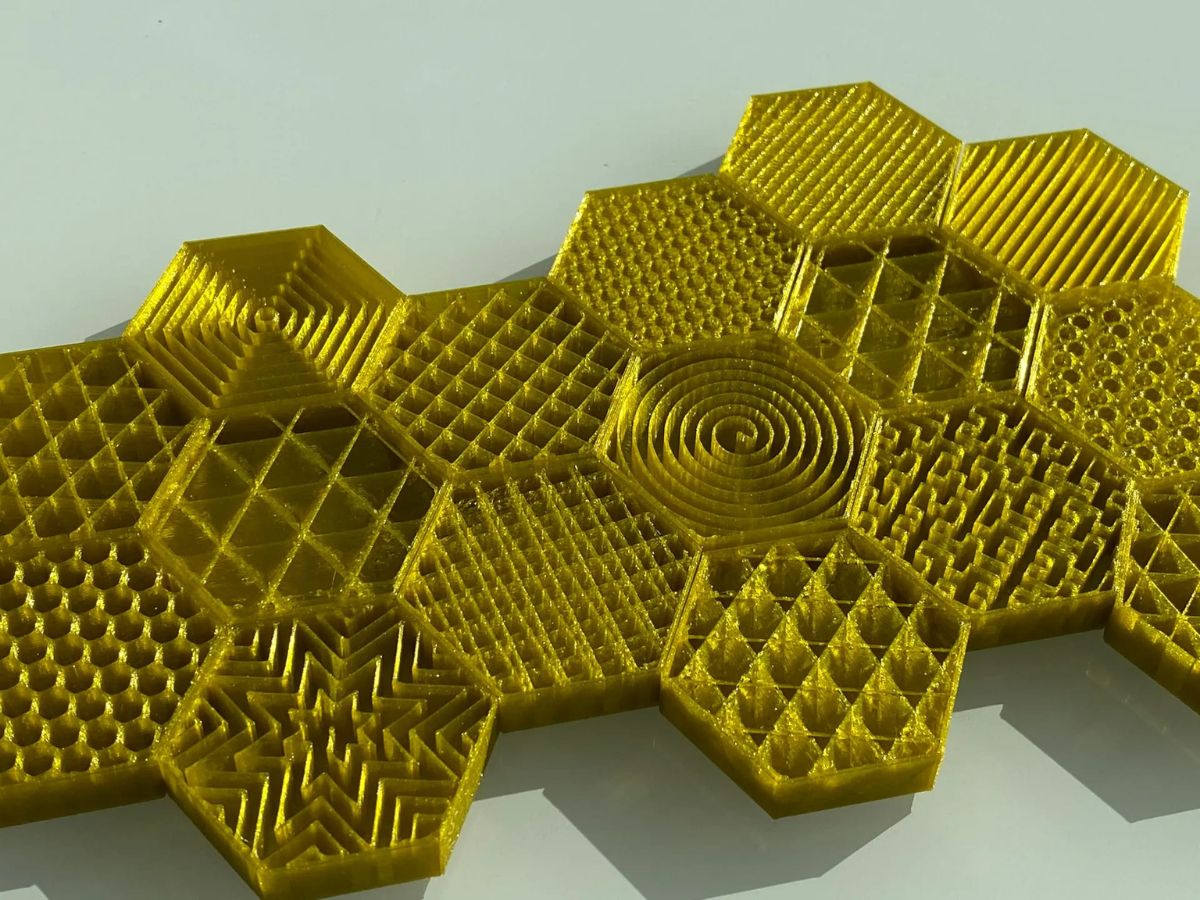
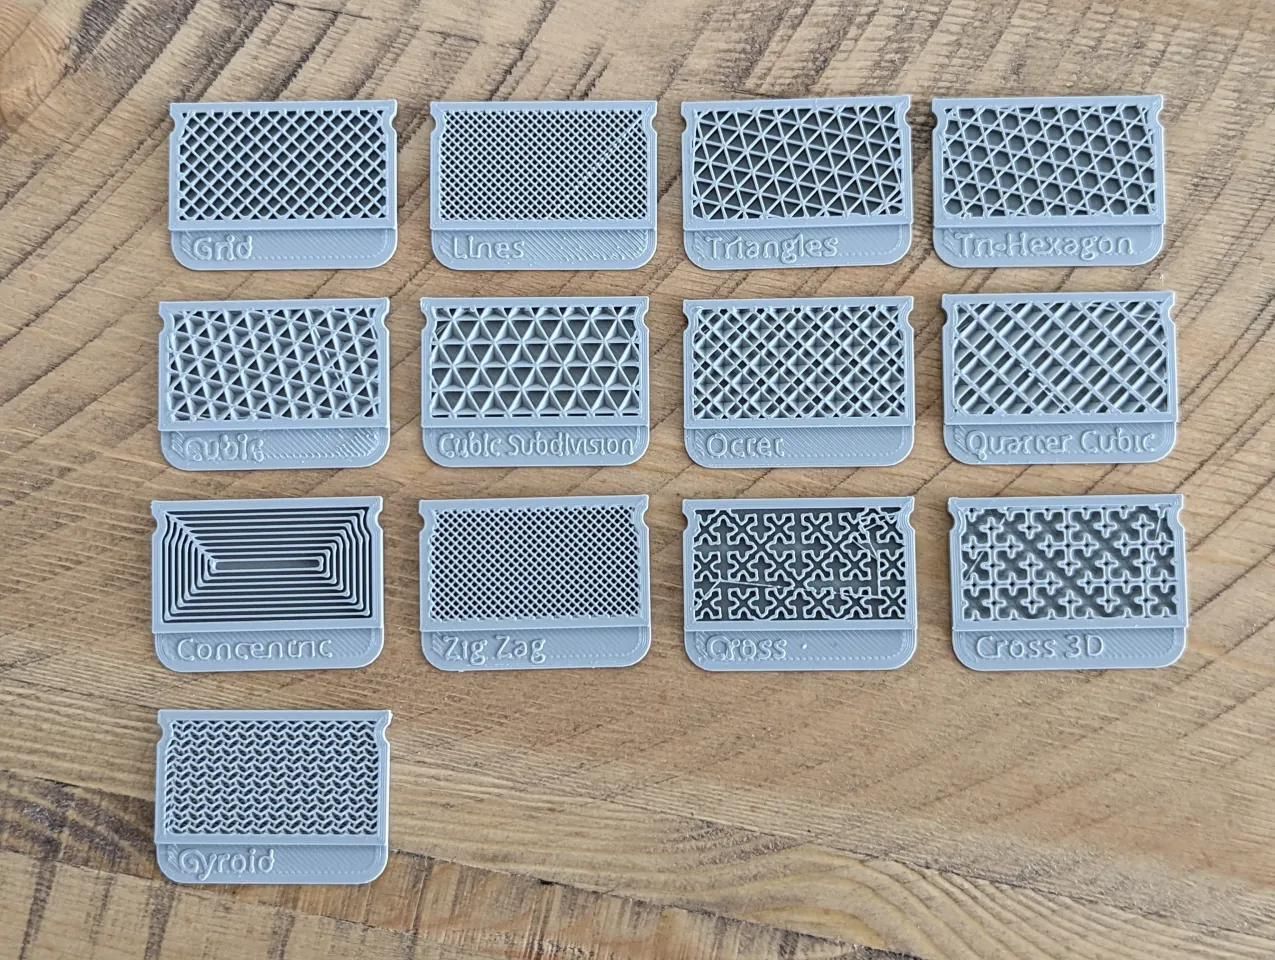
- Select the infill pattern: Slic3r offers a variety of infill patterns to choose from, including honeycomb, grid, triangles, and more. Each pattern has different characteristics in terms of strength, flexibility, and material usage. Experiment with different patterns to find the one that suits your specific requirements.
- Adjust the infill angle: In addition to the infill percentage and pattern, you can also adjust the infill angle in Slic3r. The infill angle refers to the orientation of the internal infill lines. By changing the infill angle, you can affect the overall strength and stability of the print.
As you make adjustments to the infill settings, you’ll notice that Slic3r provides a dynamic preview of the infill structure within your 3D model. Use this preview to evaluate how the changes in the infill settings will affect the print outcome.
Once you are satisfied with the infill settings, you can proceed to finalize the overall settings for your print. In the next section, we’ll cover the remaining steps to prepare your file for printing.
When changing the infill in Slic3r, adjust the “Infill Density” setting to increase or decrease the amount of infill in your 3D print. A higher percentage will result in a stronger print, while a lower percentage will save time and material.
Read more: How To Change Infill On Makerbot
Changing the Infill Percentage
One of the key parameters to adjust when changing the infill in Slic3r is the infill percentage. The infill percentage determines the amount of internal structure your print will have, affecting its strength and weight. By changing the infill percentage, you can achieve different characteristics in your prints.
Here’s how you can change the infill percentage in Slic3r:
- Access the infill settings: In Slic3r, navigate to the “Print Settings” tab and locate the “Infill” section.
- Adjust the infill percentage: In the infill section, you’ll find a slider or input field that allows you to set the desired infill percentage. Move the slider or enter the desired percentage to increase or decrease the amount of internal structure in your print. As you change the infill percentage, the Slic3r preview window will update to show a representative view of the resulting infill structure.
- Evaluate the print outcome: As you adjust the infill percentage, take into consideration the intended use of your 3D print. Higher infill percentages, such as 80% or more, will result in a denser and stronger print, but it will also increase the printing time and material usage. Lower infill percentages, around 20% or less, will create a more hollow and lightweight object, suitable for prototypes or decorative prints. Finding the right balance between strength and material usage is crucial for optimizing your print.
- Consider using variable infill: Some advanced slicing software, including Slic3r, offer the option to use variable infill. With variable infill, you can define different infill percentages for different regions of your print. For example, you can have a higher infill percentage for critical areas that require added strength and a lower infill percentage for less critical areas. This can result in significant material and time savings while maintaining the required strength in specific areas.
By experimenting with different infill percentages and considering the specific requirements of your print, you can achieve the desired balance between strength, weight, and material usage.
Next, let’s explore how you can customize the infill pattern to further optimize your print.
Customizing the Infill Pattern
After adjusting the infill percentage, the next step in changing the infill in Slic3r is customizing the infill pattern. The infill pattern determines how the internal structure of your print is filled, affecting its strength, flexibility, and material consumption. Slic3r offers a variety of infill patterns to choose from, allowing you to tailor the internal structure to meet your specific needs.
Here’s how you can customize the infill pattern in Slic3r:
- Access the infill settings: In Slic3r, navigate to the “Print Settings” tab and locate the “Infill” section.
- Select the infill pattern: In the infill section, you’ll find a drop-down menu or a list of options where you can choose the desired infill pattern. Popular infill patterns include honeycomb, grid, triangles, and concentric. Each pattern offers different characteristics in terms of strength, flexibility, and material usage. Consider the requirements of your print and choose the pattern that aligns with your needs.
- Adjust the infill density: Some infill patterns allow you to further customize the density of the internal structure. This setting determines the spacing between the infill lines. By increasing the density, you can achieve a more solid and robust internal structure, while decreasing the density will create a more sparse and lightweight infill. Use the associated slider or input field to set the desired density.
- Preview and evaluate the infill structure: As you make changes to the infill pattern and density, Slic3r provides a dynamic preview of the infill structure within your 3D model. Take advantage of this preview to assess how the chosen pattern and density will affect the overall strength and stability of your print.
Remember to consider the function of your print when choosing the infill pattern. For example, if you require maximum strength and durability, a solid infill pattern or a pattern with strong interlocking geometry may be the best choice. On the other hand, if weight reduction or flexibility is more important, a sparse infill pattern may be suitable.
By customizing the infill pattern to align with your specific requirements, you can optimize the internal structure of your print and achieve the desired characteristics.
Next, we’ll cover the final steps to finalize the settings and prepare your sliced file for printing in Slic3r.
Finalizing the Settings
After adjusting the infill percentage and customizing the infill pattern in Slic3r, it’s time to finalize the overall settings for your 3D print. This involves reviewing and adjusting a few key parameters to ensure optimal print quality and performance.
Here are the steps to finalize the settings in Slic3r:
- Review the print settings: Take a moment to review the general print settings in Slic3r. This includes parameters such as layer height, print speed, support structures, and extrusion settings. Make sure these settings are appropriate for your print and adjust them as needed.
- Inspect the skirt and brim settings: The skirt and brim are features that can be added to your print to help with bed adhesion and filament priming. Check the settings for the skirt and brim in Slic3r and enable them if necessary to ensure a successful print.
- Consider enabling supports: If your 3D model has overhangs or complex geometries that require support structures, evaluate whether supports need to be enabled. Slic3r offers options to generate support structures automatically or manually. Enable supports if you anticipate difficulties during printing due to these complex features.
- Adjust the print temperature: Revisit the print temperature settings for your filament. Different materials require specific temperatures to print optimally. Consult the filament manufacturer’s guidelines and adjust the print temperature accordingly for best results.
- Set the print speed and cooling settings: Adjust the print speed and cooling settings to achieve the desired balance between print time and print quality. Higher print speeds may result in reduced overall printing time, but they can also affect the quality and accuracy of the print. Experiment with different speeds and cooling settings to find the optimal combination.
- Double-check the layer height: Verify that the selected layer height aligns with your desired level of detail and surface finish. Lower layer heights offer finer resolution but require longer print times, while higher layer heights speed up the print but result in a more visible layering effect.
By carefully reviewing and adjusting these settings, you can ensure that your print will meet your expectations in terms of quality, strength, and printing time.
Once you’re satisfied with the overall settings, it’s time to proceed to the next step: previewing and saving the sliced file.
Previewing and Saving the Sliced File
Before sending your 3D model to the printer, it’s crucial to preview the sliced file in Slic3r and make any final adjustments if needed. The preview allows you to visualize the layers, infill, support structures, and other print elements to ensure that everything is correctly configured for your desired outcome.
Here’s how you can preview and save the sliced file in Slic3r:
- Click on the “Preview” button: In Slic3r, locate the “Preview” button, usually found at the bottom of the screen. Click on this button to open the preview window.
- Navigate through the layers: In the preview window, you can navigate through the layers of the print using the slider or the layer navigation controls. Take the time to examine each layer and ensure that there are no unexpected issues, such as missing sections or excessive support structures.
- Inspect the infill: Pay close attention to the infill structure in the preview. Verify that the infill pattern, density, and angle are visually appealing and aligned with your intended settings. Evaluate the overall strength and solidity of the print based on the previewed infill.
- Check for support structures: If you have enabled support structures, carefully examine their placement and density. Make sure that they are appropriately supporting any overhangs or intricate parts of your print.
- Make adjustments if necessary: If you identify any issues in the preview, such as unexpected gaps, excessive support structures, or flaws in the infill, go back to the relevant settings in Slic3r and make the necessary adjustments. Re-slice the model and preview the file again to ensure that the changes have been applied correctly.
- Save the sliced file: Once you are satisfied with the slices and the preview, it’s time to save the sliced file. Click on the “Slice Now” button or select the option to save the G-code file. Choose a location on your computer where you want to save the file and provide an appropriate name.
With the sliced file saved, you are now ready to transfer it to your 3D printer, either by transferring the file directly or using an SD card or other transfer methods supported by your printer. Then, initiate the printing process using the settings and instructions specific to your 3D printer.
Congratulations! You have successfully changed the infill in Slic3r and prepared your model for printing. With this newfound knowledge, you can continue to explore and experiment with different infill settings to optimize your prints for strength, time, and material usage.
Happy printing!
Read more: What Is R4 Infill Zoning
Conclusion
Changing the infill in Slic3r is a crucial step in optimizing the quality and functionality of your 3D prints. By adjusting the infill percentage and customizing the infill pattern, you can achieve different characteristics such as strength, weight, and material usage in your prints. Through this article, we have guided you through the process of changing the infill in Slic3r, including preparing your printer, launching the software, loading the model, adjusting the infill settings, and finalizing the overall print settings.
Remember to always prepare your printer properly by ensuring bed leveling, nozzle cleanliness, filament loading, and stable placement. Launch Slic3r and configure the printer settings, select the appropriate printing profile, and load your 3D model into the software. From there, adjust the infill percentage to determine the internal structure of your print and customize the infill pattern to suit your specific requirements. Evaluate the previewed sliced file to confirm its accuracy and make any necessary adjustments before saving the file and transferring it to your 3D printer for printing.
By mastering the art of changing the infill in Slic3r, you can enhance your 3D printing experience and achieve prints with the desired qualities of strength, time efficiency, and material optimization. Don’t be afraid to experiment with different infill settings to find the perfect balance for each project. Whether you’re creating functional prototypes, decorative objects, or engineering parts, incorporating customized infills will elevate the quality and performance of your prints.
Now, armed with the knowledge and skills you have gained, go forth and unlock the full potential of your 3D printer. Embrace creativity, explore new possibilities, and enjoy the journey of turning your digital designs into tangible objects with precise infill structures.
Happy printing!
Frequently Asked Questions about How To Change The Infill In Slic3R
Was this page helpful?
At Storables.com, we guarantee accurate and reliable information. Our content, validated by Expert Board Contributors, is crafted following stringent Editorial Policies. We're committed to providing you with well-researched, expert-backed insights for all your informational needs.


0 thoughts on “How To Change The Infill In Slic3R”