Home>Garden Essentials>How To Germinate Jacaranda Tree
Garden Essentials
How To Germinate Jacaranda Tree
Modified: October 20, 2024
Learn how to effectively germinate a Jacaranda tree in your garden and enjoy its vibrant blooms all season long. Step-by-step instructions and expert tips provided.
(Many of the links in this article redirect to a specific reviewed product. Your purchase of these products through affiliate links helps to generate commission for Storables.com, at no extra cost. Learn more)
Introduction
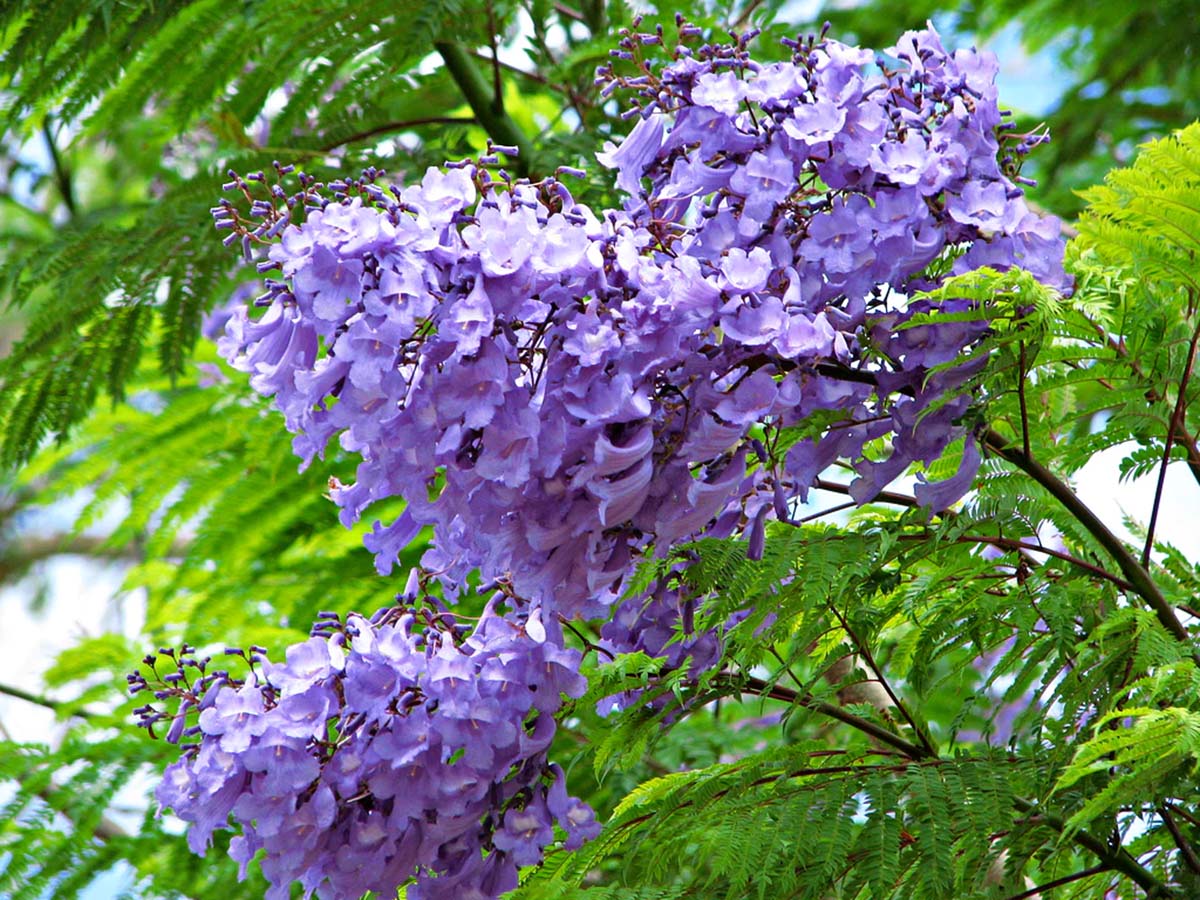
Welcome to the world of Jacaranda trees! If you’re a gardening enthusiast, you’ve probably come across these stunning trees with their vibrant purple blooms and delicate fern-like foliage. Jacaranda trees, native to tropical and subtropical regions, are known for their striking beauty and can add a pop of color to any garden or landscape.
But have you ever wondered how to grow your own Jacaranda tree from scratch? In this article, we’ll take you through the step-by-step process of germinating Jacaranda seeds and nurturing them into healthy seedlings. From collecting the seeds to planting them in the ground, we’ll cover all the essential details you need to know.
Before we dive into the exciting journey of growing a Jacaranda tree, it’s important to note that germinating seeds can be a labor of love and requires patience. However, the satisfaction of watching your tiny seeds sprout and eventually grow into majestic trees is truly rewarding. So let’s get started on this green thumb adventure!
Key Takeaways:
- Growing a Jacaranda tree from seed requires patience and attention to detail. From collecting and preparing the seeds to nurturing the seedlings, the process is a rewarding journey for gardening enthusiasts.
- Creating the ideal germination environment and providing proper care are essential for the successful growth of Jacaranda seedlings. With consistent watering, suitable lighting, and gradual acclimatization, your seedlings will thrive and blossom into beautiful trees.
Step 1: Collecting Jacaranda Seeds
The first step in germinating Jacaranda seeds is collecting the seeds themselves. Jacaranda trees produce seed pods that contain numerous small, flat seeds. Here’s how you can collect Jacaranda seeds:
- Wait for the right time: Jacaranda trees typically produce seed pods in late spring or early summer. Keep an eye on your tree and wait until you see the seed pods starting to form.
- Gather fallen pods: Once the seed pods begin to dry and turn brown on the tree, they will eventually fall to the ground. Collect these fallen pods and take them indoors.
- Open the pods: Use your hands or a small knife to carefully open the pods and remove the seeds. Ensure that the seeds are fully developed and have a brown or dark color. Immature seeds are unlikely to germinate successfully.
- Seed cleaning: After extracting the seeds from the pods, you may notice a thin papery covering around each seed. Gently remove this covering by rubbing the seeds between your fingers or using a soft cloth. This helps improve germination rates.
- Store the seeds: Place the cleaned seeds in a dry and cool location. It’s important to store the seeds in a breathable container to prevent moisture buildup. Paper envelopes or small mesh bags are ideal for seed storage. Avoid using plastic bags, as they can cause condensation and mold formation.
By following these steps, you can ensure that you have a good supply of Jacaranda seeds ready for germination. Remember to collect more seeds than you actually plan to plant, as not all seeds may successfully germinate.
Step 2: Preparing the Seeds for Germination
Once you have collected the Jacaranda seeds, it’s time to prepare them for germination. Proper preparation increases the chances of successful germination and ensures that the seeds have the best possible start. Here’s what you need to do:
- Soak the seeds: Fill a small container with room temperature water and place the Jacaranda seeds in it. Allow the seeds to soak for 24 hours. This soaking process helps to soften the seed coat, making it easier for the seeds to sprout.
- Perform a float test: After soaking, remove any seeds that are floating as these are likely to be non-viable. Healthy seeds will sink to the bottom of the container while empty or damaged seeds may float.
- Scarify the seeds (optional): Jacaranda seeds have a hard outer shell, which can hinder germination. To enhance germination rates, you can scarify the seeds. Gently rub the seeds with sandpaper or make small cuts on the seed coat using a knife. This process allows water to penetrate the seed and encourages germination.
- Pre-chill the seeds (optional): Some gardeners recommend pre-chilling Jacaranda seeds to further enhance germination. Place the scarified seeds in a damp paper towel or in a plastic bag with some moist vermiculite or peat moss. Seal the container or bag and refrigerate it for 4-6 weeks. This simulated winter period can help break the seeds’ dormancy.
By following these preparation steps, you are priming the Jacaranda seeds for germination. Pre-soaking and scarification improve water absorption and seed coat permeability, giving the seeds the best chance to sprout. However, it’s important to note that scarifying and pre-chilling are optional steps and not always necessary for successful germination.
Step 3: Creating the Germination Environment
Now that your Jacaranda seeds are prepared, it’s time to create the ideal environment for germination. Providing the right conditions will encourage the seeds to sprout and give them a healthy start. Follow these steps to create a suitable germination environment:
- Select a germination container: Choose a container that is at least 2-3 inches deep and has drainage holes at the bottom. A seed tray, nursery pot, or even a recycled plastic container can work well.
- Prepare the germination medium: Fill the container with a well-draining germination medium. A mix of equal parts peat moss, perlite, and vermiculite works well. This combination provides good moisture retention and allows proper aeration for the developing roots.
- Moisten the germination medium: Before sowing the Jacaranda seeds, moisten the germination medium without making it overly soggy. You want the medium to be damp but not waterlogged.
- Sow the seeds: Place the pre-soaked and scarified Jacaranda seeds on the moistened germination medium. Gently press the seeds into the medium, ensuring they make good contact with the surface, but don’t bury them too deep. Aim for a planting depth of approximately ¼ to ½ inch.
- Cover the seeds (optional): If desired, you can lightly cover the seeds with a thin layer of vermiculite or fine seed starting mix. This helps to retain moisture around the seeds and provides some protection during germination.
- Label the container: It’s important to label the container with the date and the plant variety to keep track of the germination process.
By creating the ideal germination environment, you are setting the stage for successful seed sprouting. The well-draining germination medium provides the necessary moisture and helps prevent seed rot, while the cover layer, if used, aids in moisture retention. Remember to place the germination container in a warm and well-lit area, but avoid direct sunlight.
Step 4: Germinating the Jacaranda Seeds
With the germination environment set up, it’s time to initiate the germination process for your Jacaranda seeds. Follow these steps to encourage the seeds to sprout and begin their journey towards becoming seedlings:
- Provide consistent moisture: It’s crucial to maintain consistent moisture levels in the germination medium. Check the medium regularly and mist it with water if it begins to dry out. Avoid overwatering, as excess moisture can lead to fungal diseases.
- Provide warmth: Jacaranda seeds require warm temperatures to germinate successfully. The ideal temperature range is between 70-80°F (21-27°C). Use a seedling heat mat or place the germination container in a warm location to provide the necessary heat.
- Be patient: Germination times can vary for Jacaranda seeds. It typically takes anywhere from 2-6 weeks for the seeds to sprout. Be patient and resist the urge to disturb or dig up the seeds during this period.
- Monitor for germination: Keep a close eye on the germination container for any signs of sprouting. Once the seeds germinate, you’ll notice small green shoots emerging from the soil. This is an exciting milestone in the germination process.
- Provide light: As soon as the Jacaranda seeds sprout, it’s important to provide them with adequate light. Place the germination container in a location with bright, indirect light or use a grow light to provide artificial lighting.
By ensuring consistent moisture, warmth, and proper lighting, you are creating the optimal conditions for the Jacaranda seeds to germinate and develop into healthy seedlings. Remember to be patient and give the seeds enough time to sprout, as it can vary depending on seed quality and environmental conditions.
To germinate a Jacaranda tree seed, soak it in warm water for 24 hours, then plant it in well-draining soil and keep it consistently moist. Place the pot in a warm, sunny location and be patient, as it can take several weeks for the seed to sprout.
Read more: What Do It Mean To Germinate Bonsai Trees
Step 5: Transferring the Sprouted Seeds to Pots
Once your Jacaranda seeds have successfully germinated and sprouted, it’s time to transfer them to individual pots. This step allows the seedlings to develop stronger root systems and provides them with the space they need to grow. Here’s what you need to do:
- Select suitable pots: Choose pots that are at least 6-8 inches in diameter with drainage holes at the bottom. This will ensure proper drainage and prevent waterlogged soil.
- Prepare the potting mix: Use a well-draining potting mix that is enriched with organic matter. A mix of potting soil, perlite, and compost works well for Jacaranda seedlings.
- Fill the pots: Fill each pot with the potting mix, leaving about an inch of space from the top. Lightly press down the soil to ensure it settles evenly.
- Carefully transplant the seedlings: Gently lift the sprouted Jacaranda seedlings from the germination container, being careful not to damage the delicate roots. Place each seedling into its own pot, making sure to position it at the same soil depth as it was in the germination container.
- Backfill and firm the soil: Fill the space around the seedlings with the potting mix, gently pressing it down to ensure good contact between the roots and the soil. Avoid compacting the soil too tightly, as it can hinder root growth.
- Water thoroughly: After transplanting, water the seedlings thoroughly to settle the soil and provide moisture to the roots. Allow any excess water to drain out of the pots.
- Place in a suitable location: Find a spot for the potted seedlings that receives bright, indirect sunlight. Avoid exposing them to harsh afternoon sun or extreme temperature fluctuations.
By transferring the sprouted Jacaranda seedlings to individual pots, you are giving them the room they need to grow and establish their root systems. The well-draining potting mix provides proper moisture retention and nutrients, while the suitable pot size allows for healthy growth.
Remember to continue providing regular water and monitor the seedlings for any signs of stress or nutrient deficiencies. With proper care, your Jacaranda seedlings will thrive and be ready for planting in the ground when the time is right.
Step 6: Caring for the Germinating Seeds
Now that your Jacaranda seeds have sprouted and are in their individual pots, it’s important to provide them with proper care to ensure healthy growth. Here are some essential steps to follow:
- Watering: Water the seedlings regularly to keep the soil evenly moist but not waterlogged. Check the moisture level by sticking your finger into the soil; if it feels dry, it’s time to water. Avoid letting the soil dry out completely or allowing the pots to sit in standing water.
- Lighting: Place the pots in a location that receives bright, indirect sunlight. If you’re growing the seedlings indoors, you may need to supplement with artificial light. Maintain a consistent light source for 12-16 hours a day to promote healthy growth.
- Temperature and humidity: Jacaranda seedlings thrive in warm temperatures between 70-85°F (21-29°C). Avoid exposing them to cold drafts or extreme temperature fluctuations. Maintain a moderate level of humidity around the plants by misting them regularly or using a humidifier.
- Fertilization: Once the seedlings have established a few sets of true leaves, you can begin fertilizing them. Use a balanced liquid fertilizer diluted to half the recommended strength. Apply the fertilizer every 2-3 weeks to provide essential nutrients for growth.
- Pruning: As the seedlings grow, you may need to prune them to maintain a well-balanced structure. Trim back any leggy or weak branches to encourage a more compact and sturdy growth habit.
- Pest and disease control: Keep a close eye on the seedlings for any signs of pest infestation or disease. Common pests that may affect Jacaranda seedlings include aphids, mealybugs, and spider mites. Treat any infestations promptly with insecticidal soap or appropriate organic pest control methods.
- Gradual acclimatization: If you plan to transplant the Jacaranda seedlings into the ground, it’s important to gradually acclimate them to outdoor conditions. Start by exposing them to a few hours of direct sunlight each day and gradually increase the time over the course of a week or two.
By following these care steps, you will give your Jacaranda seedlings the best chance of thriving and growing into healthy trees. Regular watering, proper lighting, optimal temperature and humidity, and timely fertilization will ensure strong growth and development.
Remember to observe your seedlings closely and address any issues promptly to prevent them from negatively impacting the overall health of the plants. With care and attention, your Jacaranda seedlings will transform into beautiful trees ready to grace your garden or landscape.
Step 7: Planting the Germinated Jacaranda Seeds
After providing proper care to your germinated Jacaranda seeds and nurturing them into healthy seedlings, it’s time to plant them in their permanent location. Here’s what you need to know:
- Select the planting site: Choose a location that receives full sun and has well-draining soil. Jacaranda trees thrive in fertile soil, so if your soil is heavy or compacted, consider amending it with organic matter like compost or well-rotted manure.
- Prepare the planting hole: Dig a hole that is slightly larger and deeper than the root ball of your seedling. This extra space allows the roots to spread and establish themselves more easily.
- Remove the seedling from the pot: Gently tap the sides and bottom of the pot to loosen the soil. Carefully slide the seedling out, holding the base of the stem between your fingers. Take care not to damage the delicate roots.
- Plant the seedling: Place the seedling in the planting hole, making sure that the top of the root ball is level with the surrounding soil. Backfill the hole with the excavated soil, gently firming it around the roots to eliminate any air pockets.
- Watering: Give the newly planted seedling a deep watering to settle the soil and ensure good root-to-soil contact. Provide regular but moderate watering to keep the soil moist, especially during the initial few weeks until the plant becomes established.
- Mulching: Apply a layer of organic mulch around the base of the seedling, keeping it a few inches away from the stem. The mulch helps to retain soil moisture, suppress weeds, and regulate soil temperature. Avoid piling the mulch directly against the stem as it can cause rot.
- Staking (if necessary): If your seedling seems a bit weak or prone to wind damage, you can provide support by staking it. Use a sturdy stake and loosely tie the seedling to it with soft garden ties or twine. Check the ties regularly and adjust them as the seedling grows.
By following these planting steps, you will ensure the successful transition of your Jacaranda seedling from the pot to its permanent location in the ground. Proper soil preparation, adequate watering, and the use of organic mulch create an optimal growing environment for the young tree.
After planting, continue to monitor the tree’s growth and provide regular care, including watering, fertilization, and occasional pruning to shape and maintain its form. With time and proper care, your Jacaranda tree will flourish, rewarding you with its distinctive beauty and stunning purple blooms.
Conclusion
Congratulations on successfully germinating and planting your very own Jacaranda tree! Growing a Jacaranda tree from seed is a rewarding experience that allows you to witness the transformation of a tiny seed into a majestic tree adorned with beautiful purple blooms.
Through the step-by-step process outlined in this article, you learned how to collect Jacaranda seeds, prepare them for germination, create a suitable germination environment, germinate the seeds, transfer the sprouted seeds to pots, care for the germinating seeds, and finally, plant the germinated Jacaranda seeds in their permanent location.
Throughout this journey, you exercised patience, provided optimal growing conditions, and ensured proper care to nurture the seedlings into healthy trees. It’s important to remember that Jacaranda trees require ongoing maintenance, including regular watering, adequate sunlight, and occasional pruning to maintain their beauty and form.
As your Jacaranda tree continues to grow and mature, you’ll be rewarded with its iconic purple blossoms, creating a stunning focal point in your garden or landscape. The beauty and elegance of these trees are sure to captivate both you and those who have the pleasure of enjoying your outdoor space.
Remember to share your knowledge and experience with others who may be interested in growing Jacaranda trees. Whether it’s through conversations, online forums, or local gardening clubs, sharing your insights and tips can help inspire fellow gardeners to embark on their own Jacaranda-growing adventures.
So go ahead, continue to nurture and care for your Jacaranda tree. Enjoy the process, embrace the beauty it brings, and savor the rewards that come with growing and witnessing the marvel of nature unfold right in your own backyard.
Frequently Asked Questions about How To Germinate Jacaranda Tree
Was this page helpful?
At Storables.com, we guarantee accurate and reliable information. Our content, validated by Expert Board Contributors, is crafted following stringent Editorial Policies. We're committed to providing you with well-researched, expert-backed insights for all your informational needs.


0 thoughts on “How To Germinate Jacaranda Tree”