Home>Garden Essentials>How To Germinate Autoflowers
Garden Essentials
How To Germinate Autoflowers
Modified: August 28, 2024
Learn how to successfully germinate autoflowers in your garden with our step-by-step guide. Grow healthy and vibrant plants from seed to harvest.
(Many of the links in this article redirect to a specific reviewed product. Your purchase of these products through affiliate links helps to generate commission for Storables.com, at no extra cost. Learn more)
Introduction
Welcome to the world of gardening! Whether you are an experienced gardener or just starting out, there is something fascinating about growing your own plants, flowers, and vegetables. One of the most exciting types of plants to grow are autoflowers. These special plants have gained popularity for their ability to flower automatically, without the need for a specific light cycle. In this article, we will explore how to successfully germinate Autoflowers and get your garden off to a thriving start!
Autoflowers are a type of cannabis plants that have been crossbred with Ruderalis genetics, which is a subspecies of the cannabis plant. This genetic variation allows autoflowers to start flowering based on age rather than the light cycle. This unique characteristic makes them ideal for gardeners looking for a quick and easy way to grow cannabis plants.
When it comes to choosing autoflower seeds, you have a wide range of options available. There are many reputable seed banks that offer a variety of strains with different flavors, effects, and growing characteristics. Some popular autoflower strains include Northern Lights, White Widow, and AK-47. It’s important to do your research and choose seeds that are suited to your specific needs and growing conditions.
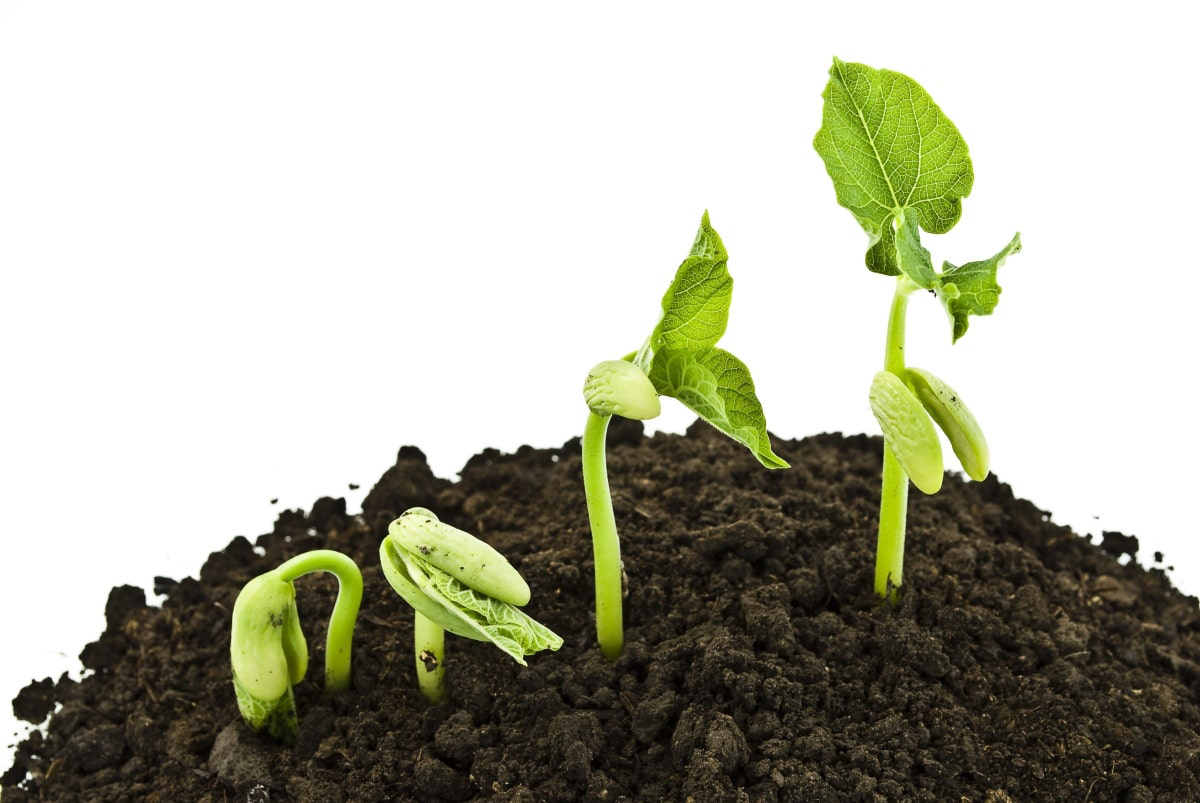
Now, let’s dive into the different germination methods for autoflowers. Germination is the process of getting the seeds to sprout and develop into seedlings. There are several methods you can use, including soaking seeds, the paper towel method, and the soil method.
Key Takeaways:
- Autoflowers are unique cannabis plants that flower based on age, making them ideal for quick and easy gardening. Choose high-quality seeds and use the soaking, paper towel, or soil method for successful germination.
- Transplant seedlings carefully, provide proper light and climate conditions, and monitor their progress closely. Enjoy the journey of growing your own autoflower garden and embrace the rewarding experience of gardening!
Read more: How To Germinate A Bean
Understanding Autoflowers
Before we delve into the germination process, it’s essential to have a solid understanding of autoflowers. As mentioned earlier, autoflowering cannabis plants are unique because they start flowering based on age rather than the light cycle. Typically, autoflowers will begin flowering within 2 to 4 weeks from germination, regardless of the number of light hours they receive.
This inherent trait makes autoflowers ideal for gardeners who want a quicker harvest or have limited control over the light cycle, such as outdoor growers. Additionally, autoflowers tend to be more compact in size compared to regular cannabis plants, making them suitable for small spaces or discreet growing.
Autoflowers also have a relatively short life cycle, usually around 8 to 12 weeks from seed to harvest. This shorter cycle means you can enjoy multiple harvests within a year, providing a continuous supply of fresh buds.
Another advantage of autoflowers is their resilience and ability to withstand harsh environmental conditions. Because of their Ruderalis genetics, which originally developed in colder regions, autoflowers have adapted to handle colder temperatures, making them suitable for growers in various climates.
It’s important to note that although autoflowers are relatively easy to grow, they still require proper care and maintenance. Pay attention to factors such as light intensity, temperature, humidity, and nutrient levels to ensure optimal growth and yield. Now that you have a basic understanding of autoflowers, let’s move on to the crucial step of choosing the right seeds.
Choosing the Right Seeds
When it comes to growing autoflowers, choosing the right seeds is crucial for a successful garden. With the wide variety of autoflower strains available, you can select the ones that suit your preferences and growing conditions.
One key factor to consider when choosing autoflower seeds is the desired effects you’re looking for. Different strains offer different levels of THC and CBD, which contribute to the plant’s psychoactive and medicinal properties. Whether you prefer a relaxing, sedating effect or a more uplifting and energizing experience, there is a strain out there to suit your needs.
In addition to the effects, consider the flavors and aromas that appeal to you. Autoflowers come in a vast array of flavors, ranging from fruity and sweet to earthy and spicy. Research the strain genetics and read reviews to get an idea of the specific flavors and terpene profiles you can expect from different seed varieties.
Furthermore, it’s essential to take into account the growing conditions you can provide. Some autoflower strains are better suited for indoor cultivation, while others thrive in outdoor environments. Understanding the climate, temperature range, and available space will help you select seeds that will thrive in your specific setup.
Lastly, consider the size and structure of the plants. If you have limited space or prefer smaller, more manageable plants, look for strains known for their compact size and bushy structure. On the other hand, if you have ample space and want larger, more productive plants, go for strains that are known to grow taller and have a more open structure.
Be sure to purchase your seeds from a reputable seed bank or trusted breeders to ensure genetic quality and viability. Take your time in researching and selecting the right seeds that align with your preferences and growing conditions. With the right seeds in hand, you’re ready to start the germination process and get your autoflower garden underway!
Germination Methods
Now that you have your chosen autoflower seeds, it’s time to initiate the germination process. There are several different methods you can use to kickstart the growth of your seeds. Let’s explore the most common germination methods:
Soaking Seeds
The soaking method involves placing your seeds in a glass or container filled with water. Start by filling a glass with room temperature tap water and dropping your seeds into the water. Let them soak for about 24 to 48 hours. During this time, the seeds will absorb water and start the germination process. Once the seeds have swollen and cracked open, they are ready for planting.
Read more: How To Germinate Pecans
Paper Towel Method
The paper towel method is a popular and effective way to germinate seeds. Take a couple of damp paper towels and place your seeds on one half, leaving enough space between them. Fold the towel over the seeds, covering them completely. Place the paper towel with the seeds inside a sealed plastic bag or container to maintain moisture. Keep the bag at room temperature and check on the seeds every day. Within a few days, you should see the seeds sprouting roots.
Soil Method
The soil method is straightforward and mimics natural germination. Fill seedling pots or trays with a well-draining potting mix or seedling soil. Make a small indentation in the soil, around half an inch deep. Drop your seeds into the hole and cover them lightly with soil. Mist the soil with water to ensure it is moist but not soaked. Place the pots or trays in a warm area with consistent temperatures, ideally around 70 to 85°F (21 to 29°C). Within a few days to a week, you should start to see the seedlings emerge from the soil.
These germination methods are all effective, and the choice ultimately comes down to personal preference and availability of materials. Whichever method you choose, it’s important to ensure the seeds are kept moist and at the appropriate temperature for successful germination.
Now that your seeds have sprouted and developed into seedlings, it’s time to learn about transplanting them into their permanent home. We’ll cover that in the next section.
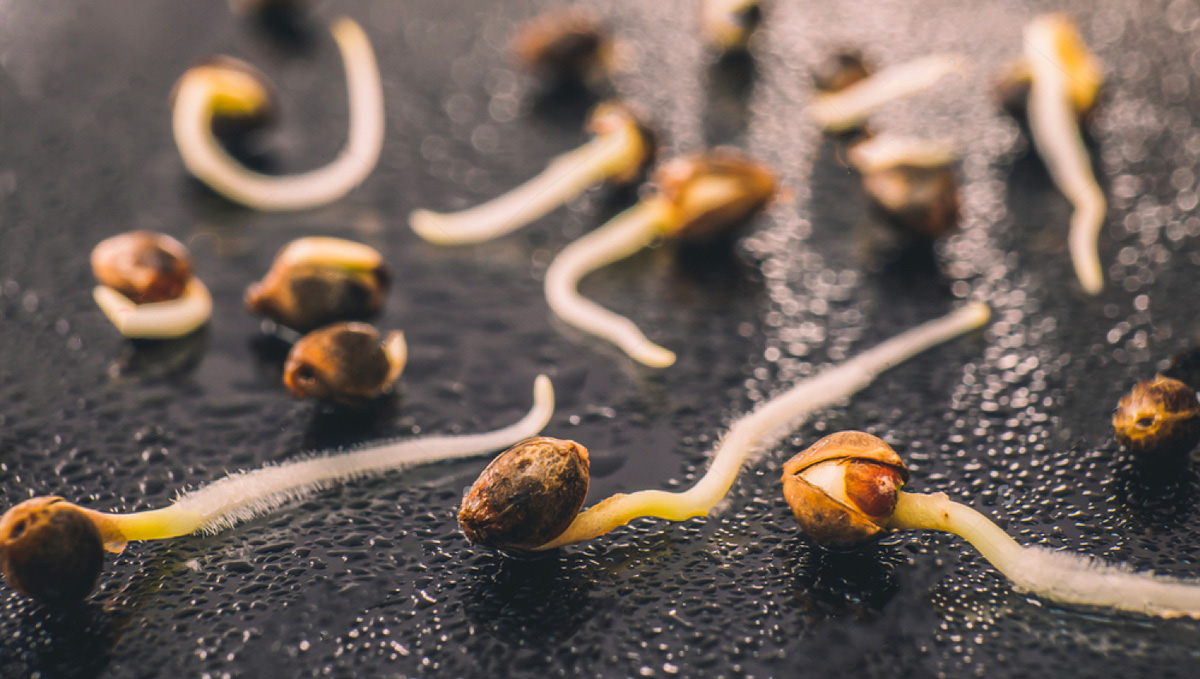
Soaking Seeds
The soaking method is a simple and effective way to kickstart the germination process for your autoflower seeds. By soaking the seeds in water, you provide them with the moisture needed to break dormancy and initiate the growth process.
To begin, gather your selected autoflower seeds and a clean glass or container. Fill the container with room temperature tap water, ensuring that there is enough water to fully submerge the seeds. Avoid using chlorinated water, as this can potentially harm the seeds. Allow the water to sit for a few hours to dissipate any chlorine present.
Once your water is ready, carefully place your autoflower seeds into the glass, making sure they are fully submerged. It’s a good idea to label the container if you are soaking different varieties to keep track of which seeds are which.
Leave the seeds to soak for approximately 24 to 48 hours. During this time, the seeds will absorb water and undergo the process of imbibition, where water is taken in to initiate germination. As the seeds soak, you may notice that they start to sink to the bottom of the glass; this is an indication that they are taking in water and beginning to germinate.
It’s important to check on the seeds periodically during the soaking process. If any seeds float to the top and remain floating after 24 hours, they may be non-viable and less likely to germinate successfully. Remove any floating seeds from the container and discard them.
After the allotted soaking time has passed, carefully remove the soaked seeds from the water. They may be slightly swollen and have a crack or split in the seed casing, indicating that germination has begun.
Now that your seeds are primed for germination, it’s time to plant them in their growing medium. This can be soil, coco coir, or any other suitable substrate of your choice. Gently plant the pre-soaked seeds in their respective containers, ensuring they are buried at an appropriate depth (usually about half an inch or 1 to 2 centimeters deep).
Keep the newly planted seeds in a warm and humid environment, ideally around 70 to 85°F (21 to 29°C), with a humidity level of around 70%. Continue to provide water to the growing medium as needed, keeping it moist but not overly saturated. Within a few days, you should start to see the seeds sprout and tiny seedlings emerge from the soil.
The soaking method is a reliable and straightforward way to germinate your autoflower seeds. By providing the right conditions and moisture, you can ensure a successful start to your autoflower garden.
Paper Towel Method
The paper towel method is a popular and effective technique for germinating autoflower seeds. This method provides a controlled and moist environment for the seeds to sprout, making it easier to monitor their progress.
To begin, gather your preferred autoflower seeds and a few sheets of damp paper towels. Ensure that the paper towels are moist but not dripping wet. You can achieve this by dampening the paper towels with clean water and then gently squeezing out any excess moisture.
Place one damp paper towel on a clean surface and spread it out evenly. Take your autoflower seeds and place them on one half of the paper towel, leaving enough space between each seed. Fold the other half of the paper towel over the seeds, covering them completely.
Next, transfer the folded paper towel with the seeds to a sealed plastic bag or container. This step is crucial to creating a mini greenhouse-like environment that retains moisture. The bag or container will help maintain high humidity levels and prevent the paper towel from drying out.
Now, find a warm and dark location for the seeds to germinate. The optimal temperature range for seed germination is typically around 70 to 85°F (21 to 29°C). Keep in mind that light is not necessary during this stage, as the seeds need darkness to focus on root development.
Check on the seeds daily by opening the bag or container to inspect their progress. You should start to see small roots emerging from the seeds within a few days. Once the roots have grown to about half an inch or 1 to 2 centimeters, it’s time to transfer the germinated seeds to their growing medium.
Be extremely gentle when handling the germinated seeds to avoid damaging the delicate roots. Carefully transfer the sprouted seeds to individual containers with your preferred growing medium, such as soil or coco coir. Plant the seeds at a suitable depth, usually around half an inch or 1 to 2 centimeters deep.
Place the newly planted seeds in a warm and bright location, but be cautious with direct, intense light at this stage. Ensure that the growing medium remains moist, but avoid overwatering, as it can lead to root rot.
With proper care and attention, the seedlings will continue to grow, developing their first set of true leaves and establishing a strong root system. At this point, you can gradually introduce them to more light and adjust their growing environment based on your specific setup.
The paper towel method is a reliable and straightforward way to germinate your autoflower seeds. It provides an ideal environment for seed sprouting and allows you to easily monitor their progress. Follow this method, and you’ll be well on your way to a thriving autoflower garden!
Read more: How To Germinate A Pinecone
Soil Method
The soil method is a straightforward and reliable way to germinate your autoflower seeds. Mimicking natural conditions, this method allows the seeds to sprout directly in their intended growing medium, leading to a seamless transition for the seedlings.
To begin, select a well-draining potting mix or seedling soil that is rich in nutrients and suitable for young plants. Fill seedling pots or trays with the soil, leaving enough space for the seeds to be planted at an appropriate depth. A depth of about half an inch or 1 to 2 centimeters is usually sufficient.
Make a small indentation in the soil for each seed. Place one seed in each indentation, ensuring they are not planted too deep or too shallow. Cover the seeds lightly with a thin layer of soil, enough to bury them securely but still allow for easy emergence of the seedlings.
After planting, gently mist the soil with water to ensure it is moist but not overly saturated. You can also water from the bottom by placing the seedling pots or trays in a shallow container filled with water and allowing the soil to absorb the moisture through the drainage holes. Be careful not to overwater, as excessive moisture can lead to issues such as damping off or root rot.
Now, find a warm and bright location for the seeds to germinate. The optimal temperature range for seed germination is typically around 70 to 85°F (21 to 29°C). You can use a heating mat or place the seedlings near a heat source to maintain the desired temperature.
Within a few days to a week, you should start to see the seedlings emerge from the soil. At this stage, it’s crucial to provide them with adequate light. Place the seedlings under grow lights or in a location with sufficient natural sunlight. Aim for around 18 hours of light per day to promote healthy growth and development.
As the seedlings grow, continue to monitor the moisture levels in the soil. Water the plants when the top inch of the soil feels dry to the touch. Avoid overwatering, as it can lead to root-related issues. Alternatively, underwatering can cause stunted growth, so find a balance that keeps the soil consistently moist but not waterlogged.
Once your seedlings have developed their first set of true leaves, it’s time to consider transplanting them into larger pots or the final growing location. This step allows the plants to have more space for root development and provides better access to nutrients and water.
The soil method is a straightforward and effective way to germinate your autoflower seeds. By providing a suitable growing medium right from the start, you can ensure a seamless transition for your seedlings and set them up for success in their journey to becoming mature autoflower plants.
Germination Tips
Germinating autoflower seeds is an exciting process that sets the foundation for a successful garden. To maximize your chances of achieving healthy and vigorous seedlings, here are some essential tips to keep in mind:
1. Quality Seeds:
Start with high-quality autoflower seeds from reputable breeders or seed banks. Ensure that the seeds are fresh, viable, and stored properly to increase their germination success rate.
2. Optimal Environment:
Create an ideal germination environment by maintaining a temperature range of 70 to 85°F (21 to 29°C). This helps promote rapid and successful germination. Provide consistent warmth and humidity to encourage healthy seedling development.
Read more: How To Germinate Rice
3. Proper Moisture:
Ensure the growing medium, whether it’s soil, coco coir, or paper towels, is kept consistently moist during the germination process. Use clean, pH-balanced water to avoid potential issues. Avoid overwatering, as it can lead to damping off or other fungal problems.
4. Darkness:
Keep the seeds in a dark environment during the germination process to encourage root growth. Once the seedlings emerge, provide adequate light for their photosynthesis needs.
5. Gentle Handling:
Handle the germinated seeds with care to avoid damaging the delicate roots. Use tweezers or your fingers, being cautious not to squeeze or crush the seeds. When transplanting, support the seedlings by their leaves or root ball, avoiding pulling or tugging on the stems.
6. Patience:
Germination times can vary from a few days to a week or more, depending on the strain and environmental conditions. Be patient and resist the urge to interfere or disturb the seeds during this crucial stage.
Read more: How To Germinate Mitraria
7. Cleanliness:
Ensure cleanliness in your growing environment to minimize the risk of pests, diseases, or contamination. Sterilize your tools and equipment, and maintain good hygiene practices throughout the germination process.
8. Adjusting Light Intensity:
If using artificial light, gradually increase the intensity as the seedlings grow. Too much light intensity in the early stages can stress or damage the plants. Strike a balance between providing adequate light for growth while avoiding light burn.
9. Adequate Air Circulation:
Ensure proper air circulation around the germinating seeds or seedlings. Good airflow helps prevent the buildup of excess moisture and reduces the risk of fungal or mold issues.
10. Record Keeping:
Maintain a record of your germination process, including the date of germination, the seed strain, and any specific observations. This information can be valuable for future reference and improving your cultivation techniques.
Remember, germination is a crucial stage in the life cycle of your autoflower plants. By following these tips and providing optimal conditions, you can increase the likelihood of successful germination and set your garden up for a bountiful harvest.
Read more: How To Germinate Grape
Transplanting Seedlings
Once your autoflower seedlings have emerged and established their first set of true leaves, it’s time to transplant them into their permanent growing containers or outdoor garden. Transplanting allows the seedlings to have more room for root development and access to essential nutrients. Here are some key steps to follow when transplanting your autoflower seedlings:
1. Select the Right Containers:
Choose appropriately sized containers that provide enough space for the plants to grow. Ensure that the containers have adequate drainage holes to prevent waterlogged soil and potential root rot. If growing outdoors, prepare the soil bed or choose a suitable spot for direct planting.
2. Prepare the Transplanting Medium:
Fill your chosen containers or prepare the planting area with a well-draining soil mix enriched with organic matter. Ensure the soil is loose and friable, allowing for easy root penetration and nutrient uptake.
3. Water the Seedlings:
Water the seedlings in their original containers or trays a few hours before transplanting. This helps loosen the root ball and minimizes transplant shock.
Read more: How To Germinate Banana
4. Gently Remove the Seedlings:
To remove the seedlings from their original containers, gently press on the sides or bottom of the container to loosen the root ball. Carefully lift the seedling from the container, holding it by its leaves or the root ball to avoid damaging the stem.
5. Dig Planting Holes:
If transplanting into individual containers, create planting holes in the new growing medium that are large enough to accommodate the roots without overcrowding. Dig the holes a bit wider and deeper than the root ball to allow for proper root expansion.
6. Place the Seedlings:
Position the seedlings in the planting holes, ensuring they are at the correct depth with the soil level of the original containers. Gently backfill the holes with the prepared soil mix, lightly firming the soil around the seedlings to provide stability. Avoid compacting the soil too tightly, as it can impede root growth and nutrient uptake.
7. Water and Adjust:
Immediately after transplanting, water the seedlings thoroughly. This helps settle the soil, eliminates air pockets, and provides hydration to the roots. Monitor the moisture level in the days following transplantation and adjust the watering schedule as needed to maintain consistent moisture without overwatering.
Read more: How To Germinate Lychee
8. Provide Proper Light and Climate Conditions:
Place the transplanted seedlings in a location that receives adequate light. If growing indoors, adjust the height and intensity of your grow lights as the plants grow. If growing outdoors, ensure that the seedlings are protected from harsh weather conditions and gradually acclimate them to the outdoor environment to prevent shock.
9. Gradually Introduce Nutrients:
Start with a mild nutrient solution specifically formulated for seedlings or young plants. Begin fertilizing a few weeks after transplanting, following the recommendations on the nutrient package. Be mindful of not overfeeding, as autoflowers are sensitive to nutrient burn.
10. Monitor and Support:
Closely observe your transplanted seedlings for any signs of stress or deficiencies. Keep an eye out for pests, diseases, and nutrient imbalances. Use supports such as stakes or trellises if needed to provide stability as the plants grow and develop.
With proper care, your transplanted autoflower seedlings will continue to thrive and mature into robust plants. Remember to provide consistent care, including watering, light, and nutrient management, to support their growth throughout the flowering stage. Happy gardening!
Conclusion
Congratulations! You have successfully learned how to germinate autoflower seeds and are now equipped to begin your journey as an autoflower gardener. Germination is a crucial step in the cultivation process and sets the stage for healthy plant growth and bountiful harvests. By following the methods and tips outlined in this article, you can ensure successful germination and establish a strong foundation for your autoflower garden.
Understanding the unique characteristics of autoflowers, such as their ability to flower based on age rather than the light cycle, allows you to make informed choices when selecting seeds and planning your growing environment. Choose high-quality autoflower seeds that align with your preferences in terms of effects, flavors, and growing conditions.
Whether you opt for the soaking method, paper towel method, or soil method, each approach offers a reliable way to kickstart germination. Adjust the moisture levels, temperature, and lighting conditions to create an optimal environment for the seeds to sprout and develop into healthy seedlings.
Transplanting your seedlings at the appropriate stage and with care ensures their continued growth and success. Provide them with the necessary light, moisture, and nutrients to thrive, and monitor their progress closely to address any potential issues that may arise.
Remember, gardening is a continuous learning process. Take notes, track your results, and make adjustments as needed. Embrace the journey and enjoy the rewarding experience of growing your own autoflower garden.
Now that you have the knowledge and confidence, it’s time to put it into practice. Get your autoflower seeds, prepare your growing space, and watch as your plants flourish. May your garden be filled with vibrant autoflowers and abundant harvests. Happy growing!
Frequently Asked Questions about How To Germinate Autoflowers
Was this page helpful?
At Storables.com, we guarantee accurate and reliable information. Our content, validated by Expert Board Contributors, is crafted following stringent Editorial Policies. We're committed to providing you with well-researched, expert-backed insights for all your informational needs.

0 thoughts on “How To Germinate Autoflowers”