Home>Garden Essentials>How To Grow A Coconut Tree From Seed
Garden Essentials
How To Grow A Coconut Tree From Seed
Modified: April 22, 2024
Learn how to grow a coconut tree from seed in your garden. Follow these simple steps and enjoy the beauty of your own tropical oasis.
(Many of the links in this article redirect to a specific reviewed product. Your purchase of these products through affiliate links helps to generate commission for Storables.com, at no extra cost. Learn more)
Introduction
Welcome to the fascinating world of growing coconut trees from seeds! Whether you’re an avid gardener looking for a new challenge or simply intrigued by the idea of nurturing your very own coconut tree, this comprehensive guide is here to help you every step of the way. Growing a coconut tree from seed can be a rewarding experience, allowing you to witness the development of a tropical plant right in your own backyard.
Known for their iconic palm-fringed beaches and deliciously sweet fruit, coconut trees (Cocos nucifera) have long been associated with tropical paradises. These versatile trees not only bear fruit that can be enjoyed fresh or used in cooking and baking, but they also provide shade, create a tropical ambiance, and create a sense of serenity in any garden or landscape.
While it may seem daunting to grow a coconut tree from seed, with the right knowledge and techniques, you can successfully cultivate a beautiful and thriving tree. This article will guide you through the entire process, from gathering the necessary materials to caring for the mature coconut tree.
Before we dive into the step-by-step instructions, it’s important to understand that growing a coconut tree from seed requires patience and dedication. These trees grow slowly, and it can take several years before your seedling reaches maturity and starts producing coconuts. However, the journey itself is incredibly rewarding, and watching your coconut tree thrive and flourish will make all the effort worthwhile.
So, let’s dive into the exciting world of growing coconut trees from seeds. Grab your gardening gloves, and let’s get started!
Key Takeaways:
- Growing a coconut tree from seed requires patience and dedication, but the rewarding journey of nurturing a tropical treasure in your own backyard is filled with learning and satisfaction.
- Providing the essential elements for growth, including water, sunlight, nutrients, and protection from pests and diseases, will ensure the ongoing health and productivity of your mature coconut tree.
Read more: How To Grow Coconut From Seed
Step 1: Gather Materials
Before you begin the process of growing a coconut tree from seed, it’s important to gather all the necessary materials. Having everything prepared beforehand will ensure a smooth and efficient planting process.
Here are the materials you’ll need:
- Coconut: Start by obtaining a mature, fully-grown coconut from a reputable source. Look for a coconut that is heavy for its size and has a healthy, intact husk. Avoid coconuts with cracks or signs of damage.
- Pot or container: Choose a pot or container that is at least 12 inches in diameter and has drainage holes at the bottom. This will allow excess water to escape and prevent root rot.
- Potting mix: Use a well-draining potting mix that is suitable for tropical plants. You can either purchase a commercial potting mix or create your own by combining equal parts of peat moss, perlite, and vermiculite.
- Watering can or spray bottle: You’ll need a watering can or spray bottle to provide water to the coconut seedling once it starts growing.
- Transparent plastic bag or cling wrap: Use a transparent plastic bag or cling wrap to create a mini greenhouse effect and trap moisture around the coconut seed.
- Heat source: Since coconuts require warmth to germinate, consider using a heat mat or placing the pot near a heat source such as a radiator or heating vent.
Once you have gathered all the necessary materials, you’re ready to move on to the next step: choosing a suitable coconut seed for planting. Remember to prepare everything in advance, so you can start the process seamlessly.
Step 2: Choose a Suitable Seed
Choosing the right coconut seed is crucial for successful germination and the growth of a healthy coconut tree. Here are some tips to help you select a suitable seed:
- Freshness: Look for a coconut that is fresh and recently harvested. Fresh coconuts have a higher chance of successfully germinating compared to older ones.
- Firmness: Gently shake the coconut to ensure it is full of water. A firm coconut indicates that the water inside is still in good condition, which is essential for the germination process.
- Sprouting potential: Examine the three eyes (indentations) on the coconut. Look for a seed with at least one sprout, known as a “germ.” The presence of a sprout indicates that the coconut is viable and ready to grow.
- Husk condition: Inspect the husk for any signs of damage or decay. Choose a coconut with a healthy, intact husk, as it provides protection to the seed and helps retain moisture during germination.
When selecting a coconut, it’s important to note that not all store-bought coconuts are suitable for germination. Some coconuts sold for consumption may have been treated or stored in a way that affects their viability. It’s best to source coconuts from a reputable plant nursery or specialty store that specifically sells seeds for planting purposes.
If you live in a non-tropical region, it may be challenging to find fresh coconuts locally. In such cases, consider purchasing coconut seeds online from trusted sources that specialize in tropical plants.
Now that you know how to choose a suitable coconut seed, it’s time to move on to the next step: preparing the seed for planting. Gathering the right materials and selecting a healthy seed are essential for ensuring a successful germination process and the growth of a strong and vibrant coconut tree.
Step 3: Prepare the Seed for Planting
Before you can plant the coconut seed, it’s important to properly prepare it to improve germination success. Here’s how you can prepare the seed for planting:
- Remove the husk: Start by removing the outer husk of the coconut. Use a hammer or mallet to crack the coconut open, and then pry the husk away from the hard shell. Be careful not to damage the inner seed in the process.
- Clean the seed: Once the husk is removed, you’ll notice a hard, brown shell. Rinse the seed under cool water to remove any remaining husk fibers or debris.
- Inspect for rot or mold: Carefully examine the seed for any signs of rot or mold. If you come across a seed with visible damage or signs of decay, it’s best to discard it and choose a different one.
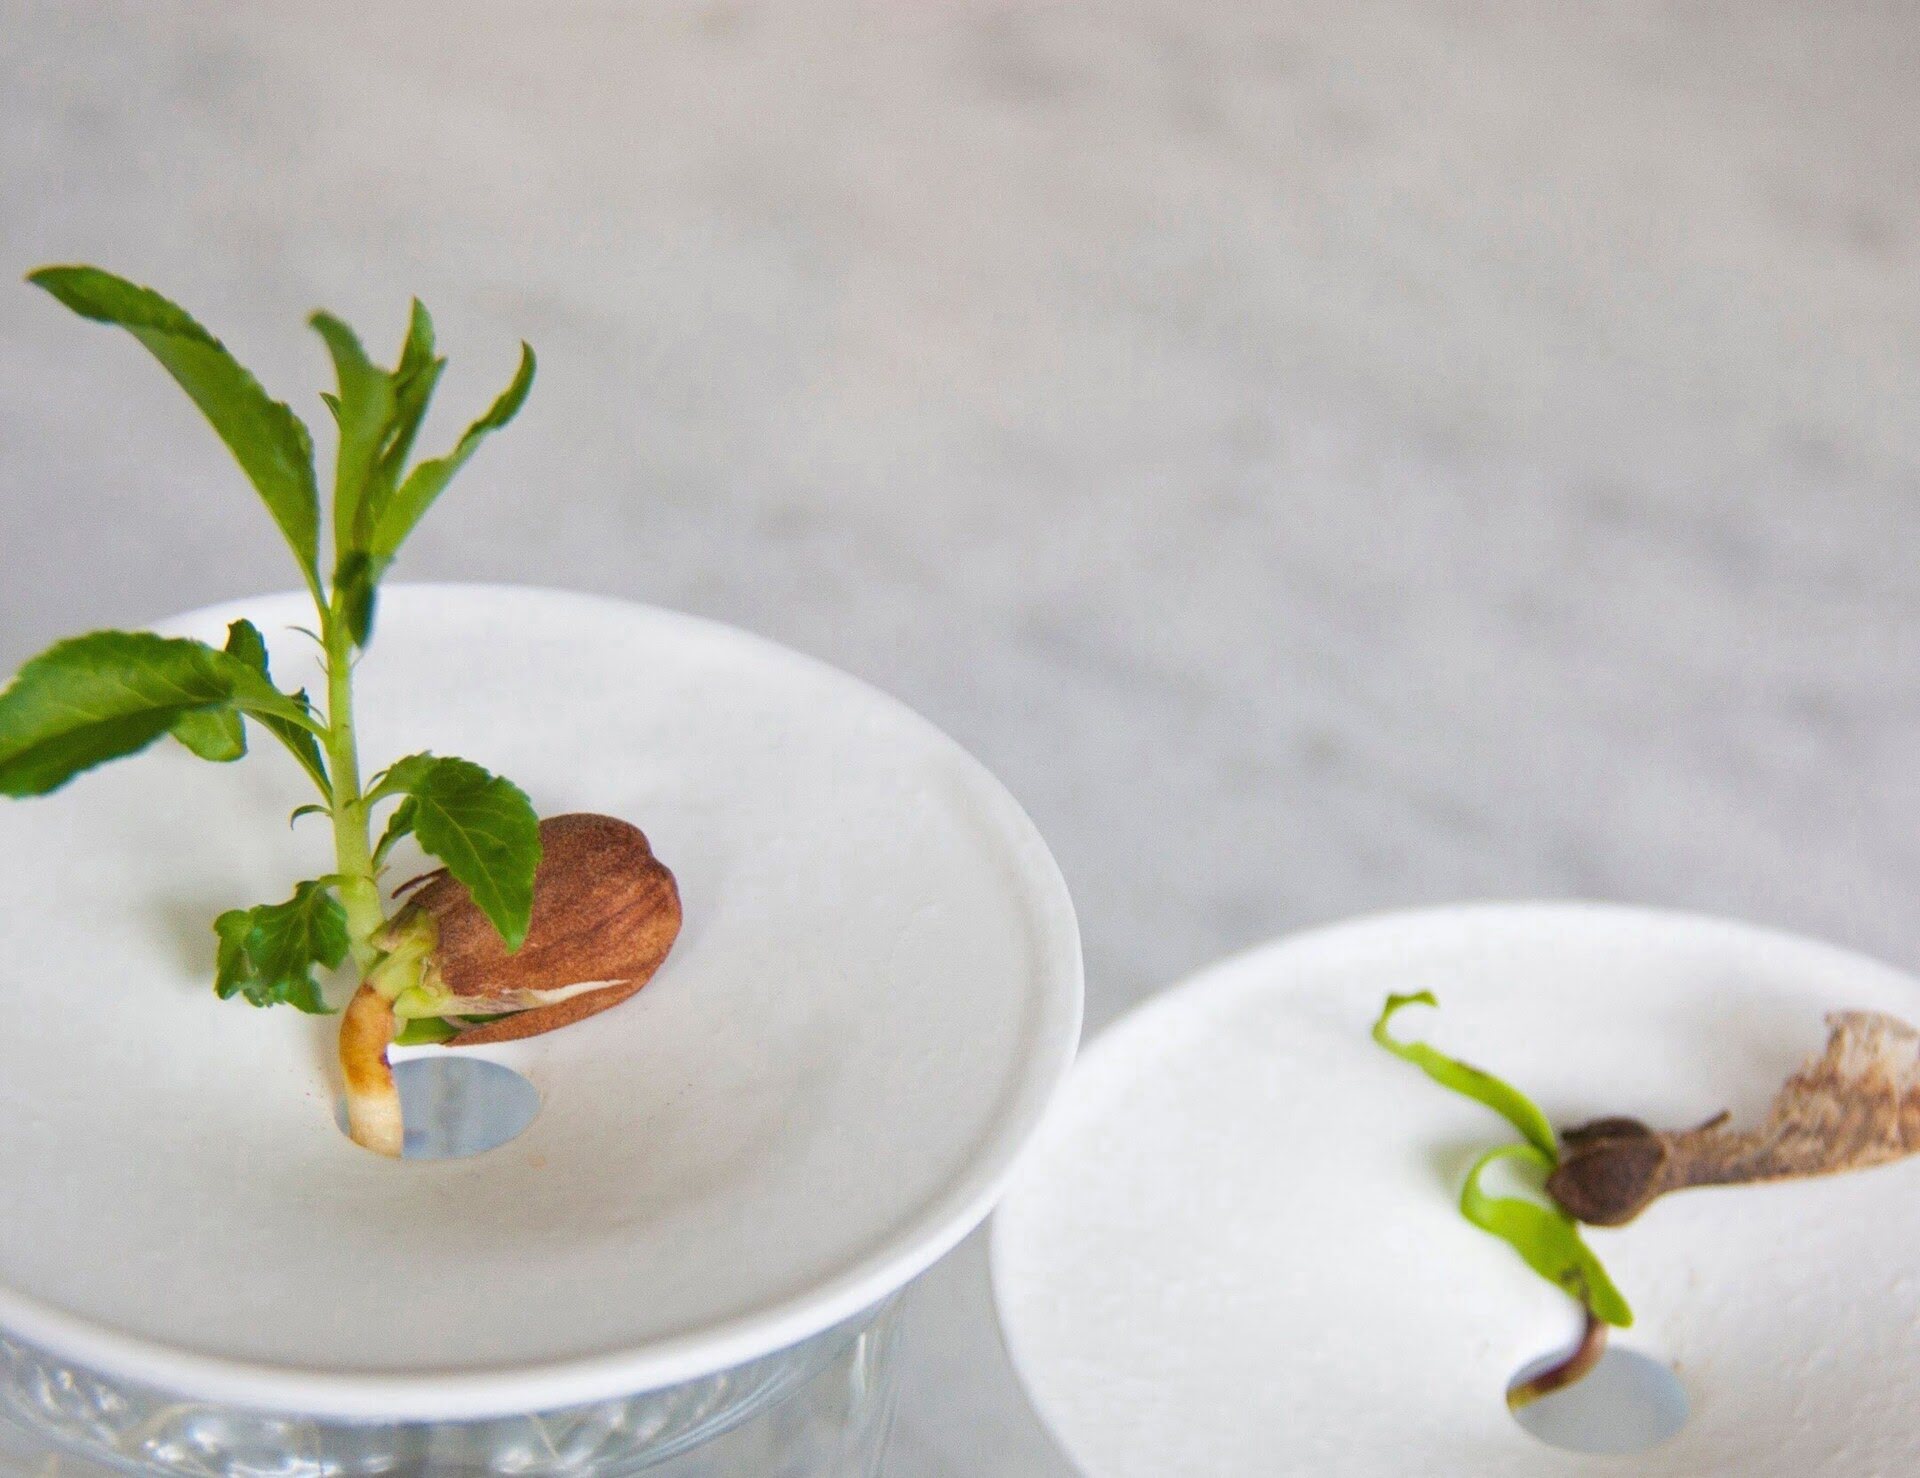
- Identify the germination point: Look for the three eyes (indentations) on the coconut seed. One of these eyes will be slightly softer and may appear to have a small crack. This is the germination point, where the sprout will emerge.
- Soak the seed: To help jumpstart the germination process, it’s recommended to soak the coconut seed in water for 24 to 48 hours. Fill a bucket or container with lukewarm water and place the seed inside. Ensure that the germination point is facing down and fully submerged in water.
Soaking the coconut seed in water helps to soften the inner shell and hydrate the seed, making it easier for the sprout to emerge. This step mimics the natural conditions necessary for germination.
After soaking, remove the coconut seed from the water and dry it for a few hours. It should still be moist but not dripping wet. Now, you’re ready to move on to the next step: creating the ideal growing environment for the coconut seed. The proper preparation of the seed is crucial for ensuring optimal germination and setting the stage for a healthy coconut tree to grow.
Step 4: Create the Ideal Growing Environment
Creating the ideal growing environment is crucial for the successful germination and growth of your coconut seedling. Here’s how you can provide the optimal conditions for your seed:
- Select a suitable location: Choose a warm and sunny spot in your garden or outdoors where the coconut seedling will receive at least 6 to 8 hours of direct sunlight each day. Coconut trees thrive in tropical and subtropical climates.
- Prepare the planting container: Fill the chosen pot or container with a well-draining potting mix. Ensure the container has drainage holes at the bottom to prevent waterlogging.
- Create a mini greenhouse: To replicate the warm and humid conditions necessary for germination, cover the pot with a transparent plastic bag or cling wrap. This will create a mini greenhouse effect and help trap moisture around the seed.
- Add warmth: Coconut seeds require warmth to germinate. Consider placing the pot near a heat source, such as a radiator or heating mat, or use a heat mat specifically designed for plant propagation to maintain a consistent temperature between 80-90°F (27-32°C).
- Monitor humidity: Coconut seeds need a high level of humidity to sprout successfully. Monitor the moisture levels inside the mini greenhouse and mist the seed with water using a spray bottle as needed to maintain a humid environment.
It’s important to note that the ideal growing conditions can vary depending on your geographical location and climate. If you’re in a colder region, you may need to provide additional heat and use a grow light to supplement sunlight during the germination phase.
During this stage, it’s crucial to maintain consistent warmth and humidity for the seed to germinate successfully. Keep a close eye on the moisture levels and temperature within the mini greenhouse, and make any necessary adjustments to ensure the optimal growing conditions.
Once you’ve created the ideal growing environment, you’re ready to move on to the next step: planting the coconut seed. With the right conditions in place, your coconut seedling is well on its way to sprouting and growing into a magnificent coconut tree.
Read more: How To Grow Tree From Seed
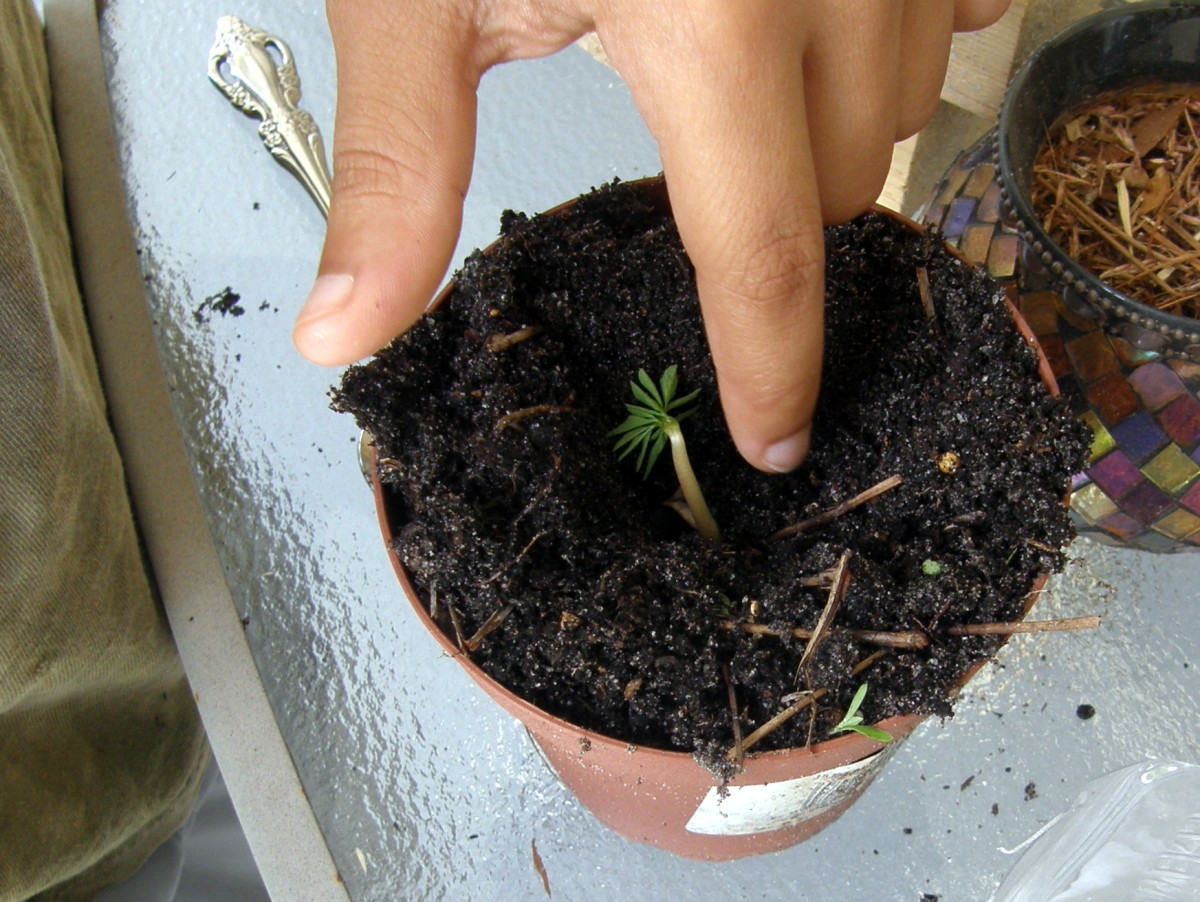
Step 5: Planting the Coconut Seed
Now that you’ve prepared the coconut seed and created the ideal growing environment, it’s time to plant the seed. Follow these steps to ensure successful planting:
- Fill the pot: Fill the pot or container with the prepared well-draining potting mix, leaving about an inch of space at the top.
- Plant the seed: Place the coconut seed with the germination point facing down into the potting mix. Make sure to bury the seed deep enough that it stands upright and remains stable.
- Cover the seed: Gently cover the seed with more potting mix, ensuring that a small portion of the germination point is still visible above the soil surface.
- Water the seed: Water the potting mix thoroughly to provide moisture to the seed. Be careful not to overwater, as excessive moisture can lead to root rot. Aim for slightly damp but not waterlogged soil.
- Place in the mini greenhouse: Place the pot inside the mini greenhouse you created using the plastic bag or cling wrap. Seal the bag or wrap, ensuring it fits loosely to allow for air circulation.
It’s important to note that the germination process can take anywhere from several weeks to several months. During this time, it’s crucial to maintain the warmth and humidity levels within the mini greenhouse and to regularly monitor the soil moisture.
As the coconut seed begins to germinate, you may notice the sprout emerging from the germination point. This is an exciting milestone in your coconut tree’s journey! Be patient and continue providing the necessary care throughout the germination and early growth stages.
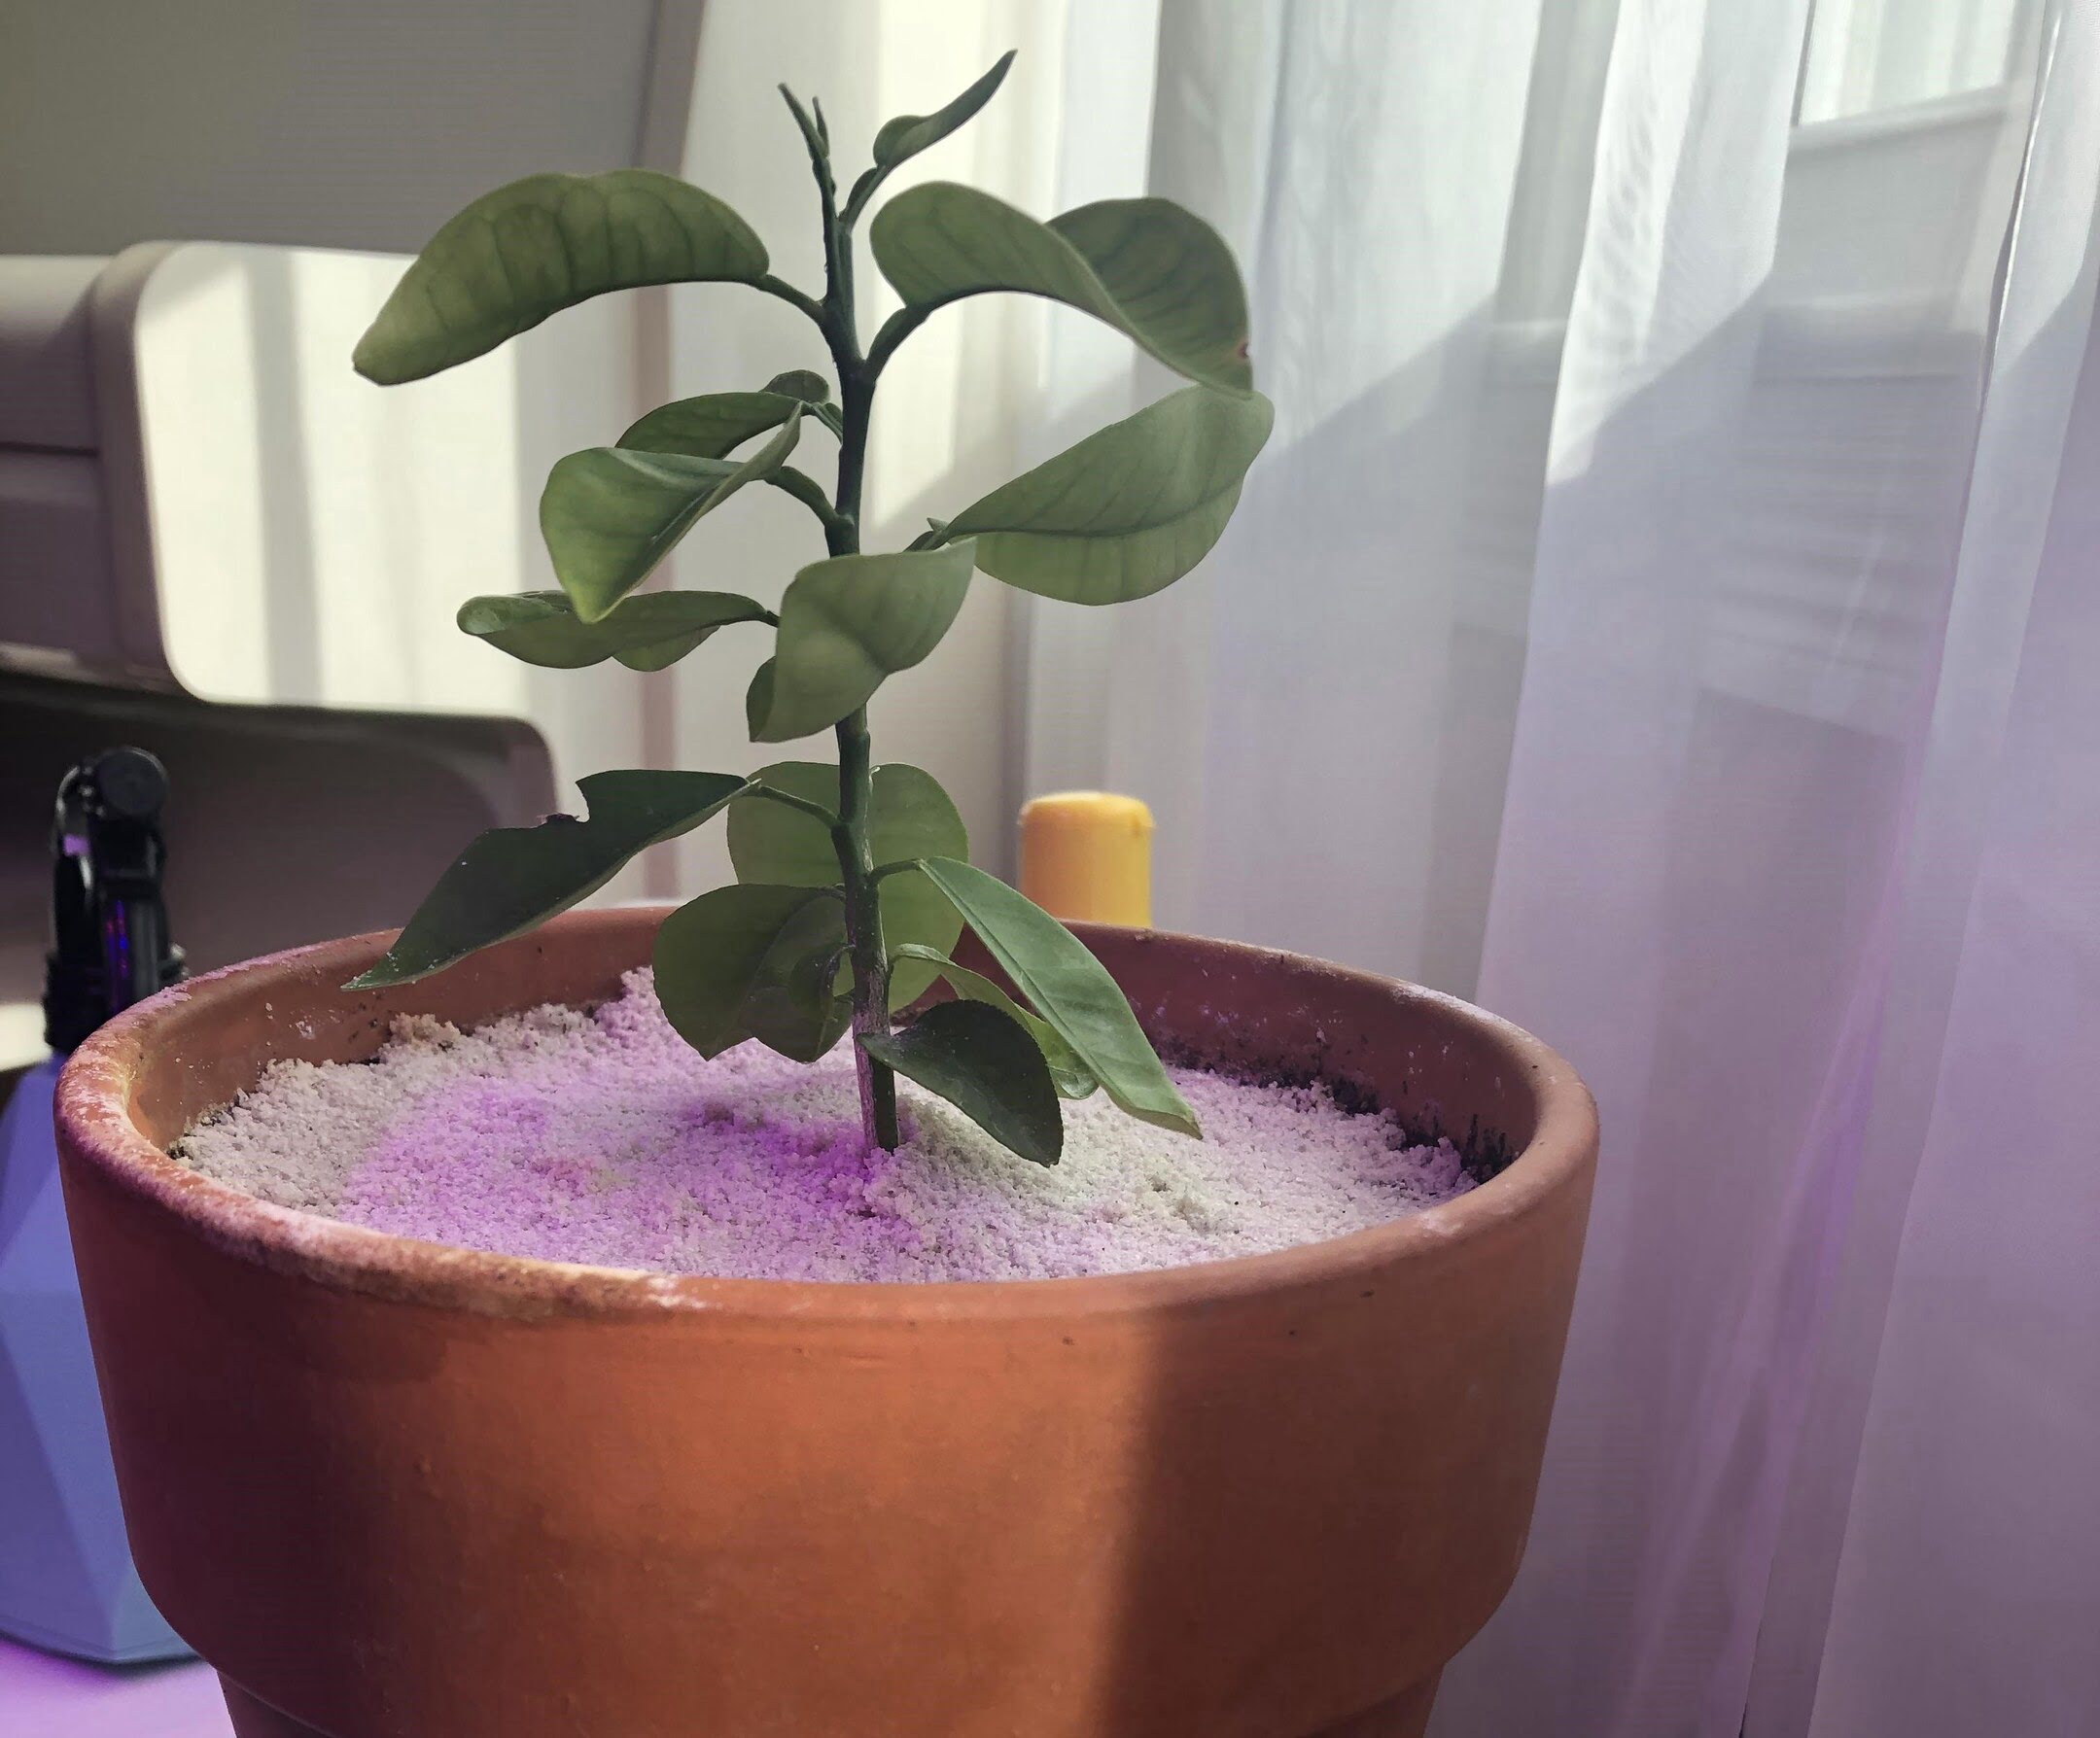
Once the coconut seedling has developed a few sets of leaves and is well-established, it’s time to move on to the next steps of care and maintenance. In the following steps, we will discuss watering, light and temperature conditions, monitoring and caring for the seedling, and ultimately transplanting the coconut tree into a larger container or outdoor location.
So sit back, enjoy the vibrant green of your coconut seedling, and get ready for the next stages of nurturing your very own coconut tree!
Soak the coconut seed in water for a few days to soften the outer husk. Plant it in a well-draining soil, keeping it moist but not waterlogged. Place it in a warm, sunny spot and be patient, as it can take several months to sprout.
Step 6: Provide Adequate Watering and Drainage
Proper watering is essential for the healthy growth of your coconut seedling. Here’s what you need to know about providing adequate water and maintaining proper drainage:
Watering:
After planting the coconut seed, it’s important to keep the soil evenly moist but not waterlogged. Here are some tips for watering your coconut seedling:
- Monitor soil moisture: Check the moisture level of the potting mix regularly. Stick your finger about an inch deep into the soil, and if it feels dry, it’s time to water.
- Water deeply: When it’s time to water, ensure that you thoroughly moisten the potting mix. Water until you see the water coming out of the drainage holes at the bottom of the pot.
- Avoid overwatering: Coconut trees are susceptible to root rot if their roots remain constantly saturated. To prevent overwatering, allow the top layer of the soil to dry out slightly before watering again.
- Adjust based on environmental conditions: The watering frequency may vary based on factors such as temperature and humidity. During hot and dry periods, you may need to water more frequently to prevent the seedling from drying out.
Drainage:
Proper drainage is crucial to prevent water from accumulating and causing root rot. Here’s how you can ensure proper drainage:
- Use well-draining potting mix: Ensure that you have used a well-draining potting mix that allows excess water to flow through easily. This helps prevent the soil from becoming waterlogged.
- Choose a pot with drainage holes: Make sure the pot or container you’re using has drainage holes at the bottom. These holes allow excess water to escape, preventing water from pooling at the bottom of the pot.
- Remove excess water: If you accidentally overwatered and notice excess water pooling at the bottom of the pot, carefully tilt the pot to pour out the excess water.
By providing adequate watering and maintaining proper drainage, you’ll create an environment that promotes healthy root development and growth for your coconut seedling. Remember to adjust the watering frequency based on the specific needs of your plant and the environmental conditions.
In the next step, we’ll discuss the importance of proper light and temperature conditions for your coconut seedling. With the right care, your coconut tree will continue to thrive and grow!
Step 7: Provide Proper Light and Temperature Conditions
Proper light and temperature conditions are vital for the optimal growth of your coconut seedling. Here’s what you need to know:
Light:
Coconut trees are tropical plants that thrive in bright, direct sunlight. Here are some important factors to consider when it comes to providing proper light for your seedling:
- Location: Place your coconut seedling in a spot that receives at least 6 to 8 hours of direct sunlight each day. Make sure there are no obstructions, such as buildings or trees, that shade the plant for extended periods.
- Supplemental lighting: If you live in a region with limited sunlight or want to boost growth during the early stages, you can use grow lights to provide additional artificial light. Position the lights about 6 to 12 inches above the seedling and keep them on for 12 to 16 hours a day.
- Monitor light intensity: Pay attention to the intensity of light your coconut seedling receives. If the leaves start turning pale or yellow, it may indicate that the light is too intense. In this case, provide some shade during the hottest part of the day or adjust the distance between the seedling and the light source.
Temperature:
Coconut trees thrive in warm, tropical climates. Here’s what you need to consider regarding temperature:
- Ideal temperature: Coconut seedlings prefer temperatures between 70°F to 95°F (21°C to 35°C) to successfully grow. Maintain a warm and consistent temperature range to ensure optimal growth.
- Avoid temperature extremes: Protect your seedling from extreme hot or cold temperatures and sudden temperature fluctuations, as they can stress the plant. If you live in a colder climate, you may need to bring the seedling indoors or provide additional heat during winter.
- Use a heat mat: Consider using a heat mat designed for plant propagation to provide consistent warmth if your ambient temperatures are lower than the desired range.
By providing your coconut seedling with ample sunlight and maintaining a warm temperature, you’ll help promote healthy and vigorous growth. However, always pay attention to your specific climate and adjust as needed to create the optimal conditions for your coconut tree to thrive.
In the next step, we’ll discuss how to monitor and care for your coconut seedling to ensure its ongoing health and development. With the right care, your seedling will grow into a strong and resilient coconut tree.
Step 8: Regularly Monitor and Care for the Seedling
Regular monitoring and care are crucial for the healthy development of your coconut seedling. Here are the key aspects to focus on:
Watering:
Continue to provide consistent, moderate watering to keep the soil evenly moist. Adjust the frequency and amount of water as needed, considering factors such as temperature and humidity. Remember to avoid overwatering, as it can lead to root rot. Monitor the soil moisture regularly and adjust your watering routine accordingly.
Fertilization:
Coconut seedlings generally don’t require fertilization until they are a few months old. When it’s time to start fertilizing, choose a balanced, slow-release fertilizer designed for tropical plants. Follow the instructions on the fertilizer packaging for proper application. It’s important not to over-fertilize, as it can lead to nutrient burn or damage to the seedling’s delicate root system.
Pruning:
As your coconut seedling grows, you may notice dead or yellowing leaves. Gently remove any damaged or unhealthy leaves by pruning them at the base of the stem. This will help maintain the overall health and appearance of the plant. Avoid pruning healthy foliage unnecessarily, as leaves play a vital role in photosynthesis.
Pest and Disease Control:
Regularly inspect your coconut seedling for signs of pests or diseases, such as aphids or fungal infections. If you notice any issues, promptly treat the affected areas with appropriate organic or chemical controls. Prevention is key, so ensure proper airflow around the seedling and maintain cleanliness to avoid pest and disease infestations.
Staking:
If your coconut seedling starts to grow tall and appears unstable, consider staking it to provide support. Use a sturdy stake or bamboo pole inserted into the potting mix next to the seedling’s stem and gently tie it with soft garden twine. This will help prevent the seedling from bending or toppling over in strong winds or heavy rainfall.
Monitor Growth and Development:
Regularly observe and document the growth and development of your coconut seedling. Take note of any changes in leaf color, size, or overall appearance. This monitoring will help you identify any potential problems and make necessary adjustments in care and maintenance.
By regularly monitoring and providing proper care to your coconut seedling, you’ll ensure its ongoing health and vibrant growth. With dedication and attention, your coconut tree will continue to thrive and bring you closer to the ultimate goal of enjoying delicious coconuts from your very own garden.
In the next step, we’ll discuss how to properly transplant your coconut tree once it has outgrown its current container.
Read more: How To Grow A Tree From A Seed
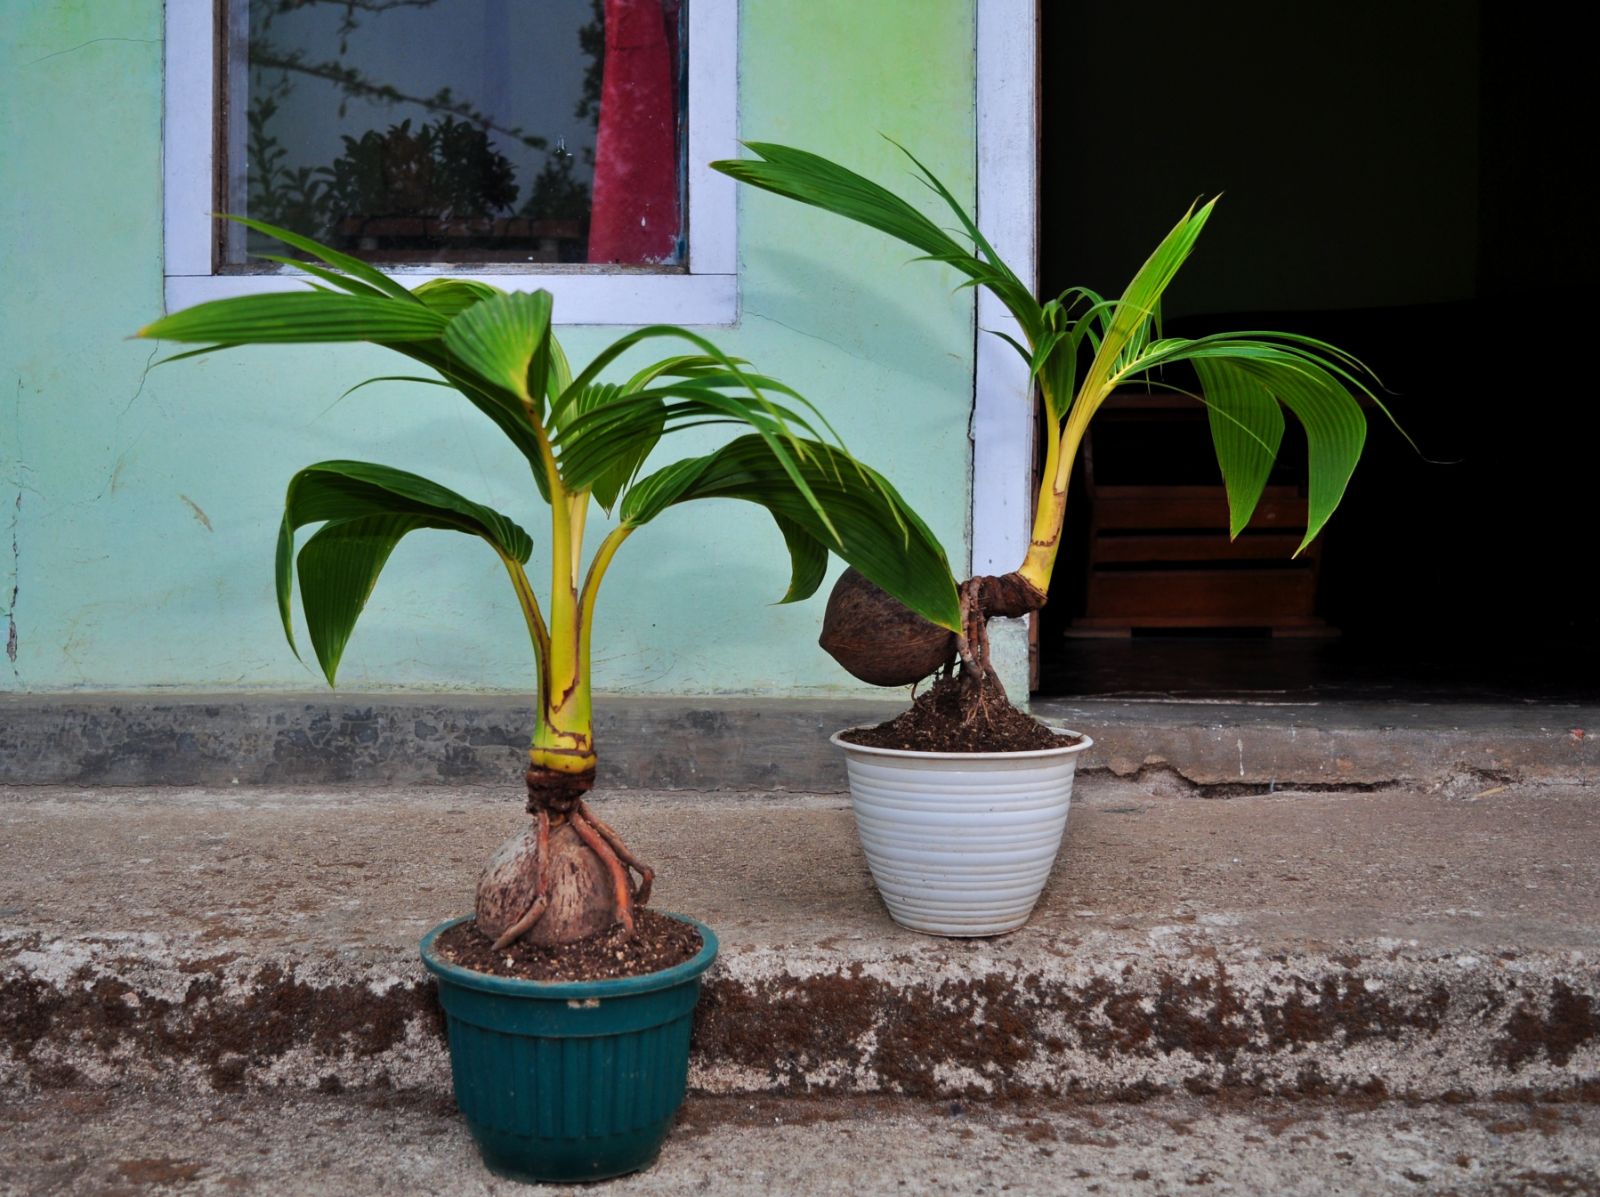
Step 9: Transplanting the Coconut Tree
As your coconut tree grows and outgrows its current container, it will eventually need to be transplanted into a larger pot or an outdoor location. Here’s what you need to know about transplanting your coconut tree:
Timing:
The best time to transplant your coconut tree is during its dormant period, typically in the early spring or late winter. Transplanting during this time allows the tree to adjust to its new environment and establish its roots before the active growing season begins.
Choosing a new location:
If you plan to keep your coconut tree as a potted plant, select a larger pot with adequate drainage holes to accommodate the growing root system. Ensure the new pot is at least one size larger than the current one, providing enough space for the roots to spread.
If you prefer to transplant your coconut tree outdoors, choose a location with well-drained soil and ample sunlight. Coconut trees require a warm, tropical environment to thrive, so ensure that the planting site receives at least 6 to 8 hours of direct sunlight each day.
Transplanting process:
- Prepare the new container: Fill the new pot with a well-draining potting mix, leaving enough room for the roots of the coconut tree.
- Remove the tree from the old container: Gently remove the coconut tree from its current pot, taking care not to damage the roots. You can use your hands or a small trowel to loosen the potting mix around the rootball.
- Plant in the new container: Place the coconut tree in the new pot and add more potting mix around the rootball, ensuring it is firmly but not tightly packed. Leave some space at the top to allow for watering.
- Water thoroughly: After transplanting, water the coconut tree thoroughly to settle the soil and eliminate any air pockets around the roots.
- Provide continued care: Place the freshly transplanted coconut tree in its new location and continue to provide proper watering, sunlight, and ongoing care as discussed in the previous steps.
Adjustment period:
It’s natural for newly transplanted coconut trees to go through an adjustment period, during which they may experience some temporary shock. Be patient and give your tree time to acclimate to its new surroundings. Continue to monitor its progress, and make any necessary adjustments in care as needed.
Remember to provide adequate water, sunlight, and nutrients to support the healthy growth of your coconut tree after transplanting. With time and proper care, your coconut tree will continue to flourish and bring tropical vibes to your garden or outdoor space.
In the final step, we’ll discuss ongoing care for your mature coconut tree and how to enjoy the fruits of your labor.
Step 10: Caring for the Mature Coconut Tree
Caring for a mature coconut tree requires ongoing maintenance to ensure its optimal health and productivity. Here are the key aspects to consider:
Watering:
Provide regular and consistent watering to your mature coconut tree. Keep the soil consistently moist, especially during dry spells or hotter months. Water deeply, allowing the water to penetrate down to the root zone. However, avoid overwatering or allowing the tree to sit in standing water, as it can lead to root rot.
Fertilization:
Apply a balanced, slow-release fertilizer designed for palm trees to provide essential nutrients to your coconut tree. Follow the instructions on the fertilizer package regarding application rates and intervals. Fertilize during the growing season, typically in spring and summer, and reduce or stop fertilization during the dormant season.
Pruning:
Regularly inspect your mature coconut tree for dead or damaged fronds (leaves). Prune these fronds using pruning shears or a saw, making clean cuts at the base of the stem. This helps maintain the tree’s appearance and reduces the risk of pests and diseases. Be cautious not to remove too many healthy fronds, as they contribute to the tree’s photosynthesis and overall vitality.
Pest and Disease Control:
Monitor your coconut tree for any signs of pests or diseases, such as coconut mealybugs, pests, or fungal infections. If you notice any issues, promptly address them with appropriate organic or chemical treatments. Regularly inspect the tree for any abnormalities and take preventive measures, such as maintaining good airflow and providing proper drainage, to minimize the risk of infestations.
Support:
As your coconut tree grows taller and produces coconuts, provide support to the trunk using stakes or braces. This helps prevent the tree from bending or breaking under the weight of the coconuts or during strong winds. Inspect the support structures periodically to ensure they remain secure and adjust as needed.
Harvesting coconuts:
Once your mature coconut tree begins to produce coconuts, they can be harvested when they are mature and ready. Coconuts are typically harvested when they turn brown and fall naturally from the tree. Use a long-handled pruning tool or a machete to safely remove the coconuts from the tree. Ensure you’re knowledgeable about the proper technique to avoid injury.
Enjoying the coconuts:
After harvesting, you can enjoy the fresh and delicious coconuts in various ways. Drink the refreshing coconut water, use the meat for cooking or baking, or even make homemade coconut milk. Coconuts provide a versatile and nutritious addition to your culinary adventures.
By providing ongoing care, you’ll ensure the overall health and productivity of your mature coconut tree. Continue to monitor for any issues, adapt your care routine based on environmental conditions, and enjoy the beauty and bounty of your very own coconut tree.
With these ten steps, you’re well-equipped to grow and care for a coconut tree from seed. Embrace the journey and delight in the tropical aura of your thriving coconut tree!
Conclusion
Congratulations on completing the journey of growing a coconut tree from seed! By following the ten steps outlined in this comprehensive guide, you’ve learned how to gather materials, select a suitable seed, prepare the seed for planting, create the ideal growing environment, plant the seed, provide adequate watering and drainage, ensure proper light and temperature conditions, monitor and care for the seedling, transplant the coconut tree, and care for it as it matures.
Throughout this process, you’ve witnessed the magic of nature as your coconut seed transformed into a vibrant seedling and eventually into a beautiful, mature coconut tree. You’ve embraced the responsibility of providing the essential elements for its growth, including water, sunlight, nutrients, and protection from pests and diseases. Your efforts have been rewarded with the satisfaction of nurturing a tropical treasure right in your own garden or outdoor space.
As your coconut tree continues to thrive, it will not only provide a sense of tranquility and beauty but may also bless you with a bountiful harvest of delicious coconuts. The joy of cracking open a fresh coconut, sipping its refreshing water, or using its meat in various culinary creations is a truly gratifying experience.
Remember that growing a coconut tree from seed requires patience and dedication. These beautiful trees grow slowly, and it may take several years before you can enjoy the full benefits of your efforts. But the journey itself is a rewarding one, filled with learning, appreciation for nature, and the satisfaction of watching your coconut tree flourish.
Thank you for embarking on this adventure of growing a coconut tree from seed and for your commitment to creating a thriving garden or outdoor oasis. May your coconut tree continue to bring tropical charm and delight to your surroundings for years to come.
Happy gardening!
Frequently Asked Questions about How To Grow A Coconut Tree From Seed
Was this page helpful?
At Storables.com, we guarantee accurate and reliable information. Our content, validated by Expert Board Contributors, is crafted following stringent Editorial Policies. We're committed to providing you with well-researched, expert-backed insights for all your informational needs.


0 thoughts on “How To Grow A Coconut Tree From Seed”