Home>Garden Essentials>How To Grow Moringa Seeds

Garden Essentials
How To Grow Moringa Seeds
Modified: March 16, 2024
Learn the best techniques to grow Moringa seeds in your garden. Discover expert tips and step-by-step instructions for a successful garden cultivation.
(Many of the links in this article redirect to a specific reviewed product. Your purchase of these products through affiliate links helps to generate commission for Storables.com, at no extra cost. Learn more)
Introduction
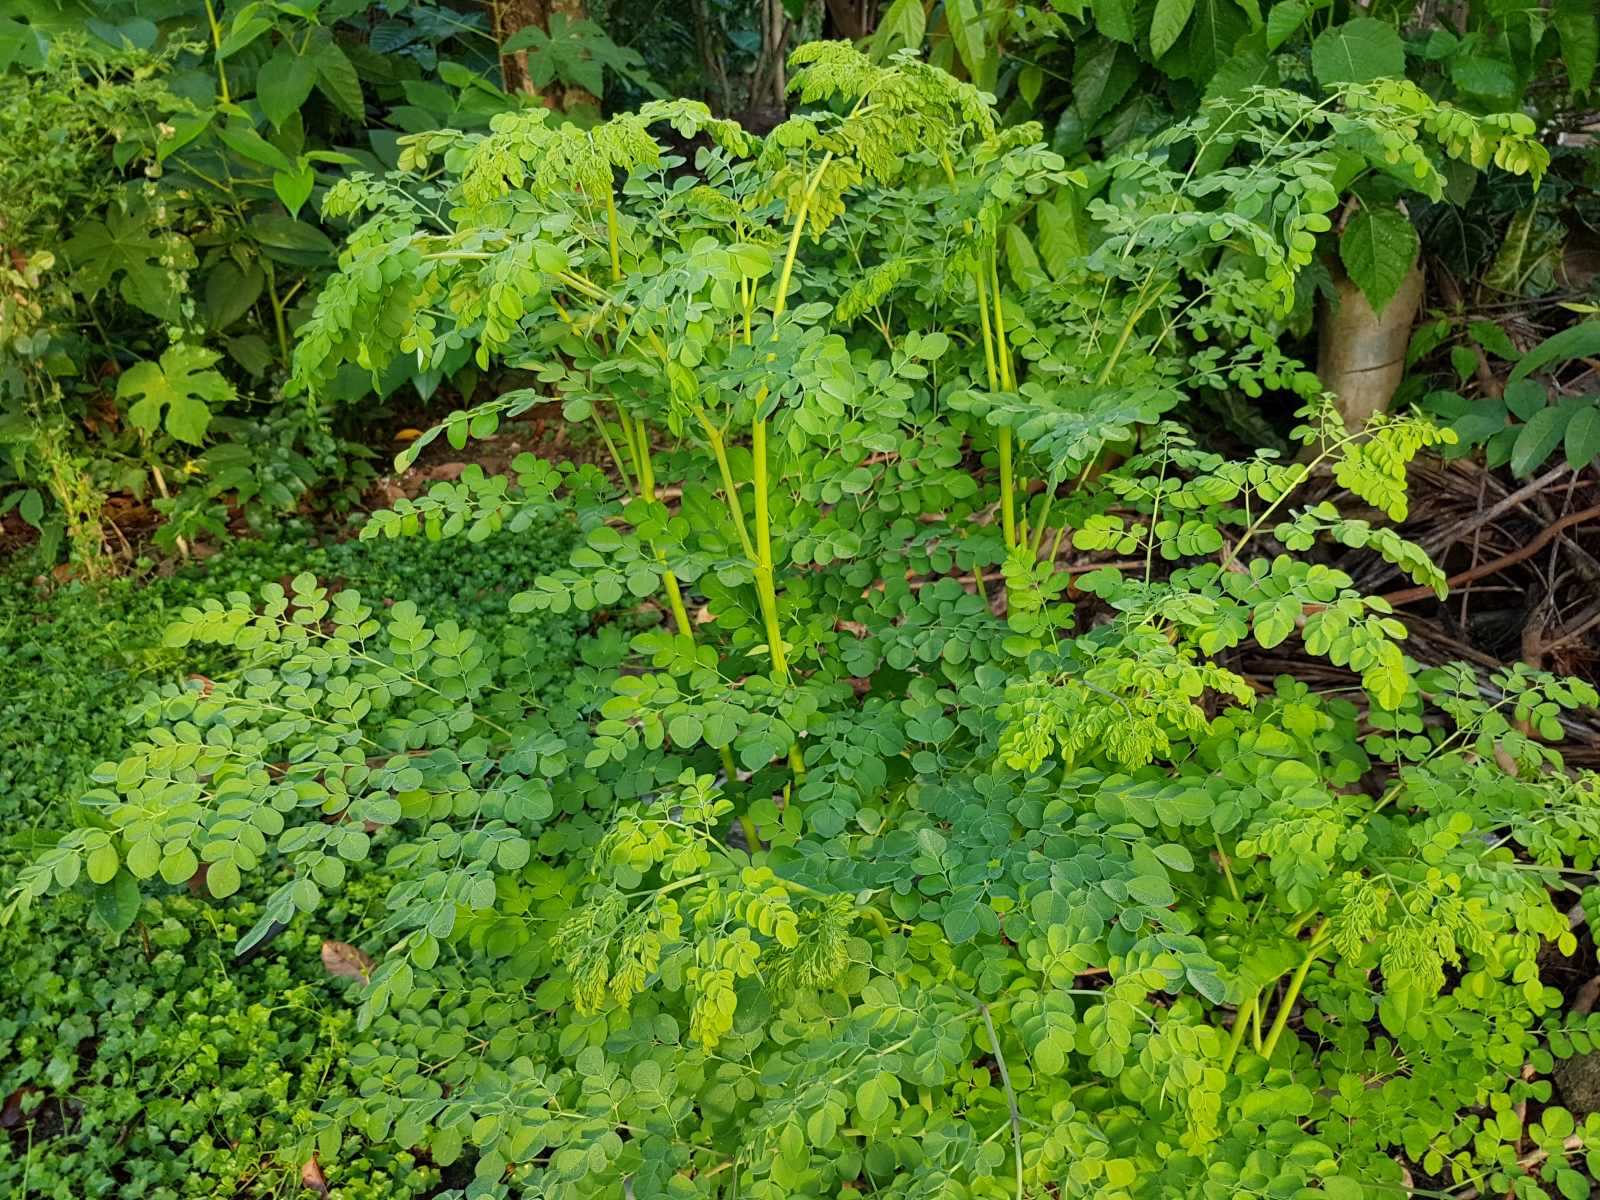
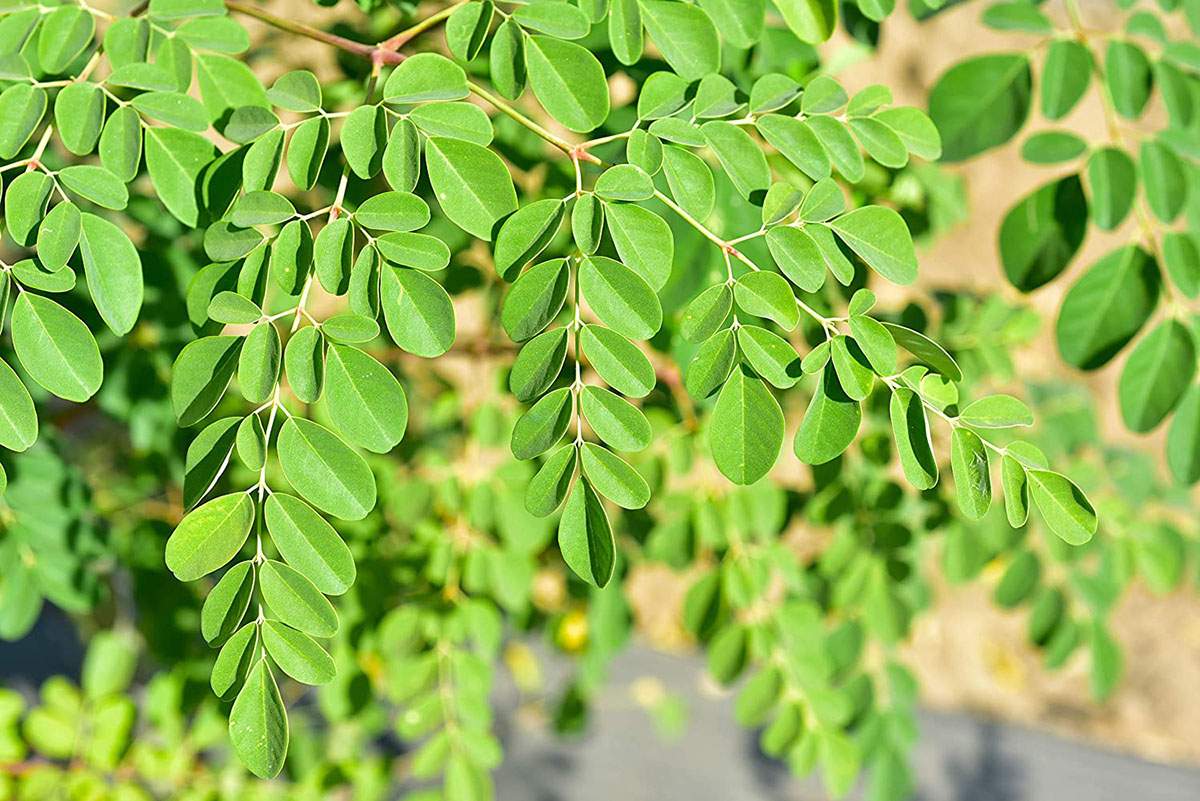
Welcome to the world of Moringa seeds, where nature holds incredible potential for your garden. Whether you’re an experienced gardener or just starting out, learning how to grow Moringa seeds can be a rewarding journey. Moringa oleifera, commonly known as the “Miracle Tree” or “Tree of Life”, has gained popularity in recent years for its nutritional and medicinal benefits.
Moringa seeds are the powerhouse of this amazing plant, packed with essential nutrients and antioxidants. Not only are they a great source of protein and healthy fats, but they also contain vitamins, minerals, and bioactive compounds that promote overall well-being. Incorporating Moringa seeds into your diet can boost your immune system, improve digestion, and even enhance the health of your hair and skin.
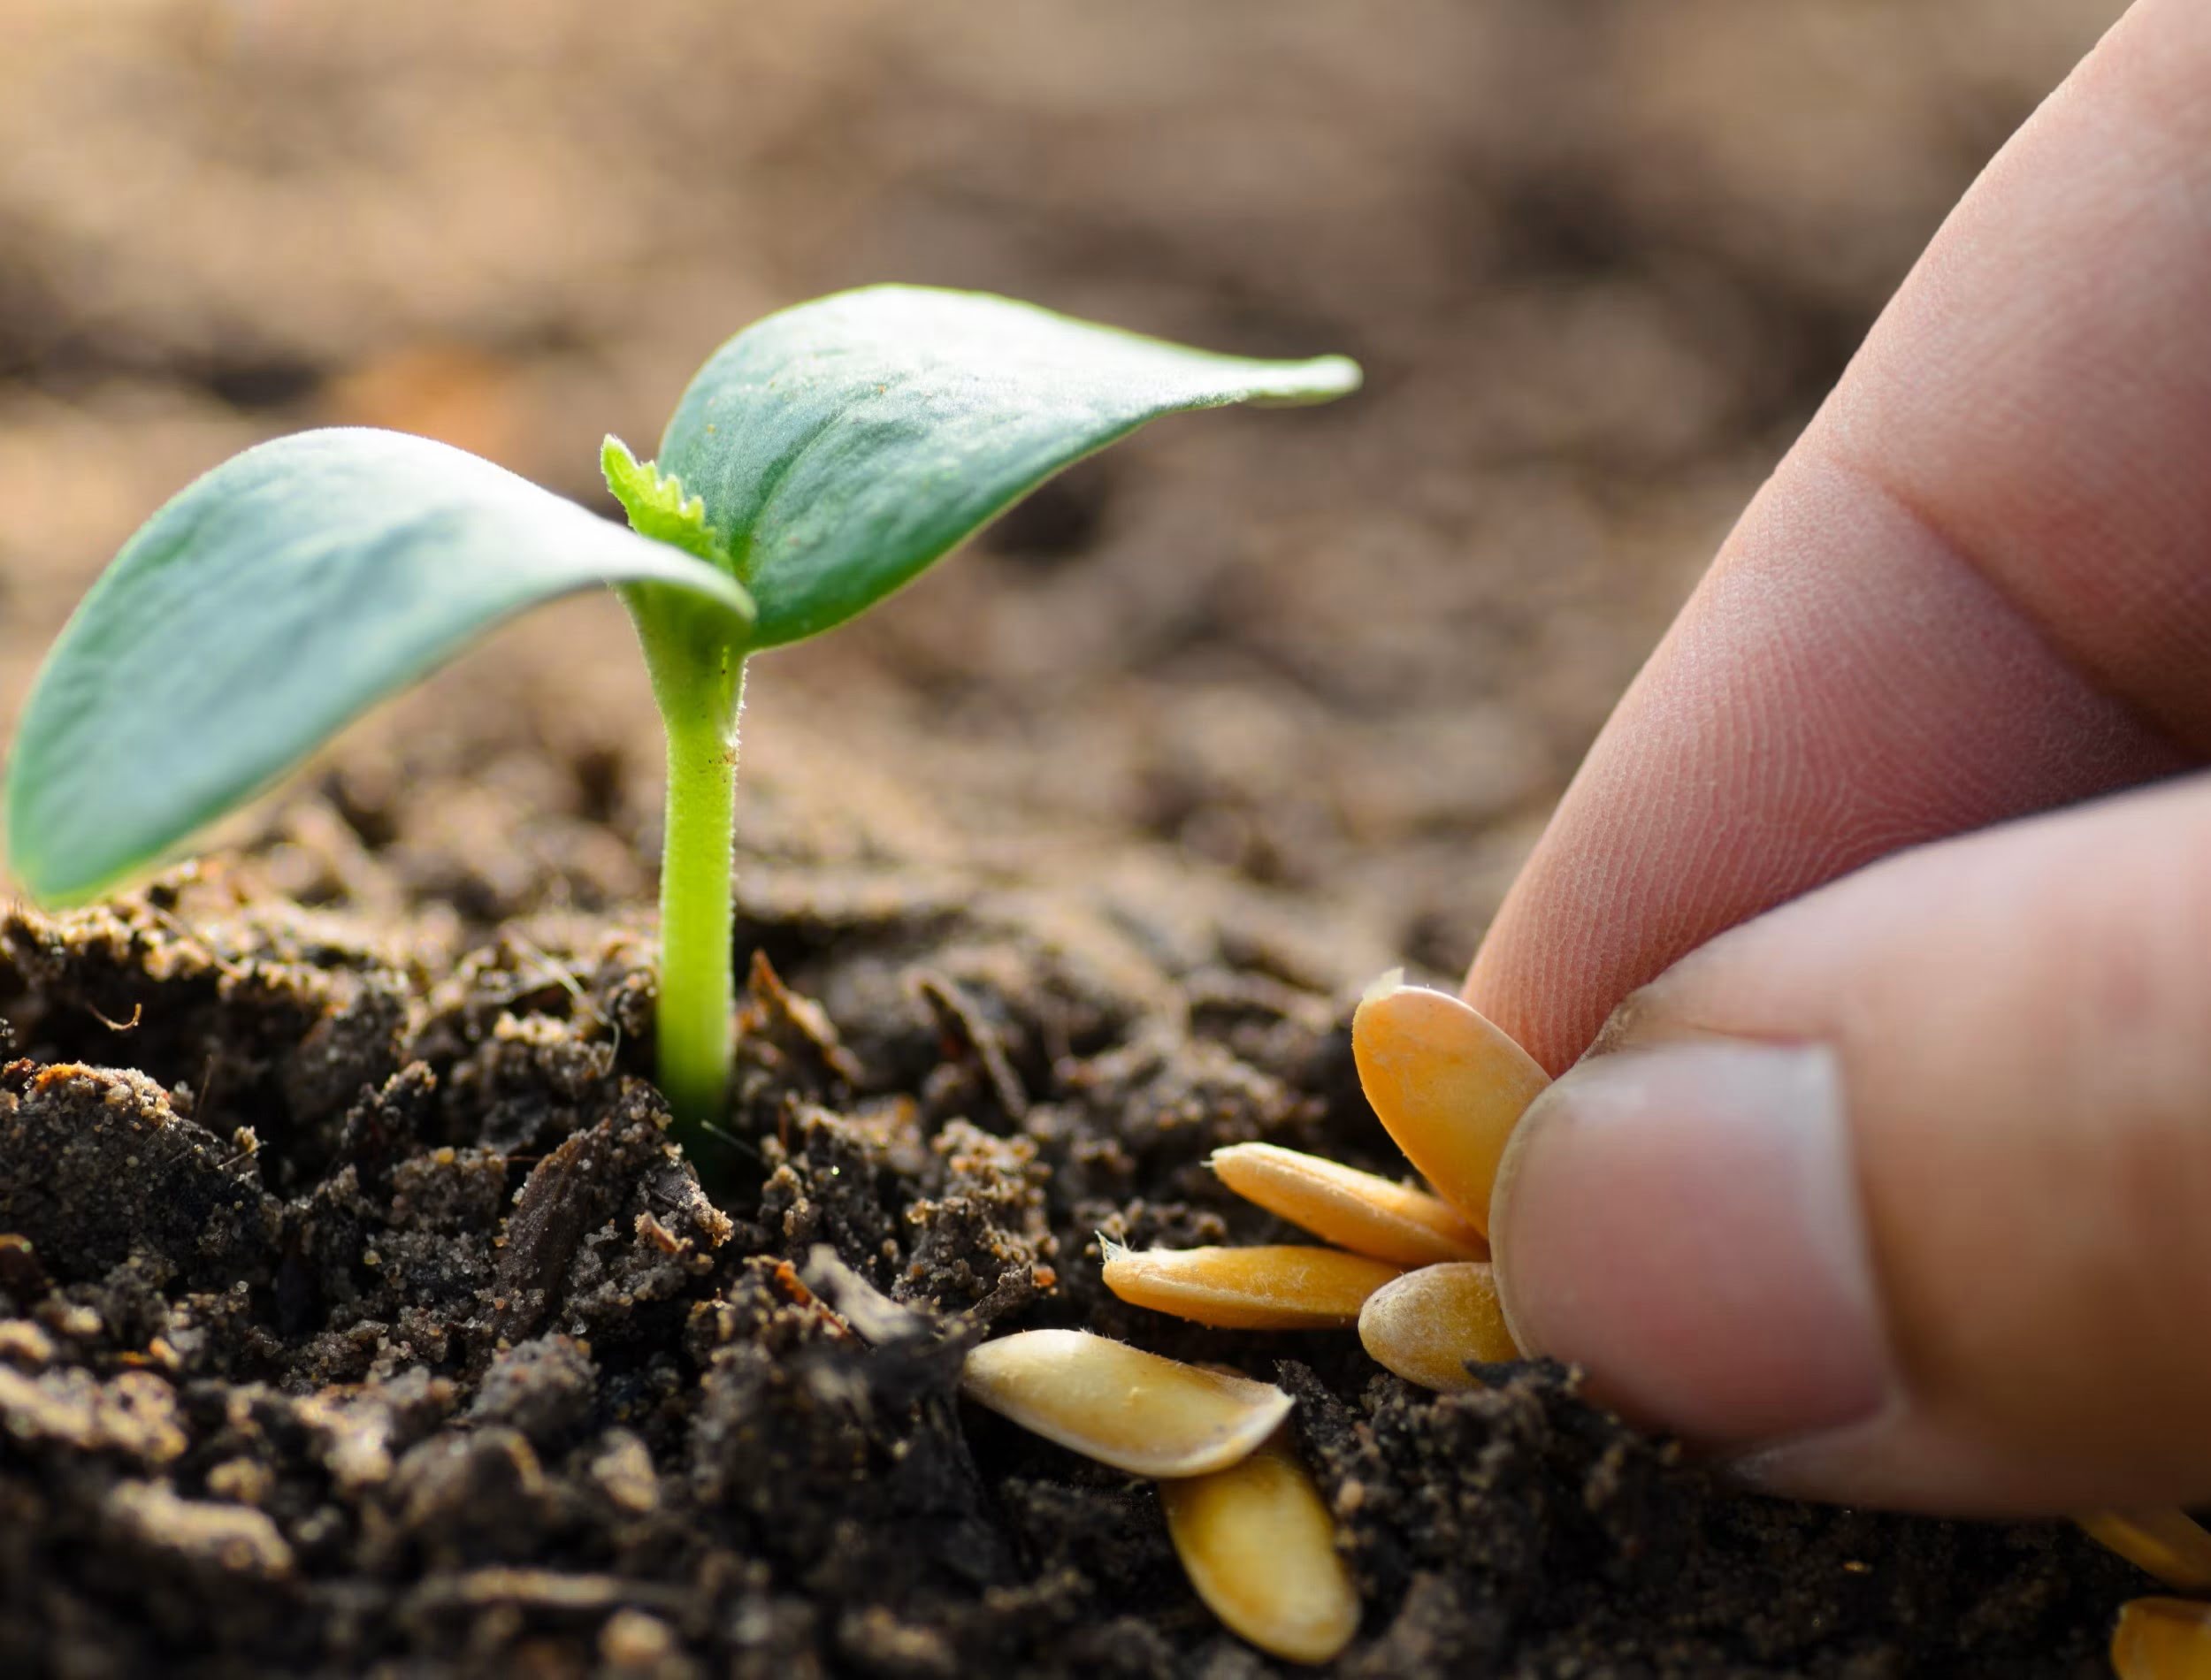
Choosing and preparing Moringa seeds for planting is the first step in bringing this extraordinary tree to life in your garden. It’s important to select high-quality seeds from a reliable source to ensure the best chances of success. Look for seeds that are firm, dark brown in color, and plump. Avoid seeds that are discolored, damaged, or shriveled.
Before planting, you’ll want to prepare the Moringa seeds by scarifying or nicking their hard outer shell. This process helps to break the seed coat and promote faster and more uniform germination. Gently rub the seeds with sandpaper or make a small cut with a knife, being careful not to damage the inner embryo.
Planting Moringa seeds requires careful consideration of soil and water requirements. Moringa trees thrive in well-drained soil with a slightly acidic pH level. If your soil is clayey or compacted, consider incorporating organic matter to improve its texture and drainage. Regular watering is essential during the germination and early growth stages, but be mindful not to overwater as Moringa trees are susceptible to root rot.
Moringa trees are sun-loving plants that require at least 6 hours of direct sunlight to grow and produce robust foliage and seeds. In terms of temperature, Moringa seeds germinate best in warm conditions, ideally between 77°F and 95°F (25°C and 35°C). If you live in a region with cooler temperatures, consider starting your seeds indoors and transplanting them outdoors once the weather warms up.
Once the Moringa seeds have germinated and sprouted into seedlings, proper care is crucial for their healthy growth. Regularly check the soil moisture and water whenever it feels dry to the touch. Avoid overwatering, as it can lead to root rot and other diseases. Provide a balanced fertilizer containing nitrogen, phosphorus, and potassium to ensure proper nutrient availability.
Transplanting Moringa seedlings into their permanent location should be done when they are around 12 to 18 inches tall and have developed a strong root system. Choose a sunny and well-drained spot, giving each tree ample space to spread its branches and grow. Remember to water the newly transplanted seedlings thoroughly and provide a layer of mulch around the base to conserve moisture and suppress weed growth.
Maintaining Moringa trees is relatively easy, but pests and diseases can occasionally pose a threat. Monitor your trees regularly for signs of insect infestation or fungal infections. Neem oil or organic insecticides can be applied to control common pests like aphids, whiteflies, or caterpillars. In case of disease, promptly remove and destroy infected parts of the tree to prevent spread.
Harvesting Moringa seeds is an exciting and rewarding phase of growing this miraculous tree. The seeds are ready for harvest when the pods turn brown and start to split open. Carefully remove the pods from the tree and allow them to dry in a well-ventilated area. Once the pods are dry, gently break them open to reveal the prized Moringa seeds.
Finally, storing and using Moringa seeds efficiently will ensure that you can enjoy their numerous benefits for an extended period. Store the seeds in a cool and dry place, preferably in an airtight container to maintain their freshness and potency. Add the seeds to your smoothies, salads, or soups, or grind them into a fine powder to use in various recipes.
Growing Moringa seeds brings both beauty and bountiful rewards to your garden. By following these guidelines and giving your Moringa trees the care and attention they need, you’ll be able to harvest a continuous supply of nutritious seeds for years to come. So, grab your gardening tools, gather your Moringa seeds, and embark on a journey of nature’s abundance!
Key Takeaways:
- Growing Moringa seeds requires careful selection, preparation, and nurturing. From choosing high-quality seeds to providing proper soil, water, and sunlight, the journey to harvest and use these powerful seeds is filled with rewarding possibilities.
- Harvesting and using Moringa seeds involves patience and attention to detail. From identifying the right time to harvest to storing and incorporating the seeds into your daily routine, the journey of Moringa seeds offers a wealth of nutrition and vitality.
Read more: How To Grow Moringa Tree From Seed
Benefits of Moringa Seeds
Moringa seeds are small but mighty powerhouses packed with an array of health benefits. From their high nutrient content to their antioxidant and anti-inflammatory properties, these seeds offer a wide range of advantages for your overall well-being. Let’s explore some of the incredible benefits of Moringa seeds:
- Nutritional Powerhouse: Moringa seeds are rich in essential nutrients, including protein, healthy fats, fiber, vitamins, and minerals. They contain all nine essential amino acids, making them a complete protein source. Consuming Moringa seeds helps promote muscle growth, repair tissues, and support overall body functions.
- Immune System Booster: Moringa seeds are packed with antioxidants, such as vitamin C, beta-carotene, and quercetin. These antioxidants help neutralize harmful free radicals, strengthen the immune system, and protect the body against various diseases and infections.
- Anti-Inflammatory Properties: The bioactive compounds found in Moringa seeds, such as isothiocyanates and flavonoids, possess potent anti-inflammatory properties. Consuming these seeds can help reduce inflammation in the body, which is often the underlying cause of chronic diseases like arthritis, heart disease, and cancer.
- Regulates Blood Sugar: Moringa seeds have been found to have a positive impact on blood sugar levels, making them beneficial for individuals with diabetes or those at risk of developing the condition. The seeds contain compounds that help regulate blood sugar and improve insulin sensitivity.
- Supports Digestive Health: Moringa seeds are an excellent source of dietary fiber, which aids digestion and prevents constipation. The fiber in these seeds also acts as a prebiotic, nourishing the beneficial bacteria in the gut and promoting a healthy digestive system.
- Enhances Skin and Hair Health: The nutrients in Moringa seeds, including vitamins A, E, and zinc, contribute to healthy skin and hair. These seeds can help improve skin elasticity, reduce the appearance of wrinkles, and promote a radiant complexion. They also strengthen hair follicles, prevent hair loss, and encourage hair growth.
- Cardiovascular Health: Moringa seeds are beneficial for heart health due to their high content of antioxidants, fiber, and omega-3 fatty acids. These seeds help lower cholesterol levels, reduce blood pressure, and protect against various cardiovascular diseases, including heart attacks and strokes.
- Anti-Aging Properties: Moringa seeds are known for their potent antioxidant activity, which helps combat oxidative stress and slow down the aging process. The antioxidants in these seeds protect against cellular damage, resulting in improved skin health, reduced wrinkles, and overall youthful appearance.
- Supports Weight Management: Including Moringa seeds in your diet can be beneficial for weight management. They provide a feeling of fullness due to their high fiber content, which reduces overeating and aids in maintaining a healthy weight.
- Bone Health: Moringa seeds contain essential nutrients like calcium, magnesium, and phosphorus, which are vital for maintaining strong and healthy bones. Consuming these seeds can help prevent bone-related disorders, such as osteoporosis.
These are just a few of the many benefits that Moringa seeds offer. By incorporating these nutrient-dense seeds into your daily diet, you can reap their remarkable advantages and improve your overall health and well-being.
Choosing and Preparing Seeds
Choosing and preparing high-quality Moringa seeds is the first step towards successful cultivation. Here are some essential tips to help you select and prepare Moringa seeds for planting:
- Source of Seeds: It is crucial to obtain Moringa seeds from a reliable source. Look for reputable nurseries, seed banks, or trusted online sellers. Ensure that the seeds are fresh and of high quality to maximize their germination rate.
- Visual Inspection: Carefully examine the seeds before purchasing or collecting them. Look for seeds that are firm, dark brown in color, and plump. Avoid seeds that are discolored, damaged, or shriveled, as they may have low viability.
- Seed Coat Scarification: Moringa seeds have a tough outer shell that hampers germination. Enhance the germination rate by scarifying or nicking the seed coat. This process breaks the dormancy and allows water to penetrate into the seed. Gently rub the seeds with sandpaper or make a small cut with a knife, being careful not to damage the inner embryo.
- Soaking Seeds: Soaking Moringa seeds in water for 24 hours prior to planting can further improve their germination rate. This softens the seed coat, making it easier for the embryo to emerge.
- Timing: Choose the right time to plant the seeds. Moringa trees thrive in warm climates, so it is advisable to plant the seeds during the spring or summer months, when the soil and air temperatures are consistently warm.
- Seed Storage: If you are not planting the seeds immediately, store them properly to maintain their viability. Place the seeds in a cool, dry, and dark location, preferably in an airtight container. Avoid exposure to moisture, direct sunlight, or extreme temperatures.
- Seed Germination Test: It’s a good idea to perform a germination test before planting a large batch of Moringa seeds. Take a few seeds and place them on a damp paper towel. Seal them in a plastic bag and keep them in a warm place. After a few days, check to see how many seeds have germinated. This will give you an idea of the seed viability and help you adjust your planting strategy if needed.
Taking the time to choose and prepare Moringa seeds carefully will significantly increase their chances of successful germination. By following these steps, you can ensure that you start your Moringa journey on the right foot and set yourself up for a thriving garden.
Planting Moringa Seeds
Once you have selected and prepared your Moringa seeds, it’s time to plant them and watch them grow into flourishing trees. Here are some key considerations and steps to follow when planting Moringa seeds:
- Prepare the Soil: Choose a location with well-drained soil and adequate sunlight. Moringa trees prefer slightly acidic soil with a pH range of 6.3 to 7.0. If your soil is clayey or compacted, consider improving its texture and drainage by incorporating organic matter such as compost or well-rotted manure.
- Sow the Seeds: Make a hole in the soil about 1 inch deep. Place the Moringa seed in the hole, pointy side down, and cover it gently with soil. If planting multiple seeds, space them at least 6 feet apart to allow for proper growth and canopy spread.
- Watering: After planting, water the soil thoroughly to ensure proper moisture penetration. Keep the soil consistently moist, but not overly saturated, during the germination and early growth stages. Avoid overwatering, as Moringa trees are sensitive to root rot.
- Protection: As Moringa seeds are prone to predation by birds and pests, consider using protective measures like netting or covering the planting area with a breathable cloth. This will prevent unwanted visitors from snacking on your seeds.
- Germination: Moringa seeds typically germinate within 1 to 2 weeks, but it may take up to several weeks for all the seeds to sprout. Be patient and provide the necessary care to encourage germination. The seedlings will emerge with a pair of small, opposite leaves.
- Thinning: Once the seedlings have emerged and grown a few inches tall, thin them out if they are planted too closely together. Select the healthiest and strongest seedlings, and gently remove the excess ones, being careful not to disturb the roots of the remaining seedlings.
- Maintaining the Seedlings: Provide adequate water and sunlight to the seedlings. Keep the soil moist but avoid waterlogging. Weed around the base of the seedlings regularly to prevent competition for nutrients and resources. Apply a balanced organic fertilizer once the seedlings have developed a few sets of true leaves.
- Transplanting Seedlings: Once the seedlings are 12 to 18 inches tall and have developed a strong root system, they are ready to be transplanted into their permanent location. Choose a sunny and well-drained spot that provides enough space for each tree to spread its branches. Dig a hole slightly larger than the root ball, place the seedling in the hole, and fill it with soil. Gently press the soil around the seedling to secure it in place.
- Post-Transplant Care: Water the newly transplanted seedlings thoroughly and provide a layer of organic mulch around the base to retain moisture and suppress weed growth. Monitor the seedlings closely in the first few weeks after transplanting and provide regular watering and maintenance as needed.
Following these steps will increase the chances of successful growth and establishment of your Moringa seedlings. As they continue to grow, you’ll be amazed at the transformation and the bountiful rewards these incredible trees will bring to your garden.
Soil and Water Requirements
The soil and water conditions play a crucial role in the successful growth of Moringa trees. Understanding their specific requirements will help you create an optimal environment for your Moringa plants. Here are some important considerations when it comes to soil and water requirements for Moringa:
Soil:
Moringa trees thrive in well-drained soil that is rich in organic matter. Here are some key points to keep in mind regarding soil requirements:
- Drainage: Moringa trees do not tolerate waterlogged soil, as it can cause root rot. Ensure that the soil in which you plant your Moringa trees has good drainage. If your soil is clayey or compacted, consider improving its drainage by incorporating organic matter such as compost or well-rotted manure.
- pH Level: Moringa trees prefer slightly acidic to neutral soil with a pH range of 6.3 to 7.0. You can test the pH level of your soil using a soil pH testing kit available at garden centers or by sending a soil sample to a laboratory for analysis. If the pH level is too acidic or alkaline, you can amend the soil accordingly to bring it within the optimal range.
- Soil Texture: Moringa trees grow well in a variety of soil types, including loam, sandy loam, and sandy soil. However, they may not thrive in heavy clay soils unless the drainage is improved. If your soil is heavy clay, consider adding sand or organic matter to improve its texture and drainage.
- Organic Matter: Incorporating organic matter into the soil helps improve its fertility, structure, and water-holding capacity. Add compost, well-rotted manure, or other organic materials to enrich the soil before planting your Moringa trees. This will provide a steady supply of nutrients and promote healthy growth.
Water:
Moringa trees have moderate water requirements, especially during the germination and early growth stages. However, they are drought-tolerant once established. Here are some key points to consider when it comes to watering your Moringa trees:
- Establishment Phase: During the germination and early growth stages, it’s important to keep the soil consistently moist but not overly saturated. Water the seedlings regularly, especially in dry, arid climates. Avoid overwatering, as it can lead to root rot and other diseases.
- Mature Trees: Once the Moringa trees are established, they become more tolerant of dry conditions. However, they still benefit from deep watering during extended periods of drought. Water the trees thoroughly when the top few inches of soil feel dry to the touch.
- Irrigation: If your region receives insufficient rainfall, supplemental irrigation may be necessary. Use methods such as drip irrigation or soaker hoses to ensure efficient water distribution directly to the root zone. Avoid overhead watering, as it can lead to foliar diseases and wasteful water evaporation.
- Mulching: Apply a layer of organic mulch around the base of your Moringa trees to conserve moisture, regulate soil temperature, and suppress weed growth. This will help maintain a more stable soil moisture level and reduce the frequency of watering.
By providing well-drained and nutrient-rich soil, as well as proper watering practices, you can create an ideal environment for your Moringa trees to thrive. Remember to monitor the soil moisture regularly and adjust your watering schedule based on the specific needs of your trees and the prevailing weather conditions.
Read more: How To Consume Moringa Seeds
Sunlight and Temperature Needs
Sunlight and temperature are crucial factors that influence the growth and development of Moringa trees. Understanding their specific needs will help you create an optimal environment for your Moringa plants. Here are some important considerations when it comes to the sunlight and temperature requirements for Moringa:
Sunlight:
Moringa trees are sun-loving plants that thrive in full sunlight. Adequate exposure to sunlight is essential for their growth, flowering, and seed production. Here are some key points to keep in mind regarding sunlight requirements:
- Full Sun: Moringa trees require a minimum of 6 hours of direct sunlight each day, preferably more. Ensure that you choose a planting location that receives ample sunlight throughout the day, with minimal shading from buildings, trees, or other structures.
- Optimal Orientation: To maximize sunlight exposure, orient the trees in a north-south direction. This allows them to receive sunlight from both the east and west sides, ensuring more balanced and uniform growth.
- Shade Tolerance: While Moringa trees prefer full sunlight, they can tolerate partial shade. However, prolonged exposure to shade can negatively impact their growth, flowering, and seed production. If your planting area has partial shade, ensure that the trees still receive a significant amount of direct sunlight.
- Protection from Harsh Sun: In extremely hot climates, young Moringa seedlings may need protection from intense midday sun. Providing shade cloth or using shade structures can help protect them until they become more established and better equipped to handle direct sunlight.
Temperature:
Moringa trees are known for their ability to thrive in a wide range of temperatures. However, specific temperature ranges are most conducive to their growth. Here are some key points to consider when it comes to temperature requirements:
- Optimal Temperature: Moringa trees prefer warm temperatures, ideally between 77°F and 95°F (25°C and 35°C). They are sensitive to frost and cannot tolerate freezing temperatures. If you live in a region with cooler temperatures, it is advisable to start the seeds indoors or in a greenhouse until the threat of frost has passed.
- Heat Tolerance: Moringa trees exhibit good heat tolerance and can withstand high temperatures up to 113°F (45°C) for short periods. However, prolonged exposure to extreme heat can stress the trees and affect their growth and productivity. Providing mulch around the base of the trees can help regulate soil temperature and protect the roots from heat stress.
- Adaptability: Moringa trees are adaptable to different climatic conditions, including arid and tropical regions. They can withstand dry and hot climates, making them suitable for cultivation in areas with limited water resources.
- Microclimates: Consider the microclimate of your specific planting area. Factors such as elevation, proximity to water bodies, and surrounding landscape can influence temperature variations. Planting Moringa trees in areas with slightly higher elevation or near bodies of water can provide a more favorable microclimate for their growth.
By providing the right amount of sunlight and maintaining suitable temperature conditions, you can create an ideal environment for your Moringa trees to thrive. Remember to monitor the exposure and temperature levels regularly, and make necessary adjustments based on the specific needs of your trees and the prevailing climatic conditions.
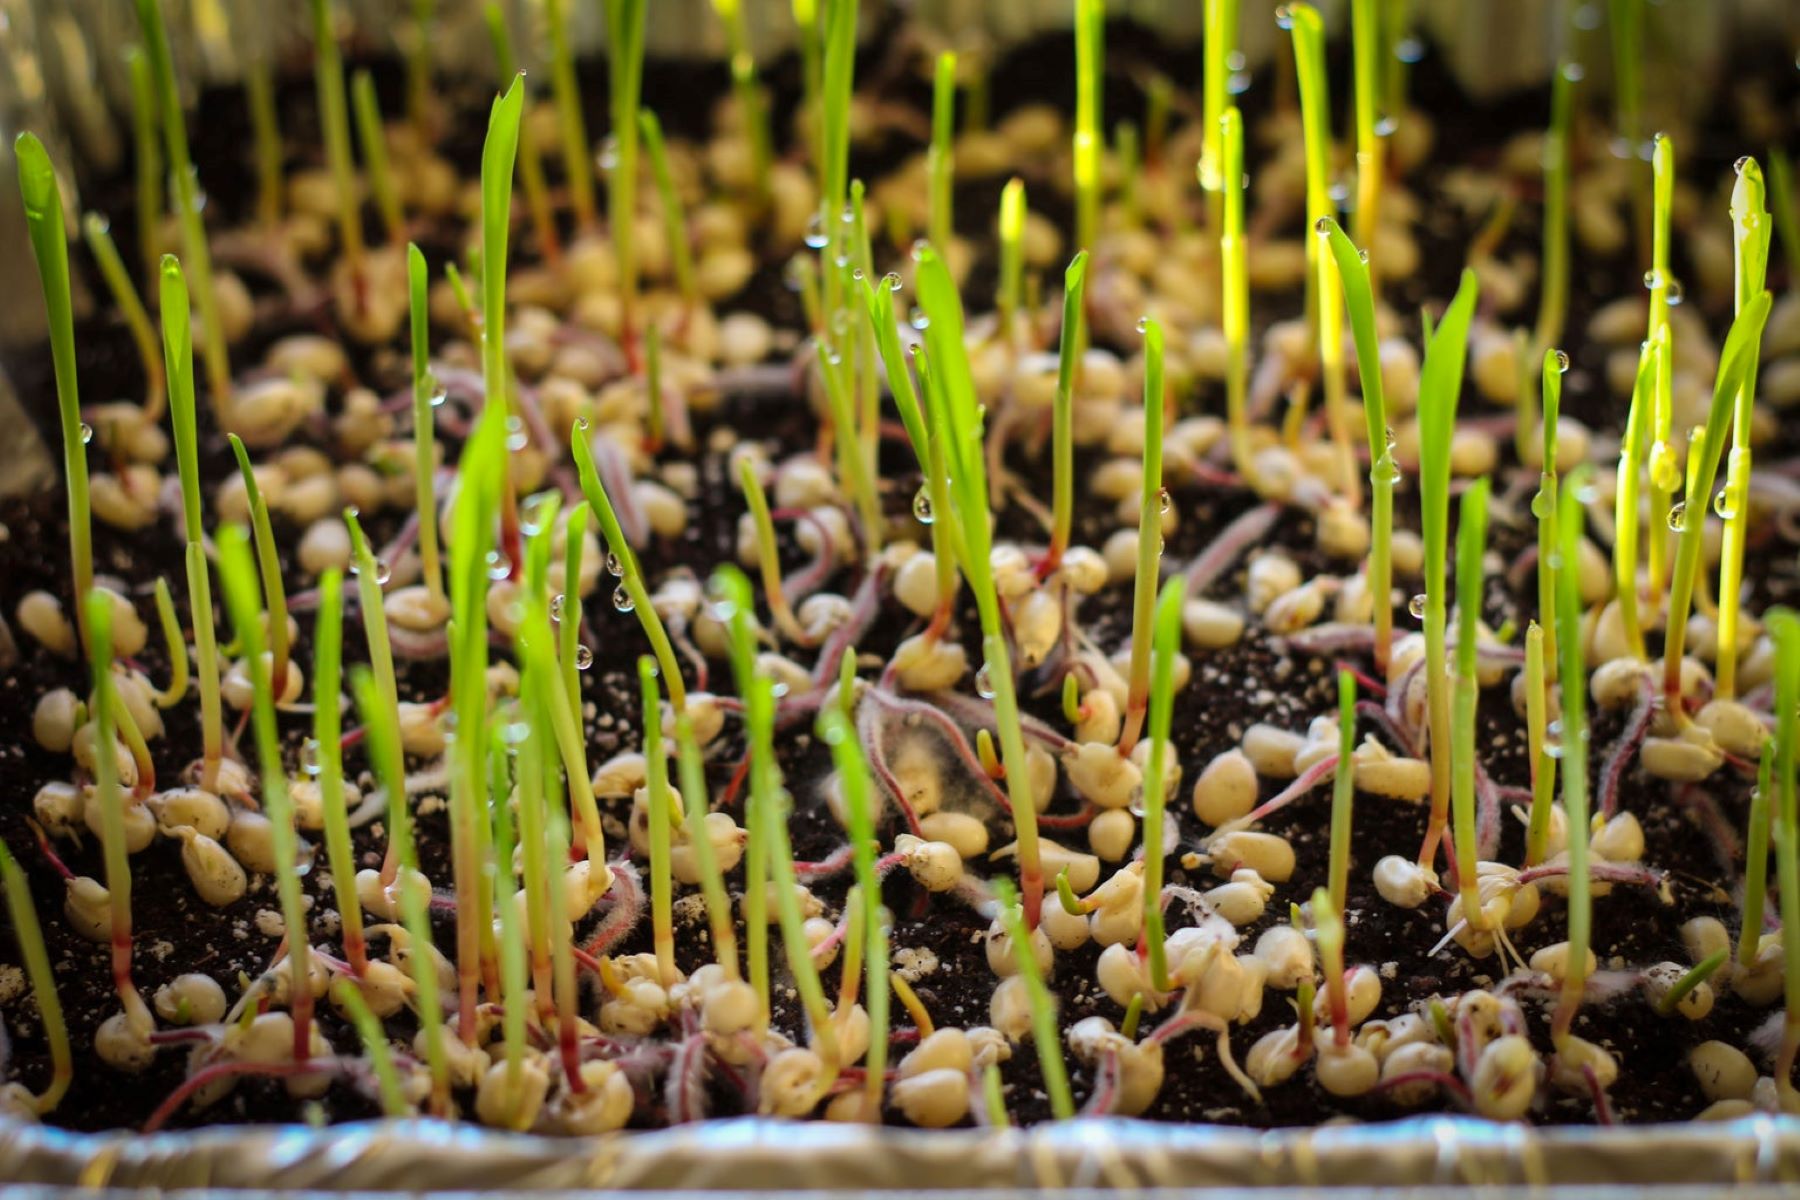
Germination and Seedling Care
The germination and early growth stages are critical for the development of Moringa seedlings. Proper care during this period will set the stage for healthy and robust trees. Here are some important guidelines for germinating and caring for Moringa seedlings:
Germination:
Moringa seeds typically germinate within 1 to 2 weeks but can take up to several weeks for all the seeds to sprout. Follow these steps to ensure successful germination:
- Planting Depth: Plant the seeds about 1 inch deep in well-drained soil. Place the seeds horizontally, with the pointy side facing down. Cover the seeds gently with soil and pat it down lightly.
- Moisture: Keep the soil consistently moist but not overly saturated during germination. Water the soil gently, ensuring that it remains damp but not waterlogged. Mist the soil surface regularly to maintain moisture levels.
- Temperature: Moringa seeds require warm temperatures for optimal germination. Maintain a temperature between 77°F and 95°F (25°C and 35°C) to promote germination. You can use a seedling heat mat or place the pots in a warm location to provide the necessary temperature conditions.
- Light: While Moringa seeds do not require light to germinate, providing indirect sunlight or fluorescent grow lights can stimulate faster and healthier seedling growth. Avoid exposing the seedlings to direct, intense sunlight as it can dry out the soil and damage the young plants.
- Patience: Be patient during the germination process, as different seeds may sprout at different times. Some seeds may take longer to germinate, so continue to provide care and monitor progress over several weeks.
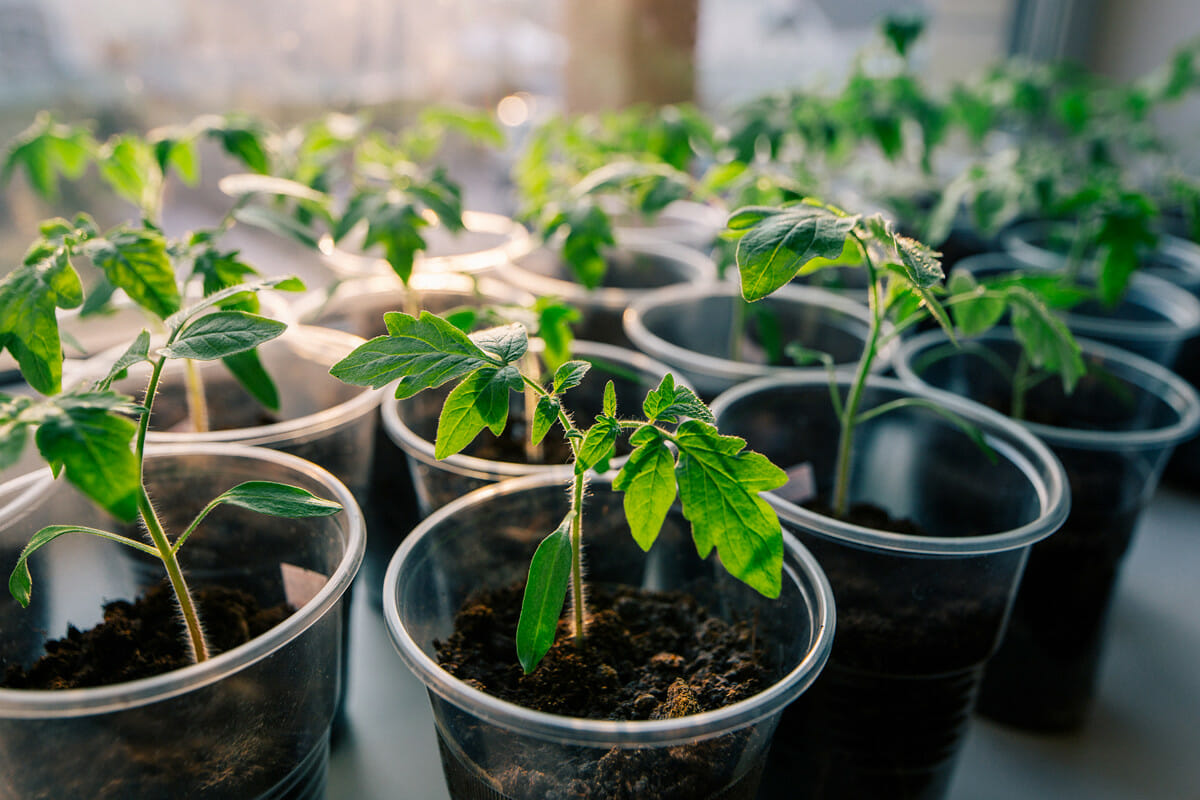
Seedling Care:
Once the seedlings have emerged and grown a few inches tall, they require proper care for healthy growth. Here are some key aspects to consider when caring for Moringa seedlings:
- Watering: Proper watering is essential for seedling health. Keep the soil consistently moist, but avoid overwatering, as Moringa trees are susceptible to root rot. Water the seedlings when the top inch of soil feels dry to the touch, typically every 2 to 3 days depending on the climate and soil drainage.
- Light: Gradually expose the seedlings to increasing amounts of direct sunlight. Start by placing them in a location with bright, indirect light and gradually move them to a spot with more sunlight. This helps the seedlings acclimate to the intensity of sunlight and prevents them from getting shocked by sudden exposure.
- Fertilization: Once the seedlings have developed a few sets of true leaves, you can begin applying a balanced organic fertilizer. Use a fertilizer with a ratio close to 10-10-10 or lower nitrogen content to promote healthy growth without excessive branching. Follow the package instructions for application rates.
- Pest Control: Monitor the seedlings for any signs of pests such as aphids, caterpillars, or whiteflies, and take appropriate measures to control them. Use organic insecticides or neem oil to treat pest infestations. Regularly inspect the leaves, stems, and undersides of the seedlings for any signs of damage.
- Thinning: If the seedlings are overcrowded, thin them out to allow for better airflow and proper growth. Select the healthiest and strongest seedlings and gently remove the excess ones, being careful not to disturb the roots of the remaining seedlings.
- Protection from Extreme Weather: Shield the young seedlings from strong winds, heavy rains, or extreme temperature fluctuations. Use protective measures such as row covers or temporary shelters to safeguard them until they become more resilient.
By providing the right conditions and care, you can ensure that your Moringa seedlings thrive and grow into healthy trees. Remember to monitor their progress regularly and adjust your care routine as needed to promote strong and vigorous growth.
Plant moringa seeds in well-draining soil, keep them moist but not waterlogged, and provide plenty of sunlight. They will germinate in 1-2 weeks.
Transplanting Seedlings
Transplanting Moringa seedlings from their nursery pots to their permanent location is an important step in their growth journey. Here are helpful guidelines to follow when transplanting Moringa seedlings:
- Timing: Transplant your Moringa seedlings when they are about 12 to 18 inches tall and have developed a strong root system. This usually takes place about 8 to 12 weeks after germination, depending on growing conditions.
- Choosing a Location: Select a sunny and well-drained spot for your Moringa trees. They thrive in full sunlight and require at least 6 hours of direct sunlight per day. Ensure the location offers adequate space for the trees to spread their branches and grow to their full potential.
- Preparing the Planting Hole: Dig a planting hole that is slightly larger and wider than the root ball of the seedling. The hole should be deep enough to accommodate the roots without bending or crowding them.
- Soil Preparation: Before transplanting, prepare the soil in the planting hole by loosening it and removing any weeds or debris. Add organic matter such as compost or well-rotted manure to enrich the soil and provide added nutrients for the growing plant.
- Transplanting: Gently remove the seedling from its nursery pot, being careful not to disturb the roots. Place the seedling in the center of the planting hole, ensuring that it sits at the same depth as it was in the nursery pot. Backfill the hole with soil, gently firming it around the seedling to eliminate air pockets.
- Watering: After transplanting, water the seedling thoroughly to settle the soil and provide hydration to the roots. Ensure that the soil is evenly moist but not waterlogged. Water the seedling regularly during the first few weeks to help establish the roots in the new location.
- Mulching: Apply a layer of organic mulch around the base of the seedling, leaving a small gap around the trunk to prevent moisture accumulation. Mulching helps conserve moisture, suppresses weed growth, and regulates the soil temperature.
- Protection: Shield the newly transplanted seedlings from strong winds, intense sunlight, or extreme temperature fluctuations. Use windbreaks or temporary shade cloth to provide protection until the seedlings become more established.
- Care: Monitor the transplanted seedlings closely and provide care as needed. Regularly check soil moisture levels and water when necessary. Ensure that weeds are removed from around the seedlings to prevent competition for nutrients and resources.
Transplanting seedlings can be a delicate process, but with proper care and attention, your Moringa seedlings will adapt to their new location and continue to grow into strong and healthy trees. Remember to monitor their progress, provide regular care, and watch as they flourish in their permanent home.
Maintenance and Nutrient Requirements
Moringa trees require regular maintenance and proper nutrient management to ensure their healthy growth and productivity. Here are some essential guidelines to follow when it comes to maintaining and providing the necessary nutrients for your Moringa trees:
Watering:
Maintaining appropriate soil moisture levels is crucial for the health and vitality of Moringa trees. Follow these guidelines for watering:
- Established Trees: Once Moringa trees are established, they are relatively drought-tolerant. However, they still require regular watering, especially during periods of extended dryness. Water deeply at the base of the tree, ensuring that the soil is evenly moist, but avoid overwatering to prevent root rot.
- Newly Planted Trees: Newly transplanted Moringa trees require frequent watering to help them establish their root system. Water the trees immediately after transplanting and continue to water regularly for the first few weeks until they become better established.
- Monitor Soil Moisture: Regularly check the soil moisture levels by inserting your finger into the soil. Water the trees when the top 1 to 2 inches of soil feels dry. Adjust the frequency and amount of watering based on weather conditions and the specific needs of your trees.
- Watering Techniques: Consider using drip irrigation or soaker hoses for efficient water delivery directly to the root zone. Avoid overhead watering, as it can lead to foliar diseases and wasteful water evaporation.
Nutrient Requirements:
Moringa trees are known for their high nutritional content, but they also require specific nutrients for optimal growth. Here are some key points to consider:
- Organic Matter: Incorporate organic matter such as compost or well-rotted manure into the soil before planting. This provides essential nutrients and improves soil fertility, structure, and water-holding capacity.
- Fertilization: Moringa trees benefit from regular fertilization to maintain healthy growth. Apply a balanced organic fertilizer once or twice a year, following the manufacturer’s instructions for application rates. Look for a fertilizer with a ratio close to 10-10-10 or lower nitrogen content to avoid excessive branching.
- Micronutrients: Moringa trees may benefit from supplemental micronutrients if the soil is deficient. Conduct a soil test to identify any nutrient deficiencies and adjust the fertilizer application accordingly. Moringa trees are particularly sensitive to iron deficiency, so consider adding an iron chelate supplement if necessary.
- Foliar Feeding: In addition to soil fertilization, foliar feeding can provide a quick nutrient boost to Moringa trees. Spray a diluted organic foliar fertilizer directly onto the leaves, following the product instructions for application rates and timing.
- Mulching: Apply a layer of organic mulch around the base of your Moringa trees to conserve moisture, suppress weed growth, and gradually release nutrients into the soil. Choose organic materials such as wood chips, straw, or leaves and replenish the mulch layer as needed.
Maintenance:
Regular maintenance practices are essential to ensure the health and longevity of Moringa trees. Here are some important maintenance tasks to consider:
- Pruning: Prune Moringa trees to maintain a desired shape, remove dead or diseased branches, and improve overall tree health. Pruning also helps stimulate new growth, increase air circulation, and maintain the tree’s size for easier management.
- Weed Control: Regularly remove weeds from around the base of the trees to minimize competition for nutrients and resources. Use mulch to suppress weed growth and minimize the need for frequent weeding.
- Pest Management: Monitor your Moringa trees for common pests such as aphids, caterpillars, or whiteflies. Inspect the leaves, stems, and undersides of the leaves regularly for signs of infestation. Apply organic insecticides or neem oil as necessary to control pest populations.
- Protection from Harsh Weather: Shield your Moringa trees from strong winds, heavy rains, or extreme temperature fluctuations. Use windbreaks, stakes, or temporary protective structures to provide shelter and prevent physical damage.
By providing regular care, ensuring proper watering, and supplying the necessary nutrients, you can ensure the healthy growth and productivity of your Moringa trees. Regular monitoring and timely maintenance will help your trees thrive and continue to provide you with their numerous benefits for years to come.
Read more: How To Eat Moringa Seeds
Pest and Disease Control
Pests and diseases can pose challenges to the health and productivity of Moringa trees. However, with proper monitoring and timely intervention, you can effectively control and prevent infestations. Here are some important guidelines for pest and disease control in Moringa trees:
Pest Control:
Moringa trees can encounter various pests, such as aphids, caterpillars, whiteflies, and mites. Here are some measures you can take to manage and control these pests:
- Regular Inspection: Monitor your Moringa trees regularly for signs of pest infestation. Look for visible insects, distorted or yellowing leaves, stunted growth, or webbing on the leaves. Early detection allows for prompt action and minimizes the spread of pests.
- Handpicking: If you notice a small number of pests on your trees, manually remove them by hand. Wear gloves and inspect the leaves and stems carefully. For larger insects like caterpillars, physically remove them and dispose of them away from your Moringa trees to prevent reinfestation.
- Biological Control: Encourage natural enemies of pests, such as ladybugs, lacewings, or parasitic wasps, to help control populations. Create a habitat that attracts beneficial insects, like planting flowers that provide nectar and pollen. Avoid using broad-spectrum insecticides that can harm these natural predators.
- Organic Insecticides: If pest populations are high and manual removal is not feasible, consider using organic insecticides derived from natural sources. Neem oil, insecticidal soap, or botanical-based sprays can be effective in controlling pests. Follow the product instructions carefully and apply during cooler hours to minimize risks to beneficial insects and pollinators.
- Companion Planting: Planting certain companion plants near your Moringa trees can help deter pests. Marigolds, basil, and garlic are known to repel pests with their strong fragrances. Consider interplanting them with your Moringa trees to create a natural barrier against insects.
Disease Control:
Moringa trees are generally resilient, but they can still be vulnerable to certain diseases. Here are some measures you can take to prevent and manage common diseases in Moringa:
- Proper Sanitation: Practice good sanitation by regularly removing fallen leaves, fruits, and debris from around the base of the trees. This helps reduce the risk of disease-causing pathogens and prevents their spread.
- Avoid Overwatering: Overwatering can create a moist environment that favors the development of fungal diseases. Ensure proper drainage and avoid excessive watering to prevent conditions conducive to fungal growth.
- Adequate Spacing: Provide enough space between Moringa trees to promote air circulation and reduce humidity, as this helps minimize the risk of fungal diseases. Prune branches that are densely packed to improve airflow within the canopy.
- Fungicides: If fungal diseases become a problem, apply an appropriate fungicide as a preventive measure or to control existing infections. Use organic fungicides and follow the product instructions carefully to minimize environmental impact and ensure safe application.
- Virus Management: Viral diseases in Moringa cannot be treated with fungicides or pesticides. Prevention is key, so avoid introducing infected plants into your garden and use disease-free planting materials. If you suspect viral infection, remove and destroy the infected plants to prevent further spread.
- Resistant Varieties: Consider planting Moringa varieties that are known for their resistance to specific diseases prevalent in your region. Resistant varieties have built-in resistance mechanisms that can help minimize the risk of disease establishment and spread.
Remember, early detection and timely intervention are crucial for effective pest and disease control. Regularly inspect your Moringa trees, implement preventive measures, and promptly address any signs of pest or disease presence. By adopting integrated pest and disease management strategies, you can maintain the health and vitality of your Moringa trees and maximize their productivity.
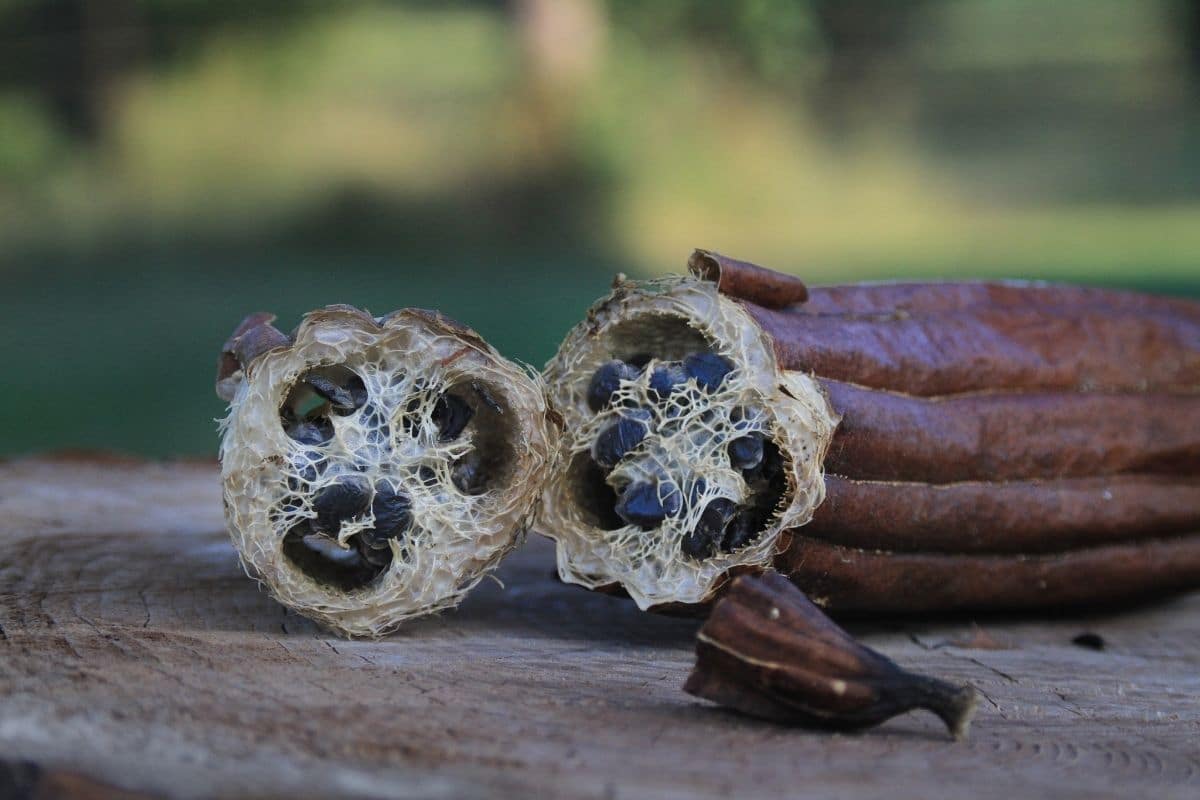
Harvesting Moringa Seeds
Harvesting Moringa seeds is an exciting and rewarding part of growing these remarkable trees. Moringa seeds are not only nutritious but also versatile, making them a valuable addition to your kitchen. Here are some important guidelines for harvesting Moringa seeds:
Timing:
Moringa seeds can be harvested once the pods have matured and started to turn brown. It usually takes about 120 to 150 days from planting for the trees to reach this stage, depending on the growing conditions and variety. Harvesting at the right time ensures that the seeds are fully developed and ready for use.
Visual Indicators:
Inspect the color and condition of the Moringa pods to determine if they are ready for harvesting:
- Pod Color: Look for pods that have turned brown or yellowish and show signs of drying out. They should feel crisp and brittle to the touch.
- Pod Texture: The pods should be dry and hardened, and you may notice slight cracks or splitting along the length of the pod.
- Seed Separation: When gently squeezing the pod, the seeds should easily separate from the pod walls.
Harvesting Method:
Follow these steps to successfully harvest Moringa seeds:
- Selecting Pods: Choose pods that meet the visual indicators of maturity. Pods that are still green and soft are not ready for harvest and should be left on the tree to continue maturing.
- Cutting or Snapping: Use clean and sharp garden shears or your hands to cut or snap the mature pods off the tree. Cut or snap each pod individually, as harvesting all the pods from a single branch at once may cause unnecessary stress to the tree.
- Handling: Handle the pods with care to prevent damage and avoid bruising the seeds. Rough handling can affect the viability and quality of the seeds.
- Drying: After harvesting, lay the pods in a well-ventilated area away from direct sunlight to dry. This can take anywhere from a few days to a couple of weeks, depending on the humidity and temperature. Ensure good airflow to prevent mold or fungal growth. The pods are sufficiently dry when they crumble easily, and the seeds within are easily separated.
- Seed Extraction: Once the pods are dry, gently break them open to release the Moringa seeds. Avoid using excessive force as it may damage the seeds inside. Collect the seeds in a clean container, discarding any damaged or discolored seeds.
Storage and Use:
Proper storage is important to maintain the quality and vitality of the Moringa seeds:
- Cleaning: Remove any remaining pieces of pod or debris from the seeds. Clean seeds have a longer shelf life and are less susceptible to mold or insect infestation.
- Storage: Store the seeds in a cool, dry, and dark place, preferably in an airtight container. This will help preserve their freshness and prevent moisture absorption. Properly stored seeds can remain viable for several years.
- Usage: Incorporate Moringa seeds into your diet to enjoy their numerous benefits. Add them to smoothies, salads, or soups, or grind them into a fine powder for use in various recipes. Experiment with different ways of using Moringa seeds to explore their versatility in the kitchen.
By harvesting Moringa seeds at the right time and following proper storage practices, you can enjoy the nutritional benefits of these tiny powerhouses and fully appreciate the rewards of growing your own Moringa trees.
Storing and Using Moringa Seeds
Once you have harvested your precious Moringa seeds, it’s important to store them properly to maintain their freshness and potency. Additionally, knowing how to incorporate these nutrient-packed seeds into your daily routine will allow you to fully enjoy their benefits. Here are some guidelines for storing and using Moringa seeds:
Storing Moringa Seeds:
Proper storage is vital to ensure the longevity and quality of your Moringa seeds:
- Cleaning: Before storing the seeds, gently clean them to remove any remnants of the seed pods or debris. Clean seeds have a longer shelf life and are less prone to mold or insect infestation.
- Moisture Control: It’s crucial to store Moringa seeds in a cool, dry, and dark place. Excess moisture can degrade the quality of the seeds and lead to mold or fungal growth. Use airtight containers, such as glass jars or resealable bags, to protect the seeds from humidity and moisture in the air.
- Cool Temperature: Choose a storage location that maintains a consistent cool temperature, ideally below 77°F (25°C). Avoid storing the seeds near sources of heat or in direct sunlight, as excessive heat can affect their nutritional value.
- Absence of Light: Light exposure can cause the seeds to deteriorate and lose their potency. Keep the containers in a dark area, away from direct sunlight or strong artificial light.
- Shelf Life: When stored properly, Moringa seeds can remain viable for several years. However, over time, the nutritional content may start to degrade, so it’s recommended to use the seeds within two to three years for optimal freshness and potency.
Using Moringa Seeds:
Moringa seeds offer a multitude of culinary and wellness possibilities. Here are some ideas for incorporating them into your daily routine:
- Smoothies: Add a tablespoon of ground Moringa seeds to your favorite smoothie recipe. They will infuse your drink with an extra nutrient boost.
- Salads: Sprinkle whole or ground Moringa seeds onto your salads for added crunch and nutritional value. They pair well with a variety of greens and veggies.
- Soups and Stews: Add whole or ground Moringa seeds to soups, stews, or curries for an extra nutritional punch. They will enhance the flavor and texture of your dishes while providing essential nutrients.
- Baking: Incorporate Moringa seeds into your baked goods such as muffins, bread, or energy bars. You can grind them into a fine powder and substitute a portion of the flour in your recipes.
- Sauces and Dressings: Blend whole or ground Moringa seeds into your favorite sauces or dressings to infuse them with added nutrients and a subtle earthy flavor.
- Snacks: Roast and season Moringa seeds with your favorite spices for a nutritious and crunchy snack. They make a great alternative to processed snacks and are packed with beneficial nutrients.
- Moringa Seed Oil: Extract oil from Moringa seeds by pressing them to obtain a nutrient-rich oil. Use it for cooking, salad dressings, or as a topical oil for skin and hair care.
Be creative and experiment with different ways of using Moringa seeds in your meals and snacks. Their versatility allows you to enjoy their nutritional benefits in various forms. Remember to start with small amounts and gradually increase the quantity to determine your preferred taste and tolerance.
By storing your Moringa seeds properly and incorporating them into your culinary creations, you can fully embrace the remarkable nutritional properties they offer and elevate your overall well-being.
Conclusion
Growing and harnessing the power of Moringa seeds is a journey filled with incredible benefits and possibilities. From the moment you choose and prepare the seeds to the rewarding experience of harvesting and using them, Moringa seeds offer a wealth of nutrition and vitality for your garden and your well-being.
Through careful selection and preparation of high-quality seeds, you set the stage for successful germination and healthy seedling growth. Attention to soil and water requirements, as well as providing the right amount of sunlight and temperature, ensures that your Moringa trees thrive in their environment.
As your Moringa trees mature, proper maintenance, nutrient management, and pest and disease control become essential. Regular care, proper watering, and the right balance of organic matter and fertilizer contribute to the health and productivity of your trees.
Once the time for harvest arrives, the magic of Moringa seeds unfolds. With a keen eye for maturity and proper harvesting techniques, you can collect the seeds and reap their abundant benefits. Storing the seeds in a cool, dry place and incorporating them into your daily routine allows you to unlock their nutritional power in delicious and creative ways.
Whether you’re enjoying Moringa seeds in smoothies, salads, soups, or baked goods, or using Moringa seed oil for cooking and skincare, you are embracing the abundance that nature offers. The versatility and wellness benefits of Moringa seeds make them an invaluable addition to your life and garden.
As you embark on your Moringa seed journey, remember the importance of patience, observation, and adapting to the unique conditions of your garden. With time and care, you’ll witness the incredible growth of your Moringa trees and the bountiful rewards they bring.
So, grab your gardening tools and let the story of Moringa seeds unfold in your garden. Experience the joy of nurturing these miraculous seeds, and savor the nourishment and well-being they provide. The journey awaits you, and the possibilities are endless.
Frequently Asked Questions about How To Grow Moringa Seeds
Was this page helpful?
At Storables.com, we guarantee accurate and reliable information. Our content, validated by Expert Board Contributors, is crafted following stringent Editorial Policies. We're committed to providing you with well-researched, expert-backed insights for all your informational needs.


0 thoughts on “How To Grow Moringa Seeds”