Home>Garden Essentials>How To Grow Melon Seeds
Garden Essentials
How To Grow Melon Seeds
Modified: October 21, 2024
Learn the step-by-step process of growing melon seeds in your garden. Discover tips and tricks for a successful melon harvest.
(Many of the links in this article redirect to a specific reviewed product. Your purchase of these products through affiliate links helps to generate commission for Storables.com, at no extra cost. Learn more)
Introduction
Growing melons from seeds can be a rewarding experience for gardeners of all skill levels. Whether you have a large backyard or a small apartment balcony, with the right techniques and care, you can enjoy the sweet taste of homegrown melons. Fresh, juicy, and bursting with flavor, melons are a delightful addition to any garden or plate.
From the refreshing watermelon to the aromatic cantaloupe and the exotic honeydew, there is a wide variety of melons to choose from, each with its own unique characteristics and flavor profiles. With a little planning, preparation, and patience, you can successfully cultivate melon seeds and take pride in the bountiful harvest.
In this guide, we will walk you through the step-by-step process of growing melons from seeds. Whether you are a seasoned gardener looking to try something new or a beginner eager to get your hands dirty, this article will provide you with valuable insights and tips to ensure a successful melon growing experience.
Before we delve into the nitty-gritty details, it is important to note that melon plants thrive in warm climates with plenty of sunlight. They require well-drained soil enriched with organic matter and regular watering. With proper care and attention, you can enjoy a fruitful melon harvest in as little as 80 to 100 days.
So, gather your gardening tools and let’s get started on this melon-growing adventure!
Key Takeaways:
- Growing melons from seeds is a fun and rewarding adventure that involves selecting the right variety, preparing the soil, and providing proper care. With patience and dedication, you can enjoy the sweet taste of homegrown melons in your garden or balcony.
- Harvesting ripe melons involves observing signs like aroma and skin color, performing tests like the tendril and thump tests, and using proper harvesting techniques. Enjoy the mouthwatering flavor of freshly harvested melons at the peak of their sweetness.
Read more: How To Save Bitter Melon Seeds
Step 1: Selecting the Melon Variety
When it comes to selecting the melon variety to grow, you have many options to choose from. The choice you make will depend on your taste preferences, growing conditions, and the space available in your garden.
Watermelons, with their juicy flesh and refreshing taste, are a popular choice for many gardeners. Varieties like ‘Crimson Sweet’ and ‘Sugar Baby’ are known for their sweet flavor and are well-suited to warm climates.
If you prefer a muskmelon or cantaloupe, you can opt for varieties such as ‘Hale’s Best Jumbo’ or ‘Ambrosia’. These melons have a fragrant aroma and a sweet, orange flesh that is perfect for snacking or adding to fruit salads.
For those who crave a unique flavor, consider growing honeydew melons. Varieties like ‘Green Ice’ and ‘Orange Honeydew’ have a creamy, green or orange flesh that is sweet and flavorful.
When selecting your melon variety, keep in mind the length of your growing season. Some melon varieties require a longer growing period, which may not be suitable for regions with shorter summers. Look for varieties that have a shorter maturity period if you live in a cooler climate.
Furthermore, consider the size of the melons and the space available in your garden. Some varieties produce large melons that need plenty of room to sprawl, while others are more compact and suitable for smaller gardens or containers.
Lastly, consult with local gardeners or extension services to identify melon varieties that are well-adapted to your specific region. They can provide valuable insights into which varieties perform best in your area’s climate and soil conditions.
Take your time to research and select the melon variety that best suits your preferences and growing conditions. Once you have chosen your melon variety, you are ready to move on to the next step: preparing the soil.
Step 2: Preparing the Soil
Preparing the soil is an essential step for successful melon cultivation. Melons thrive in well-drained soil that is rich in organic matter. By taking the time to prepare the soil properly, you will provide the melon plants with the nutrients and growing conditions they need to thrive.
Start by choosing a sunny spot in your garden for your melon patch. Melons require a minimum of 6-8 hours of direct sunlight each day to develop sweet and flavorful fruit. Pick an area that is sheltered from strong winds, as they can damage the melon vines.
Next, remove any weeds, rocks, or debris from the area to create a clear planting space. Loosen the soil using a garden fork or tiller to a depth of about 12-15 inches (30-38 cm). This will ensure that the melon roots can penetrate the soil easily and access nutrients and water.
Once the soil is loosened, incorporate organic matter such as compost or well-rotted manure to improve its fertility and structure. This will provide a steady supply of nutrients and help retain moisture in the soil. Aim to add about 2-4 inches (5-10 cm) of organic matter and mix it thoroughly into the soil.
Before planting your melon seeds or seedlings, it is recommended to conduct a soil test to determine its pH level and nutrient content. Melons prefer a slightly acidic to neutral pH range of 6.0-7.0. If the soil’s pH is too high or too low, you can adjust it by adding lime to raise the pH or sulfur to lower it.
Additionally, ensure that the soil is well-drained. Melon plants are susceptible to root rot if they are sitting in waterlogged soil. If your soil tends to retain water, consider amending it with organic matter or creating raised beds to improve drainage.
Once the soil is prepared, it’s time to move on to the next step: starting the melon seeds indoors. This will give your melon plants a head start and allow you to extend the growing season.
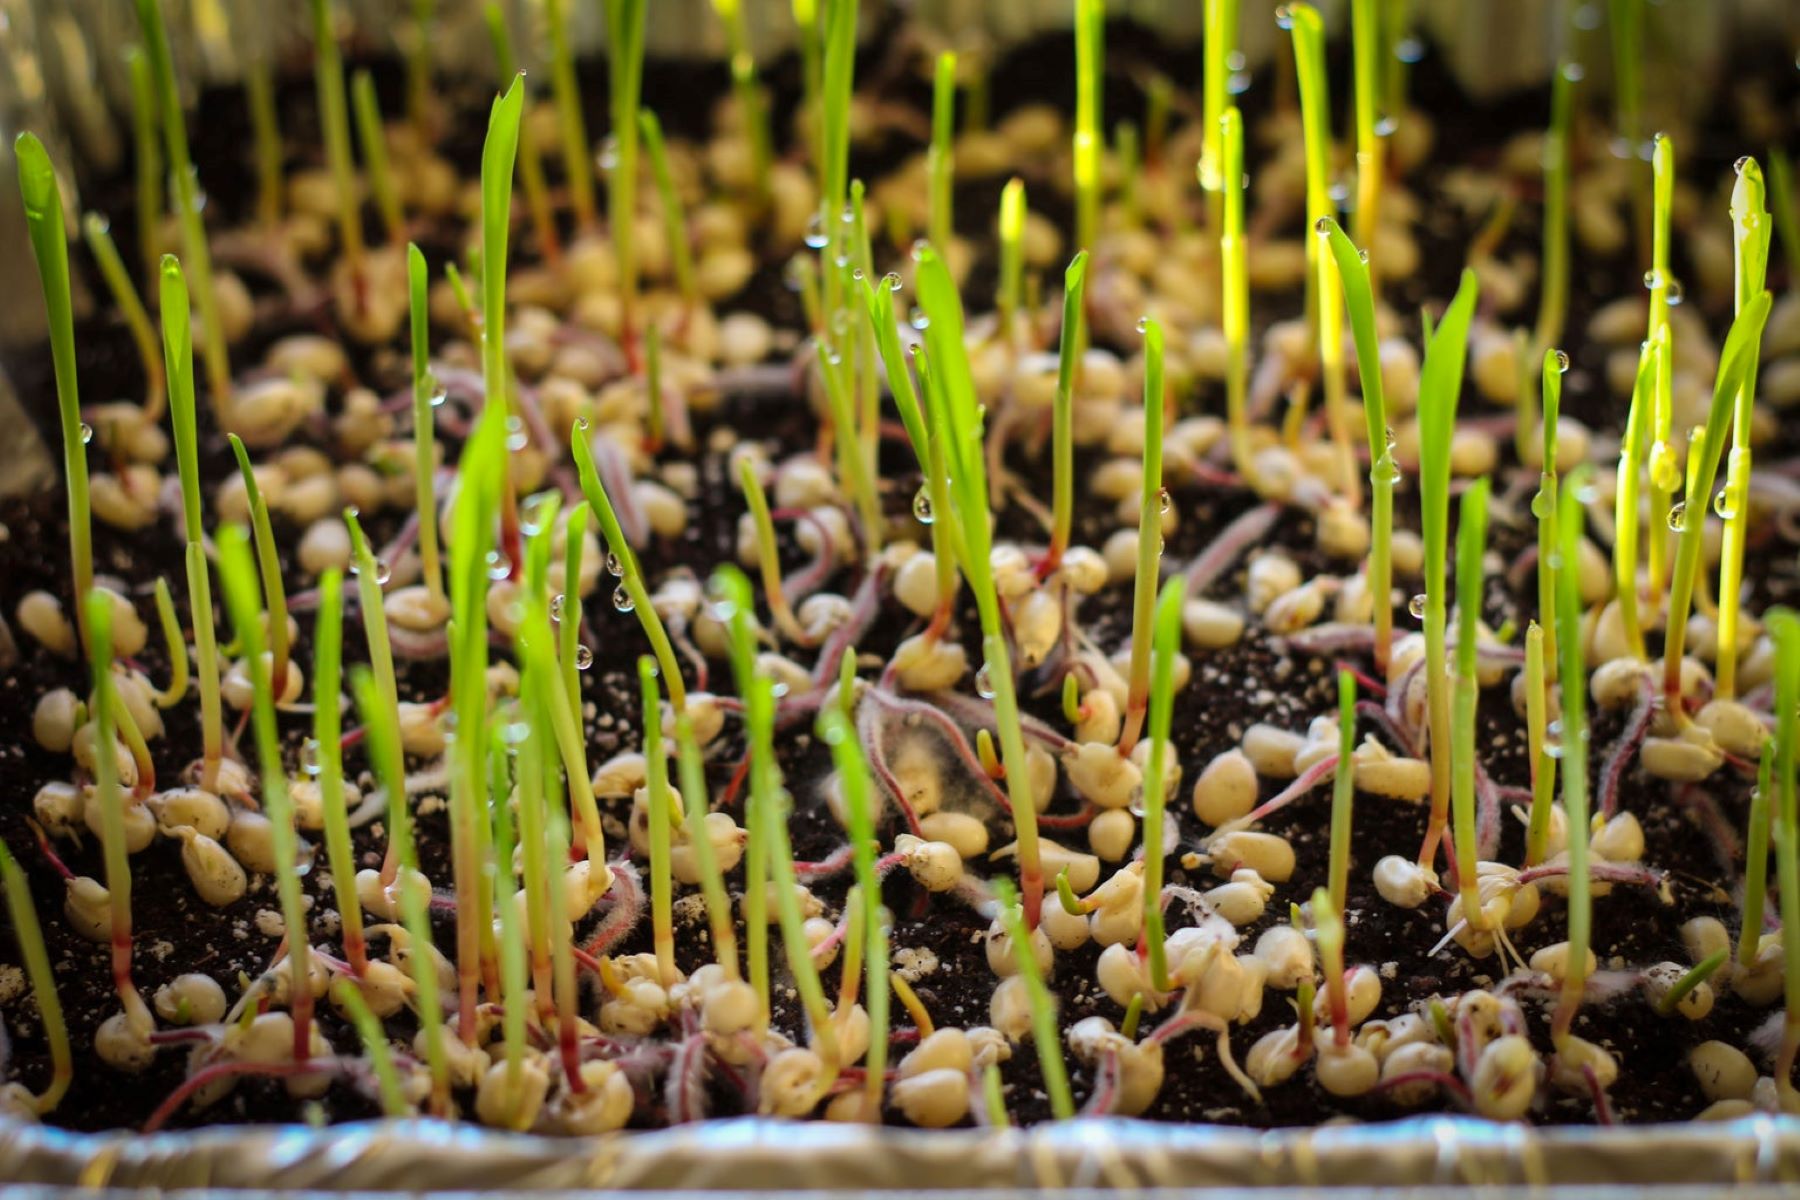
Step 3: Starting the Seeds Indoors
Starting melon seeds indoors gives them a head start and increases the chances of success, especially in regions with shorter growing seasons. This step allows you to control the growing conditions and provides a controlled environment for the seeds to germinate and develop into healthy seedlings.
The ideal time to start melon seeds indoors is 2-4 weeks before the last expected frost in your area. This will give the seedlings enough time to grow and become established before transplanting them outdoors.
Begin by selecting high-quality melon seeds that are suited for indoor seeding. Look for reputable seed suppliers and choose varieties that are known for their germination rate and disease resistance.
Fill seed trays or small pots with well-draining seed-starting mix. Moisten the soil thoroughly before planting the seeds. Plant 2-3 seeds per pot or cell, about 1 inch (2.5 cm) deep. Cover the seeds with soil and gently press it down to ensure good seed-to-soil contact.
Place the seed trays or pots in a warm and sunny location, such as a south-facing window or under grow lights. Melon seeds require a consistent temperature of around 70-85°F (21-29°C) for optimal germination. Use a heating mat if needed to maintain the required temperature.
Keep the soil moist but not waterlogged throughout the germination period. Avoid overwatering, as this can lead to rotting or damping-off disease. Consider covering the seed trays with plastic wrap or a humidity dome to create a mini greenhouse effect and retain moisture.
Within 7-14 days, you should start to see the melon seeds germinating and tiny seedlings emerging from the soil. At this point, remove any weak or overcrowded seedlings to ensure that only the strongest ones remain.
Continue to provide the seedlings with plenty of light and maintain a consistent temperature. As the seedlings grow, gradually introduce them to outdoor conditions by placing them outside for a few hours each day, gradually increasing the time over the course of a week.
By the time the risk of frost has passed, and the soil temperature outdoors has warmed up, your melon seedlings will be ready for transplanting. But first, let’s move on to the next step: transplanting the seedlings.
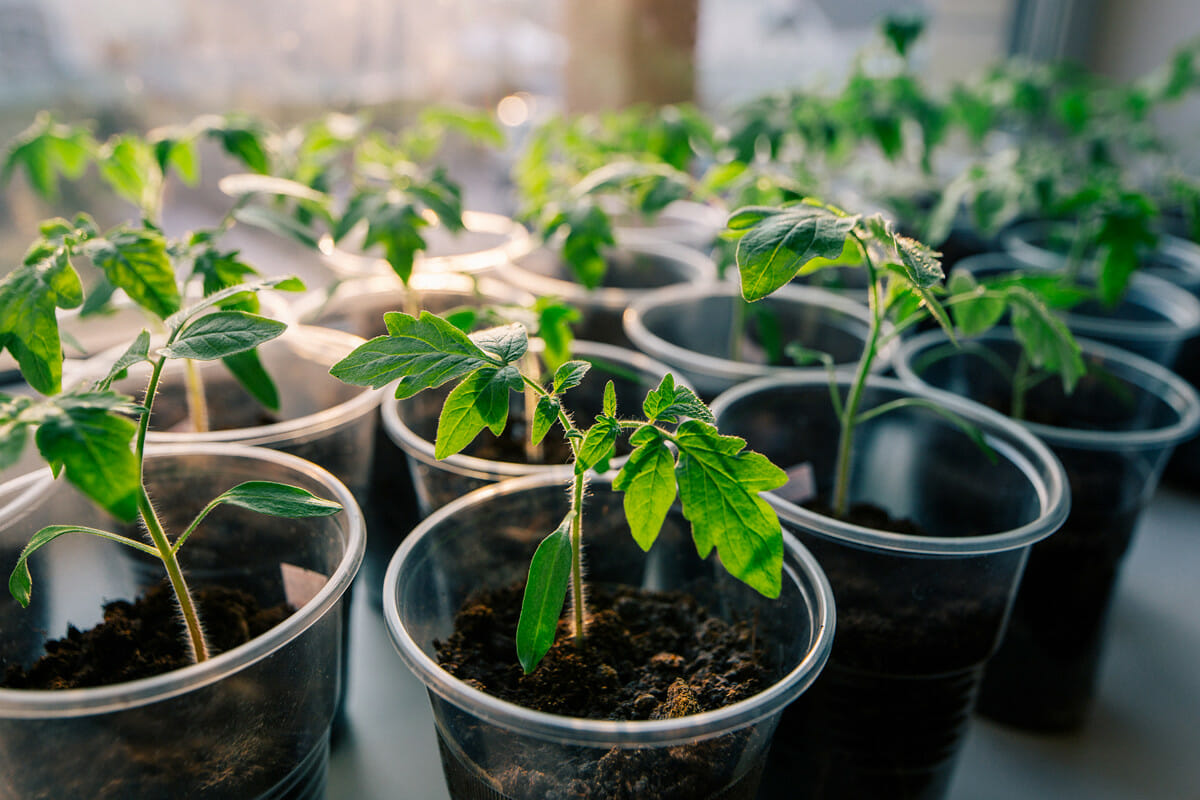
Step 4: Transplanting Seedlings
Transplanting melon seedlings is an exciting step in the journey of growing your own melons. By this point, your seedlings should be healthy and strong, ready to be transferred to their permanent location in your garden or containers.
Choose a sunny spot in your garden with well-drained soil and ample space for the melon vines to spread. It is essential to wait until all risk of frost has passed and the soil has warmed up to around 60°F (15°C) before transplanting your seedlings.
Prior to transplanting, water the soil in the area where you plan to plant your melon seedlings. This will ensure that the soil is moist and ready to receive the young plants.
Gently remove the seedlings from their pots or trays, being careful not to damage the delicate roots. If the roots are overly crowded, gently tease them apart to encourage healthy growth. Handle the seedlings by their leaves to avoid putting pressure on the stems or roots.
Dig a hole in the prepared soil that is larger than the root ball of each seedling. Place the seedlings in the holes, ensuring that the soil level around the stem is at the same level as it was in the pots or trays. Firmly press the soil around the base of the seedlings to eliminate any air pockets.
Space the seedlings according to the recommendations provided for the specific melon variety you are growing. Generally, melon plants should be placed about 2-3 feet (60-90 cm) apart. This will allow enough space for the vines to spread and ensure proper airflow.
After transplanting, water the seedlings thoroughly to settle the soil around the roots. Use a gentle stream of water to avoid washing away the soil. Ensure that the soil remains consistently moist in the weeks following transplanting, as this will help the seedlings establish themselves in their new environment.
Consider using mulch around the base of the seedlings to help retain moisture, suppress weeds, and regulate soil temperature. Organic mulches like straw or compost work well for melon plants.
Now that your melon seedlings are in the ground, it’s time to move on to the next step: outdoor care and maintenance of your melon plants.
Read more: How To Plant Bitter Melon Seeds
Step 5: Outdoor Care and Maintenance
Once your melon seedlings are transplanted outdoors, they require proper care and maintenance to ensure healthy growth and a bountiful harvest. Here are some key aspects to consider when caring for your melon plants:
Sunlight and Temperature:
Ensure that your melon plants receive at least 6-8 hours of direct sunlight each day. Melons thrive in warm temperatures between 70-85°F (21-29°C). Protect the plants from strong winds that can damage the vines and leaves.
Watering:
Maintain consistent moisture in the soil throughout the growing season. Water the plants deeply, ensuring that the water reaches the root zone. Avoid overwatering, as this can lead to root rot. Mulching around the base of the plants can help retain moisture.
Support and Trellising:
Consider providing support or trellising for your melon vines, especially for varieties that produce larger fruits. This will help keep the melons off the ground, prevent rot, and maximize space in your garden. Use cages, stakes, or trellises to support the vines as they grow.
Read more: How Long Does It Take Melons To Germinate
Weed Control:
Regularly remove weeds from around your melon plants to reduce competition for nutrients and water. Be careful not to disturb the shallow root system of the melon plants while weeding.
Fertilizing:
Feed your melon plants with a balanced fertilizer every 2-3 weeks throughout the growing season. Nitrogen-rich fertilizers can encourage excessive foliage growth at the expense of fruit production. Opt for a fertilizer with higher phosphorus and potassium content to promote flowering and fruit development.
Pruning:
Consider pruning your melon plants to encourage better airflow and fruit production. Remove any suckers that emerge from the leaf axils, as these can divert energy from the main vine. Prune away any diseased or damaged foliage to prevent the spread of diseases.
Pollination:
To ensure proper pollination and fruit set, encourage pollinators like bees and butterflies to visit your garden. Planting flowers nearby can attract beneficial insects to your melon plants. You can also hand-pollinate the flowers using a small brush or cotton swab by transferring pollen from the male flowers to the female flowers.
By following these outdoor care and maintenance practices, you will provide your melon plants with optimal growing conditions. As the plants continue to thrive, it won’t be long before you can enjoy the sweet rewards of your efforts – ripe and delicious melons!
Read more: How To Store Melons
Step 6: Watering and Fertilizing
Proper watering and fertilizing are essential factors in nurturing healthy and productive melon plants. By providing adequate moisture and necessary nutrients, you can ensure optimal growth, fruit development, and a bountiful harvest. Here are some guidelines for watering and fertilizing your melon plants:
Watering:
Melon plants require consistent and adequate moisture throughout the growing season. Deep watering is preferred over frequent shallow watering as it encourages the plants’ roots to grow deeper into the soil. Water the plants deeply, ensuring that the water reaches the root zone, which is typically 6-8 inches (15-20 cm) deep.
It is crucial to maintain moist soil, especially during hot and dry periods when evaporation is high. Aim to provide about 1-2 inches (2.5-5 cm) of water per week, either through rainfall or irrigation. Regularly monitor the soil moisture levels and adjust watering as needed. Remember, overwatering can lead to root rot, so it’s important to strike a balance and avoid waterlogged conditions.
Applying a layer of mulch around the base of the plants can help retain soil moisture, prevent weed growth, and regulate soil temperature. Organic mulches, like straw or compost, work well for melon plants.
Fertilizing:
Melon plants are heavy feeders and require a steady supply of nutrients to produce ample foliage and delicious fruits. Prior to planting, it is beneficial to amend the soil with compost or well-rotted manure to improve its fertility and organic matter content.
Once the plants have established, start fertilizing them with a balanced fertilizer. Look for a fertilizer with an NPK (nitrogen-phosphorus-potassium) ratio of around 10-10-10 or a similar composition. Follow the manufacturer’s instructions for application rates.
It is best to feed your melon plants with a slow-release fertilizer or apply a liquid fertilizer every 2-3 weeks throughout the growing season. This ensures a continuous supply of nutrients as the plants grow and produce fruit. High-phosphorus fertilizers can be particularly beneficial for promoting healthy flowering and fruit development.
When applying the fertilizer, be careful not to directly contact the stems or leaves of the plants, as this can cause burning. Water the plants after fertilizing to help the nutrients penetrate the soil and reach the roots.
Regularly monitor the plants for any signs of nutrient deficiencies, such as yellowing leaves or stunted growth. Adjust the fertilization schedule or consider a foliar application if necessary. However, be cautious not to over-fertilize, as excessive nitrogen can result in excessive foliage growth at the expense of fruit production.
By providing adequate watering and fertilizing, you will support the healthy growth and fruit development of your melon plants. Continue to monitor the plants’ needs throughout the season, adjusting your watering and fertilizing practices if required. Soon enough, you’ll be rewarded with juicy, homegrown melons that are bursting with flavor!
Step 7: Controlling Pests and Diseases
Pests and diseases can pose a threat to your melon plants and affect their growth and fruit production. Implementing proper pest and disease control measures is crucial to ensure the health and vitality of your melon crop. Here’s how you can effectively manage common pests and diseases:
Read more: How To Grow Seed
Pest Control:
Aphids: These small, soft-bodied insects can suck the sap from melon plants and transmit diseases. To control aphids, try using natural predators like ladybugs or lacewings, or use insecticidal soap to spray affected plants. Regularly inspect your plants for signs of aphid infestation, such as distorted leaves or the presence of sticky residue (honeydew).
Cucumber Beetles: These beetles can cause significant damage to young melon plants, feeding on leaves, stems, and flowers. Row covers can be effective in preventing their access to the plants. You can also use yellow sticky traps or insecticidal sprays to manage cucumber beetle populations.
Spider Mites: These tiny pests can weaken melon plants by sucking sap from the leaves, causing discoloration and fine webbing. Increase humidity around the plants by misting them regularly to discourage spider mites. If an infestation occurs, use insecticidal soap or neem oil to control their population.
Disease Control:
Powdery Mildew: This fungal disease appears as a white powdery coating on the leaves, affecting the plant’s photosynthesis and weakening its overall health. To prevent powdery mildew, provide proper spacing between plants to allow for good airflow. Avoid overhead watering, as moisture on the leaves can promote the development of the disease. If necessary, apply fungicides labeled for powdery mildew control.
Fusarium Wilt and Verticillium Wilt: These soilborne diseases can cause yellowing and wilting of the foliage, leading to stunted growth and poor fruit development. Plant disease-resistant varieties whenever possible and rotate your crops to reduce the risk of infection. If you suspect these wilt diseases, remove and destroy affected plants and avoid planting melons in the same location for several years.
Downy Mildew: This fungal disease can cause yellowing and wilting of the leaves, along with the appearance of fuzzy grayish patches on the undersides of the leaves. Apply fungicides labeled for downy mildew control and remove and destroy heavily infected plants to prevent the disease’s spread.
Monitor your melon plants regularly for any signs of pest infestations or disease symptoms. Early detection and timely intervention can minimize the damage and prevent further spread.
It’s worth noting that practicing good garden hygiene, such as removing debris and fallen leaves, can help reduce disease and pest populations. Additionally, selecting disease-resistant melon varieties, when available, can greatly reduce the risk of infection.
By implementing appropriate pest and disease control measures, you can protect your melon plants and maintain their health and productivity throughout the growing season.
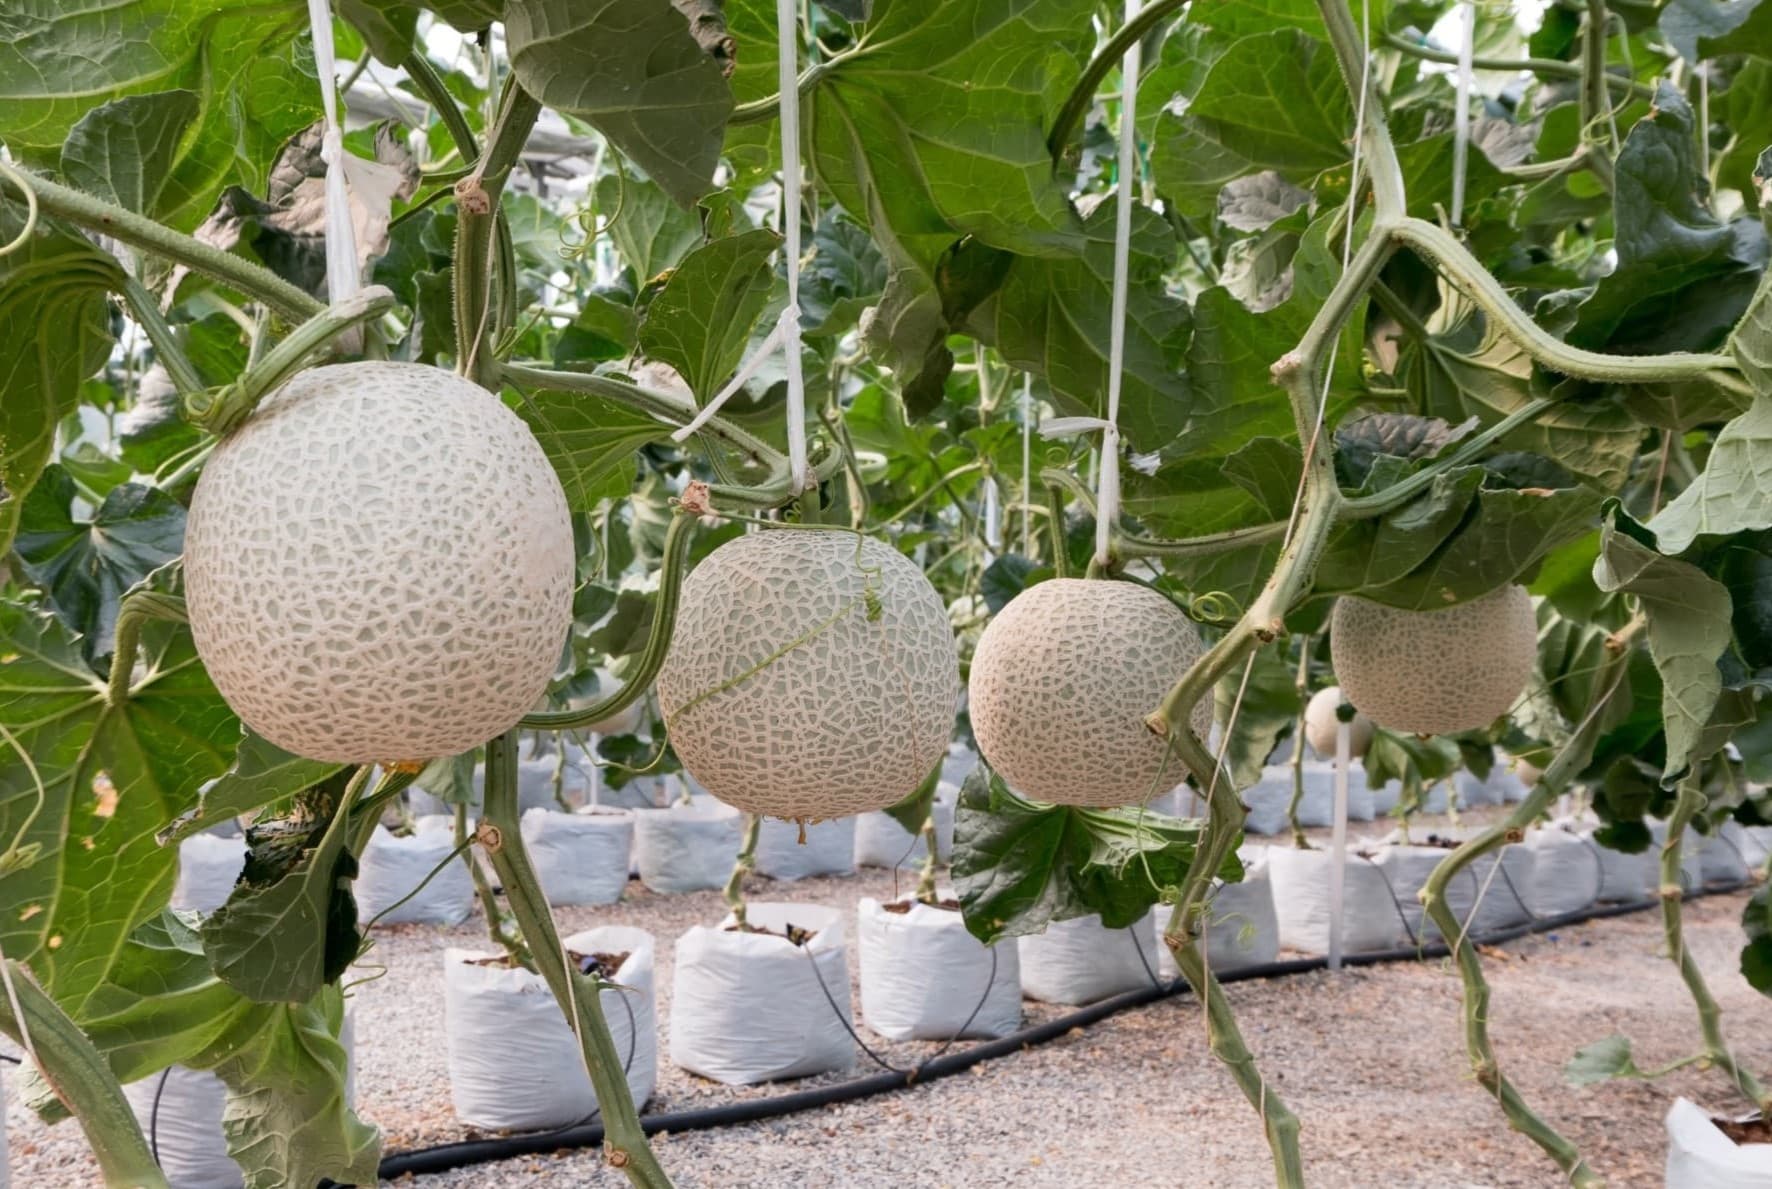
Step 8: Harvesting Ripe Melons
After weeks of nurturing your melon plants, the time will come when you can finally reap the rewards of your efforts by harvesting ripe and delicious melons. Proper timing and techniques are vital to ensure that you pick the fruits at their peak of flavor and sweetness. Here’s how to harvest ripe melons:
Observing the Signs:
One of the best indicators that a melon is ready for harvest is its aroma. Ripe melons will have a strong, sweet aroma that can be detected when you gently lift the fruit near your nose. This is especially true for muskmelons, which emit a fragrant aroma when fully ripe. Additionally, the skin color of the melon should be vibrant and uniform, without any signs of greenness or immaturity.
Read more: How To Store Bitter Melon
Checking the Rind:
Another important factor to consider when harvesting melons is the texture and appearance of the rind. The rind should be firm but slightly yielding when gentle pressure is applied. Avoid fruits with soft or mushy spots, as these may indicate overripeness or decay. For watermelons, look for a dull, matte appearance on the skin rather than a shiny surface.
The Tendril Test:
For some melon varieties, such as cantaloupes, you can perform the tendril test to determine ripeness. A tendril is a small, curly growth located near the melon stem. When the melon is mature, the tendril closest to the fruit will turn brown and dry out. This is a good indication that the melon is ready to be harvested.
Using the Thump Test:
While often associated with watermelons, the thump test can be applied to certain melon varieties as well. Gently thump the melon with your knuckles and listen to the sound it produces. A ripe melon will produce a deep, hollow sound, whereas an immature melon will have a dull or shallow sound.
Harvesting Techniques:
When harvesting melons, it’s best to use a sharp knife or pair of shears to cut the stem about an inch (2.5 cm) above the fruit. Avoid pulling or twisting the melon off the vine, as this can damage the plant and stem attachment points. Leaving a small portion of the stem attached to the fruit helps prolong its shelf life.
Read more: How Chia Seeds Grow
Post-Harvest Care:
After harvesting, gently wipe off any dirt or debris from the melon’s surface. Store the melons in a cool, dry place, away from direct sunlight. If you plan to store the melons for an extended period, it’s best to keep them at a temperature of around 50-55°F (10-13°C) with a humidity level of 75-85%. This will help maintain their quality and flavor.
By using these harvesting techniques and paying attention to the signs of ripeness, you can enjoy the mouthwatering flavor of freshly harvested melons at the peak of their sweetness. Whether you slice them for a refreshing snack, use them in delicious recipes, or share them with friends and family, your homegrown melons will be a true delight!
Conclusion
Cultivating melons from seeds is a rewarding experience that allows you to enjoy the sweet and juicy taste of homegrown fruit. By following the steps outlined in this guide, you can successfully grow melons and witness the transformation from tiny seeds to flourishing vines and, eventually, ripe and delicious melons.
From selecting the right melon variety to preparing the soil, starting the seeds indoors, transplanting seedlings, providing proper care and maintenance, controlling pests and diseases, and finally, harvesting the ripe melons, each step contributes to the overall success of your melon-growing adventure.
Throughout the process, remember to pay attention to the unique needs of your melon plants, such as providing ample sunlight, proper watering and fertilizing, and managing pests and diseases effectively. Adjustments and regular monitoring will help ensure that your plants continue to thrive while minimizing potential challenges.
Not only can growing melons from seeds yield delicious fruits, but it also allows you to connect with nature, nurture life, and experience the joy of harvesting your own produce. The journey from seed to harvest is filled with anticipation, patience, and the satisfaction of enjoying the fruits of your labor.
So, whether you have a sprawling garden or a humble patio, take the plunge and start growing melons. Experiment with different varieties, explore new techniques, and adapt to the unique conditions of your own gardening space. Embrace the joy of gardening and relish in the satisfaction of seeing your melon seeds transform into thriving plants that bear the fruits of your hard work.
With knowledge, dedication, and a touch of green thumbs, you have the power to create a vibrant melon patch bursting with flavors and memories. So, why not start your melon-growing journey today and enjoy the taste of homegrown melons that truly capture the essence of nature’s sweetness?
Frequently Asked Questions about How To Grow Melon Seeds
Was this page helpful?
At Storables.com, we guarantee accurate and reliable information. Our content, validated by Expert Board Contributors, is crafted following stringent Editorial Policies. We're committed to providing you with well-researched, expert-backed insights for all your informational needs.


0 thoughts on “How To Grow Melon Seeds”