Home>Garden Essentials>How To Grow Thunbergia From Seed
Garden Essentials
How To Grow Thunbergia From Seed
Modified: March 16, 2024
Learn how to grow Thunbergia from seed in your garden and enjoy beautiful, vibrant blooms all season long. Step-by-step guide for successful cultivation.
(Many of the links in this article redirect to a specific reviewed product. Your purchase of these products through affiliate links helps to generate commission for Storables.com, at no extra cost. Learn more)
Introduction
Welcome to the world of gardening, where nature’s beauty can be nurtured and cultivated right in your very own backyard. If you have a passion for vibrant and eye-catching flowers, then growing Thunbergia from seed might be just the project for you. Thunbergia, also known as Black-Eyed Susan Vine, is a fast-growing, twining plant that produces stunning blooms in a variety of colors. In this article, we will guide you through the process of growing Thunbergia from seed, sharing expert tips and tricks to help you achieve success.
Thunbergia seeds come in a range of varieties, each offering unique characteristics and colors. Before diving into the world of Thunbergia, it’s important to choose the right seeds for your desired garden aesthetic. Whether you prefer classic yellow blooms, deep orange hues, or even a mix of vibrant colors, there is a Thunbergia variety to suit every taste.
Preparing the seed starting mix is an essential step in ensuring the successful germination of Thunbergia seeds. A well-draining and nutrient-rich mix will provide the ideal environment for young seedlings to thrive. We will walk you through the process of creating the perfect seed starting mix using a combination of ingredients such as compost, vermiculite, and peat moss.
Sowing Thunbergia seeds requires some careful planning and attention to detail. We will provide step-by-step instructions on how to sow the seeds, including the optimal depth, spacing, and timing for germination. By following these guidelines, you can maximize the chances of successful seedling emergence.
Once your Thunbergia seedlings have emerged, it’s crucial to provide them with optimal growing conditions to promote healthy growth. From choosing the right container, providing adequate sunlight and temperature, to ensuring proper ventilation, we will cover all the important factors to consider to create the perfect environment for your Thunbergia plants.
Watering is another critical aspect of caring for Thunbergia seedlings. We will guide you on how to strike the right balance between providing enough hydration for growth while avoiding overwatering, which can lead to issues such as root rot. Understanding the watering needs of your Thunbergia plants is essential for their overall health and vitality.
Transplanting Thunbergia seedlings is an important step in their journey towards becoming mature plants. We will provide detailed instructions on when and how to transplant your seedlings into larger pots or directly into the garden bed. Proper transplanting techniques will ensure minimal shock to the plants and encourage their continued growth and development.
Caring for Thunbergia plants goes beyond watering and transplanting. We will discuss essential care tips such as providing support for the vines to climb, regular pruning to maintain their shape and encourage bushier growth, and the importance of fertilization to ensure abundant blooms.
Like any plant, Thunbergia is susceptible to pests and diseases. We will highlight common issues that may arise and provide guidance on prevention and treatment. By being vigilant and proactive in addressing these potential problems, you can ensure the long-term health and vigor of your Thunbergia plants.
Finally, we will explore the process of harvesting Thunbergia seeds, allowing you to collect and store them for future plantings. Harvesting seeds is a rewarding way to continue the cycle of growth, and we will share tips on when and how to gather mature Thunbergia seeds for success.
By the end of this article, you will have all the knowledge and confidence to grow Thunbergia from seed and enjoy a garden filled with radiant and striking blooms. So let’s get started on this exciting gardening journey together!
Key Takeaways:
- Choose the right Thunbergia seeds based on your garden’s climate and your personal taste to ensure vibrant and stunning blooms that complement your outdoor space.
- Provide optimal care for Thunbergia plants by offering support for climbing vines, regular watering, and proper pruning to maintain their health and encourage abundant blooms.
Read more: How To Grow Okra From Seed
Choosing the Right Thunbergia Seeds
When it comes to selecting Thunbergia seeds for your garden, you are presented with a wide range of choices. Thunbergia plants are known for their vibrant and eye-catching blooms, and each variety offers its own unique set of colors and characteristics. Here are some key factors to consider when choosing the right Thunbergia seeds:
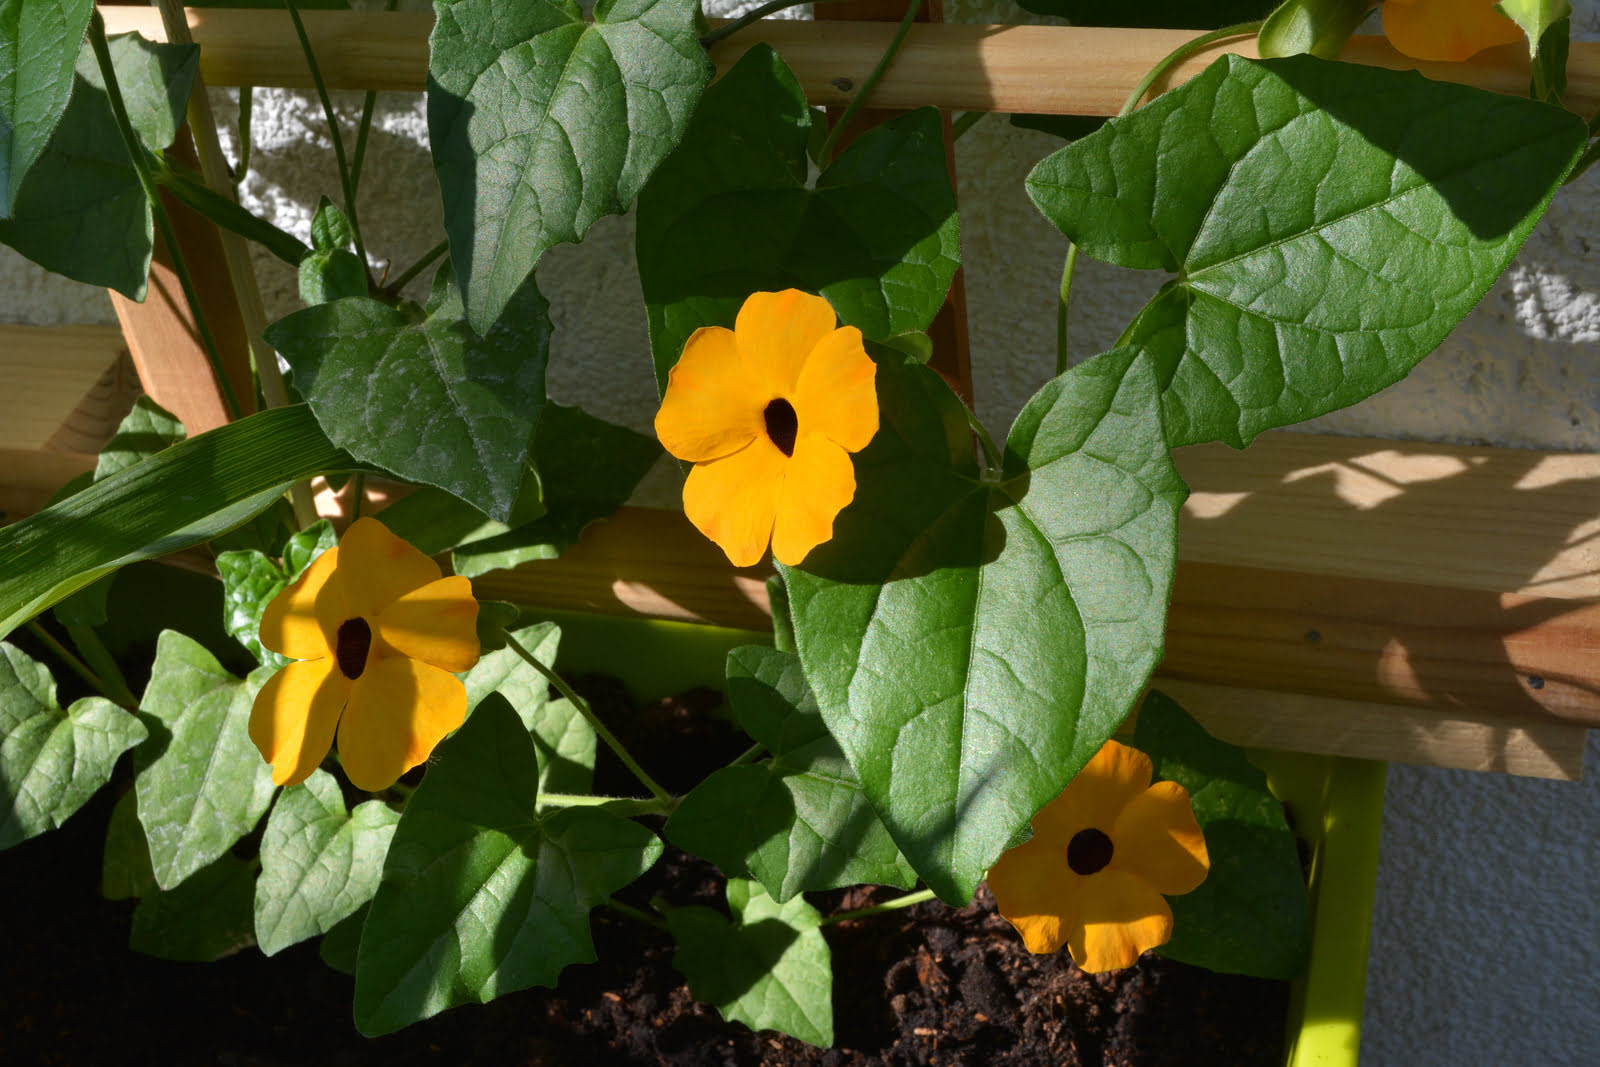
Variety: Thunbergia comes in various species and cultivars, each with its own distinct traits. The most common species is Thunbergia alata, also known as Black-Eyed Susan Vine. This variety features stunning yellow or orange flowers with a dark center. There are also other varieties available, such as Thunbergia grandiflora, which produces large blue flowers, and Thunbergia fragrans, which has creamy white blooms with a delightful fragrance. Consider the colors and characteristics you desire when selecting your Thunbergia seeds.
Growing Conditions: Thunbergia plants thrive in warm climates and prefer full sun to partial shade. Before purchasing seeds, ensure that the growing conditions in your area align with the plant’s requirements. If you live in a region with a short growing season, choose Thunbergia varieties with shorter maturation times to increase the chances of successful flowering.
Seed Quality: It’s important to source high-quality Thunbergia seeds to maximize germination rates and ensure strong, healthy plants. Look for reputable seed suppliers or nurseries that guarantee the quality and viability of their seeds. Check for any additional information provided, such as the harvest date or germination rates, to make an informed decision.
Seed Viability: Thunbergia seeds have a shelf life, and their viability decreases over time. Fresh seeds tend to have higher germination rates, so try to obtain seeds that are less than a year old. While older seeds may still germinate, the success rate might be lower. If purchasing seeds online, check the packaging for the harvest date or inquire about the seed’s age before making a purchase.
Desired Growth Habit: Thunbergia plants can either be climbers or trailing vines, so consider the growth habit that best suits your garden or landscape. Climbing varieties can be trained on trellises, fences, or arbors to create vertical interest, while trailing varieties work well in hanging baskets or as ground cover. Think about the space you have available and the visual effect you want to achieve.
Personal Preference: Ultimately, the choice of Thunbergia seeds depends on your personal taste and the overall aesthetic you want to create in your garden. Consider the colors that complement your existing flowerbeds or the visual impact you want to make with the Thunbergia blooms. It can be helpful to look for inspiration in gardening magazines, websites, or even local gardens to get an idea of the different Thunbergia varieties available.
By carefully considering these factors, you can choose the right Thunbergia seeds that will thrive in your garden. Whether you prefer the classic yellow flowers of Thunbergia alata or the vibrant blues of Thunbergia grandiflora, there is a variety that will bring color and beauty to your outdoor space. Once you have selected the seeds, it’s time to prepare the perfect seed starting mix to give your Thunbergia seedlings the best possible start.
Preparing the Seed Starting Mix
Creating the right seed starting mix is crucial for the successful germination and growth of Thunbergia seeds. This mix serves as the medium in which the seeds will be planted, providing them with the necessary nutrients, moisture, and aeration to thrive. Follow these steps to prepare the perfect seed starting mix:
1. Gather the ingredients: To create a nutrient-rich and well-draining seed starting mix, you will need a few key ingredients. These include a high-quality seed starting soil or potting mix, compost, vermiculite, and peat moss (or coconut coir).
2. Choose a container: Select a clean and sterilized container to mix your ingredients. It can be a plastic bucket or a large mixing bowl. Make sure the container is large enough to hold and mix all the ingredients effectively.
3. Mix the ingredients: Start by adding the seed starting soil or potting mix to the container. This will serve as the base of the mix. Add equal parts compost, vermiculite, and peat moss (or coconut coir) to the container. The compost will provide nutrients, while the vermiculite and peat moss (or coconut coir) will aid in moisture retention and aeration.
4. Blend thoroughly: Use your hands or a trowel to blend all the ingredients together until they are well mixed. Make sure there are no clumps or uneven distribution of the materials. The goal is to achieve a uniform consistency throughout the mix.
5. Test the moisture: Take a small handful of the seed starting mix and squeeze it gently. It should hold its shape and feel slightly moist, but not wet. Adjust the moisture level by adding a little more water if it feels too dry or adding more peat moss (or coconut coir) if it feels too wet. The ideal moisture level is crucial for seed germination.
6. Sterilize, if necessary: If you suspect the seed starting mix may contain pests or disease pathogens, you can sterilize it to ensure a clean environment for your seeds. The mix can be sterilized by baking it in the oven at a temperature of 180°F (82°C) for 30 minutes. Let it cool completely before using it for seed starting.
7. Transfer to containers: Once the seed starting mix is ready, you can transfer it to the desired containers for seed sowing. Use clean pots or seed trays with drainage holes to allow excess water to escape and prevent waterlogged soil.
By following these steps, you can create a high-quality seed starting mix that provides the ideal conditions for Thunbergia seed germination. The mix’s nutrient content and drainage properties will promote healthy root development and overall seedling growth. Once the mix is prepared, it is time to sow your Thunbergia seeds and begin the exciting journey of watching them sprout and grow into beautiful plants.
Sowing Thunbergia Seeds
Sowing Thunbergia seeds is a critical step in the process of growing these stunning flowers. By following the correct techniques and timing, you can maximize the germination rate and ensure a successful start for your Thunbergia plants. Here’s a step-by-step guide to sowing Thunbergia seeds:
1. Gather the supplies: Before you begin, make sure you have all the necessary supplies on hand. You will need Thunbergia seeds, your prepared seed starting mix, clean pots or seed trays with drainage holes, and a spray bottle for watering.
2. Fill the containers: Fill your pots or seed trays with the prepared seed starting mix, leaving about ¾ inch (2 cm) of space at the top. Gently pat down the mix to create a slightly firm planting surface.
3. Sow the seeds: Thunbergia seeds are small and should be sown on the surface of the soil mix. Sprinkle the seeds evenly over the surface, spacing them about 1-2 inches (2.5-5 cm) apart. Avoid overcrowding, as this can affect air circulation around the seedlings.
4. Cover lightly: Thunbergia seeds require light to germinate, so do not bury them deep in the soil. Instead, gently press the seeds into the surface of the mix or cover them with a thin layer of vermiculite to provide some protection while still allowing light to reach the seeds.
5. Mist with water: Use a spray bottle to mist the surface of the soil gently. Avoid using a heavy stream of water, as this can disturb the seeds. The goal is to moisten the soil without causing it to become saturated.
6. Maintain moisture: To aid in germination, it’s important to keep the soil consistently moist but not waterlogged. Check the moisture level regularly and mist the soil surface whenever it starts to dry out. A lid or plastic wrap can be placed over the containers to create a mini greenhouse effect and retain moisture.
7. Provide warmth and light: Place the containers in a warm location with temperatures between 70-75°F (21-24°C). Thunbergia seeds require warmth to germinate successfully. Additionally, make sure the seedlings receive plenty of bright, indirect light. A south-facing window or a grow light can provide suitable lighting conditions.
8. Be patient: Thunbergia seeds typically take 10-14 days to germinate, although it can vary depending on the variety and growing conditions. Be patient and resist the urge to disturb the seeds during this time. Trust in the process and continue to provide the appropriate care.
9. Thin out seedlings: Once the seedlings have emerged and developed their first set of true leaves, it’s time to thin them out if necessary. If multiple seedlings have grown in one container, carefully remove the weakest ones, leaving the strongest seedling to continue growing.
By following these steps, you can ensure a successful start for your Thunbergia plants. Remember to provide consistent moisture, warmth, and light during the germination period. In a matter of weeks, you will be rewarded with the sight of sprouting Thunbergia seedlings, setting the stage for their future growth and blooms.
Providing Optimal Growing Conditions
Creating the right growing conditions for your Thunbergia plants is essential in promoting healthy growth and vibrant blooms. These tropical plants thrive in specific environmental conditions, and by providing them with optimal care, you can ensure their success. Here are some key aspects to consider when providing the best growing conditions for your Thunbergia plants:
Sunlight: Thunbergia plants require plenty of bright, indirect sunlight to flourish. Place them in a location that receives at least 6-8 hours of sunlight per day. However, in regions with extremely hot and intense sunlight, it is best to provide some shade during the hottest part of the day to prevent scorching of the leaves.
Temperature: Thunbergia plants are warm-weather lovers and thrive in temperatures between 70-80°F (21-27°C). They are not frost-tolerant, so make sure to plant them after the danger of frost has passed. In cooler climates, Thunbergia can be grown as an annual or brought indoors during the colder months.
Soil: Thunbergia plants prefer well-draining soil that is rich in organic matter. A mixture of garden soil, compost, and perlite can help create the ideal soil composition. Avoid heavy clay soils that retain too much moisture, as they can lead to root rot. Test the soil’s pH and aim for a slightly acidic to neutral range of 6.0-7.0 for optimal growth.
Watering: Thunbergia plants prefer regular and consistent watering, especially during hot and dry periods. Keep the soil evenly moist but not waterlogged. Water deeply, allowing the water to penetrate the root zone, and then wait for the top inch (2.5 cm) of soil to dry out before watering again. Avoid overwatering, as waterlogged soil can lead to root issues.
Fertilization: Thunbergia plants benefit from regular fertilization to support healthy growth and abundant blooms. Use a balanced, slow-release fertilizer or a water-soluble fertilizer diluted to half strength. Apply the fertilizer according to the package instructions, usually every 2-3 weeks during the growing season. Be cautious not to over-fertilize, as this can lead to excessive foliage growth instead of blooms.
Support: Thunbergia is a twining plant that loves to climb and trail. Provide a trellis, fence, or other support structure for the vines to climb upon. This will not only add visual interest to your garden but also help prevent the plants from sprawling and tangling on the ground. Regularly train the vines to grow along the support to maintain an organized and well-structured appearance.
Pruning: Thunbergia plants can benefit from occasional pruning to maintain their shape, control growth, and encourage bushier foliage. Prune back any excessively long or leggy vines, and remove any dead or damaged leaves or flowers. Pruning in early spring before new growth starts can help stimulate the plant to produce more blooms during the growing season.
Air Circulation: Adequate air circulation around Thunbergia plants is important to prevent the development of fungal diseases. Avoid overcrowding the plants and provide enough space between them to allow air to flow freely. Prune any dense foliage or thin out plants if necessary.
By paying attention to these key factors and providing the optimal growing conditions, you can ensure the health and vigor of your Thunbergia plants. With plenty of sunlight, appropriate temperatures, well-draining soil, regular watering, and proper support, your Thunbergia plants will thrive and reward you with their spectacular blooms.
Read more: How To Grow A Tree From A Seed
Watering Thunbergia Seedlings
Proper watering is crucial for the healthy growth of Thunbergia seedlings. These young plants have delicate root systems and can be sensitive to both underwatering and overwatering. By following the right watering techniques, you can provide optimal hydration for your Thunbergia seedlings. Here are some important considerations when watering Thunbergia seedlings:
Frequency: Thunbergia seedlings need regular and consistent moisture for proper growth. Water them whenever the top inch (2.5 cm) of soil feels dry to the touch. Depending on the conditions, this may require watering every 2-3 days. Keep in mind that young seedlings have smaller root systems, so they will dry out more quickly than established plants.
Watering method: When watering Thunbergia seedlings, it’s advisable to use a gentle watering method to avoid disturbing the delicate roots. A spray bottle or a watering can with a fine rose attachment can provide a gentle and even distribution of water. This helps prevent soil erosion and ensures that the seedlings receive the proper amount of moisture.
Avoid overwatering: While it’s important to keep Thunbergia seedlings hydrated, it’s equally important to avoid overwatering, as this can lead to issues such as root rot. Ensure that the soil is adequately moist but not waterlogged. If the soil feels excessively wet and the seedlings are showing signs of wilting or yellowing leaves, this may be an indication of overwatering. Adjust the watering schedule accordingly.
Deep watering: When you water Thunbergia seedlings, aim for deep watering. This means watering until you see moisture seeping out of the drainage holes at the bottom of the container. Deep watering encourages the roots to grow deeper into the soil, which leads to stronger and more resilient plants.
Watering in the morning: It is generally recommended to water Thunbergia seedlings in the morning. This allows the foliage to dry out during the day, reducing the risk of fungal diseases that thrive in damp conditions. Watering in the morning also ensures that the seedlings have enough moisture to sustain them throughout the day.
Monitoring moisture levels: Regularly monitor the moisture levels of the soil to ensure that it remains consistently moist but not overly saturated. You can use your finger or a moisture meter to gauge the soil’s moisture content. Adjust the watering schedule as needed based on the specific needs of your Thunbergia seedlings and the environmental conditions.
Environmental factors: Take into account the specific environmental conditions that may influence the watering needs of Thunbergia seedlings. Factors such as temperature, humidity, and air circulation can affect how quickly the soil dries out. During hot and dry weather, seedlings may require more frequent watering, while cooler and more humid conditions may necessitate less frequent watering.
By providing proper and consistent watering, you can ensure the healthy development of Thunbergia seedlings. Remember to check the moisture levels regularly, avoid overwatering, and adjust the watering schedule based on the specific needs of the seedlings. With the right care and attention, your Thunbergia seedlings will grow into beautiful, vibrant plants ready to adorn your garden.
Start thunbergia seeds indoors 6-8 weeks before the last frost. Use a well-draining seed starting mix and keep the soil consistently moist. Once the seedlings have 2-3 sets of leaves, transplant them into larger pots or the garden. Thunbergia prefers full sun and well-drained soil.
Transplanting Thunbergia Seedlings
Transplanting Thunbergia seedlings is an important step in their growth journey, allowing them to establish themselves in their permanent home. As young plants, Thunbergia seedlings require careful handling and proper transplanting techniques to minimize stress and ensure successful establishment. Here’s a step-by-step guide on how to transplant Thunbergia seedlings:
1. Timing: Thunbergia seedlings should be transplanted when they have developed a strong root system and have at least two sets of true leaves. This typically occurs 4-6 weeks after germination. Ensure that the risk of frost has passed before transplanting them outdoors or into larger containers.
2. Preparing the new location: Choose a planting location that provides the optimal growing conditions for Thunbergia. This includes full sun to partial shade and well-draining soil. Prepare the soil by removing any weeds, rocks, or debris and incorporating compost or organic matter to enrich the soil with nutrients. Thunbergia plants appreciate a fertile soil, so adding some slow-release fertilizer at this stage can also be beneficial.
3. Digging the planting hole: Dig a hole in the prepared location that is slightly larger and deeper than the root ball of the Thunbergia seedling. This will allow the roots to spread out and establish themselves more easily. Make sure to space the planting holes according to the recommended spacing for the specific Thunbergia variety you are growing.
4. Transplanting the seedlings: Carefully remove the Thunbergia seedlings from their original containers, gently grasping the seedling by the base of its leaves. Be cautious not to pull on the delicate stems, as this can cause damage. Place each seedling into a prepared planting hole, ensuring that the base of the stem is level with or slightly above the soil level. Backfill the hole with soil, gently pressing it around the seedling to secure it in place.
5. Watering: After transplanting, water the newly planted Thunbergia seedlings thoroughly. This will help settle the soil around the roots and provide essential moisture. Ensure that the soil is evenly moist but not waterlogged. Continue to water regularly, keeping the soil consistently moist as the seedlings acclimate to their new environment.
6. Mulching: Mulching around the base of the Thunbergia seedlings can help conserve moisture, suppress weed growth, and regulate soil temperature. Apply a layer of organic mulch, such as wood chips or straw, around the base of the plants, avoiding direct contact with the stems. Leave a small space around the stem to prevent rot.
7. Providing support (if applicable): If you are growing climbing varieties of Thunbergia, install a trellis, fence, or other support structure near the seedlings. As they grow, guide the vines towards the support and secure them gently with twine or plant ties. This will ensure that the plants have the necessary support to climb and spread their beautiful foliage.
8. Monitoring and care: Keep a close eye on the transplanted Thunbergia seedlings during the first few weeks after transplanting. Water them regularly, monitor soil moisture levels, and provide additional support or staking if needed. Protect the young plants from strong winds and extreme weather conditions, especially if transplanting them into the garden.
By following these steps, you can successfully transplant Thunbergia seedlings, allowing them to establish themselves and continue their growth journey. With proper care and attention, these seedlings will develop into beautiful vines, producing an array of vibrant, eye-catching blooms in your garden.
Caring for Thunbergia Plants
Caring for Thunbergia plants involves providing the necessary support, regular maintenance, and proper cultural practices to ensure their health, vigor, and abundant blooms. By following these care guidelines, you can enjoy the beauty and resilience of these stunning vines. Here are some essential tips for caring for your Thunbergia plants:
1. Providing Support: Thunbergia plants are climbers, and they require support to reach their full potential. Install trellises, fences, or other structures near the plants to give their vines something to climb upon. Secure the vines to the support as they grow, guiding them along the desired path. This will help create a well-structured and visually appealing display.
2. Watering: Thunbergia plants appreciate regular watering, especially during dry periods. Keep the soil consistently moist but not waterlogged, as excessive moisture can lead to root rot or other fungal diseases. Water deeply, allowing the water to reach the root zone, and then allow the top inch (2.5 cm) of soil to dry out slightly before watering again. Adjust the watering frequency based on environmental conditions and the moisture needs of the plants.
3. Fertilization: To encourage healthy growth and abundant blooms, feed Thunbergia plants with a balanced, slow-release fertilizer or a water-soluble fertilizer diluted to half strength. Apply the fertilizer according to the package instructions, typically every 3-4 weeks during the growing season. Be cautious not to over-fertilize, as this can lead to excessive foliage growth at the expense of blooms.
4. Pruning: Regular pruning helps maintain the shape and promote bushier growth in Thunbergia plants. Trim back any excessively long or straggly vines to encourage branching and a fuller appearance. Remove any dead or yellowed leaves and spent flowers to keep the plants looking tidy and healthy. Pruning in early spring before new growth starts can help stimulate the production of more blooms during the growing season.
5. Providing Shade: Thunbergia plants thrive in full sun to partial shade conditions. However, in extremely hot and intense sunlight, they may benefit from some protection during the hottest part of the day. Consider providing natural shade through nearby trees, shrubs, or strategically placed temporary shade cloth to protect the plants from heat stress.
6. Regular Inspection: Monitor your Thunbergia plants regularly for signs of pests or diseases. Common pests that can affect Thunbergia include aphids, whiteflies, and spider mites. If you notice any pests, treat them with appropriate organic or chemical controls to minimize damage to the plants. Additionally, keep an eye out for any signs of disease, such as leaf spots or wilting, and take necessary steps to address the issue.
7. Treating Overwintered Thunbergia: In regions with cold winters, Thunbergia plants may not survive outdoors. To overwinter them, bring them indoors before the first frost and place them in a bright area with temperatures between 60-70°F (15-21°C). Reduce watering and fertilization during this period, allowing the plants to go dormant. In early spring, resume regular care and gradually reintroduce them to outdoor conditions.
8. Enjoying the Blooms: Thunbergia plants produce magnificent, trumpet-shaped blooms that attract pollinators and add a burst of color to your garden. Take the time to appreciate and enjoy the beauty of these flowers. Consider cutting a few blooms to bring indoors and create vibrant floral arrangements.
By following these care tips, you can ensure the health and beauty of your Thunbergia plants. With proper support, regular watering and fertilization, timely pruning, and vigilant pest and disease management, you will be rewarded with an impressive display of glorious blooms that will captivate and delight for many seasons to come.
Common Pests and Diseases
Thunbergia plants are generally hardy and relatively resistant to pests and diseases. However, like any plant, they can still be susceptible to certain issues. Being aware of common pests and diseases that can affect Thunbergia plants will help you identify and address problems promptly to keep your plants healthy. Here are some of the common pests and diseases to watch out for:
Pests:
1. Aphids: Aphids are small, soft-bodied insects that feed on the sap of plants. They can cause yellowing, stunted growth, and distorted foliage. Use insecticidal soap or a strong blast of water to remove aphids from Thunbergia plants. Encouraging natural predators, such as ladybugs or lacewings, can also help control aphid populations.
2. Whiteflies: Whiteflies are tiny, winged insects that cluster on the undersides of leaves, sucking the sap and causing yellowing and wilting. Use sticky traps, insecticidal soap, or neem oil to manage whitefly infestations. Regularly inspect the undersides of leaves and remove heavily infested foliage.
3. Spider Mites: Spider mites are tiny arachnids that thrive in dry conditions. They cause yellow speckling on the leaves and create fine webbing. Increase humidity around the plants, regularly mist the foliage, or wash them with a gentle stream of water to help control spider mites. Neem oil or insecticidal soap can also be used as treatment.
4. Slugs and Snails: These slimy pests can chew on the leaves of Thunbergia plants, leaving irregular holes and trails of slime. Handpick slugs and snails or use physical barriers like copper tape or diatomaceous earth to protect your plants. You can also apply organic slug pellets sparingly around the base of the plants.
Diseases:
1. Powdery Mildew: Powdery mildew is a fungal disease that appears as a white, powdery coating on the leaves and stems of plants. It thrives in humid conditions. To prevent powdery mildew, ensure good air circulation around the plants and avoid overhead watering. Remove infected plant material, and apply fungicidal sprays if necessary.
2. Leaf Spot: Leaf spot diseases can cause dark, irregularly shaped spots on the leaves of Thunbergia plants. They are usually caused by fungal pathogens. Remove affected leaves and ensure good air circulation to prevent the spread of the disease. Fungicidal sprays may be necessary in severe cases.
3. Root Rot: Root rot occurs when the soil is excessively wet and poorly drained, leading to the decay of the plant’s roots. To prevent root rot, ensure proper drainage in the planting area and avoid overwatering. Allow the soil to dry out slightly between watering and avoid waterlogging the roots.
4. Gray Mold: Gray mold, or Botrytis blight, can affect Thunbergia plants, especially in cool, humid conditions. It causes fuzzy gray mold growth and rot on the flowers, leaves, and stems. Remove affected plant material and improve air circulation around the plants. Avoid overhead watering and provide proper spacing between plants to reduce humidity.
Regularly inspect your Thunbergia plants for signs of pests or diseases. Early detection and appropriate action can help prevent the spread of these issues and minimize damage to the plants. Maintaining good cultural practices, such as proper watering, providing adequate air circulation, and promoting overall plant health, will also help prevent pest and disease problems. With proper care, your Thunbergia plants can thrive and showcase their vibrant blooms.
Read more: How To Grow Zinnias From Seed
Harvesting Thunbergia Seeds
Harvesting Thunbergia seeds allows you to collect and store them for future plantings, ensuring a continuous cycle of growth and beauty. Thunbergia plants produce seed pods that contain the mature seeds, ready to be collected. Harvesting the seeds at the right time and using proper techniques will help ensure their viability. Here’s a step-by-step guide on how to harvest Thunbergia seeds:
1. Timing: Thunbergia seeds are ready for harvesting when the seed pods have fully dried on the plant. The seed pods will turn brown or tan, and the outer covering will become brittle. Wait until the seed pods have naturally dried and show no signs of green or moisture.
2. Inspecting the seed pods: Carefully examine the dried seed pods before harvesting the seeds. Ensure that the seed pods are fully mature and have not been damaged by insects or disease. Avoid harvesting from pods that are discolored, moldy, or show any signs of rot.
3. Collecting the seeds: Gently pinch or twist the dried seed pods to release the mature seeds. Thunbergia seeds are typically small and brown, resembling tiny pebbles. Collect the seeds and place them in a clean container or envelope for storage. Shake or tap the seed pods over the container to capture all the seeds.
4. Removing debris: After collecting the seeds, inspect them for any debris, such as dried plant material or other non-seed items. Remove any unwanted debris by hand or use a fine mesh sieve to separate the seeds from any impurities.
5. Storing the seeds: Properly storing Thunbergia seeds will help maintain their viability. Place the clean, dry seeds in a sealed envelope or airtight container. Label the container with the seed variety and the harvest date. Store the seeds in a cool, dry, and dark location, such as a refrigerator or a cool basement. The seeds can remain viable for several years if stored under optimal conditions.
6. Saving seeds from hybrid varieties: If you are saving seeds from hybrid Thunbergia varieties, be aware that the characteristics of the offspring may not be the same as the parent plant. Hybrid seeds often produce a variety of traits, as they are the result of cross-pollination between different Thunbergia varieties.
7. Seed germination test: If you are unsure about the viability of harvested Thunbergia seeds, you can perform a seed germination test. Moisten a paper towel, place a few seeds on it, fold the towel over the seeds, and seal it in a plastic bag. Keep the bag in a warm area and check the seeds after a few weeks. If a high percentage of seeds germinate, they can be safely used for planting.
By following these steps, you can successfully harvest Thunbergia seeds and store them for future use. Collecting seeds from your Thunbergia plants not only provides a sustainable way to grow these beautiful flowers but also allows you to share the joy of gardening with others by sharing the seeds. Enjoy the process of harvesting and continue the cycle of growth and beauty in your garden.
Conclusion
Congratulations on gaining a comprehensive understanding of how to grow Thunbergia from seed and care for these beautiful plants. By following the steps outlined in this article, you are well-equipped to embark on a successful gardening journey with Thunbergia. From choosing the right seeds and preparing the seed starting mix to sowing the seeds, providing optimal growing conditions, and caring for the plants, you now have the knowledge to nurture Thunbergia plants from seedling to maturity.
Remember to choose the Thunbergia variety that suits your garden aesthetic and climate, and prepare a well-draining and nutrient-rich seed starting mix. Take care to sow the seeds at the correct depth and provide optimum growing conditions with adequate sunlight, proper watering, and regular fertilization. Support the climbing vines and prune as needed to maintain their desired shape. Keep an eye out for common pests and diseases, promptly addressing any issues that may arise.
As your Thunbergia plants mature, you will have the delight of witnessing their stunning blooms in a variety of colors. Whether they trail gracefully in hanging baskets or climb artfully along trellises and fences, Thunbergia plants add a vibrant touch to any garden landscape. Take the time to appreciate the beauty of their trumpet-shaped flowers and even consider saving some seeds from your mature plants for future plantings.
By following best practices and giving your Thunbergia plants the care and attention they need, you will be rewarded with a flourishing garden filled with these radiant flowers. Enjoy the process and remember to adapt your gardening techniques to suit the specific needs of your plants and your local climate.
Now that you are armed with the knowledge of growing and caring for Thunbergia, it’s time to put that knowledge into practice. Get your hands dirty, sow those seeds, and witness the magic of nature unfold in your garden. With a little dedication and patience, you’ll be surrounded by the captivating beauty of Thunbergia in no time.
Frequently Asked Questions about How To Grow Thunbergia From Seed
Was this page helpful?
At Storables.com, we guarantee accurate and reliable information. Our content, validated by Expert Board Contributors, is crafted following stringent Editorial Policies. We're committed to providing you with well-researched, expert-backed insights for all your informational needs.


0 thoughts on “How To Grow Thunbergia From Seed”