Home>Garden Essentials>How To Slow Down Infill On Active Print
Garden Essentials
How To Slow Down Infill On Active Print
Modified: October 27, 2024
Learn how to slow down infill on active print in your garden with these simple tips. Maintain a lush and vibrant garden with reduced infill using our easy-to-follow techniques.
(Many of the links in this article redirect to a specific reviewed product. Your purchase of these products through affiliate links helps to generate commission for Storables.com, at no extra cost. Learn more)
Introduction
Welcome to the wonderful world of gardening! Whether you’re an experienced green thumb or just starting out, it’s no secret that gardening is a rewarding and fulfilling hobby. Not only does it allow you to connect with nature, but it also provides a sense of accomplishment as you watch your plants grow and flourish. And with the advent of technology, gardening has become even more exciting and accessible, thanks to innovative tools and techniques like active print.
Active print is a cutting-edge method that combines gardening with 3D printing technology, allowing you to create custom planters, pots, and even intricate structures for your garden. It opens up a world of possibilities and enables you to unleash your creativity, turning your garden into a unique and personalized oasis.
However, as with any new technology, there may be challenges and considerations to keep in mind. One such challenge is the infill speed in active print. Infill refers to the density of the material used to fill the interior of a 3D print. When it comes to gardening applications, infill determines the strength, durability, and overall quality of the print.
In this article, we will explore the importance of slowing down infill on active print and provide you with a comprehensive guide on how to achieve optimal results. So, if you’re ready to take your active print gardening to the next level, let’s dive in!
Key Takeaways:
- Slowing down infill in active print gardening can enhance plant growth, reduce material usage, and improve print quality, resulting in durable and visually appealing 3D printed garden structures.
- To achieve optimal results, prepare for slower infill by selecting the right printing material, calibrating your 3D printer, and monitoring the printing process. Be patient and troubleshoot common issues for successful active print gardening projects.
Read more: What Infill Does Shapeways Print With
Understanding Active Print
Before we delve into the specifics of slowing down infill on active print, let’s take a moment to understand what active print is all about. Active print combines the art of gardening with 3D printing technology, allowing you to create intricate and customized designs for your garden.
With active print, you can unleash your creativity by designing and printing unique planters, decorative structures, and even functional gardening tools. This innovative technique gives you the freedom to bring your wildest gardening ideas to life.
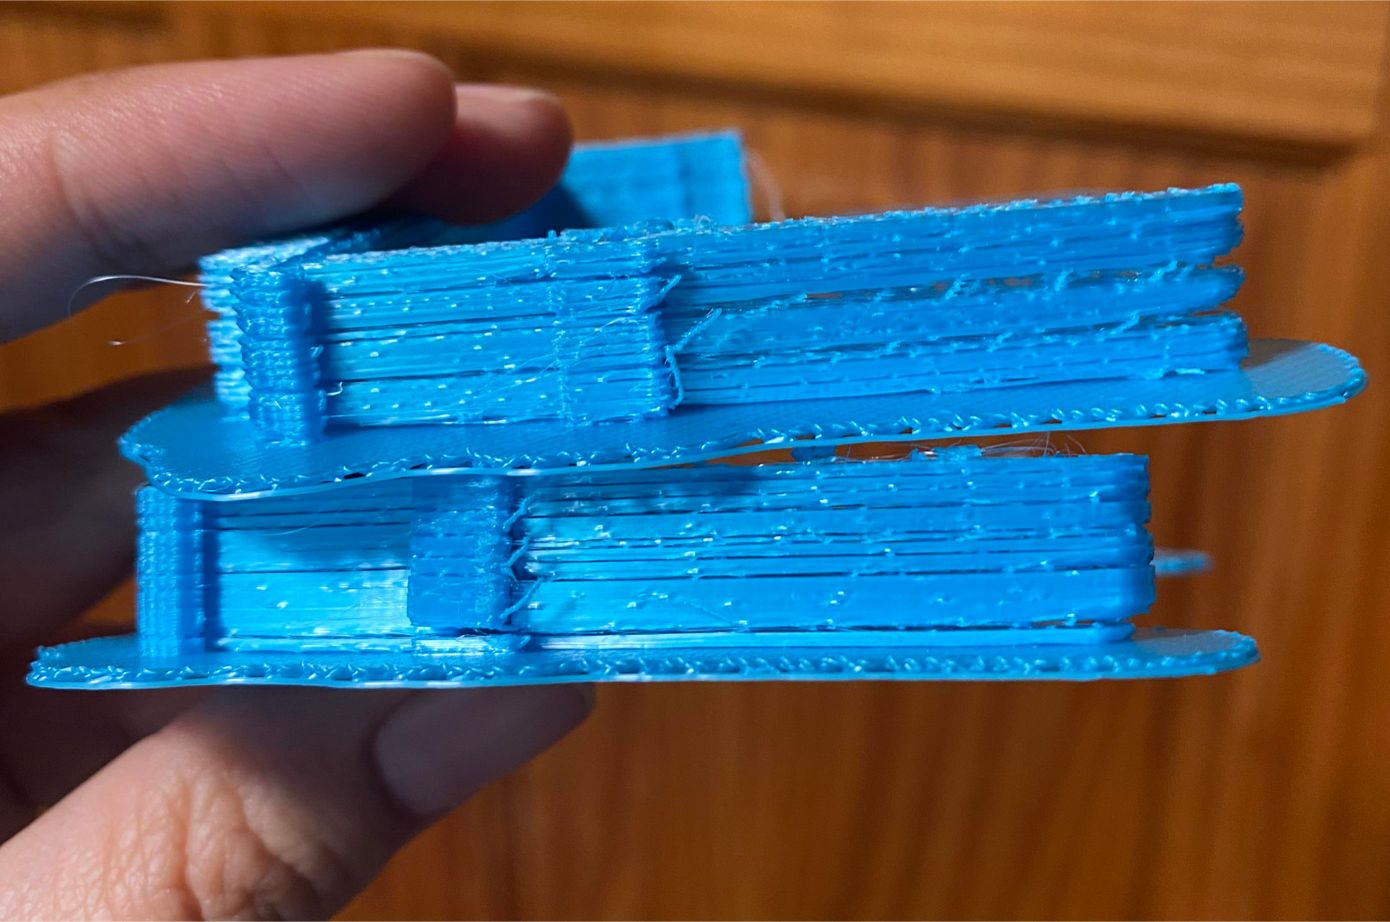
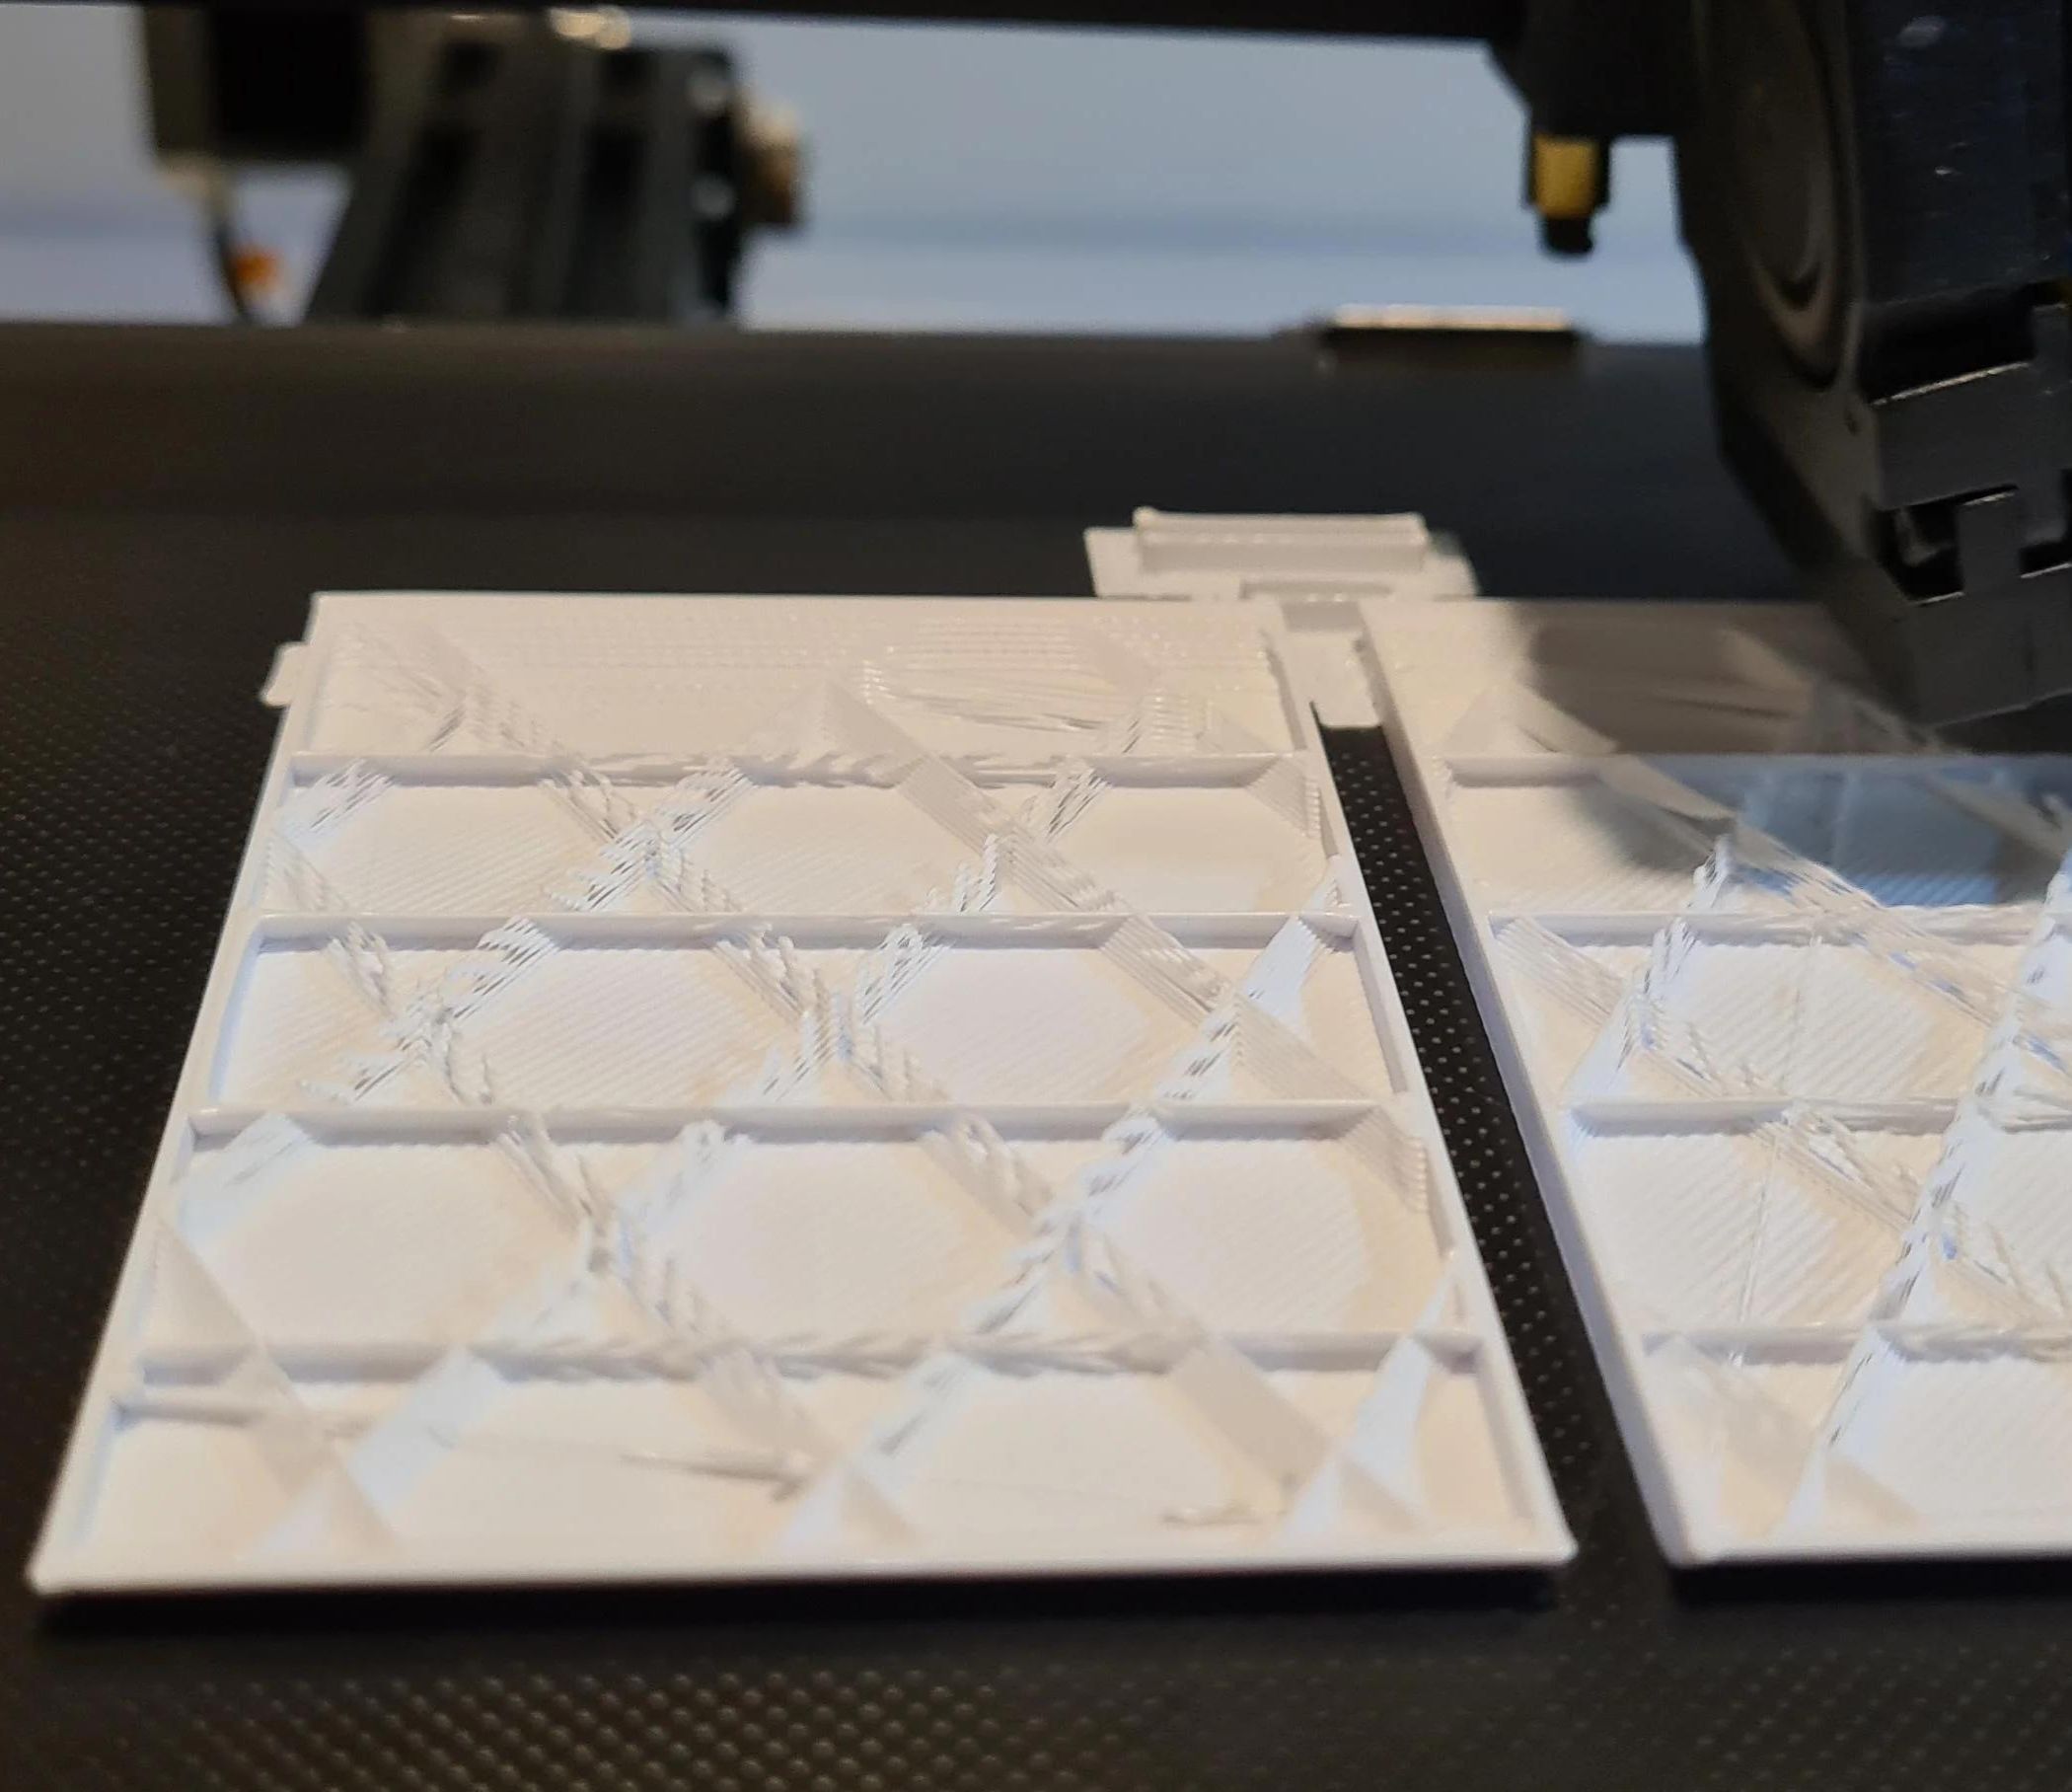
One of the key components of active print is the infill. Infill refers to the internal structure of a 3D print, which is often represented as a pattern of interconnected lines or a grid. The infill provides structural support and strength to the print, ensuring that it retains its shape and withstands environmental factors.
The infill density determines how solid or porous the interior of the print is. A higher infill density results in a print that is more robust and durable, while a lower infill density creates a print that is lighter and more flexible. When it comes to gardening applications, finding the right infill density is crucial to ensure the longevity and functionality of your active print creations.
By customizing the infill density, you have the ability to control the overall strength and weight of your active print designs. Whether you’re creating a delicate flower pot or a sturdy garden structure, understanding how infill works and knowing when to slow it down can make a significant difference in the final result.
Now that we have a general understanding of active print and the role of infill, let’s explore the reasons why slowing down infill is beneficial for your gardening projects.
Reasons to Slow Down Infill
Slowing down the infill speed in active print can have several advantages when it comes to gardening applications. Here are a few key reasons why you should consider adjusting the infill settings:
- Enhanced Plant Growth: By slowing down the infill, you allow for better airflow and moisture distribution within the active print structures. This improved ventilation promotes healthy root development and facilitates optimal plant growth. Additionally, slower infill can prevent excessive heat buildup, reducing the risk of overheating and damage to the plants.
- Reduced Material Usage: Slower infill can lead to a more efficient use of materials. With a lower infill density, you reduce the amount of material required to print your gardening designs. This not only saves costs but also allows you to be more environmentally friendly by minimizing waste.
- Increased Design Flexibility: Adjusting the infill speed gives you greater control over the internal structure of your active print creations. By slowing down the infill, you can achieve more intricate and delicate designs, allowing for unique patterns and textures in your gardening structures. This flexibility can enhance the aesthetics of your garden while showcasing your creativity.
- Improved Print Quality: Slower infill can contribute to better print quality by reducing the risk of print defects. It allows for more accurate deposition of the printing material, resulting in cleaner lines and smoother surfaces. This results in visually pleasing and professionally finished active print designs that will truly enhance your garden’s appeal.
- Longevity of Prints: With slower infill, your active print creations tend to be more durable and resistant to wear and tear. The increased density and better adhesion between the printed layers contribute to the overall strength of the design, ensuring that it withstands the elements and lasts longer in your garden.
Now that we understand the benefits of slowing down infill, let’s move on to the practical steps you can take to prepare for slower infill in your active print projects.
Preparing for Slower Infill
Before you start adjusting the infill settings for your active print gardening projects, it’s essential to make the necessary preparations. Here are some key steps to follow:
- Select the Right Printing Material: Choose a printing material that is suitable for your gardening needs and compatible with slower infill. Some materials, such as PLA (polylactic acid), are known to work well with slower infill speeds and offer good strength and durability for garden structures. Consult the specifications of your 3D printer and select a material that will deliver optimal results.
- Calibrate Your 3D Printer: Ensure that your 3D printer is properly calibrated before attempting to slow down the infill. A well-calibrated printer will provide more accurate and consistent results. Pay close attention to the bed leveling, extrusion rate, and temperature settings to ensure optimal printing conditions.
- Prepare Your Design: If you’re using a pre-designed model, make sure it is compatible with slower infill. Some intricate designs may require adjustments to accommodate slower infill speeds. If you’re creating your own design, keep in mind the limitations and considerations related to infill density and adjust the design accordingly for optimal results.
- Monitor the Environment: The ambient temperature and humidity levels in your printing environment can affect the performance of slower infill. Ensure that the printing area is well-ventilated and that the temperature and humidity are within the recommended range for your printing material. This will help prevent any issues related to excessive heat, moisture, or warping of the print.
- Prepare for Longer Printing Times: Slowing down the infill will increase the overall print time. Be prepared for longer printing sessions and plan accordingly. Consider factors such as power supply, print bed adhesion, and the availability of sufficient printing material to ensure a smooth printing process.
By following these preparation steps, you will be well-equipped to adjust the infill settings and achieve optimal results in your active print gardening projects. Next, let’s explore how to adjust the infill settings on your 3D printer.
Adjusting Infill Settings
Now that you’re ready to adjust the infill settings for your active print gardening projects, it’s time to take a closer look at how to make the necessary adjustments on your 3D printer. Here are some steps to follow:
- Access the Printer Settings: Open the software or interface that controls your 3D printer. Locate the settings specific to infill and navigate to the infill settings menu.
- Select the Infill Density: Choose the desired infill density for your active print design. Slowing down the infill speed typically involves reducing the density to a lower percentage. Experiment with different values to find the right balance between strength and weight for your specific project. Keep in mind that a lower infill percentage will result in a lighter and more flexible print.
- Adjust the Infill Speed: Next, focus on the speed settings for the infill. Decrease the speed value to slow down the infill process. Start with a conservative reduction and gradually decrease the speed until you achieve the desired effect. Keep in mind that too slow of an infill speed can lead to overextrusion and other issues, so find the right balance based on your printer’s capabilities and the desired result.
- Consider the Infill Pattern: Infill density is not the only factor that affects the strength and structure of the print. The infill pattern can also contribute to the overall quality and integrity of the design. Experiment with different infill patterns, such as grid, honeycomb, or gyroid, to find the one that works best for your gardening project. Each pattern has its own characteristics in terms of strength, flexibility, and material usage.
- Save and Apply the Settings: Once you’re satisfied with the adjustments made to the infill settings, save the changes and apply them to your 3D printer. Double-check the other print settings, such as layer height and temperature, to ensure they are suitable for active print gardening.
Remember, adjusting the infill settings may require some trial and error to find the optimal configuration for your specific gardening project. Document your settings and make note of any observations or adjustments for future reference.
With the infill settings adjusted, it’s time to dive into the actual process of printing with slower infill. We’ll explore best practices to ensure a successful print in the next section.
To slow down infill on an active print, adjust the infill speed setting in your 3D printer’s slicer software. Lowering the infill speed can help improve print quality and reduce the risk of errors.
Read more: How To Slow Down An Electric Motor
Printing with Slower Infill
Now that you have adjusted the infill settings on your 3D printer to slow down the infill, it’s time to start printing your active print gardening projects. Here are some best practices to follow for successful printing:
- Choose the Right Layer Height: The layer height determines the vertical resolution of your print. For active print gardening projects, opt for a layer height that strikes a balance between quality and printing time. A smaller layer height will result in finer details but longer print times.
- Ensure Proper Adhesion: To prevent print failures, ensure that your print adheres well to the print bed. Clean the print bed surface and use adhesion aids like painter’s tape or a specialized print bed adhesive if needed. Consider enabling a brim or raft to improve adhesion and stability during the printing process.
- Monitor the Print: Keep a close eye on the printing process, especially during the infill stage. Look out for any signs of underextrusion or overextrusion, which can affect the overall quality of the print. It’s also important to observe any potential issues like warping, strings, or layer shifting and make adjustments as necessary.
- Optimize Cooling: Cooling plays a crucial role, particularly with slower infill speeds. Ensure that your 3D printer’s cooling system is functioning properly and adjust the fan speed if needed. Proper cooling helps in preventing overheating and improving the overall print quality.
- Practice Patience: Slower infill speeds result in longer print times. It’s important to be patient and resist the urge to interrupt or rush the printing process. Remember, the end result will be worth the wait, as you’ll have a high-quality active print gardening project.
By following these recommendations, you’ll have a better chance of achieving successful prints with slower infill speeds for your active print gardening projects. However, if you encounter any issues along the way, don’t worry. We’ll explore some common troubleshooting tips in the next section.
Now, let’s move on to evaluating the results of your active print gardening projects and ensuring that they meet your expectations.
Evaluating the Results
Once you have completed the printing process with slower infill for your active print gardening projects, it’s important to evaluate the results and ensure that they meet your expectations. Here’s how you can assess the quality of your prints:
- Inspect the Print Quality: Examine the printed object for any visible defects or imperfections. Look for smooth surfaces, clean lines, and well-defined details. Check for any signs of underextrusion, overextrusion, or inconsistent layer adhesion that may affect the strength and durability of the print.
- Assess Structural Integrity: Test the structural integrity of the printed object by applying gentle pressure or stress. It should have sufficient strength to withstand typical use in a gardening setting. Check for any signs of weakness, brittleness, or excessive flexibility that may indicate issues with the infill density or print settings.
- Consider Aesthetic Appeal: Evaluate the overall aesthetics of the print. Does it match your intended design and vision? Consider the color, texture, and finish of the object, as well as how it blends in with your garden’s style and theme.
- Test Functionality: If the printed object has a specific function, such as a planter or tool, test its usability. Ensure that it serves its purpose effectively and meets your expectations in terms of functionality, such as holding soil or supporting plant growth.
- Solicit Feedback: If possible, seek feedback from others who have experience with active print gardening or other 3D printing projects. They may be able to provide insights and suggestions for improvement based on their own experiences.
Based on your evaluation, make note of any areas that require improvement or adjustments. Consider tweaking the infill settings or making design modifications to address any issues that arose during the evaluation process.
Now, let’s explore some common issues that you may encounter when printing with slower infill and how to troubleshoot them effectively.
Troubleshooting Common Issues
While printing with slower infill can yield fantastic results for your active print gardening projects, you may encounter some common issues along the way. Here are a few troubleshooting tips to help you address these challenges:
- Underextrusion: If you notice that the infill or outer walls appear sparse or have gaps, it may indicate underextrusion. Check if the nozzle is clogged and clean it if necessary. You can also increase the printing temperature slightly to ensure better flow of the printing material.
- Overextrusion: Overextrusion can result in prints with rough surfaces or excessive bulging. Ensure that the filament diameter is accurate in your slicer software. Adjust the extrusion multiplier or flow rate accordingly to mitigate overextrusion issues.
- Warping: Warping occurs when the printed object lifts or warps off the print bed during the printing process. Ensure that the print bed is properly leveled and clean. Consider adding a brim or using adhesion aids like painter’s tape or a specialized print bed adhesive to improve bed adhesion and prevent warping.
- Stringing: Stringing refers to the thin strands of filament that can appear between different parts of the print or on the surface. Adjust the retraction settings in your slicer software to minimize stringing. Increasing travel speed or enabling combing can also help reduce stringing.
- Layer Shifting: Layer shifting occurs when the layers of the print are not aligned correctly, resulting in a misaligned or skewed object. Check that the belts and pulleys in your 3D printer are properly tensioned and tighten them if necessary. Additionally, ensure that the print bed is securely attached to the printer.
- Excessive Print Time: While slower infill speeds can result in longer print times, if you find that the print is taking an excessively long time, consider adjusting other print settings. You can increase the layer height or decrease the overall print quality while maintaining the desired infill density to reduce the print time.
Remember, troubleshooting is often a process of trial and error. If one solution doesn’t resolve the issue, try a different approach or seek advice from the active print community or online forums that specialize in 3D printing troubleshooting.
With these troubleshooting tips in mind, you can overcome common challenges and produce high-quality active print gardening projects. Now, let’s wrap up our discussion.
Conclusion
Congratulations on exploring the world of active print gardening and learning how to slow down infill for optimal results. By adjusting the infill settings, you can enhance plant growth, reduce material usage, increase design flexibility, improve print quality, and ensure the longevity of your active print creations.
Throughout this article, we’ve covered the basics of active print, the importance of infill, the reasons to slow down infill, and the steps to prepare for slower infill in your 3D printing projects. We’ve also discussed the process of adjusting infill settings, printing with slower infill, and evaluating the results of your active print gardening projects.
Remember to pay attention to details such as choosing the right printing material, calibrating your 3D printer, and monitoring the printing process. Be patient, as slower infill speeds may result in longer print times, but the end results will be worth it.
If you encounter any issues along the way, refer to the troubleshooting tips provided to address common challenges, such as underextrusion, overextrusion, warping, stringing, layer shifting, or excessive print time.
By taking these steps and incorporating your creativity into your active print gardening projects, you can create beautiful, functional, and personalized designs that will transform your garden into a unique sanctuary. Enjoy the journey of exploring the possibilities that active print technology brings to the world of gardening.
Happy gardening and happy printing!
Frequently Asked Questions about How To Slow Down Infill On Active Print
Was this page helpful?
At Storables.com, we guarantee accurate and reliable information. Our content, validated by Expert Board Contributors, is crafted following stringent Editorial Policies. We're committed to providing you with well-researched, expert-backed insights for all your informational needs.


0 thoughts on “How To Slow Down Infill On Active Print”