Home>Gardening & Outdoor>Outdoor Structures>How To Build A Shed From Scratch
Outdoor Structures
How To Build A Shed From Scratch
Modified: August 28, 2024
Learn how to build a durable shed from scratch with our step-by-step guide. Get expert tips for creating outdoor structures that last.
(Many of the links in this article redirect to a specific reviewed product. Your purchase of these products through affiliate links helps to generate commission for Storables.com, at no extra cost. Learn more)
Introduction
So, you've decided to tackle a new project: building a shed from scratch. Whether you need extra storage space, a workshop, or a cozy retreat, constructing your own shed can be a fulfilling and practical endeavor. Not only does it allow you to customize the design to fit your specific needs, but it also provides a sense of accomplishment and ownership once the project is completed.
Building a shed from the ground up may seem like a daunting task, but with careful planning, the right tools, and a step-by-step approach, it can be a rewarding experience. In this guide, we will walk you through the process of building a shed, covering everything from initial planning and gathering materials to the final touches that will make your shed a functional and visually appealing addition to your property.
Whether you're a seasoned DIY enthusiast or a novice builder, this guide will equip you with the knowledge and confidence to take on this project. By the end, you'll be ready to roll up your sleeves, grab your tools, and embark on the journey of constructing a custom shed that meets your needs and reflects your personal style. So, let's dive in and explore the exciting world of building a shed from scratch!
Key Takeaways:
- Building a shed from scratch requires careful planning, essential tools, and quality materials. It’s a rewarding DIY project that adds value and personal touch to your property.
- The finishing touches, such as interior organization, lighting, and landscaping, elevate your shed into a functional and personalized space. It’s a reflection of your creativity and craftsmanship.
Planning and Preparation
Before you start swinging hammers and sawing lumber, it’s crucial to invest time in thoughtful planning and thorough preparation. This phase sets the foundation for a successful shed-building project and can help you avoid costly mistakes down the road.
1. Determine Your Shed’s Purpose: Consider how you will use the shed. Will it primarily serve as storage for garden tools and equipment, a workshop for DIY projects, or a multifunctional space? Understanding the shed’s intended purpose will influence its size, layout, and features.
2. Choose an Ideal Location: Select a level area on your property for the shed. Ensure it complies with local building codes and zoning regulations. Take into account factors such as sunlight exposure, accessibility, and proximity to utilities.
3. Obtain Necessary Permits: Check with your local municipality or county to determine if permits are required for shed construction. Compliance with building codes and regulations is essential to avoid potential legal issues in the future.
4. Create a Detailed Plan: Sketch out a design for your shed, including dimensions, door and window placements, and any additional features. This plan will serve as a roadmap during the construction phase and can help you estimate the required materials accurately.
5. Set a Budget: Establish a realistic budget for the project, factoring in expenses for materials, tools, permits, and any professional assistance you may need. Having a clear budget in mind will guide your purchasing decisions and prevent overspending.
6. Gather Essential Tools: Make sure you have the necessary tools for the job, including a hammer, tape measure, level, saw, drill, and safety equipment. Having the right tools on hand will streamline the construction process and ensure precision in your work.
By investing time in careful planning and thorough preparation, you’ll lay the groundwork for a successful shed-building venture. This initial phase sets the stage for a smooth construction process and increases the likelihood of achieving a shed that meets your needs and exceeds your expectations.
Gathering Materials and Tools
With a solid plan in place, it’s time to gather the materials and tools needed to bring your shed to life. The key to a smooth construction process is ensuring that you have all the necessary components at your disposal before you commence building. Here’s a comprehensive list of materials and tools you’ll likely need:
Materials:
- Lumber: Purchase quality lumber for framing, siding, and trusses. Opt for pressure-treated wood for durability and resistance to decay.
- Fasteners: Stock up on nails, screws, and other fasteners required for securing various components of the shed.
- Roofing Materials: Depending on your preference, choose from asphalt shingles, metal roofing panels, or other suitable roofing materials.
- Foundation Materials: If you’re opting for a concrete foundation, acquire the necessary concrete mix, gravel, and formwork materials.
- Doors and Windows: Select doors, windows, and associated hardware that align with your shed’s design and functionality.
- Siding: Choose siding material that complements your property’s aesthetics while providing weather protection for the shed.
- Vapor Barrier and Insulation: If your shed will be used for extended periods, consider adding insulation and a vapor barrier for climate control.
Tools:
- Power Tools: Invest in a quality circular saw, power drill, and nail gun for efficient and precise construction work.
- Hand Tools: Ensure you have a hammer, tape measure, level, square, and a set of screwdrivers for various tasks.
- Safety Gear: Prioritize safety with protective gear such as goggles, gloves, and a dust mask to safeguard against potential hazards.
- Ladder or Scaffolding: Depending on the shed’s height, secure a stable ladder or scaffolding for safe access during construction.
- Workbench and Sawhorses: Set up a sturdy workbench and sawhorses to provide a stable work surface for cutting and assembling materials.
By procuring the required materials and tools in advance, you’ll streamline the construction process and minimize disruptions. With everything at your fingertips, you’ll be well-equipped to progress smoothly through each phase of building your custom shed.
Read more: How To Build A Bar Cart From Scratch
Building the Foundation
The foundation serves as the anchor of your shed, providing stability and ensuring longevity. The type of foundation you choose depends on factors such as soil composition, shed size, and local building codes. Let’s explore two common foundation options and the steps involved in their construction:
Concrete Slab Foundation:
If you opt for a concrete slab foundation, follow these general steps:
- Site Preparation: Clear the designated area and ensure it’s level. Excavate the soil to the required depth, allowing space for the concrete slab and any necessary formwork.
- Formwork Installation: Construct formwork using wooden boards to create a mold for the concrete slab. Ensure the formwork is precisely aligned and securely braced.
- Reinforcement Placement: If necessary, place steel reinforcement mesh within the formwork to enhance the slab’s strength and durability.
- Concrete Pouring: Pour the concrete mixture into the formwork, spreading and leveling it with a screed or trowel. Ensure the slab’s surface is smooth and even.
- Curing and Finishing: Allow the concrete to cure for the recommended duration while protecting it from premature drying or disturbances. Once cured, finish the surface as desired.
Skid Foundation:
For a skid foundation, the process involves:
- Prepare Skids: Cut pressure-treated beams to the required length and lay them out parallel to each other, serving as the foundation’s base.
- Position and Level: Place concrete blocks or gravel beneath the skids to provide support and ensure level positioning.
- Anchor Skids: Secure the skids in place using anchor bolts or heavy-duty screws, ensuring they are firmly attached to the blocks or gravel.
- Add Floor Joists: Install floor joists perpendicular to the skids, providing the framework for the shed’s floor structure.
Regardless of the foundation type, meticulous attention to detail during construction is paramount. A well-built foundation sets the stage for a sturdy and durable shed that can withstand the test of time and environmental conditions.
Next, we’ll delve into the process of constructing the shed’s frame, a pivotal stage that forms the structural backbone of the entire building.
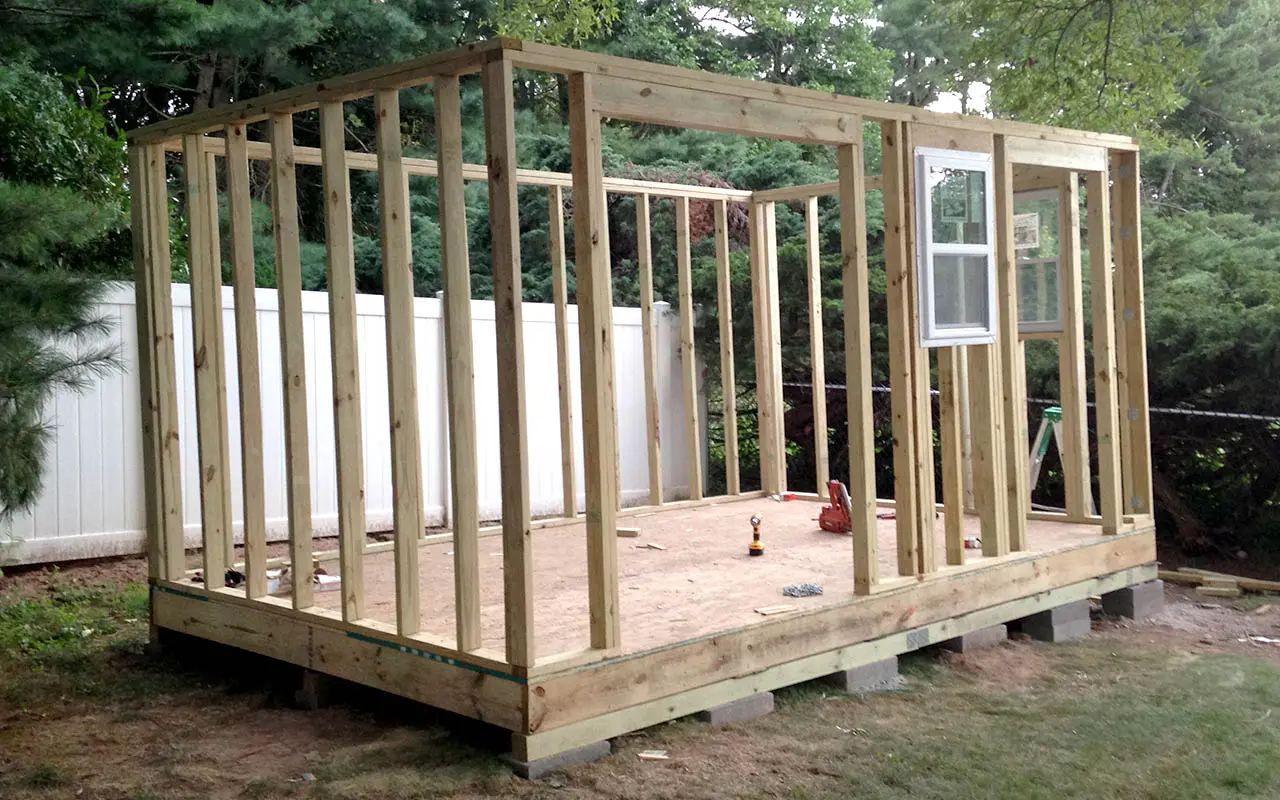
Constructing the Frame
With the foundation in place, it’s time to focus on constructing the frame, which forms the structural skeleton of your shed. The frame provides support for the walls, roof, and doors, dictating the shed’s overall strength and stability. Here’s a step-by-step guide to framing your shed:
Read more: How To Build A Pizza Oven From Scratch
1. Cut and Assemble the Lumber:
Measure and cut the lumber according to your shed’s design specifications. This will typically involve cutting studs, plates, and headers to the required lengths, ensuring precision and accuracy in your cuts.
2. Build the Wall Frames:
Assemble the wall frames on a level surface, laying out the bottom and top plates with the studs positioned at the specified intervals. Use framing nails or screws to secure the components, ensuring the frames are square and sturdy.
3. Install Door and Window Openings:
If your shed design includes doors and windows, frame out the respective openings within the wall frames, following the dimensions specified in your initial plan. This step prepares the frames for the installation of doors and windows at a later stage.
4. Construct the Roof Trusses:
If your shed features a pitched roof, construct the roof trusses according to the design specifications. Ensure the trusses are built accurately to maintain the structural integrity of the roof system.
Read more: How Build A Shed
5. Raise and Secure the Wall Frames:
With the wall frames and roof trusses assembled, raise the wall frames into position on the foundation, securing them in place with anchor bolts or framing anchors. Ensure the frames are plumb and aligned before fixing them securely.
6. Install the Roof Trusses:
Once the wall frames are in place, install the roof trusses, positioning and securing them according to the shed’s design. This step establishes the framework for the roof structure, setting the stage for the next phase of roofing installation.
By meticulously following these steps, you’ll successfully construct a sturdy and well-engineered frame for your shed. The frame lays the groundwork for the shed’s exterior cladding, roofing, and finishing touches, bringing you one step closer to completing your custom-built shed.
Adding Roofing and Siding
With the frame in place, it’s time to add the roofing and siding to enclose and protect your shed from the elements. The choice of roofing and siding materials can significantly impact the shed’s durability, aesthetics, and weather resistance. Let’s explore the essential steps for adding roofing and siding to your custom-built shed:
1. Roofing Installation:
When it comes to roofing, you have several options, including asphalt shingles, metal panels, or other suitable roofing materials. The installation process typically involves:
- Underlayment: Begin by laying down a weather-resistant underlayment to shield the shed’s interior from moisture and ensure a watertight seal.
- Shingle or Panel Installation: Depending on your chosen roofing material, proceed to install shingles or panels, starting from the bottom and working your way up the roof’s slope. Follow manufacturer guidelines for proper fastening and overlap.
- Flashing and Ridge Cap: Apply flashing around roof penetrations and install a ridge cap to provide a finished look while enhancing weather resistance.
Read more: How To Build A Wood Tool Shed From Pallets
2. Siding Application:
The siding not only enhances the shed’s visual appeal but also serves as a protective barrier against the elements. Common siding options include wood, vinyl, metal, or composite materials. The siding installation process involves:
- Sheathing Installation: Begin by installing a layer of sheathing, such as plywood or oriented strand board (OSB), over the exterior wall frames to provide a stable base for the siding.
- Siding Panels or Boards: Apply the chosen siding material, ensuring proper alignment and fastening according to manufacturer recommendations. Consider factors such as weather exposure and aesthetic preferences when selecting the siding pattern and orientation.
- Trim and Corner Installation: Complete the siding installation by adding trim pieces, corner boards, and other finishing details to enhance the shed’s visual appeal and weather resistance.
By carefully executing the roofing and siding installation, you’ll effectively shield your shed from the elements while adding aesthetic charm to the exterior. These components play a pivotal role in enhancing the shed’s functionality and visual appeal, bringing you closer to the completion of your custom-built outdoor structure.
Finishing Touches
As your custom-built shed nears completion, it’s time to focus on the finishing touches that will elevate its functionality, aesthetics, and overall appeal. These final steps add personality and practicality to your outdoor structure, turning it into a fully realized space that meets your specific needs. Let’s delve into the essential finishing touches for your shed:
1. Interior Organization:
Consider incorporating storage solutions, shelves, and workbenches to optimize the shed’s interior space. Customizing the interior layout to accommodate your tools, equipment, and supplies will enhance functionality and ensure efficient use of the available space.
2. Electrical and Lighting:
If you plan to use the shed as a workshop or hobby space, consider installing electrical outlets, lighting fixtures, and even a small electrical panel if necessary. Proper lighting and electrical access can significantly enhance the shed’s usability and comfort, especially during evening hours.
Read more: How To Build A Shed
3. Paint and Sealant:
Applying a fresh coat of paint to the exterior not only adds visual appeal but also provides protection against the elements. Choose a high-quality exterior paint that complements your property’s aesthetics while offering durability and weather resistance. Additionally, apply a suitable sealant to safeguard the wood from moisture and decay.
4. Ventilation and Climate Control:
Ensure adequate ventilation within the shed to prevent humidity buildup and maintain air circulation. Consider adding vents or windows that can be opened to regulate temperature and humidity, creating a comfortable environment for storage or work activities.
5. Landscaping and Pathways:
Enhance the shed’s surroundings by incorporating landscaping elements such as flower beds, shrubs, or pathways leading to the entrance. Thoughtful landscaping can seamlessly integrate the shed into your property’s overall aesthetic while adding a touch of charm to the outdoor space.
6. Personalized Details:
Add personal touches such as decorative accents, signage, or custom hardware to infuse the shed with your unique style. These small details can transform the shed into a personalized retreat or functional workspace that reflects your individuality.
By attending to these finishing touches, you’ll transform your custom-built shed into a fully functional, visually appealing, and personalized space that complements your property and lifestyle. These details elevate the shed from a simple outdoor structure to a valuable and cherished addition to your home.
Read more: How To Build A Bar Shed
Conclusion
Congratulations on successfully navigating the journey of building a shed from scratch! What began as a vision and a pile of materials has now transformed into a tangible and functional outdoor structure that complements your property and meets your specific needs. Throughout the process, you’ve embraced the role of a builder, craftsman, and designer, shaping every aspect of the shed to align with your vision and purpose.
As you stand back and admire the completed shed, take pride in the knowledge that you’ve not only constructed a practical space for storage, work, or relaxation but also honed your skills as a DIY enthusiast. The experience of building a shed from the ground up has likely equipped you with valuable insights, problem-solving abilities, and a sense of accomplishment that extends beyond the physical structure itself.
Moreover, your custom-built shed stands as a testament to your creativity, resourcefulness, and dedication to transforming ideas into reality. It’s a space where functionality meets aesthetics, where craftsmanship meets utility, and where your personal touch is infused into every detail.
As you move forward, remember that your shed is more than just a building; it’s a reflection of your ingenuity and a space where memories will be made, projects will be pursued, and dreams will take shape. Whether it serves as a workshop for your hobbies, a sanctuary for relaxation, or a haven for your gardening tools, your shed embodies the spirit of creativity and practicality.
With your custom-built shed now a cherished part of your property, may it continue to inspire you, serve you well, and stand as a testament to the power of vision, perseverance, and hands-on craftsmanship. Your journey of building a shed from scratch has not only added a valuable asset to your property but has also enriched your life with the satisfaction of creating something truly remarkable.
So, as you step into your completed shed, may it be a space where your ideas flourish, your passions thrive, and your creativity knows no bounds. Here’s to the journey you’ve undertaken, the skills you’ve honed, and the shed you’ve brought to life from a simple idea to a tangible reality. Well done!
Frequently Asked Questions about How To Build A Shed From Scratch
Was this page helpful?
At Storables.com, we guarantee accurate and reliable information. Our content, validated by Expert Board Contributors, is crafted following stringent Editorial Policies. We're committed to providing you with well-researched, expert-backed insights for all your informational needs.


0 thoughts on “How To Build A Shed From Scratch”