Home>Gardening & Outdoor>Outdoor Structures>How To Build An Inexpensive Shed
Outdoor Structures
How To Build An Inexpensive Shed
Modified: February 23, 2024
Learn how to build a cost-effective outdoor shed with our step-by-step guide. Create durable and practical outdoor structures for less.
(Many of the links in this article redirect to a specific reviewed product. Your purchase of these products through affiliate links helps to generate commission for Storables.com, at no extra cost. Learn more)
**
Introduction
**
Are you in need of some extra storage space or a cozy workshop but hesitant to break the bank on a pre-built shed? Building your own shed can be a rewarding and cost-effective endeavor. Not only does it allow you to customize the design to suit your needs, but it also provides a sense of accomplishment. Whether you're a seasoned DIY enthusiast or just starting to dabble in construction projects, this guide will walk you through the process of building an inexpensive shed from the ground up.
Constructing a shed doesn't have to be an overwhelming task. With careful planning, resourcefulness, and a bit of elbow grease, you can create a functional and visually appealing structure without draining your wallet. From selecting the perfect location for your shed to adding the finishing touches, each step presents an opportunity to infuse your personal touch into the project. So, roll up your sleeves and get ready to embark on a fulfilling journey of building your very own budget-friendly shed.
Key Takeaways:
- Building your own shed is a cost-effective and rewarding endeavor, allowing you to customize the design and create a functional space without breaking the bank.
- Careful planning, resourcefulness, and attention to detail are key to building an inexpensive shed that meets your specific needs and reflects your unique style.
Read more: How Build A Shed
Planning and Preparation
Before diving into the construction process, meticulous planning is key to ensuring a smooth and successful shed-building venture. Begin by envisioning the purpose of your shed. Will it primarily serve as storage for garden tools, outdoor equipment, or as a workshop for DIY projects? Determining its intended use will guide the design and size considerations.
Next, familiarize yourself with the local building codes and regulations. Contact your municipal planning department or local authorities to obtain the necessary permits and ensure compliance with zoning laws. This step is crucial to avoid potential legal issues down the road.
With a clear understanding of your shed’s purpose and the green light from local authorities, it’s time to create a detailed plan or blueprint. While professional drafting skills are not required, a rough sketch outlining the shed’s dimensions, door and window placements, and overall layout will serve as a valuable reference throughout the construction process.
As you plan, take stock of the tools and equipment needed for the project. Basic carpentry tools such as a hammer, circular saw, level, tape measure, and power drill are essential. Additionally, consider the materials required, including lumber, nails, roofing materials, and any optional features such as windows or skylights.
Lastly, consider the timeline for your project. While building an inexpensive shed is a cost-effective option, it still requires an investment of time. Set realistic milestones and allocate sufficient time for each phase of the construction process. By taking the time to plan and prepare meticulously, you’ll lay a solid foundation for the construction of your budget-friendly shed.
Choosing the Right Location
When it comes to building a shed, the location is more than just a matter of convenience—it significantly impacts the shed’s functionality and longevity. Start by surveying your property to identify an ideal spot for your new structure. Consider factors such as sunlight exposure, terrain, and proximity to existing structures.
Optimal sunlight exposure is crucial for sheds used as workshops or storage spaces for plants and gardening tools. Select a location that receives ample natural light throughout the day, as this not only enhances visibility within the shed but also promotes a healthier environment for stored items.
Furthermore, assess the terrain and soil conditions. A level surface is essential for the shed’s stability and longevity. If the chosen area is uneven, consider leveling the ground or using a foundation to ensure a stable base for the shed.
Proximity to existing structures, such as your home or garage, should also be taken into account. Ensure that the chosen location allows for easy access and convenience. Additionally, consider the shed’s visual impact on your property and neighborhood, aiming for a placement that complements the overall aesthetics.
Before finalizing the location, be mindful of local building codes and regulations. Some areas have specific setback requirements, dictating the minimum distance between the shed and property lines, fences, or other structures. Adhering to these regulations is essential to avoid potential conflicts and ensure a smooth building process.
By carefully selecting the right location for your shed, you can maximize its utility, longevity, and visual appeal. Take the time to assess various factors and envision how the shed will integrate with your outdoor space. A well-chosen location sets the stage for a successful and harmonious addition to your property.
Gathering Materials
With the location secured and the plans in place, it’s time to gather the materials needed to bring your budget-friendly shed to life. A well-thought-out approach to sourcing materials can significantly impact the overall cost and quality of the project.
Start by creating a detailed list of required materials based on your shed’s design and dimensions. When it comes to lumber, consider using pressure-treated wood for the foundation and any components in direct contact with the ground to prevent decay and prolong the shed’s lifespan. For the frame and siding, standard dimensional lumber such as 2x4s and exterior-grade plywood are cost-effective and readily available options.
When it comes to roofing, asphalt shingles are a popular and affordable choice. Alternatively, metal roofing offers durability and requires minimal maintenance, making it a cost-effective long-term investment. Factor in the necessary hardware such as nails, screws, and brackets, ensuring that they are suitable for outdoor use to withstand the elements.
Consider salvaging materials whenever possible. Reclaimed lumber, windows, and doors can add character to your shed while reducing costs and environmental impact. Check local classifieds, online marketplaces, or building material reuse centers for potential bargains on gently used or surplus materials.
For those seeking additional savings, consider purchasing materials in bulk or opting for factory seconds. While these materials may have minor blemishes or imperfections, they often offer substantial cost savings without compromising structural integrity.
Lastly, don’t overlook the importance of safety equipment. Invest in protective gear such as safety goggles, gloves, and a dust mask to ensure a safe and comfortable working environment throughout the construction process.
By thoughtfully sourcing materials and exploring cost-effective options, you can minimize expenses without sacrificing the quality and durability of your shed. With a carefully curated selection of materials, you’re ready to move on to the next phase of the construction process.
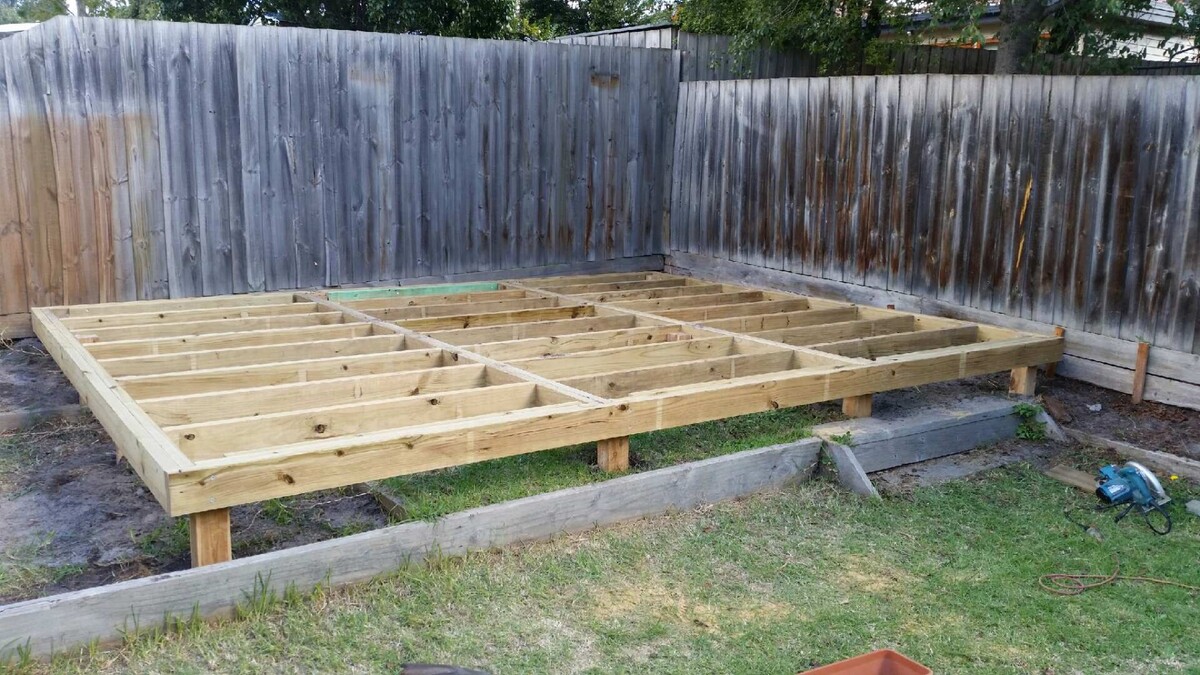
Building the Foundation
The foundation serves as the anchor of your shed, providing stability and protection against moisture and shifting ground. A well-constructed foundation is essential for ensuring the longevity of your budget-friendly shed.
Begin by clearing and leveling the ground at the chosen location. If the terrain is uneven, consider using a shovel, rake, and a long straight board to create a level surface. For added stability and moisture protection, consider laying down a layer of gravel to promote drainage and prevent water from accumulating beneath the shed.
Next, you’ll need to decide on the type of foundation suitable for your shed. Concrete piers, concrete blocks, or a poured concrete slab are popular options. Concrete piers offer a cost-effective and relatively simple foundation solution, providing support for the shed’s floor joists. Alternatively, concrete blocks can be arranged to create a stable base for the shed, especially on level ground.
If you opt for a poured concrete slab, ensure that it is properly reinforced with rebar or wire mesh to enhance its strength and durability. While a concrete slab requires more effort and resources, it offers a solid and long-lasting foundation for your shed.
For those seeking an even more budget-friendly approach, consider using pressure-treated skids or runners as the foundation. These horizontal beams, placed directly on the ground, provide a stable base for the shed to rest upon. Ensure that the skids are level and properly anchored to the ground to prevent shifting over time.
Regardless of the foundation type, it’s crucial to ensure that it is level and square to provide a solid base for the shed’s frame and floor. Take the time to double-check the measurements and make any necessary adjustments before proceeding to the next phase of construction.
By dedicating attention to building a sturdy and level foundation, you’ll establish a reliable base for your shed, setting the stage for the subsequent construction phases. With the foundation in place, you’re ready to elevate your shed-building project to new heights.
Consider using salvaged or repurposed materials such as old pallets, windows, and doors to build an inexpensive shed. This can help reduce the overall cost of the project while still creating a functional and durable structure.
Read more: How To Build A Shed
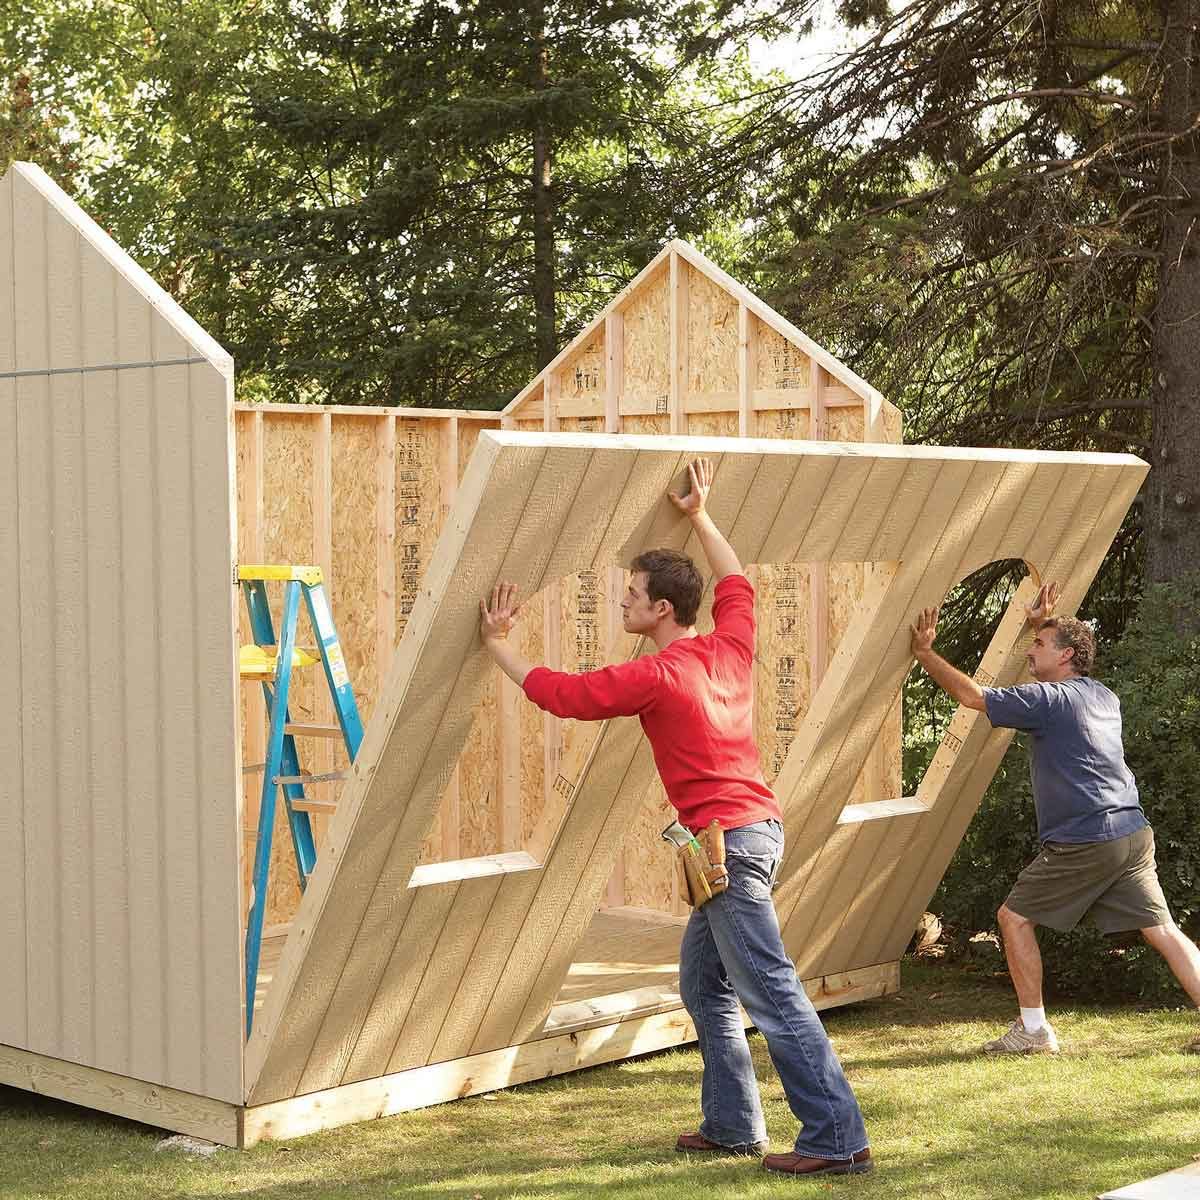
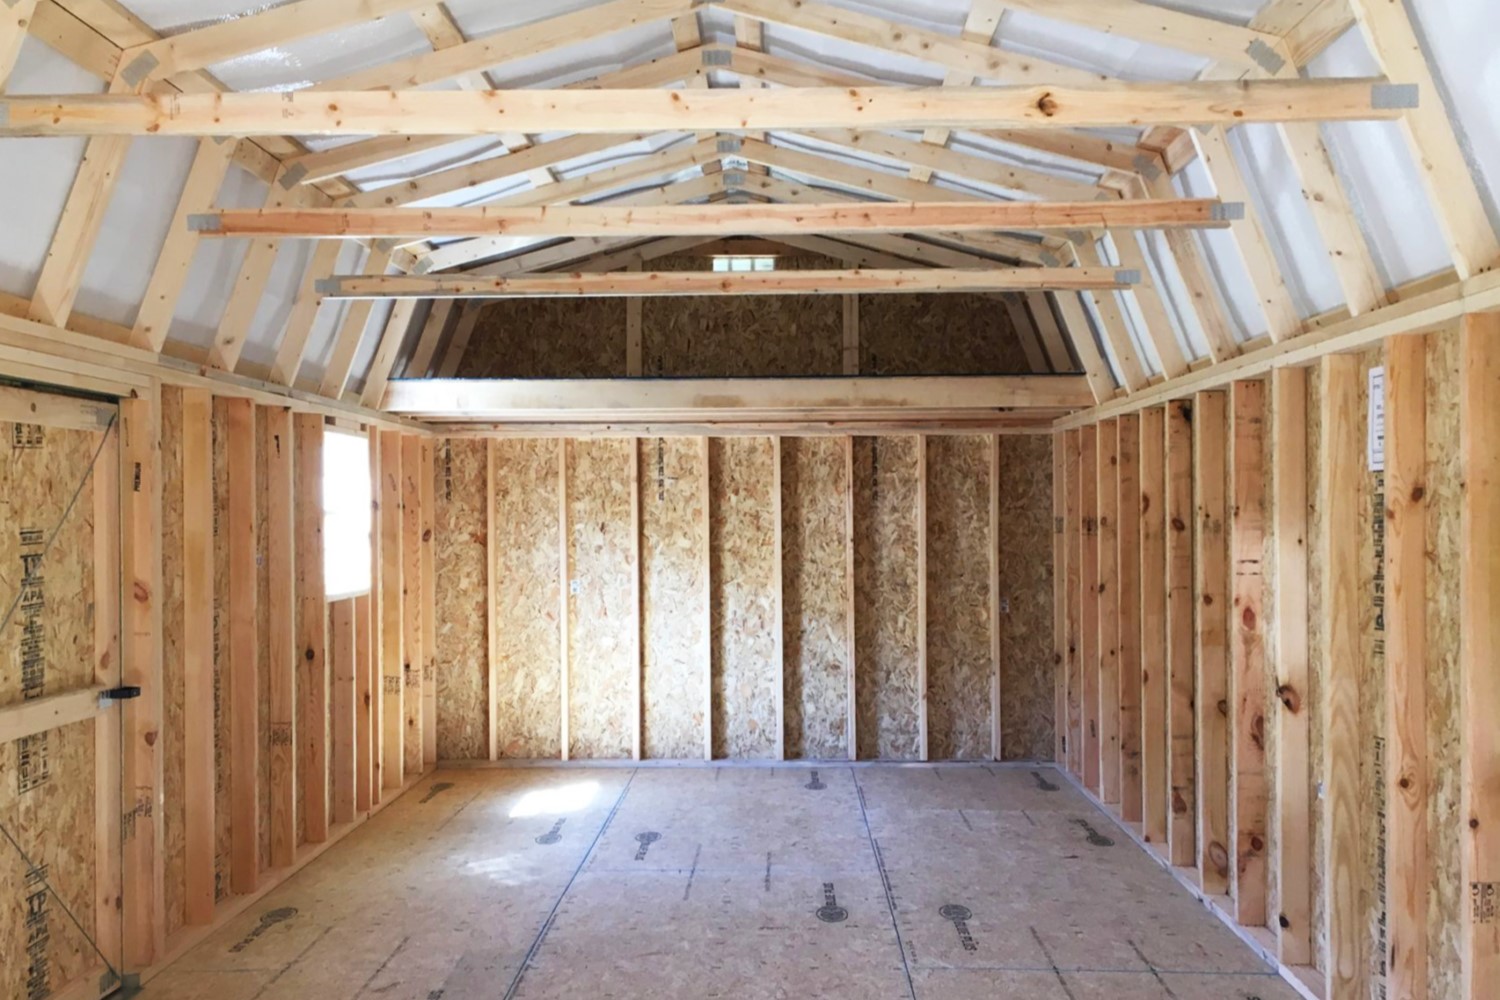
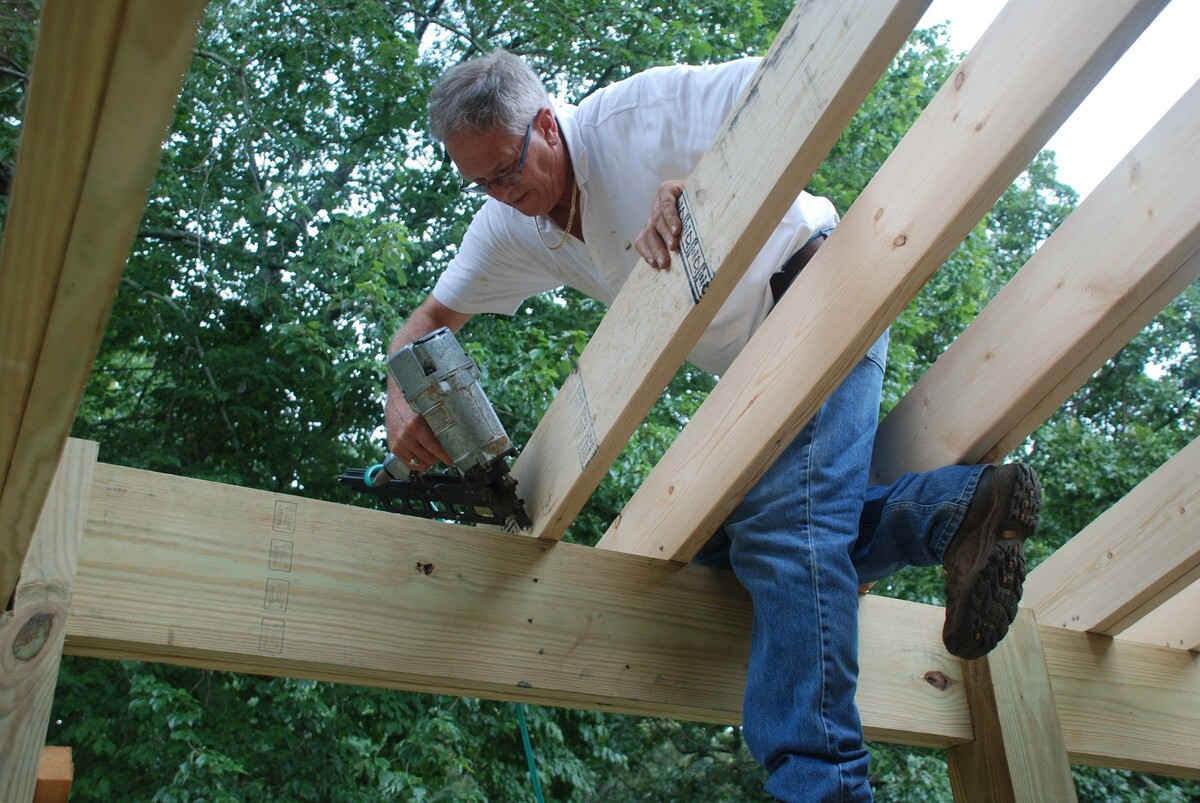
Constructing the Frame
With the foundation laid, it’s time to embark on the exciting phase of constructing the shed’s frame. The frame serves as the structural backbone of the shed, providing support for the walls, roof, and doors. By following a carefully planned approach, you can build a sturdy frame that forms the core of your budget-friendly shed.
Begin by assembling the necessary tools and materials, including the pre-cut lumber specified in your shed plans. Take precise measurements and use a square to ensure that the frame components are aligned and perpendicular. When cutting the lumber, be mindful of creating clean and accurate cuts to facilitate seamless assembly.
For the walls, construct the frame using 2×4 studs, spaced according to your shed’s design specifications. Secure the studs together using nails or screws, ensuring that the corners are square and the frame is structurally sound. If your shed design includes windows or doors, frame these openings accordingly, taking care to provide adequate support for these features.
As you progress, consider reinforcing the frame with diagonal bracing to enhance its stability and resistance to wind forces. These braces, often referred to as “corner bracing,” are typically installed at the corners of the frame to prevent shifting and ensure structural integrity.
For the roof trusses, careful attention to detail is paramount. Construct the trusses according to your shed plans, ensuring that they are identical in size and shape. Properly constructed trusses are essential for ensuring a strong and reliable roof structure. If you’re new to truss construction, consider seeking guidance from online resources or experienced DIY enthusiasts to ensure accuracy.
Throughout the frame construction process, periodically check for squareness, level, and alignment to avoid potential issues down the line. A well-constructed and precisely aligned frame sets the stage for the subsequent phases of shed construction, ensuring a smooth and trouble-free assembly process.
By meticulously constructing the shed’s frame, you’re laying the foundation for a durable and reliable structure. Attention to detail and precision during this phase will pay dividends as you progress through the construction process, bringing you one step closer to realizing your vision of a budget-friendly shed.
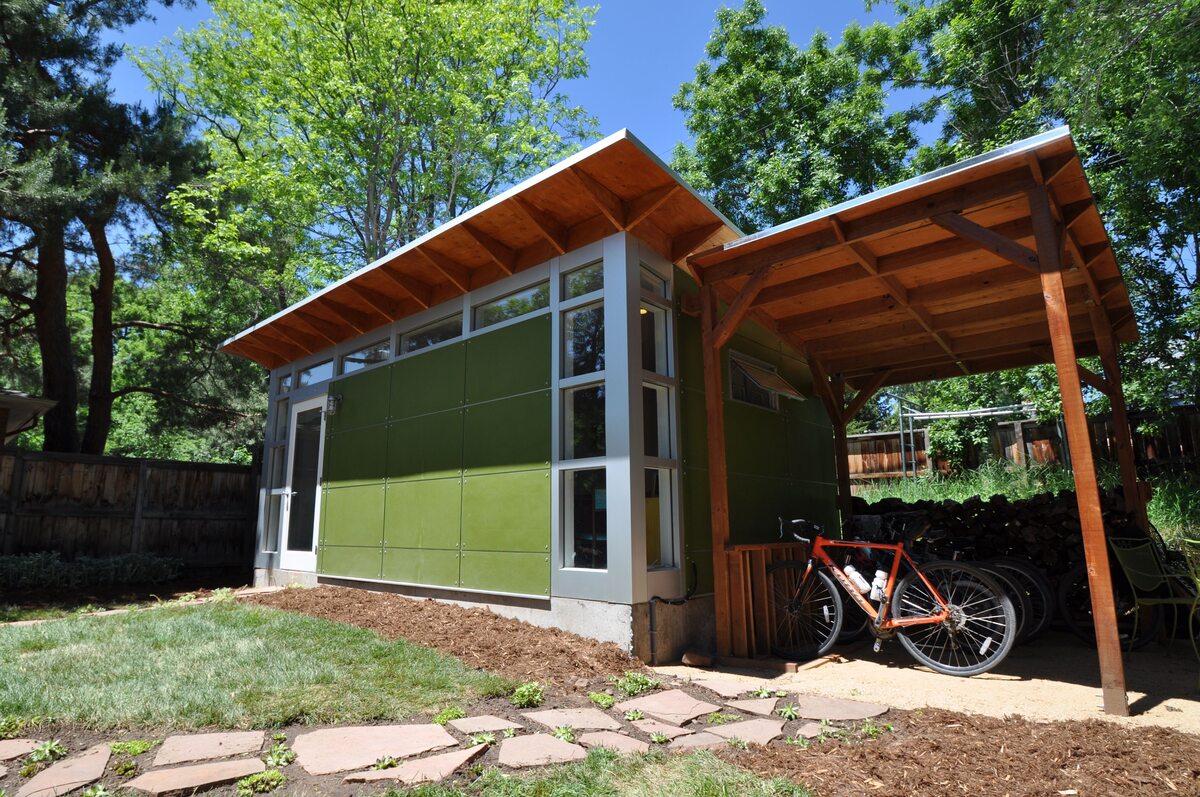
Adding Siding and Roofing
With the frame in place, it’s time to shift your focus to adding the siding and roofing to your budget-friendly shed. These elements not only contribute to the shed’s visual appeal but also provide essential protection against the elements, ensuring that your shed remains a functional and inviting space for years to come.
When it comes to siding, a popular and cost-effective option is exterior-grade plywood. Available in various thicknesses, plywood siding offers durability and ease of installation. Begin by measuring and cutting the plywood panels to fit the dimensions of the shed walls, ensuring a snug and uniform fit. Secure the panels to the frame using galvanized nails or screws, spacing them according to your design preferences.
If you’re aiming for a more traditional look, consider using T1-11 siding, which features a textured appearance reminiscent of overlapping planks. T1-11 siding offers a classic aesthetic and can be stained or painted to complement your outdoor space’s overall design.
When it comes to roofing, asphalt shingles are a popular and budget-friendly choice. Available in a variety of colors, asphalt shingles provide durable and weather-resistant protection for your shed. Begin by installing a drip edge along the eaves of the roof to prevent water from seeping under the shingles. Next, apply an underlayment to provide an additional layer of protection against moisture. Finally, install the shingles according to the manufacturer’s instructions, starting from the bottom and working your way up in overlapping rows.
For those seeking a low-maintenance and long-lasting roofing solution, consider metal roofing. Metal roofing offers exceptional durability and weather resistance, making it a cost-effective long-term investment. Additionally, metal roofing is available in a variety of styles, including corrugated panels and standing seam designs, allowing you to customize the shed’s aesthetic to suit your preferences.
Throughout the installation of siding and roofing, prioritize weatherproofing and attention to detail. Properly installed siding and roofing not only enhance the shed’s visual appeal but also provide essential protection against the elements, ensuring that your budget-friendly shed remains a functional and inviting space for years to come.
By adding siding and roofing to your shed, you’re one step closer to completing the construction process and bringing your vision of a budget-friendly shed to fruition. With careful attention to detail and a focus on quality, your shed will soon stand as a testament to your craftsmanship and resourcefulness.
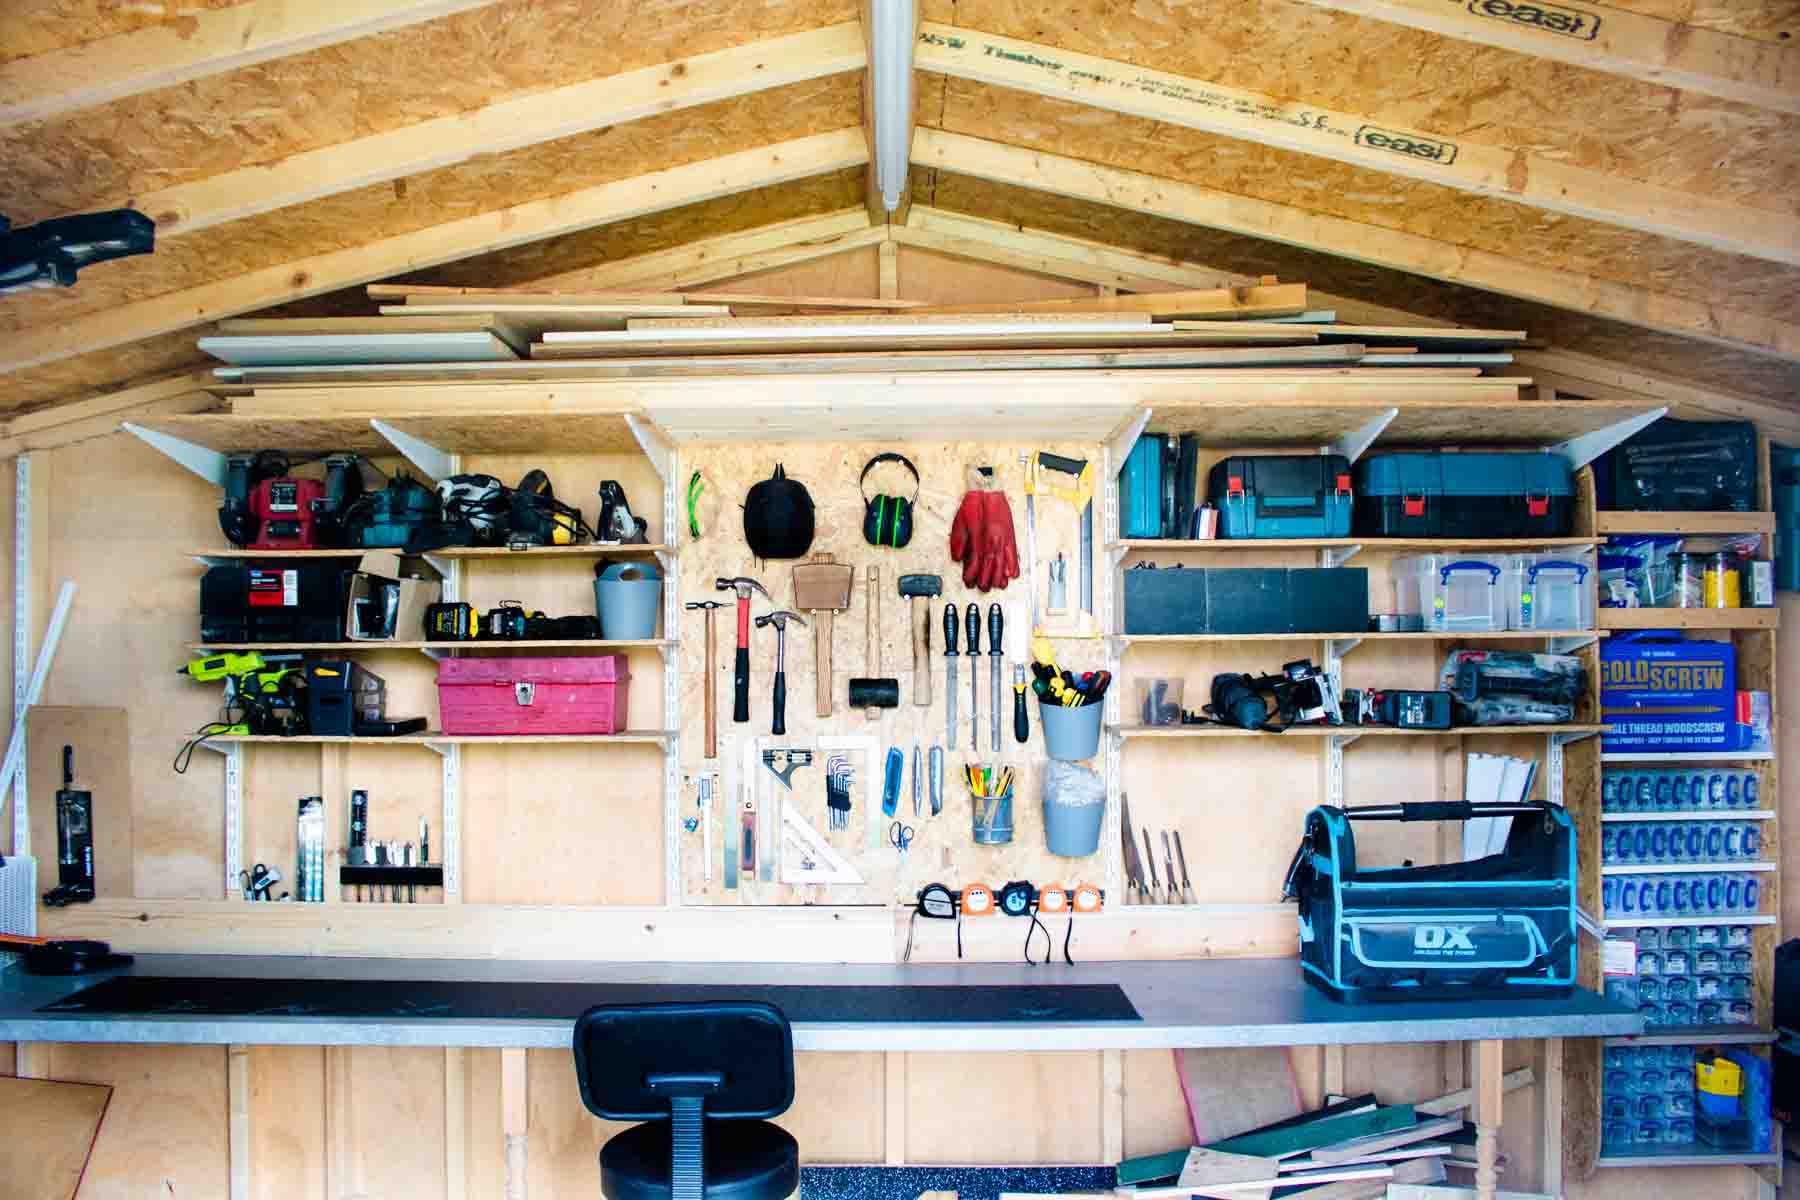
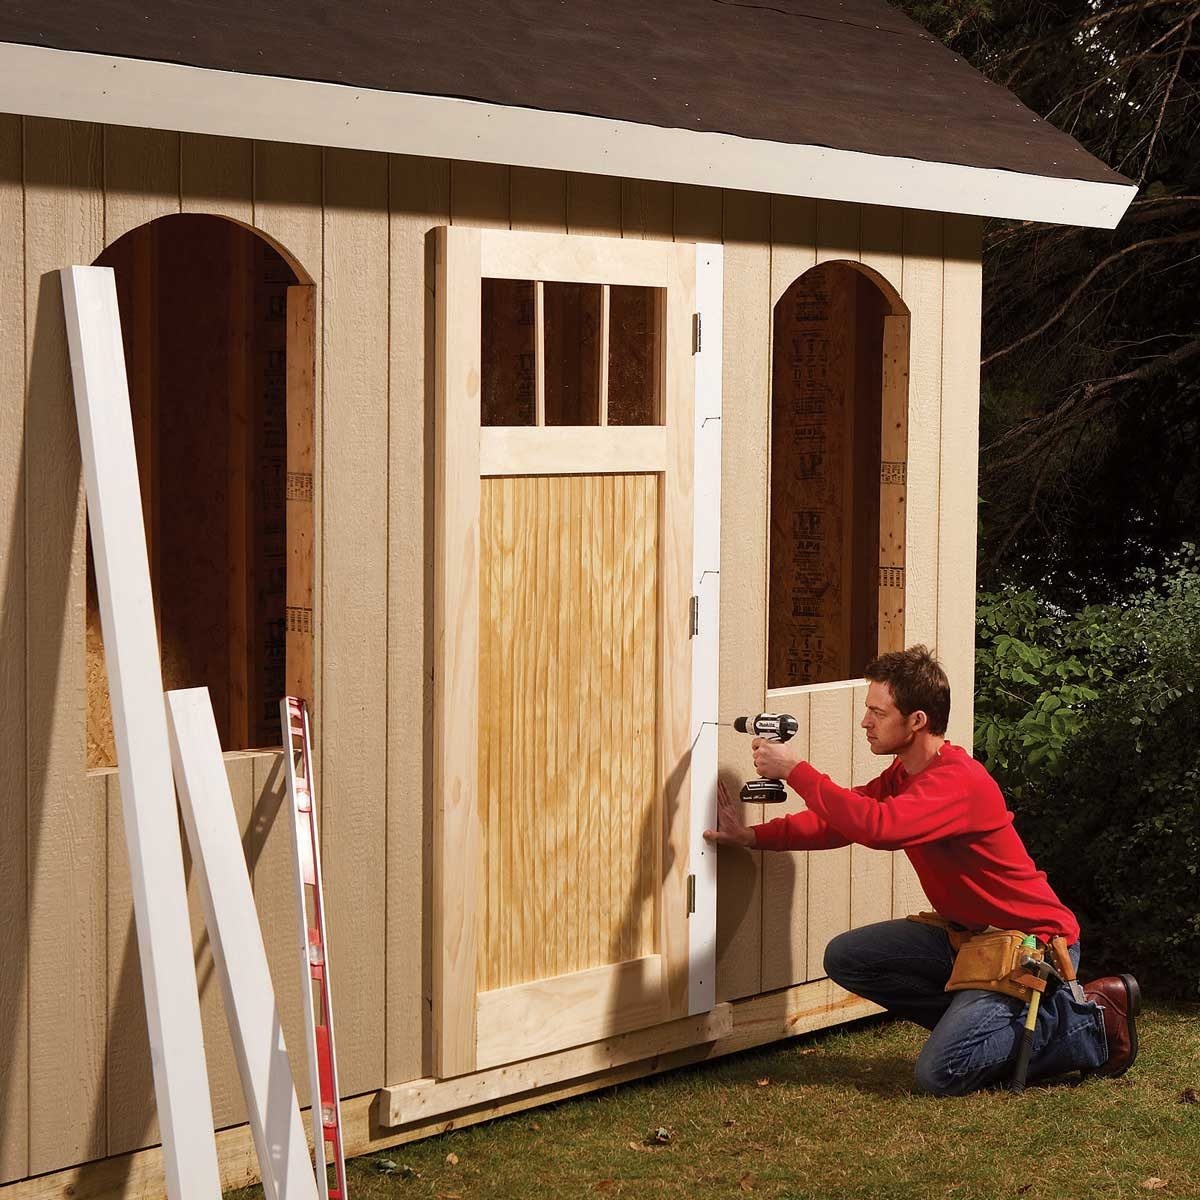
Finishing Touches
As you near the completion of your budget-friendly shed, it’s time to turn your attention to the finishing touches that will elevate its functionality, aesthetics, and overall appeal. By adding thoughtful details and addressing essential considerations, you can transform your shed into a welcoming and practical space that meets your specific needs.
One of the key finishing touches is the installation of doors and windows. Choose doors that are sturdy, weather-resistant, and complement the overall design of your shed. Additionally, consider adding windows to introduce natural light and ventilation. When installing windows, ensure they are properly sealed to prevent water infiltration and maintain energy efficiency.
For the interior, consider adding shelving, hooks, and storage solutions to maximize the shed’s organizational potential. Customizable storage options allow you to optimize the space for storing tools, equipment, and other items, ensuring easy access and efficient utilization of the shed’s interior.
Furthermore, consider applying a protective finish to the exterior surfaces of the shed. A coat of high-quality exterior paint or stain not only enhances the shed’s visual appeal but also provides essential protection against weathering, UV exposure, and moisture. Be sure to choose a finish that is suitable for the type of siding used and complements the surrounding landscape.
To enhance the shed’s functionality, consider incorporating electrical wiring if your shed will serve as a workshop or hobby space. Consult a qualified electrician to ensure that the wiring is safely installed and complies with local building codes and regulations. Access to electricity can significantly expand the shed’s utility and convenience for various activities.
Finally, consider landscaping around the shed to integrate it seamlessly into your outdoor space. Planting shrubs, flowers, or creating a stone pathway can enhance the shed’s visual appeal and create a harmonious connection with the surrounding environment.
By attending to these finishing touches, you’ll bring your budget-friendly shed to its full potential, creating a space that is not only functional but also visually appealing and tailored to your specific needs. Each detail contributes to the shed’s overall charm and functionality, making it a valuable addition to your property.
Conclusion
Congratulations on successfully completing the construction of your budget-friendly shed! What began as a vision has now materialized into a functional and personalized space that adds value to your property. Throughout the process, you’ve demonstrated resourcefulness, craftsmanship, and a commitment to creating a structure that meets your specific needs without breaking the bank.
Building an inexpensive shed is not just about saving money; it’s about embracing the satisfaction of hands-on construction and the pride of creating a space that reflects your unique style and preferences. By taking on this project, you’ve not only expanded your DIY skills but also gained a deeper appreciation for the value of thoughtful planning and attention to detail.
As you step back and admire your newly constructed shed, take a moment to reflect on the journey you’ve undertaken. From meticulous planning and preparation to the hands-on construction phases, each step has contributed to the realization of your vision. Whether it’s a storage space for outdoor equipment, a workshop for creative projects, or a tranquil retreat, your budget-friendly shed now stands as a testament to your ingenuity and determination.
Remember that the completion of the construction phase is just the beginning of the shed’s journey. As you begin to utilize the space, continue to make it your own by adding personalized touches, organizing the interior, and integrating it seamlessly into your outdoor environment. Your shed is a versatile canvas waiting for your creativity and practicality to shape it into a space that enhances your lifestyle.
Furthermore, consider sharing your experience with others who may be inspired to embark on their own shed-building journey. Your insights, tips, and lessons learned can serve as valuable guidance for fellow DIY enthusiasts seeking to create their own budget-friendly structures.
As you move forward, may your budget-friendly shed bring you joy, productivity, and a sense of accomplishment. Embrace the possibilities it offers and revel in the satisfaction of having built a practical and personalized space from the ground up. Your shed stands as a testament to your resourcefulness and creativity, enriching your property and your life in countless ways.
With your budget-friendly shed now a cherished part of your property, take pride in the knowledge that you’ve not only built a structure but also created a space where memories will be made, projects will be pursued, and dreams will take shape.
Frequently Asked Questions about How To Build An Inexpensive Shed
Was this page helpful?
At Storables.com, we guarantee accurate and reliable information. Our content, validated by Expert Board Contributors, is crafted following stringent Editorial Policies. We're committed to providing you with well-researched, expert-backed insights for all your informational needs.


0 thoughts on “How To Build An Inexpensive Shed”