Home>Gardening & Outdoor>Outdoor Structures>How To Build Lean To Off A Shed
Outdoor Structures
How To Build Lean To Off A Shed
Modified: May 6, 2024
Learn how to build a lean-to off a shed with our expert outdoor structures guide. Create a functional and stylish addition to your outdoor space.
(Many of the links in this article redirect to a specific reviewed product. Your purchase of these products through affiliate links helps to generate commission for Storables.com, at no extra cost. Learn more)
Introduction
Building a lean-to off a shed is a fantastic way to expand your outdoor storage space while enhancing the functionality and aesthetic appeal of your property. Whether you need extra room for gardening tools, outdoor equipment, or simply wish to create a cozy sheltered area, a lean-to can be a practical and visually pleasing addition to your shed.
In this comprehensive guide, we will walk you through the process of constructing a lean-to off a shed, from selecting the optimal location to adding the finishing touches. You will learn about the essential materials required, the necessary preparations, and the step-by-step building process. By the end of this article, you will have the knowledge and confidence to embark on this rewarding DIY project.
So, roll up your sleeves, gather your tools, and let's delve into the exciting world of lean-to construction!
Key Takeaways:
- Building a lean-to off a shed expands storage space and adds charm to your property. Choose the right location, gather materials, and follow the step-by-step process for a successful DIY project.
- Finishing touches like paint, lighting, and landscaping enhance the functionality and visual appeal of your lean-to. Enjoy the rewards of your creativity and dedication to outdoor living!
Choosing the Right Location
Before embarking on the construction of a lean-to off your shed, it’s crucial to carefully select the optimal location. The right placement will not only enhance the functionality of the lean-to but also complement the overall aesthetics of your outdoor space.
Here are some key factors to consider when choosing the location:
- Orientation: Assess the direction of sunlight throughout the day. Ideally, the lean-to should be positioned to maximize natural light while providing adequate shade during the hottest hours. Consider the prevailing wind direction to minimize exposure to strong gusts.
- Accessibility: Determine the accessibility of the lean-to from your shed and the surrounding area. It should be conveniently located for easy access to the items stored within.
- Drainage: Ensure that the chosen location has proper drainage to prevent water accumulation, especially during heavy rainfall. Proper grading and drainage will protect the integrity of the lean-to and its contents.
- Visual Harmony: Take into account the visual impact of the lean-to on your property. Consider how it will blend with the existing structures and landscaping, aiming for a harmonious and cohesive appearance.
Once you have carefully evaluated these factors, you can confidently proceed to the next steps, knowing that your lean-to will be strategically positioned to serve its intended purpose and enhance the overall appeal of your outdoor space.
Gathering Materials
Now that you have chosen the perfect location for your lean-to, it’s time to gather the essential materials needed for the construction. Ensuring that you have all the necessary components in advance will streamline the building process and prevent unnecessary delays. Here’s a comprehensive list of materials you will likely need:
- Lumber: Select high-quality pressure-treated lumber for the frame and support beams. The specific dimensions will depend on the size of your lean-to, so be sure to calculate the required quantities accurately.
- Roofing Materials: Choose durable roofing materials such as metal panels, asphalt shingles, or polycarbonate sheets. Consider the climate and weather conditions in your area when selecting the most suitable option.
- Fasteners: Stock up on galvanized screws, nails, and other fastening hardware to securely assemble the structure.
- Concrete and Gravel: If your lean-to will have a concrete foundation or footings, ensure you have the necessary concrete mix and gravel for the installation.
- Tools: Gather a comprehensive set of tools including a circular saw, hammer, drill with bits, level, measuring tape, and a sturdy ladder. Having the right tools at your disposal will make the construction process more efficient.
- Protective Gear: Prioritize safety by obtaining protective gear such as gloves, safety glasses, and a dust mask. These items are essential for safeguarding yourself during the construction phase.
By procuring these materials in advance, you can set the stage for a smooth and organized construction process. Additionally, it’s advisable to double-check the quantities and specifications of the materials to avoid any last-minute surprises. With your materials at the ready, you’re one step closer to bringing your lean-to vision to life.
Preparing the Area
Before commencing the construction of your lean-to, it’s vital to prepare the designated area to ensure a solid foundation and optimal structural integrity. This preparatory phase sets the stage for a successful and long-lasting addition to your shed. Here’s a step-by-step guide to preparing the area:
- Clearing and Leveling: Begin by clearing the area of any debris, vegetation, or obstacles that may impede the construction process. Once cleared, assess the ground for levelness. If the ground is not level, consider grading the area or adding fill to create a flat and stable surface.
- Marking the Layout: Use stakes and string to outline the dimensions and layout of the lean-to. This visual guide will help you visualize the final placement and ensure that the structure aligns with your initial plans.
- Excavation (If Applicable): If your lean-to will have a concrete foundation or footings, you will need to excavate the marked area to the required depth. Be sure to follow local building codes and guidelines for the proper depth and dimensions of the foundation.
- Installing Footings or Piers: If your lean-to will have footings or piers, carefully follow the recommended installation process, ensuring that they are accurately positioned and securely anchored in place.
- Applying Weed Barrier (Optional): Consider laying a weed barrier fabric to prevent weed growth beneath the lean-to. This additional step can help maintain a tidy and low-maintenance area around the structure.
By meticulously preparing the area, you are laying a solid groundwork for the construction phase. This careful attention to detail will contribute to the stability and longevity of your lean-to, ensuring that it stands the test of time while providing reliable functionality and visual appeal.
When building a lean-to off a shed, make sure to properly anchor the lean-to to the shed to ensure stability. Use pressure-treated lumber for the frame to prevent rot and decay.
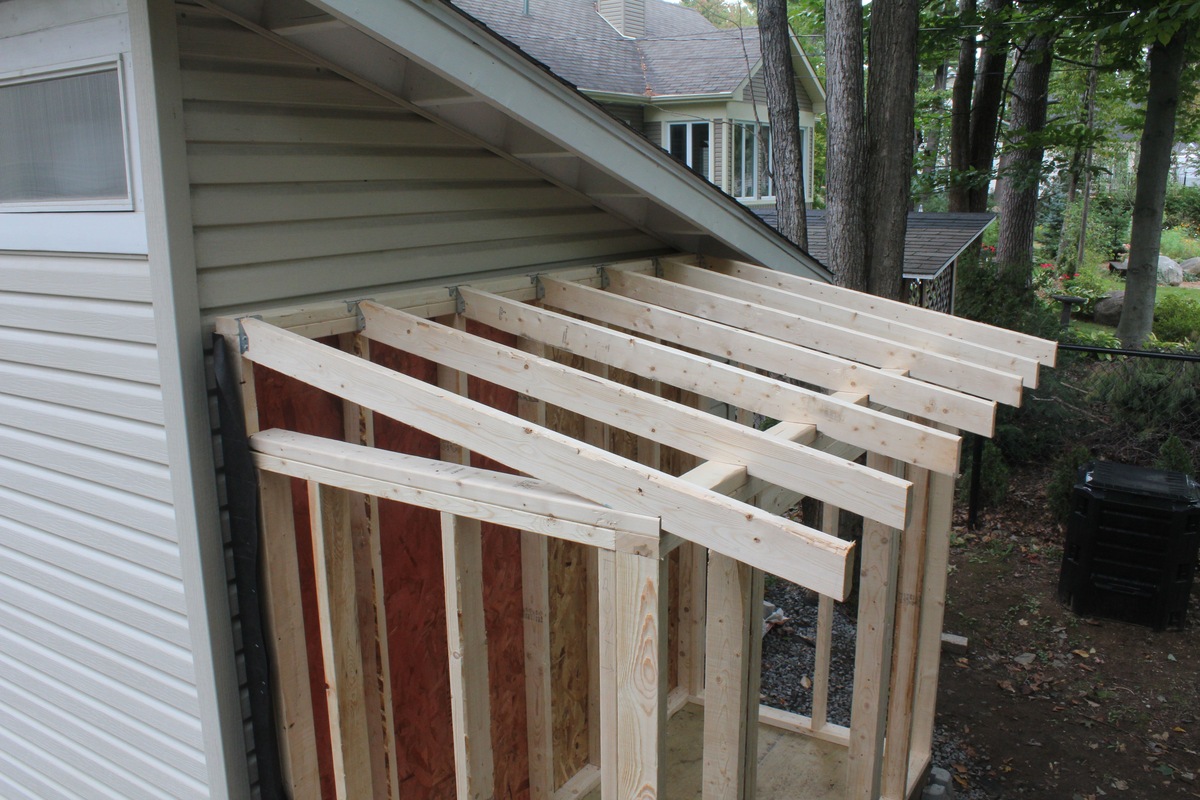
Building the Lean To
With the location chosen, materials gathered, and area prepared, you are now ready to embark on the exciting phase of building your lean-to. This step-by-step process will guide you through the construction, ensuring that each stage is executed with precision and attention to detail.
- Assembling the Frame: Begin by constructing the frame of the lean-to using the pressure-treated lumber. Follow your predetermined measurements and plans, ensuring that the frame is sturdy and well-secured to the existing shed. Use a level to guarantee that the frame is perfectly horizontal and plumb.
- Installing Support Beams: Position and secure the support beams at regular intervals along the length of the lean-to. These beams will provide essential structural support for the roofing materials and contribute to the overall stability of the structure.
- Attaching Roofing Materials: Once the frame and support beams are in place, it’s time to install the selected roofing materials. Whether you opt for metal panels, shingles, or polycarbonate sheets, ensure that they are securely fastened and properly sealed to prevent water infiltration.
- Adding Gutters and Downspouts (Optional): Consider incorporating gutters and downspouts to efficiently manage rainwater runoff from the lean-to roof. Proper drainage will protect the surrounding area and prevent water-related issues.
- Applying Finishing Touches: To enhance the visual appeal of your lean-to, consider adding finishing touches such as trim work, paint, or decorative elements. These details can elevate the aesthetics of the structure and integrate it seamlessly with the existing shed.
Throughout the construction process, prioritize safety measures, and take your time to ensure each step is completed accurately. By following this systematic approach, you will witness your lean-to taking shape, evolving from a conceptual design to a tangible and functional addition to your outdoor space.
Adding Finishing Touches
As you near the completion of your lean-to construction, adding the finishing touches will not only enhance the visual appeal of the structure but also contribute to its functionality and longevity. These final details will elevate the overall aesthetic and ensure that your lean-to seamlessly integrates with your existing shed and outdoor environment.
- Paint or Stain: Consider applying a coat of paint or stain to the exterior surfaces of the lean-to. Choose a color that complements the existing shed and blends harmoniously with the surroundings. This protective finish will also safeguard the wood from weathering and deterioration.
- Sealing Gaps and Joints: Inspect the lean-to for any gaps or joints that may require sealing to prevent water infiltration and drafts. Use a suitable sealant to ensure that the structure is weather-tight and resistant to the elements.
- Adding Lighting: Enhance the functionality and ambiance of the lean-to by incorporating lighting fixtures. Whether it’s overhead lighting for practical tasks or decorative lighting for evening gatherings, strategically placed fixtures can transform the space.
- Organizational Features: Install shelves, hooks, or storage solutions within the lean-to to maximize its utility. These organizational features will help keep the space tidy and efficiently store gardening tools, outdoor equipment, or other items.
- Landscaping and Softscaping: Integrate landscaping elements around the lean-to to soften its edges and create a cohesive transition with the surrounding environment. Consider planting shrubs, flowers, or ornamental grasses to add natural beauty to the area.
By attending to these finishing touches, you will not only refine the visual appeal of your lean-to but also enhance its functionality and integration within your outdoor space. Each detail contributes to the overall character and usability of the structure, ensuring that it becomes a valuable and harmonious addition to your property.
Conclusion
Congratulations on successfully completing the construction of your lean-to off a shed! This rewarding endeavor has not only expanded your outdoor storage capacity but has also added a charming and functional space to your property. As you stand back and admire the fruits of your labor, it’s essential to reflect on the journey and the transformation that has taken place.
By carefully choosing the location, gathering the necessary materials, and meticulously preparing the area, you have laid a solid foundation for the construction process. The step-by-step building phase allowed you to witness your vision materialize, as the frame, roofing, and finishing touches came together to form a cohesive and practical structure.
More than just a physical addition to your property, the lean-to represents your creativity, resourcefulness, and dedication to enhancing your outdoor space. It now stands as a testament to your DIY prowess and your ability to transform ideas into tangible, functional realities.
As you enjoy the benefits of your new lean-to, whether it’s sheltering gardening tools, providing a cozy nook for relaxation, or simply adding visual interest to your shed, take pride in the craftsmanship and attention to detail that have gone into its creation.
Remember, the lean-to is not just a structure; it’s a reflection of your passion for outdoor living and your commitment to making the most of your surroundings. Embrace the possibilities it offers and continue to infuse it with your personal touches as it becomes an integral part of your outdoor lifestyle.
May your lean-to bring you joy, functionality, and a sense of accomplishment for years to come. Cheers to your successful venture into lean-to construction!
Ready to dive deeper into the world of home improvement and unique designs? If you enjoyed learning about building a lean-to, you'll love discovering the joys and benefits of DIY Projects. They not only allow for creative freedom but also offer a sense of accomplishment. For those with a penchant for aesthetics and functionality, exploring various Outdoor Structures can provide endless inspiration for enhancing any living space. Don’t miss out on these exciting reads!
Frequently Asked Questions about How To Build Lean To Off A Shed
Was this page helpful?
At Storables.com, we guarantee accurate and reliable information. Our content, validated by Expert Board Contributors, is crafted following stringent Editorial Policies. We're committed to providing you with well-researched, expert-backed insights for all your informational needs.


0 thoughts on “How To Build Lean To Off A Shed”