Home>Health & Lifestyle>Air Quality & Filtration>How To Make Your Own Fabric Freshener

Air Quality & Filtration
How To Make Your Own Fabric Freshener
Modified: January 6, 2024
Improve your indoor air quality with our DIY fabric freshener. Learn how to make your own natural air freshener for a healthier home environment. Enhance air quality and filtration today!
(Many of the links in this article redirect to a specific reviewed product. Your purchase of these products through affiliate links helps to generate commission for Storables.com, at no extra cost. Learn more)
Introduction
Welcome to the world of DIY fabric fresheners! Whether you’re looking to eliminate odors from your favorite sofa, revitalize musty linens, or simply infuse your living space with a delightful fragrance, creating your own fabric freshener can be a rewarding and cost-effective endeavor. By crafting a personalized fabric freshener, you can tailor the scent to your preferences and avoid the potentially harmful chemicals found in many commercial air fresheners.
In this guide, we’ll explore the simple yet satisfying process of making your own fabric freshener using natural ingredients. Not only will you be able to enjoy a beautifully scented environment, but you’ll also contribute to a healthier indoor atmosphere. With just a few materials and a bit of creativity, you can elevate your fabric freshening experience to new heights.
So, gather your supplies and get ready to embark on a journey of olfactory delight as we delve into the art of creating a custom fabric freshener that will leave your home smelling fresh and inviting.
Key Takeaways:
- Create your own fabric freshener using natural ingredients like essential oils, vodka, and distilled water. Enjoy a personalized scent while avoiding harmful chemicals found in commercial air fresheners.
- Follow simple steps to make and use your fabric freshener, including spot testing, proper distance when spraying, and experimenting with different essential oil combinations. Enjoy a fresher, more inviting living environment with your DIY creation!
Read more: How To Make Your Own Blinds
Materials Needed
Before diving into the process of making your own fabric freshener, it’s essential to gather the necessary materials. The beauty of DIY fabric fresheners lies in their simplicity and the ability to customize the ingredients to suit your preferences. Here’s a list of the basic materials you’ll need to get started:
- Empty spray bottle: Opt for a clean, empty spray bottle to hold and dispense your homemade fabric freshener. Consider using a glass bottle to avoid any potential interaction between the ingredients and plastic.
- Distilled water: Using distilled water helps ensure that your fabric freshener remains free from impurities that could impact its effectiveness or fragrance.
- High-proof vodka or rubbing alcohol: This serves as a natural disinfectant and helps the fabric freshener dry quickly after application.
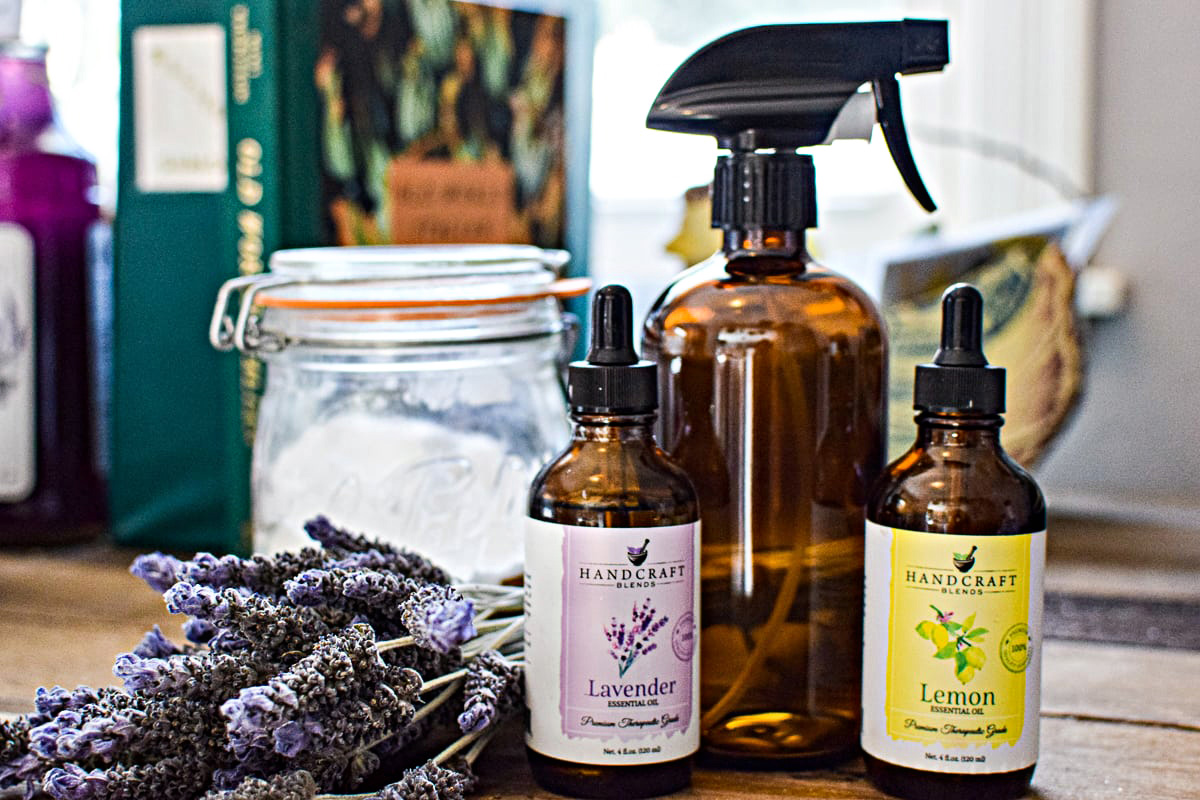
- Essential oils: Choose your favorite essential oils to impart a delightful scent to your fabric freshener. Popular options include lavender, tea tree, eucalyptus, citrus, and peppermint.
- Optional: Witch hazel or vegetable glycerin can be added to help the scent linger longer on fabrics.
With these simple yet versatile materials, you’ll be well-equipped to create your very own fabric freshener that not only refreshes your textiles but also adds a personalized touch to your living space.
Steps to Make Fabric Freshener
Now that you have all the necessary materials at your disposal, it’s time to embark on the enjoyable process of concocting your very own fabric freshener. Follow these straightforward steps to create a delightful and effective homemade fabric freshener:
- Prepare the Spray Bottle: Thoroughly clean the spray bottle to ensure it’s free from any residue or odors that could affect the scent of your fabric freshener.
- Combine the Ingredients: In the spray bottle, mix one part high-proof vodka or rubbing alcohol with three parts distilled water. This solution serves as the base for your fabric freshener and helps disperse the essential oils evenly.
- Add Essential Oils: Add your chosen essential oils to the alcohol and water mixture. The number of drops will depend on your preferred strength of fragrance. A good starting point is 20-30 drops in an 8-ounce bottle, but feel free to adjust based on your scent preferences.
- Optional Additions: If desired, incorporate a small amount of witch hazel or vegetable glycerin into the mixture to help the scent linger on fabrics for a longer duration.
- Shake and Store: Secure the spray bottle’s cap and shake the contents vigorously to ensure thorough mixing of the ingredients. Store the fabric freshener in a cool, dark place for a day to allow the scents to meld and enhance the fragrance.
- Test and Enjoy: After allowing the fabric freshener to rest, give it a gentle shake and spritz it onto a small area of fabric to test the scent and ensure it doesn’t cause any discoloration. Once confirmed, your homemade fabric freshener is ready to use!
By following these simple steps, you can create a personalized fabric freshener that not only revitalizes your textiles but also surrounds you with a captivating aroma tailored to your preferences.
Add a few drops of essential oil to your fabric freshener for a pleasant scent. Lavender, lemon, or eucalyptus are great options.
Tips for Using Fabric Freshener
Now that you’ve crafted your own delightful fabric freshener, it’s time to explore some helpful tips for using it effectively and maximizing its benefits. Whether you’re aiming to banish odors, freshen up linens, or infuse your living space with a pleasant scent, these tips will guide you toward achieving the best results:
- Spot Testing: Before applying the fabric freshener liberally, it’s advisable to conduct a spot test on a small, inconspicuous area of the fabric to ensure compatibility and avoid any potential discoloration or damage.
- Proper Distance: When spritzing the fabric freshener onto textiles, maintain a distance of 12-18 inches to allow for even distribution and prevent oversaturation.
- Air Circulation: After applying the fabric freshener, allow the treated fabrics to air out and dry completely. This helps the scent to settle and ensures that the alcohol base evaporates, leaving behind the delightful fragrance of the essential oils.
- Storage: Store your fabric freshener in a cool, dark place away from direct sunlight and heat to preserve the potency of the essential oils and maintain the freshness of the scent.
- Versatile Applications: Your fabric freshener can be used on a wide range of textiles, including upholstery, curtains, carpets, bedding, and even clothing. However, always refer to specific care instructions for delicate fabrics.
- Customization: Feel free to experiment with different essential oil combinations to create unique scents that align with your mood and preferences. From relaxing lavender to invigorating citrus, the possibilities are endless.
By incorporating these tips into your fabric freshening routine, you can ensure that your homemade creation not only imparts a delightful fragrance to your textiles but also enhances the overall ambiance of your living space.
Conclusion
Congratulations on mastering the art of creating your very own fabric freshener! By harnessing the power of natural ingredients and your favorite essential oils, you’ve embarked on a journey toward a fresher, more inviting living environment. The process of making a DIY fabric freshener not only allows you to customize the scent to your liking but also grants you the satisfaction of knowing exactly what you’re bringing into your home.
With just a few simple materials and a dash of creativity, you’ve gained the ability to banish unpleasant odors, revitalize fabrics, and infuse your surroundings with a delightful aroma that reflects your unique tastes. By following the steps outlined in this guide and incorporating the provided tips, you can maximize the effectiveness and enjoyment of your homemade fabric freshener.
As you continue to explore the world of natural home care, don’t hesitate to experiment with different essential oil blends, conduct scent trials, and share your newfound knowledge with friends and family. The versatility and personalization offered by DIY fabric fresheners make them a delightful addition to any household, enhancing both the olfactory experience and the overall ambiance of your living space.
So, revel in the delightful scents that now fill your home, and take pride in the fact that you’ve embraced a healthier, more natural approach to fabric freshening. With your newfound expertise, you can look forward to enjoying a space that not only looks clean and inviting but also exudes a captivating, personalized fragrance that uplifts your spirits and those of your loved ones.
Frequently Asked Questions about How To Make Your Own Fabric Freshener
Was this page helpful?
At Storables.com, we guarantee accurate and reliable information. Our content, validated by Expert Board Contributors, is crafted following stringent Editorial Policies. We're committed to providing you with well-researched, expert-backed insights for all your informational needs.







0 thoughts on “How To Make Your Own Fabric Freshener”