Articles
How To Make Your Own Tool Box
Modified: August 27, 2024
Learn how to create your own tool box with these helpful articles. Get step-by-step instructions and expert tips for building the perfect toolbox.
(Many of the links in this article redirect to a specific reviewed product. Your purchase of these products through affiliate links helps to generate commission for Storables.com, at no extra cost. Learn more)
Introduction
Having a reliable and well-organized tool box is essential for any DIY enthusiast or professional. It provides a convenient way to store and transport your tools, keeping them easily accessible whenever you need them. While there are many pre-made tool boxes available on the market, nothing beats the satisfaction of making your own customized toolbox.
In this article, we will guide you through the process of creating your own tool box from scratch. By following these steps, you can make a toolbox that suits your specific needs, preferences, and style.
Before we dive into the details, it’s important to note that building a tool box requires basic woodworking skills and access to some common tools. However, don’t let that discourage you if you’re a beginner. With a little patience and determination, you’ll be able to create a functional and beautiful toolbox that you can be proud of.
So, roll up your sleeves and get ready to unleash your creativity as we walk you through each step of the toolbox-building process. Let’s get started!
Key Takeaways:
- Crafting a personalized toolbox allows DIY enthusiasts to tailor the size, design, and compartments to their specific needs, providing a sense of satisfaction and convenience in storing and transporting tools.
- Building a toolbox from scratch requires basic woodworking skills and access to common tools, but with patience and determination, anyone can create a functional and customized toolbox that reflects their style and preferences.
Read more: How To Make Your Own Bento Lunch Box
Step 1: Determine the size and design of your toolbox
Before you start building your toolbox, it’s important to take some time to consider the size and design that will work best for your specific needs. Think about the types and sizes of tools you will be storing, as well as any additional features or compartments you may want to include.
When it comes to size, consider the space you have available for the toolbox and the number of tools you want to store. You want to make sure your toolbox is large enough to accommodate all your tools, but not so large that it becomes cumbersome to carry or store.
Next, think about the design of your toolbox. Are you looking for a classic rectangular shape, or do you prefer a more unique and personalized design? Consider whether you want a single-compartment toolbox or one with multiple compartments and drawers for better organization.
Additionally, you can also think about the materials you want to use for your toolbox. Wood is a popular choice due to its durability and versatility, but you can also consider using metal, plastic, or even repurposed materials for a more eco-friendly approach.
Once you have a clear idea of the size and design you want for your toolbox, you can move on to gathering the necessary materials and tools for the construction process.
Step 2: Gather the necessary materials and tools
Now that you have determined the size and design of your toolbox, it’s time to gather all the materials and tools you will need for the construction process. Here’s a list of the essential items:
- Wood: Depending on your design, you will need plywood or solid wood boards for the sides, bottom, and top of the toolbox. Choose a sturdy and durable wood that can withstand the weight of your tools.
- Saw: You will need a handsaw or a circular saw to cut the wood pieces to the desired dimensions. Make sure you have appropriate safety equipment, such as goggles and gloves, when using the saw.
- Sandpaper: To ensure a smooth and polished finish on your toolbox, you will need sandpaper with different grits. Start with a coarse grit to remove any rough edges and then move to finer grits for a refined finish.
- Nails or screws: Depending on your preference, you can choose to use nails or screws to assemble the toolbox. Make sure to select the appropriate size and type based on the thickness of the wood.
- Drill: If you opt for using screws, you will need a drill to create pilot holes for easier screw insertion. Ensure you have the appropriate drill bits for the size of screws you are using.
- Wood glue: Adding wood glue in the joints of the toolbox will provide extra strength and stability. Be sure to choose a strong wood glue that is suitable for the type of wood you are using.
- Measuring tape and ruler: Accurate measurements are crucial for the construction process. Have a measuring tape and ruler on hand to ensure precise cuts and dimensions.
- Clamps: Clamps will help hold the wood pieces together while the glue dries or when securing them in place for nailing or screwing.
- Screwdriver: If you are using screws, a screwdriver will be needed for attaching the hardware, such as the handle or any additional compartments.
Make sure you have all these materials and tools readily available before moving on to the next step. Preparation is key to a smooth and efficient toolbox-building process.
Step 3: Measure and cut the pieces for the toolbox
With the necessary materials and tools in hand, it’s time to measure and cut the wood pieces for your toolbox. This step is crucial for ensuring that all the components fit together properly and create a sturdy structure.
Start by measuring the dimensions for the sides, bottom, and top of the toolbox. Use a measuring tape and ruler to take accurate measurements, ensuring that the sides are equal in height and the bottom and top are of the desired width and length.
Once you have your measurements, transfer them onto the wood using a pencil or marker. Double-check your measurements to avoid any errors before proceeding.
Next, it’s time to cut the wood pieces. If you have a circular saw, make sure to adjust the blade to the appropriate depth and angle. Follow your marked lines and make straight cuts along the edges of the wood. If you’re using a handsaw, take your time and use long, smooth strokes to achieve clean cuts.
Take extra care when cutting the corners, as these will affect the overall look and fit of the toolbox. You can use a coping saw or a small handsaw to make precise cuts at the corners, creating clean and seamless joints.
After cutting all the necessary pieces, use sandpaper to smooth any rough edges or splinters. Sand in the direction of the wood grain to avoid causing any damage to the surface. Start with a coarse grit sandpaper and gradually move to finer grits for a polished finish.
Remember to label each piece to avoid confusion during the assembly process. This will make it easier for you to identify where each piece fits in the overall structure of the toolbox.
With the wood pieces cut and sanded, you’re now ready to move on to the next step: assembling the sides, bottom, and top of the toolbox.
Step 4: Assemble the sides, bottom, and top of the toolbox
Now that you have measured and cut the pieces for your toolbox, it’s time to assemble them together. The assembly process will create the basic structure of your toolbox and lay the foundation for the final product.
Begin by laying out the pieces on a flat and sturdy surface. Align the edges of the sides, bottom, and top to ensure they fit together properly. Use clamps to hold the pieces in place while you work.
If you’re using nails, pre-drill pilot holes at regular intervals along the edges of the wood pieces. This will prevent the wood from splitting when you drive in the nails. Alternatively, if you’re using screws, you can skip the pilot holes and drive the screws directly into the wood.
Apply a thin layer of wood glue along the edges of the pieces that will be joined together. This will create a strong bond and reinforce the structural integrity of your toolbox.
With the pieces aligned and the glue applied, carefully drive the nails or screws into the pre-drilled holes. Make sure to secure the pieces tightly together, but be cautious not to over tighten and cause damage.
Continue the process of attaching the sides to the bottom and the top, completing the main frame of the toolbox. Make any necessary adjustments to ensure the edges are flush and the corners are aligned perfectly.
Once all the pieces are securely attached, remove any excess glue that may have squeezed out during the assembly process. Use a damp cloth or sponge to wipe away the excess glue before it dries.
Allow the glue to dry completely according to the manufacturer’s instructions. This may take several hours, so it’s important to be patient and let the glue set properly. The clamps can be removed once the glue has dried and the pieces are firmly held together.
With the sides, bottom, and top of your toolbox assembled, you’re now ready to move on to the next step: attaching the handle.
When making your own tool box, be sure to measure and plan out the dimensions carefully to ensure that all of your tools will fit comfortably and securely.
Read more: How To Make Your Own Cat Litter Box
Step 5: Attach the handle to the toolbox
Adding a handle to your toolbox will make it easier to carry and transport your tools. It’s important to choose a handle that is sturdy and comfortable to hold, as it will bear the weight of your toolbox and its contents.
Before attaching the handle, determine the desired location on the top of your toolbox. Consider the balance and ease of carrying when selecting the placement.
Once you have chosen the location, mark the positions where the screws or bolts will go. Use a ruler or measuring tape to ensure that the markings are symmetrical and evenly spaced.
If your handle comes with pre-drilled holes, align them with the markings on the top of the toolbox. If not, you will need to create pilot holes using a drill and appropriate drill bit size.
With the pilot holes in place, position the handle over the markings and insert the screws or bolts through the holes. Tighten them using a screwdriver or a wrench, ensuring that they are securely fastened.
Make sure to test the handle for stability by giving it a gentle tug. If it feels loose, tighten the screws or bolts further to ensure a secure attachment.
Step back and admire your toolbox with its newly attached handle. You’re now ready to move on to the next step: sanding and finishing.
Step 6: Sand and finish the toolbox
Now that the basic construction of your toolbox is complete, it’s time to give it a smooth and polished finish. Sanding and finishing the wood will not only enhance its appearance but also protect it from wear and tear.
Start by using a medium-grit sandpaper to sand the entire surface of the toolbox. Sand in the direction of the wood grain, using long and even strokes. This will help remove any rough spots or imperfections, creating a more refined finish.
Once you have sanded the toolbox with the medium-grit sandpaper, switch to a finer-grit sandpaper to achieve a smoother surface. Repeat the sanding process, ensuring that you cover every inch of the toolbox, including the corners and edges.
After sanding, wipe away any dust or debris with a clean cloth or a tack cloth. This will help prepare the surface for the finishing process.
Now it’s time to choose a finish for your toolbox. There are various options available, depending on your preference and the type of wood you’re working with. Common finishes include varnish, stain, or paint.
If you prefer a natural look, you can use a clear varnish or wood sealant to protect the wood while still highlighting its natural beauty. Apply the varnish or sealant according to the manufacturer’s instructions, ensuring even coverage on all surfaces of the toolbox.
If you prefer a colored finish, you can use wood stain or paint. Apply the stain or paint in thin, even coats, allowing each coat to dry before applying the next. This will ensure smooth and professional-looking results.
After applying the finish, allow it to dry completely. Once dry, lightly sand the surface with a fine-grit sandpaper to remove any raised fibers or imperfections. Wipe away any dust with a cloth or tack cloth.
With the sanding and finishing process complete, your toolbox will now have a polished and professional appearance. The next step is to consider any additional compartments or dividers you may want to add.
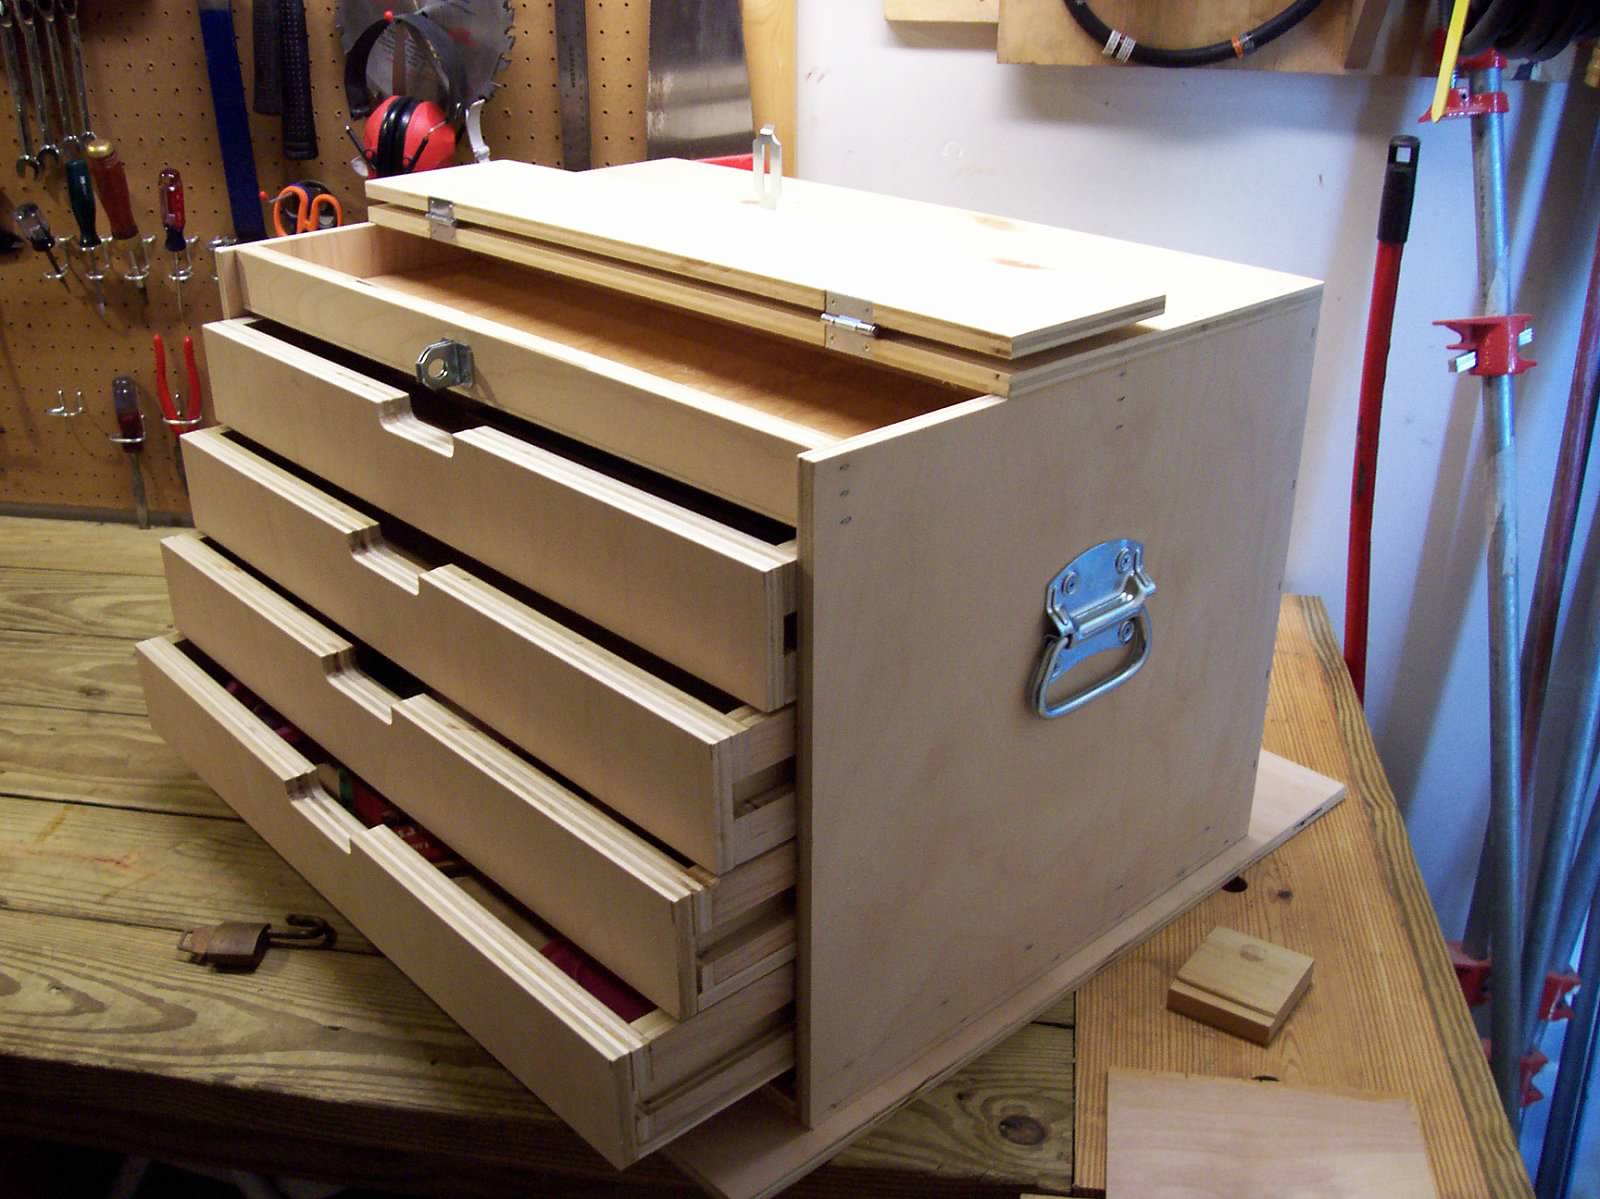
Step 7: Add any desired compartments or dividers
Adding compartments or dividers to your toolbox can help with organizing your tools and making them easily accessible. Depending on the type and size of tools you have, you can customize the interior of your toolbox to suit your needs.
Begin by assessing the types of tools you plan to store in the toolbox. Consider their sizes and shapes, as well as any special requirements for their storage. This will guide you in determining the number and size of compartments or dividers needed.
There are several options for creating compartments or dividers in your toolbox. You can use small pieces of wood or plywood to build separate sections, or you can repurpose materials such as PVC pipes or plastic containers to create compartments. Alternatively, you can purchase pre-made dividers or organizers from hardware stores.
Measure and mark the desired locations for the compartments or dividers inside the toolbox. Use a ruler or measuring tape to ensure accuracy in your markings.
If you’re using wood or plywood to create compartments, cut them to the appropriate sizes and shapes. Sand any rough edges and ensure a snug fit within the toolbox.
If you prefer using repurposed materials or pre-made dividers, position them in the marked locations and secure them in place using screws, nails, or adhesive, depending on the material and the desired level of permanence.
Take the time to arrange your tools within the compartments or dividers, considering their sizes and shapes. You may need to adjust the positioning of the dividers or compartments to accommodate different tools and maximize space utilization.
Adding compartments or dividers will not only help with organizing your toolbox but also protect your tools from potential damage caused by movement or contact with other tools. It will make it easier to find the tools you need, saving you time and effort.
Now that your toolbox is well-organized and customized to your requirements, it’s time for the final step: testing out your new toolbox.
Step 8: Test out your new toolbox
Congratulations! You have successfully built and customized your own toolbox. Now it’s time to put it to the test and ensure that it meets your needs and expectations.
Begin by gathering your tools and placing them inside the compartments or dividers you have created. Take note of how well the toolbox accommodates each tool and whether there is enough space for everything you need.
Carry the toolbox around and evaluate its weight and comfort. Does the handle feel secure and comfortable in your hand? Is the toolbox easy to transport without any wobbling or shifting of tools?
Open and close the lid of the toolbox multiple times to check for smooth operation. Ensure that the lid securely closes and stays shut during transport.
Take a moment to admire your handiwork and appreciate the functional and aesthetic value of your custom toolbox. If you notice any areas for improvement or adjustments, make note of them and consider making necessary modifications in the future.
You can also take this opportunity to personalize your toolbox further by adding labels or decorative elements like stickers or paint. This will not only add a personal touch but also make it easier to identify and locate specific tools.
Remember, the purpose of testing your new toolbox is to ensure it is functional, durable, and meets your specific needs. Take the time to make any necessary adjustments or improvements to fully optimize its performance.
Now that your toolbox has passed the test, you can confidently put it to use for all your DIY projects and professional endeavors. Enjoy the convenience and satisfaction that comes with having a well-organized and personalized toolbox.
As time goes on, don’t forget to maintain your toolbox by regularly cleaning and organizing it. This will help prolong its lifespan and ensure it continues to serve you well in the years to come.
With completion of Step 8, you have successfully built and tested your new toolbox. Give yourself a pat on the back for your hard work and craftsmanship!
Frequently Asked Questions about How To Make Your Own Tool Box
Was this page helpful?
At Storables.com, we guarantee accurate and reliable information. Our content, validated by Expert Board Contributors, is crafted following stringent Editorial Policies. We're committed to providing you with well-researched, expert-backed insights for all your informational needs.


0 thoughts on “How To Make Your Own Tool Box”