Home>Technology>Smart Home Devices>How To Make Your Own Stickers With A Printer

Smart Home Devices
How To Make Your Own Stickers With A Printer
Modified: August 28, 2024
Learn how to create custom stickers at home using a printer. Explore creative ideas for smart home devices and personalize your space with unique designs. Unlock the potential of DIY sticker making!
(Many of the links in this article redirect to a specific reviewed product. Your purchase of these products through affiliate links helps to generate commission for Storables.com, at no extra cost. Learn more)
Introduction
So, you want to add a personal touch to your belongings or create unique decorations for special occasions? Making your own stickers with a printer is an excellent way to unleash your creativity and customize items with your own designs. Whether you're a seasoned crafter or a beginner looking for a fun DIY project, creating custom stickers at home is a rewarding and enjoyable endeavor.
With the right materials and a dash of creativity, you can transform your ideas into vibrant, adhesive works of art. From personalized labels to decorative stickers for scrapbooking, the possibilities are endless. In this comprehensive guide, we'll walk through the step-by-step process of making your own stickers using a printer. You'll learn about the essential materials needed, the design process, printing techniques, and the finishing touches that will bring your stickers to life.
Get ready to embark on a creative journey as we delve into the exciting world of DIY sticker making. Whether you're looking to add flair to your personal items or create memorable gifts for friends and family, making your own stickers is a delightful way to express your individuality and showcase your artistic talents. So, roll up your sleeves and let's dive into the wonderful realm of sticker crafting!
Key Takeaways:
- Unleash your creativity by making custom stickers at home using a printer. Gather materials, design, print, and apply for a fun and rewarding DIY project.
- Personalize your belongings and gifts with vibrant, professional-looking stickers. Design, print, and apply with precision to showcase your unique style and creativity.
Read more: How To Make Stickers With A Printer
Materials Needed
Before diving into the sticker-making process, it’s essential to gather the necessary materials. Here’s what you’ll need to get started:
- Printer: A high-quality inkjet or laser printer capable of printing on sticker paper is essential for creating vibrant and durable stickers.
- Sticker Paper: Choose sticker paper that is compatible with your printer type. Matte or glossy sticker paper options are available, each offering a unique finish for your stickers.
- Design Software: Access to design software or online platforms that allow you to create and customize your sticker designs. Popular options include Adobe Photoshop, Illustrator, or free alternatives like Canva and GIMP.
- Images and Graphics: Whether it’s original artwork, photographs, or pre-made graphics, having a collection of images to incorporate into your sticker designs is crucial for personalization.
- Scissors or Cutting Tool: A reliable pair of scissors or a precision cutting tool, such as a craft knife or cutting machine, will be needed to cut out your printed stickers.
- Clear Sealant (Optional): If you want to add an extra layer of protection to your stickers, consider using a clear sealant spray to enhance durability and resistance to moisture.
- Workspace: A clean and well-lit workspace with a flat surface to accommodate your designing and cutting activities.
By ensuring you have these materials on hand, you’ll be fully equipped to embark on your sticker-making journey. With the tools and resources in place, you’re ready to unleash your creativity and bring your sticker designs to life.
Designing Your Stickers
Once you’ve gathered all the necessary materials, it’s time to unleash your creativity and begin the design process. Whether you’re crafting custom logos, decorative motifs, or whimsical illustrations, the design phase is where your imagination takes center stage. Here’s how to approach designing your stickers:
1. Brainstorm and Conceptualize: Start by brainstorming ideas for your sticker designs. Consider the purpose of the stickers and the message or visual theme you want to convey. Whether it’s playful, elegant, or informative, defining the style and purpose of your stickers will guide your design choices.
2. Select Design Software: Utilize design software or online platforms to create and customize your sticker designs. These tools offer a wide range of features, including layering, text manipulation, and image editing, allowing you to bring your ideas to life with precision.
3. Incorporate Images and Graphics: Whether you’re using original artwork, photographs, or pre-made graphics, integrate these elements into your designs to add personality and visual appeal to your stickers. Experiment with different compositions and layouts to achieve the desired aesthetic.
4. Consider Sizing and Shape: Determine the size and shape of your stickers based on their intended use. Whether you’re creating small labels or larger decorative stickers, ensure that the dimensions complement the design and fit the target application surface.
5. Add Text and Details: If your stickers include text, choose complementary fonts and colors that enhance readability and visual impact. Pay attention to details such as borders, patterns, or decorative elements that enrich the overall design.
6. Review and Refine: Take time to review your designs and make any necessary refinements. Consider factors such as color balance, visual hierarchy, and overall cohesiveness to ensure that your stickers effectively communicate your intended message or aesthetic.
By following these steps, you can craft captivating and personalized sticker designs that reflect your unique style and creative vision. The design phase sets the stage for the printing and finishing stages, allowing you to bring your imaginative concepts to fruition as vibrant, adhesive works of art.
When making your own stickers with a printer, be sure to use sticker paper that is compatible with your printer to ensure the best quality and adhesion.
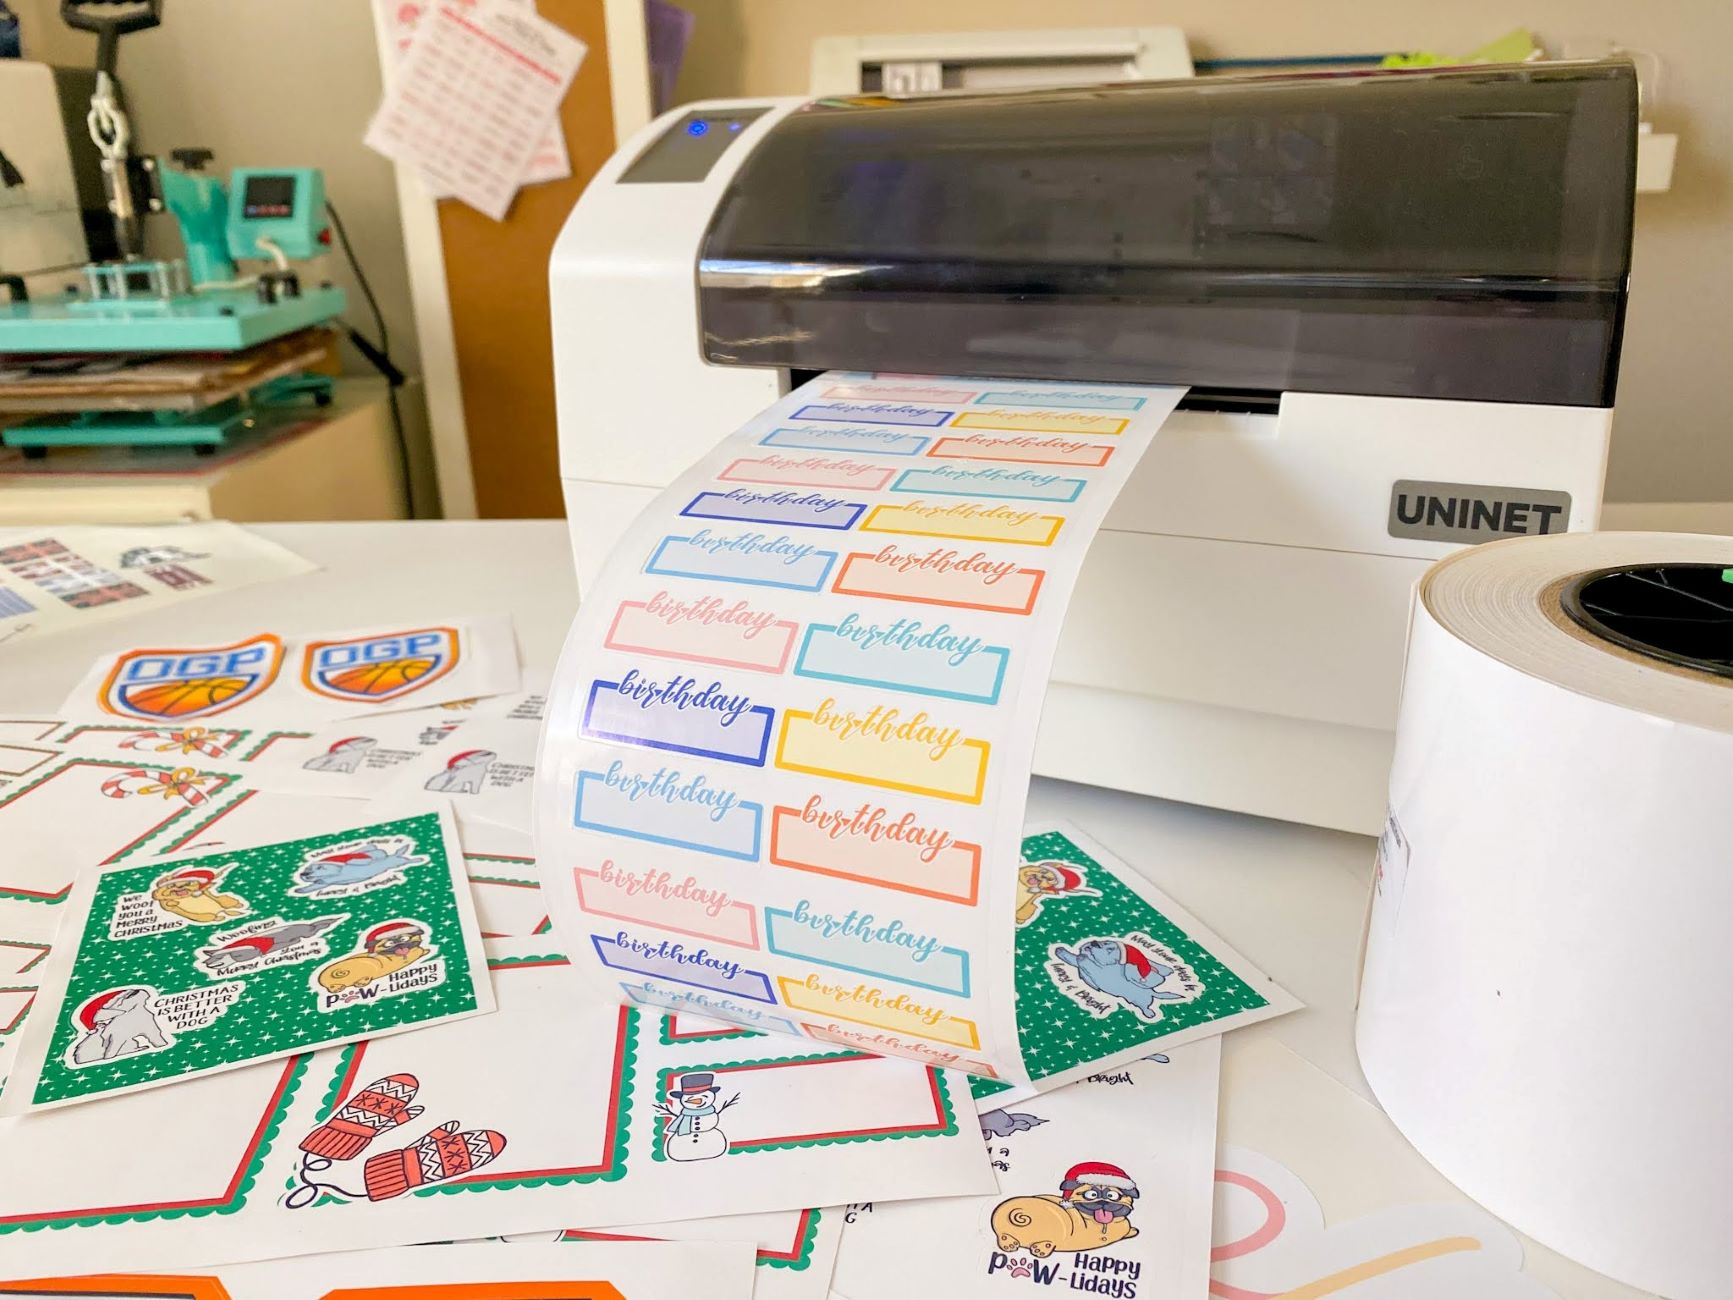
Printing Your Stickers
With your sticker designs finalized, it’s time to bring them to life through the printing process. Achieving high-quality prints is crucial for vibrant and long-lasting stickers. Here’s a step-by-step guide to printing your stickers:
1. Select the Right Sticker Paper: Ensure that you have the appropriate sticker paper compatible with your printer type. Whether you opt for matte or glossy sticker paper, choosing the right material will impact the final appearance and durability of your stickers.
2. Load the Sticker Paper: Follow your printer’s specifications for loading the sticker paper into the input tray. Ensure that the paper is positioned correctly to avoid misalignment or printing errors.
3. Adjust Print Settings: Access your printer’s settings and select the appropriate print quality and paper type for optimal results. Adjust settings such as color saturation, print resolution, and paper size to match your sticker designs and preferences.
4. Test Print: Before printing the entire batch of stickers, consider performing a test print on regular paper to assess the colors, alignment, and overall appearance of the designs. This allows you to make any necessary adjustments before using the sticker paper.
5. Print Your Designs: Once satisfied with the test print, proceed to print your sticker designs on the sticker paper. Monitor the printing process to ensure that the colors and details are accurately reproduced, and that the paper feeds smoothly through the printer.
6. Allow for Drying Time: After printing, allow the stickers to dry completely before handling them. This prevents smudging or smearing of the ink, ensuring that your stickers maintain their visual integrity.
By following these steps, you can produce crisp, vibrant, and professional-looking stickers that showcase your designs with precision and clarity. The printing stage is a pivotal part of the sticker-making process, as it brings your digital creations into the tangible realm, ready for the final finishing touches.
Cutting and Peeling Your Stickers
Once your sticker designs have been printed and allowed to dry, the next step involves carefully cutting and peeling them to prepare for application. This phase requires precision and attention to detail to ensure that your stickers are neatly trimmed and ready for use. Here’s a guide to cutting and peeling your stickers:
1. Select a Cutting Tool: Choose a cutting tool that best suits your preferences and the intricacy of your designs. Whether it’s a pair of sharp scissors for simple shapes or a precision cutting machine for complex patterns, having the right tool is essential for achieving clean and precise cuts.
2. Trim Around the Designs: Use your chosen cutting tool to carefully trim around the outlines of your printed designs. Exercise patience and steady hand movements to maintain the integrity of the designs and ensure that the edges are smooth and even.
3. Consider Protective Coating: If your stickers will be subject to frequent handling or exposure to moisture, consider applying a clear sealant over the printed designs to enhance their durability. This additional step can prolong the lifespan of your stickers and protect them from wear and tear.
4. Peel the Backing: Once the stickers are cut to size, gently peel away the backing material to reveal the adhesive layer on the underside of each sticker. Take care to avoid damaging the printed designs during the peeling process, especially for delicate or intricate designs.
5. Arrange and Organize: Organize your cut and peeled stickers according to their designs or intended use. This step is particularly important for batch production or when creating multiple variations of stickers, ensuring that they are readily accessible for application or packaging.
6. Store Appropriately: If you’re not using the stickers immediately, store them in a clean and dry environment to prevent dust or moisture from affecting their adhesive properties or visual appeal. Storing the stickers properly maintains their quality until they are ready to be used.
By following these steps, you can ensure that your stickers are meticulously cut, peeled, and prepared for application. Attention to detail during this phase contributes to the overall professional appearance and usability of your custom-made stickers, setting the stage for their final destination.
Read more: How To Make Your Own 3D Printer
Applying Your Stickers
After the meticulous process of designing, printing, cutting, and peeling your custom stickers, it’s time to apply them to your desired surfaces. Whether you’re embellishing personal items, creating decorative displays, or adding a personalized touch to gifts, the application stage is where your stickers truly come to life. Here’s a guide to effectively applying your stickers:
1. Clean and Prepare the Surface: Ensure that the surface where the stickers will be applied is clean and dry. Remove any dust, debris, or residue that may affect the adhesion of the stickers, providing a smooth and suitable canvas for application.
2. Position and Align: Carefully position the stickers on the surface, ensuring that they are aligned and centered according to your desired placement. Take your time to achieve the perfect positioning before firmly pressing the stickers onto the surface.
3. Press and Smooth: Use gentle yet firm pressure to adhere the stickers to the surface, smoothing out any air bubbles or creases that may occur during application. This ensures that the stickers bond securely and maintain a polished appearance.
4. Allow for Adhesion: After applying the stickers, allow them to adhere to the surface for a brief period, as recommended by the sticker paper manufacturer. This allows the adhesive to establish a strong bond, enhancing the longevity of the stickers.
5. Inspect and Touch Up: Once the stickers are applied, inspect the edges and overall adhesion to ensure that they are firmly in place. If necessary, touch up any areas where the stickers may require additional pressure or smoothing to achieve a seamless finish.
6. Share and Showcase: Once applied, proudly share and showcase your custom stickers. Whether they adorn personal belongings, handmade crafts, or special gifts, your stickers serve as unique expressions of creativity and personalization.
By following these steps, you can effectively apply your custom stickers with precision and care, ensuring that they enhance the visual appeal and individuality of the items they adorn. Whether for practical labeling purposes or decorative embellishments, your custom stickers are ready to make a statement and leave a lasting impression.
Frequently Asked Questions about How To Make Your Own Stickers With A Printer
Was this page helpful?
At Storables.com, we guarantee accurate and reliable information. Our content, validated by Expert Board Contributors, is crafted following stringent Editorial Policies. We're committed to providing you with well-researched, expert-backed insights for all your informational needs.


0 thoughts on “How To Make Your Own Stickers With A Printer”