Home>Furniture>Bedroom Furniture>How To Make Your Own Rustic Bed Frame
Bedroom Furniture
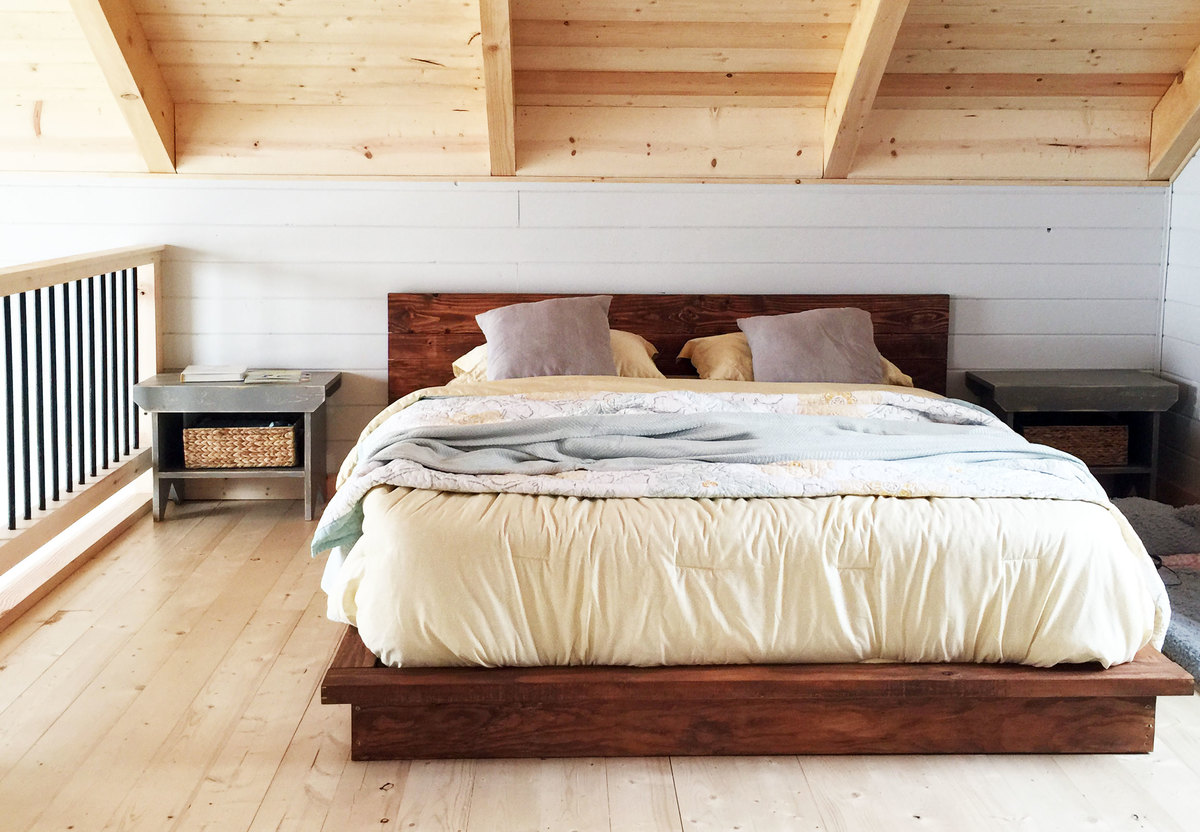
How To Make Your Own Rustic Bed Frame
Modified: August 17, 2024
Learn how to create a charming and rustic bed frame for your bedroom with our step-by-step guide. Transform your space with unique bedroom furniture.
(Many of the links in this article redirect to a specific reviewed product. Your purchase of these products through affiliate links helps to generate commission for Storables.com, at no extra cost. Learn more)
Introduction
Welcome to the world of rustic bedroom furniture! There’s something incredibly charming and timeless about the warmth and character that rustic pieces bring to any bedroom. And, what better way to add a touch of rustic elegance than by creating your own rustic bed frame? Whether you’re a seasoned DIY enthusiast or a beginner looking for a fun project, building your own rustic bed frame allows you to customize every aspect of your sleeping oasis.
In this article, we’ll guide you through the steps of making your own rustic bed frame. From selecting the right materials to adding the finishing touches, we’ll cover everything you need to know to create a beautiful and sturdy bed frame that will become the centerpiece of your bedroom.
Before we dive into the details, let’s talk about the advantages of going the DIY route. Perhaps the most obvious benefit is the cost-effectiveness. By building your own bed frame, you can save a significant amount of money compared to purchasing one from a store. Additionally, you will have full control over the design and dimensions, allowing you to create a bed frame that perfectly suits your style and fits the specifications of your bedroom.
Another advantage of building your own rustic bed frame is the satisfaction and pride that comes with creating something with your own hands. It’s a fulfilling experience to see your vision come to life and have a functional piece of furniture that you built yourself. Plus, you’ll have a unique bed frame that reflects your personal taste and style.
Now that we understand the benefits of DIY and building your own rustic bed frame, let’s move on to the materials you’ll need for this project.
Key Takeaways:
- Building your own rustic bed frame allows for cost-effective customization, providing a sense of pride and satisfaction in creating a unique piece that reflects your personal style and fits your bedroom perfectly.
- The step-by-step process of measuring, cutting, assembling, and finishing your rustic bed frame ensures a sturdy, beautiful, and functional result, offering a cozy and charming addition to your bedroom.
Read more: How To Make Your Own Blinds
Materials Needed
Before you begin building your rustic bed frame, it’s important to gather all the necessary materials. Here’s a list of items you’ll need:
- 1. Wood:
- – 4×4 lumber for the bed posts
- – 2×6 or 2×8 lumber for the frame
- – 1×4 lumber for the slats
- – 1×6 or 1×8 lumber for the headboard and footboard
- – Plywood for additional support (optional)
- 2. Screws or nails: Depending on your preference, select the appropriate fasteners to secure the wood pieces together.
- 3. Screwdriver or drill: A power drill or screwdriver will make the assembly process quicker and easier.
- 4. Saw: You’ll need a saw to cut the wood to the desired lengths.
- 5. Sandpaper: To smooth out any rough edges and achieve a polished finish.
- 6. Wood stain or paint: Choose a stain or paint that matches your desired rustic aesthetic.
- 7. Paintbrush or cloth: For applying the stain or paint.
- 8. Measuring tape: Accurate measurements are crucial for ensuring the proper dimensions of your bed frame.
- 9. Clamps: Optional, but helpful for securing pieces together during assembly.
- 10. Safety equipment: Gloves and eye protection are recommended when working with wood and power tools.
Make sure you have all these materials before getting started. It’s always better to be prepared and have everything you need within reach.
Now that you have your materials ready, let’s move on to the first step of building your rustic bed frame- gathering your tools.
Step 1: Gather Your Tools
Before diving into the construction of your rustic bed frame, it’s essential to gather all the necessary tools. Having the right tools will make the process smoother and more efficient. Here are the tools you will need:
- 1. Power Drill or Screwdriver: A power drill or screwdriver will make it easier to insert screws and secure the wood pieces together. Make sure you have the appropriate drill bits for your screws.
- 2. Saw: You’ll need a saw to cut the wood to the desired lengths. A circular saw or miter saw will work well for this project.
- 3. Sandpaper or Sanding Block: To smooth out any rough edges and create a polished finish on your bed frame.
- 4. Measuring Tape: Accurate measurements are crucial for ensuring your bed frame is the right size. A measuring tape will help you achieve precise dimensions.
- 5. Clamps (optional): Clamps can be useful for holding wood pieces together while you drill or screw them in place. They provide additional stability during assembly.
- 6. Level: To ensure that your bed frame is straight and even, a level is essential. It will help you avoid any unevenness or tilting.
- 7. Carpenter’s Square: A carpenter’s square is a handy tool for checking and maintaining right angles while assembling your bed frame.
- 8. Safety Equipment: Gloves and eye protection are essential when working with power tools and handling wood.
Once you have gathered all the necessary tools, make sure you have them easily accessible in your workspace. It’s important to have a well-organized and clutter-free area to work in, ensuring a smooth and safe building process.
With your tools ready, you’re now fully equipped to move on to the next step of constructing your rustic bed frame- measuring and cutting the wood.
Step 2: Measure and Cut the Wood
Now that you have all your tools prepared, it’s time to measure and cut the wood for your rustic bed frame. This step is crucial to ensure that all the components fit together properly. Here’s how you can proceed:
- Start by measuring the space where you want your bed frame to fit. Take accurate measurements of the length, width, and height. Remember to account for any extra space you want to leave around the bed.
- With the measurements in hand, mark and cut the wood accordingly. Use your saw to cut the 4×4 lumber into four equal lengths for the bed posts. These will serve as the sturdy support for your bed.
- Next, cut the 2×6 or 2×8 lumber to create the frame of your bed. Cut two longer pieces for the sides and two shorter pieces for the head and foot of the bed frame. Make sure to cut them to the appropriate length based on your measurements.
- If you’re planning to add a headboard and footboard, cut the 1×6 or 1×8 lumber to the desired width and height. You can opt to cut them into a rectangular shape or get creative with different designs.
- Measure and cut the 1×4 lumber into slats that will support the mattress. The number of slats will depend on the size of your bed frame and personal preference.
Remember to double-check your measurements and use a carpenter’s square to ensure accurate right angles when cutting the wood. Taking your time and being precise during this step will greatly contribute to the overall stability and aesthetics of your rustic bed frame.
Once you have all the wood pieces cut to the appropriate sizes, move on to the next step: sanding the wood to create a smooth surface.
Step 3: Sand the Wood
After cutting the wood to the desired measurements, it’s time to sand the surfaces to create a smooth and polished finish. Sanding not only enhances the appearance of the wood but also helps to remove any rough or splintered edges. Follow these steps to achieve a professional-looking result:
- Before starting, ensure you have all the necessary safety equipment, including gloves and eye protection. Sanding can create dust, so it’s important to take precautions.
- Begin by using rough-grit sandpaper, such as 80 or 100 grit, to smooth the cut edges and any rough surfaces. Sand in the direction of the wood grain to avoid creating scratches.
- Continue sanding with finer grit sandpaper, such as 120 or 150 grit, to achieve a smoother surface. Pay attention to any imperfections or sharp edges and sand them until they’re smooth to the touch.
- For a perfectly polished finish, you can use an even finer grit sandpaper, such as 220 grit. This will result in a silky-smooth surface that’s ready for staining or painting.
- Once you’ve sanded all the wood pieces, use a damp cloth or tack cloth to remove any dust or debris. This will ensure a clean surface for the next steps.
Remember to take your time and be thorough when sanding the wood. Pay extra attention to the edges and corners to achieve a consistent and smooth finish. Once your wood is sanded and prepared, you’re ready to move on to the next step: assembling the headboard.
Read more: How To Make Your Own Mattress
Step 4: Assemble the Headboard
The headboard is an important component of your rustic bed frame, providing both aesthetic appeal and support. Assembling the headboard requires careful attention to detail. Follow these steps to create a beautiful and sturdy headboard:
- Start by arranging the 1×6 or 1×8 lumber pieces on a flat surface, ensuring they are aligned correctly.
- If you prefer a simple rectangular headboard, align the pieces side by side and use clamps to hold them together securely. Make sure the edges are flush and even.
- If you want a more intricate design, mark the desired pattern on the wood pieces before assembling. Use a carpenter’s square to ensure accurate angles and measurements.
- Once you’re satisfied with the arrangement, use your power drill or screwdriver to attach the pieces together. Place screws or nails along the joints of the wood, evenly spaced.
- Double-check the stability of the headboard by gently pushing on it from different angles. Make any necessary adjustments to secure the pieces firmly.
It’s important to choose the right fasteners for assembling the headboard. Screws or nails that are long enough to go through the thickness of the wood and provide a secure bond are recommended. Additionally, you can reinforce the attachment by adding wood glue to the joints before inserting the screws or nails.
Once your headboard is assembled and stable, set it aside for now and move on to the next step: building the side rails and footboard.
When making your own rustic bed frame, consider using reclaimed wood for a more authentic and weathered look. This can add character and charm to your finished piece.
Step 5: Build the Side Rails and Footboard
With the headboard assembled, it’s time to focus on constructing the side rails and footboard of your rustic bed frame. These components will provide support and stability to the overall structure. Follow these steps to build the side rails and footboard:
- Measure and cut the 2×6 or 2×8 lumber to the appropriate length for the side rails. These should match the width of your mattress.
- If you prefer a platform-style bed frame, you can cut the side rails to be the same length as the headboard, allowing the mattress to rest directly on the rails. If you prefer a raised bed frame with a gap between the mattress and the floor, adjust the length accordingly.
- For the footboard, cut the 2×6 or 2×8 lumber to the desired height and width. This can match the headboard dimensions or be customized to your preference.
- Once the pieces are cut, sand the edges and smooth the surfaces using sandpaper, as we covered in Step 3.
- Now, assemble the side rails by placing them perpendicular to the headboard, forming the rectangular shape of the bed frame. Make sure the corners are square and the edges are flush.
- Attach the side rails to the headboard using screws or nails. Place them evenly spaced along the joints.
- Next, attach the footboard to the opposite ends of the side rails. Secure the footboard in place using screws or nails, ensuring a sturdy connection.
Take your time when building the side rails and footboard, ensuring that all the pieces are aligned correctly and securely attached. Double-check the stability of the frame by gently pushing and pulling on it to test for any wobbling or looseness.
With the side rails and footboard constructed, you’re ready to move on to the next step: attaching them to the headboard.
Step 6: Attach the Side Rails and Footboard to the Headboard
With the side rails and footboard in place, it’s time to connect them to the headboard, bringing your rustic bed frame together. This step is crucial for establishing a solid and stable structure. Here’s how to attach the side rails and footboard to the headboard:
- With the headboard, side rails, and footboard positioned correctly, align the ends of the side rails with the corresponding edges of the headboard.
- Use clamps to hold the side rails firmly against the headboard to ensure a secure connection during the assembly process.
- Pre-drill pilot holes through the headboard into the end of each side rail. This will prevent the wood from splitting when you drive the screws in.
- Insert screws into the pilot holes and drive them through the headboard into the side rails. Make sure the screws are long enough to securely join the pieces together.
- Repeat the process for the footboard, attaching it to the opposite ends of the side rails in the same manner.
- Double-check the alignment and stability of all the connections. Tighten any screws or make adjustments if necessary to ensure a secure and sturdy bed frame.
It’s important to take your time during this step to ensure that the side rails and footboard are properly attached to the headboard. The strength and stability of these connections will determine the overall durability of your rustic bed frame.
Once the side rails and footboard are securely attached to the headboard, you’re ready to move on to the next step: adding support slats.
Step 7: Add Support Slats
Adding support slats to your rustic bed frame is essential to provide even weight distribution and prevent the mattress from sagging. These slats will help ensure a comfortable and supportive sleep surface. Follow these steps to add support slats to your bed frame:
- Measure the distance between the side rails or the space inside the bed frame to determine the number and spacing of the support slats.
- Cut the 1×4 lumber to the appropriate length for the slats, allowing a slight overhang on each side of the rails for stability.
- If desired, sand the slats to create a smooth surface and remove any rough edges.
- Place the support slats on top of the side rails, evenly spaced across the bed frame.
- Secure each support slat to the side rails using screws or nails. Make sure they are centered and securely attached to prevent any movement or shifting.
- If additional support is desired, cut and attach plywood across the entire area under the mattress, providing a solid foundation.
Adding support slats will help distribute weight and prevent the mattress from sinking, ensuring a comfortable and stable sleep surface. The number of slats needed will depend on the size of the bed frame and personal preference. Generally, spacing the slats approximately 2-3 inches apart is recommended.
Once the support slats are in place, your rustic bed frame is almost complete. All that’s left is to add some finishing touches.
Read more: How To Make A Floor Bed Frame
Step 8: Finishing Touches
Now that the main structure of your rustic bed frame is complete, it’s time to add the finishing touches that will enhance its appearance and longevity. These final steps will ensure that your bed frame is not only functional but also visually appealing. Here’s what you can do:
- Sand any rough spots or edges that you may have missed during the earlier sanding process. This will give your bed frame a smooth and polished finish.
- If you prefer a natural look, you can apply a wood stain to enhance the grain patterns and color of the wood. Ensure you choose a stain that matches your desired rustic aesthetic. Apply the stain evenly using a paintbrush or cloth, following the manufacturer’s instructions. Let it dry completely before proceeding.
- For a more personalized touch, you can consider adding some decorative accents such as metal brackets, carvings, or engraved designs to the headboard or footboard. This will add character and make your bed frame truly unique.
- Apply a protective finish, such as polyurethane or a clear sealant, to protect the wood from wear and tear and preserve its beauty over time. Apply the finish according to the manufacturer’s instructions, ensuring full coverage and allowing sufficient drying time between coats.
- Once the finish has dried, carefully reassemble your bed frame, ensuring all connections are tight and secure. Test the stability of the frame by gently rocking and exerting pressure on different parts.
- Finally, place your mattress on the slats or platform, and add your favorite bedding and pillows to complete your rustic haven.
By adding these finishing touches, you’ll not only enhance the visual appeal of your rustic bed frame, but also protect it from everyday wear and tear. Taking care of the wood and maintaining its beauty will ensure that your bed frame lasts for years to come.
Congratulations! You have successfully built your own rustic bed frame, tailored to your style and specifications. Enjoy the satisfaction that comes with creating a functional and beautiful piece of furniture with your own hands.
Remember, building a bed frame requires precision and attention to detail. Take your time, follow the steps carefully, and enjoy the process. Happy sleeping in your cozy and charming rustic bed frame!
Conclusion
Building your own rustic bed frame is a rewarding and fulfilling experience that allows you to create a personalized sleeping oasis that reflects your unique style. Throughout this article, we’ve covered the step-by-step process to help you construct a sturdy, beautiful, and functional bed frame that will become the centerpiece of your bedroom.
From gathering the necessary tools and materials to measuring and cutting the wood, sanding the surfaces, assembling the components, and adding the finishing touches, each step has been carefully explained to guide you through the process. By following these instructions and infusing your personal creativity, you can build a rustic bed frame that perfectly suits your taste and meets your specific bedroom requirements.
Not only does building your own bed frame allow you to save money compared to purchasing one from a store, but it also gives you the satisfaction of creating something with your own hands. The sense of accomplishment when you lay down on a bed that you built yourself is truly amazing.
Remember to take your time throughout the process and pay attention to the details. Measure carefully, sand thoroughly, secure the connections, and add the desired decorative accents to make your bed frame uniquely yours.
As you enjoy your handmade rustic bed frame, keep in mind that maintenance is key to preserving its beauty and longevity. Regularly inspect the frame for any signs of wear and tear, and consider reapplying protective finishes to keep the wood looking fresh and protected.
Now, it’s time to embrace the comfort and charm of your own rustic bed frame. Dress it up with your favorite bedding, pillows, and accessories to create a cozy and inviting atmosphere in your bedroom. Let this be a place of relaxation, rejuvenation, and sweet dreams.
Congratulations on completing your DIY rustic bed frame! May it provide you with many years of restful nights and bring a touch of rustic elegance to your home.
Frequently Asked Questions about How To Make Your Own Rustic Bed Frame
Was this page helpful?
At Storables.com, we guarantee accurate and reliable information. Our content, validated by Expert Board Contributors, is crafted following stringent Editorial Policies. We're committed to providing you with well-researched, expert-backed insights for all your informational needs.


0 thoughts on “How To Make Your Own Rustic Bed Frame”