Home>Home Maintenance>How To Install Drainage In The Garden
Home Maintenance
How To Install Drainage In The Garden
Modified: March 7, 2024
Learn how to install effective drainage in your garden with our easy-to-follow home maintenance guide. Prevent water damage and keep your garden healthy!
(Many of the links in this article redirect to a specific reviewed product. Your purchase of these products through affiliate links helps to generate commission for Storables.com, at no extra cost. Learn more)
Introduction
Having proper drainage in your garden is essential for maintaining a healthy and vibrant outdoor space. A well-designed drainage system prevents waterlogging, soil erosion, and damage to plants and structures. Whether you’re dealing with heavy rainfall or poor soil drainage, installing a drainage system in your garden can help prevent these problems and keep your plants thriving.
In this guide, we will walk you through the steps of installing a drainage system in your garden. From planning and design to gathering materials and tools, we will cover everything you need to know to get the job done right. By the end of this article, you’ll have the knowledge and confidence to tackle this home maintenance project on your own.
Before we dive into the installation process, it’s important to understand the importance of proper drainage and the potential consequences of neglecting this crucial aspect of garden maintenance. When excess water accumulates in your garden, several issues can arise:
- Waterlogged soil can suffocate plant roots, leading to stunted growth or even death.
- Excess water can erode soil, causing uneven ground and undermining the stability of structures such as pathways and retaining walls.
- Poor drainage can create breeding grounds for pests and diseases that thrive in moist environments.
- Standing water can attract mosquitoes and other unwanted insects.
By installing a drainage system, you can effectively manage water runoff and protect your garden and outdoor living spaces from these potential problems. Now, let’s move on to the planning and design phase of your drainage project.
Key Takeaways:
- Proper drainage in your garden prevents waterlogging, soil erosion, and plant damage. By planning, installing, and maintaining a drainage system, you can create a healthy and thriving outdoor space.
- Choosing the right drainage system, gathering materials and tools, and following step-by-step installation guidelines are essential for successfully managing water runoff and protecting your garden.
Read more: How To Improve Garden Drainage
Planning and Design
Before you begin the installation process, it’s important to carefully plan and design your drainage system. Taking the time to assess your garden’s needs and create a well-thought-out plan will ensure that your drainage system functions effectively.
Here are some key steps to consider during the planning and design phase:
Evaluate your garden’s current drainage situation:
Take a close look at your garden to identify areas prone to waterlogging or poor drainage. Observe how water flows during rainfall and determine if there are any low-lying or sloped areas that need attention. Understanding the specific drainage issues in your garden will help you determine the best course of action.
Determine the type of drainage system:
There are several types of drainage systems, including surface drains, French drains, and subsurface drains. Surface drains are designed to collect and channel water away from the soil surface, while French drains are buried underground to redirect excess water. Subsurface drains, such as perforated pipes, are installed below the ground to remove water from lower soil layers. Analyze your garden’s needs and choose the most suitable drainage system.
Calculate the drainage capacity:
Estimate the volume of water that needs to be drained from your garden during heavy rain or irrigation. This will help determine the size and number of drainage pipes required for your system. Consider factors such as soil type, rainfall intensity, and the size of your garden when calculating the drainage capacity.
Read more: How To Install A Driveway Drainage System
Plan the drainage route:
Create a detailed plan of the drainage route, taking into account the slope of the land and the desired drainage outlet. Ideally, water should flow away from your garden and towards a suitable drainage point, such as a natural slope or a municipal storm drain. Mark the route on the ground using stakes or spray paint to guide you during the installation process.
Obtain necessary permits:
Depending on your location, you may need to obtain permits or approvals before installing a drainage system. Check with your local municipality or homeowner’s association to ensure compliance with any regulations or guidelines. This will help prevent any legal issues or complications down the line.
By thoroughly planning and designing your drainage system, you can ensure that it effectively addresses your garden’s specific drainage needs. Next, we’ll discuss how to choose the right drainage system for your garden.
Choosing the Right Drainage System
When it comes to selecting the right drainage system for your garden, there are several factors to consider. The type of soil, the severity of the drainage problem, and the overall layout of your outdoor space will all play a role in determining the most suitable option.
Surface Drains:
Surface drains are an excellent choice for areas that experience pooling or runoff on the soil surface. These drains consist of a grated inlet, which allows water to enter the system, and piping that carries the water away. Surface drains are particularly effective at removing water from patios, driveways, and low-lying areas. They are easy to install and maintain, making them a popular choice for many homeowners.
French Drains:
French drains are effective at tackling waterlogged soil and groundwater issues. This type of drainage system typically consists of a perforated pipe wrapped in a permeable membrane, surrounded by gravel or crushed stone. The pipe allows water to enter, while the gravel acts as a filtering medium. French drains are buried underground and designed to redirect water away from problem areas. They are commonly used to alleviate water buildup around foundations, basements, or in areas with poor soil drainage.
Subsurface Drains:
Subsurface drains, also known as subsoil drains, are installed below the ground to remove excess water from the lower layers of soil. They are commonly used in areas with high water tables or heavy clay soils. Subsurface drains typically consist of perforated pipes buried in trenches filled with gravel or crushed stone. These drains help reduce the risk of waterlogging, prevent soil erosion, and maintain a stable soil environment for plant roots.
Retention and Detention Ponds:
For larger properties or areas that experience significant water runoff, retention and detention ponds can be a viable option. These ponds are designed to hold and slowly release excess water over time, reducing the impact of heavy rainfall. Retention ponds typically have a natural ecosystem, with aquatic plants and wildlife, while detention ponds are solely for water storage purposes. Professional design and construction are usually required for these types of drainage systems.
When choosing the right drainage system, it’s crucial to assess your garden’s specific needs and consult with professionals if necessary. Consider factors such as the severity of the drainage problem, the size of the area to be drained, and your budget constraints. By selecting the most appropriate drainage system, you’ll effectively manage water runoff and protect your garden from potential damage.
Now that you have an understanding of the different drainage system options available, let’s move on to gathering the necessary materials and tools for installation.
Gathering Materials and Tools
Before you start the installation process, it’s important to gather all the materials and tools you’ll need for your drainage system. Having everything at hand will make the installation process smoother and more efficient.
Materials:
- Drainage pipes: Choose the appropriate type and size of drainage pipes based on your specific system requirements. Common options include PVC pipes or corrugated plastic pipes.
- Pipe connectors and fittings: These are used to join sections of pipes or to connect pipes to other components, such as downspouts or catch basins.
- Perforated pipe sleeves or filters: These are used to prevent debris from entering the drainage system and clogging the pipes.
- Gravel or crushed stone: This is used to create a stable and well-drained base for the drainage system.
- Landscape fabric: This is optional but can be used to further prevent soil and debris from clogging the drainage system.
- Stakes or spray paint: These are used to mark the drainage route and provide guidance during the installation process.
- Topsoil and grass seed: These are optional but may be needed to restore the garden’s appearance after the installation is complete.
Tools:
- Shovel: A sturdy shovel is necessary for digging trenches and moving soil.
- Trenching spade: This specialized spade with a long, narrow blade is useful for digging narrow and deep trenches.
- Tape measure: Use a tape measure to accurately measure the distances for your drainage system layout.
- Straightedge or level: This is useful for ensuring that the trenches are even and level.
- Circular saw or pipe cutter: If necessary, these tools can be used to cut drainage pipes to the desired length.
- Hammer: A hammer is handy for securing pipe connectors and fittings.
- Utility knife: This is useful for cutting landscape fabric or trimming excess material.
- Wheelbarrow or bucket: You’ll need something to transport gravel or crushed stone to the installation site.
Before purchasing materials, measure the length and width of your drainage route to determine the amount of pipe, gravel, and other materials you’ll need. It’s always a good idea to buy a little extra to account for any unexpected situations or mistakes.
Once you have all the necessary materials and tools, you’ll be ready to dive into the installation process. In the following steps, we’ll guide you through each stage, from marking the drainage route to adding the finishing touches.
Let’s move on to the first step: marking the drainage route.
Step 1: Marking the Drainage Route
Marking the drainage route is the first step in the installation process. This will help guide you as you dig trenches and install the drainage pipes. Follow these steps to mark the drainage route effectively:
1. Assess your garden:
Take a thorough look at your garden and identify the areas where water tends to accumulate or where you want to improve drainage. This could be near downspouts, low-lying areas, or sections with poor soil drainage. Consider the overall slope of your yard and identify the best path for water to flow away from these problem areas.
Read more: How To Install Pop-Up Garden Drainage
2. Measure and mark:
Using a tape measure, measure the distance from the starting point of your drainage system to the desired outlet point. Mark the starting and ending points with stakes or spray paint. Ensure that you maintain a gentle downward slope to allow water to flow naturally.
3. Determine trench depth:
The depth of the trenches should be determined based on the type of drainage system you’re installing. For surface drains, dig a trench deep enough to accommodate the drain and allow for proper installation. For subsurface or French drains, the trench depth should be based on the desired depth of the drainpipe and the surrounding gravel or crushed stone bed.
4. Mark the trench path:
Using stakes or spray paint, mark the path of the trenches on the ground. Ensure that the marking is clear and visible to guide you during the digging process. You can use a straightedge or level to ensure that the lines are straight and evenly spaced.
5. Adjust the route if necessary:
If you encounter any obstacles, such as tree roots or utility lines, you may need to adjust the route of the drainage system. It’s essential to avoid damaging any existing structures or services while digging trenches. Consult with professionals if you’re unsure about the location of underground utilities.
By taking the time to accurately mark the drainage route, you’ll have a clear path to follow during the installation process. This step sets the foundation for the upcoming steps, where you’ll dig trenches and install the drainage pipes. Stay tuned for step 2: digging trenches.
Step 2: Digging Trenches
Once you have marked the drainage route, it’s time to start digging trenches for your drainage system. The trenches will provide a pathway for the drainage pipes, allowing water to flow away from problem areas. Follow these steps to dig trenches effectively:
1. Gather the necessary tools:
Before you begin digging, make sure you have the right tools on hand. A sturdy shovel or trenching spade will be your primary tools for this task. Additionally, a tape measure and straightedge or level can help ensure accuracy in trench depth and width.
2. Start digging:
At the starting point of your drainage route, use the shovel or trenching spade to dig a trench along the marked path. The trench should be wide enough to accommodate the chosen drainage pipe and allow space for backfilling later. The depth of the trench will depend on the type of drainage system you’re installing and should follow the recommended guidelines.
3. Maintain a gradual slope:
As you dig, remember to maintain a gentle and consistent slope along the trench. This slope should follow the natural gradient of your garden and ensure that water flows freely towards the desired outlet point. Use a level or straightedge to check the evenness of the slope as you progress.
4. Check trench width and depth:
Regularly check the width and depth of the trench as you dig to ensure it meets the specifications required for your chosen drainage system. Measure the width using a tape measure and compare it to the recommended width for the pipe and surrounding materials. Use the straightedge or level to check the depth and make adjustments if necessary.
5. Continue to the endpoint:
Continue digging the trench along the marked path until you reach the endpoint of your drainage system. Take care to maintain the gradual slope and consistent width throughout the entire length of the trench.
6. Dispose of excavated soil:
As you dig, transfer the excavated soil to a wheelbarrow or designated area for disposal. This will help keep the work area clean and organized.
By following these steps, you can efficiently dig the trenches for your drainage system. Once the trenches are complete, you’ll be ready to move on to the next step: installing the drainage pipes. Stay tuned for step 3!
Step 3: Installing the Drainage Pipes
With the trenches dug, it’s time to move on to the next step: installing the drainage pipes. The pipes will collect and channel water away from problem areas in your garden, ensuring proper drainage. Follow these steps to install the drainage pipes effectively:
1. Gather the necessary materials:
Before you begin, ensure you have the required materials, including the drainage pipes, pipe connectors, and fittings. Check that the pipes are the correct size and type for your chosen drainage system. Additionally, have the appropriate tools, such as a saw or pipe cutter, on hand if any pipe adjustments are needed.
2. Inspect the trench:
Take a moment to inspect the trench and remove any debris or excess soil that may have fallen in during the digging process. It’s important to have a clean and clear trench for proper pipe installation.
3. Begin pipe installation:
Starting at the lowest point of the trench, begin laying the drainage pipes. If you’re installing a French drain or subsurface drain, lay a layer of gravel or crushed stone along the bottom of the trench before placing the pipe. This will provide a stable base and ensure proper water flow.
4. Connect the pipes:
As you progress along the trench, connect the pipes using pipe connectors or fittings. Follow the manufacturer’s instructions for proper installation. Ensure that the connections are secure and leak-proof to prevent any water seepage.
5. Adjust pipe lengths if needed:
If necessary, cut the drainage pipes to the desired lengths using a saw or pipe cutter. Ensure that the cuts are clean and straight for proper pipe fitment.
6. Continue pipe installation:
Continue laying and connecting the drainage pipes along the marked trench, following the desired route and maintaining the gradual slope. Be careful not to damage the pipes or displace the gravel or crushed stone bed underneath.
7. Test the pipe installation:
Once all the pipes are installed, run water through the system to test for any leaks or blockages. Rectify any issues before proceeding to the next step.
By following these steps, you can successfully install the drainage pipes for your system. With the pipes in place, you’re ready to move on to the next step: connecting pipes and fittings. Stay tuned for step 4!
Step 4: Connecting Pipes and Fittings
With the drainage pipes installed, the next step is to connect them using pipe connectors and fittings. Properly connecting the pipes ensures a secure and leak-free drainage system. Follow these steps to connect the pipes and fittings effectively:
Read more: How To Add Drainage To A Garden
1. Check the pipe ends:
Inspect the ends of the drainage pipes to ensure they are clean and free from any debris or damage. Trim any rough edges or burrs with a utility knife to facilitate smooth and secure connections.
2. Apply PVC primer (if applicable):
If you’re working with PVC pipes, apply PVC primer to the outside of the pipe ends and the inside of the connectors or fittings. The primer helps clean the surfaces and prepares them for the adhesive.
3. Apply PVC adhesive:
Next, apply PVC adhesive to the primed areas of the pipe ends and the inside of the connectors or fittings. Follow the instructions on the adhesive label for application technique and drying time.
4. Insert the pipe ends:
Insert the pipe ends into the connectors or fittings, applying slight twisting motion to ensure a snug fit. Make sure the pipes are fully inserted to the recommended depth. Align any markings or indicators on the pipes and fittings to ensure proper alignment and flow direction.
Read more: What Is Drainage In Construction
5. Hold and secure the connection:
Hold the pipe and fitting connection firmly in place for the recommended time as specified by the adhesive manufacturer. This will allow the adhesive to set and create a strong bond. Avoid disturbing the connection until the adhesive is fully cured.
6. Repeat for other connections:
Repeat the process for all the connections along the drainage system, ensuring each connection is properly secured. Take extra care when connecting pipes at corners or junctions to maintain the desired direction of water flow.
7. Check for leaks:
Once all the connections are made, run water through the system and carefully inspect for any leaks. Pay close attention to the connections and areas where multiple pipes meet. If any leaks are detected, disassemble the connection, clean the surfaces, and reapply the adhesive.
By following these steps, you can effectively connect the drainage pipes and fittings, creating a secure and functional drainage system. With the pipes and fittings connected, you’re ready to move on to the next step: adding a gravel bed to enhance drainage. Stay tuned for step 5!
Step 5: Adding Gravel Bed
Adding a gravel bed is an important step in the installation of your drainage system. The gravel bed provides additional drainage and helps to stabilize the pipes. Follow these steps to properly add a gravel bed to your system:
Read more: How To Design Drainage For A House
1. Prepare the trench:
Ensure that the trench is clean and free of any debris or excess soil. Use a shovel or rake to remove any obstructions or loose material from the trench. This will provide a clean and stable base for the gravel bed.
2. Choose the right gravel:
Select an appropriate grade of gravel or crushed stone for your drainage system. The ideal size is typically around 3/4 inch to 1 inch in diameter. This size provides good drainage without allowing smaller particles to clog the system. Avoid using round stones, as they may roll and shift over time.
3. Add the gravel:
Start by pouring a layer of gravel into the bottom of the trench. The depth of the gravel bed will depend on the design and specifications of your drainage system. Typically, a layer of 2 to 4 inches should be sufficient. Use a rake or shovel to spread the gravel evenly along the bottom of the trench.
4. Level the gravel bed:
Once the initial layer of gravel is added, level it using a rake or shovel. Spread the gravel evenly to ensure a consistent bed throughout the trench. This will create a stable base for the drainage pipes and prevent shifting or unevenness.
5. Align the pipes:
Check the alignment of the pipes, making sure they are positioned properly within the trench. The pipes should sit evenly on the gravel bed, ensuring a secure and stable installation. Make any necessary adjustments to the pipe position at this stage.
6. Complete the gravel bed:
Continue adding more gravel to the trench, covering the pipes completely. The layer of gravel should be at least 2 inches above the top of the pipes. Use a rake or shovel to spread the gravel and achieve an even and consistent bed. Ensure that there are no gaps or spaces in the gravel bed.
7. Inspect the gravel bed:
Take a final look at the gravel bed, ensuring that it is level and well-distributed along the trench. Make any necessary adjustments to achieve a smooth and uniform surface.
Adding a gravel bed provides excellent drainage and stability to your system, ensuring proper functionality. With the gravel bed in place, you’re ready to move on to the next step: backfilling the trenches. Stay tuned for step 6!
Step 6: Backfilling Trenches
After adding the gravel bed in the previous step, it’s time to backfill the trenches. Backfilling involves filling the remaining space in the trench with soil, ensuring stability and covering the drainage pipes. Follow these steps to properly backfill the trenches:
Read more: How Does House Drainage Work
1. Gather the right soil:
Collect the soil that was originally removed from the trenches. It’s important to use the same soil to ensure consistency and maintain the natural characteristics of your garden. If necessary, you can amend the soil with organic matter or compost to improve its drainage properties.
2. Fill the trench:
Start by carefully adding soil to the trench, covering the pipes and gravel bed. Use a shovel or rake to spread the soil evenly and ensure that there are no large air pockets or gaps. Gradually fill the trench, layer by layer, compacting the soil gently as you go. Avoid excessive compaction, as it can hinder water drainage.
3. Maintain the slope:
As you backfill, keep the desired slope in mind. Ensure that the soil is packed more firmly on the sides of the trench, gradually sloping towards the desired drainage outlet. This will facilitate water flow and prevent soil erosion.
4. Compact the soil:
After each layer of soil is added, use a hand tamper or the back of a shovel to lightly compact the soil. This will help stabilize the backfill and prevent settling over time. Be cautious not to over-compact, as it can disrupt the natural drainage flow.
Read more: How To Use Rocks For Plant Drainage
5. Monitor for settling:
Keep an eye on the backfilled trenches over time. If settling occurs, add more soil as necessary to ensure proper coverage of the drainage system. Aim for a uniform and consistent soil level along the trench.
6. Restore the surface:
If any surfaces were disturbed during the installation process, such as lawn or garden beds, take the time to restore them. Add topsoil, level it, and lightly compact it to create a smooth and even surface. Reseed or replant as needed to blend the restored areas back into your garden.
7. Clean up the work area:
Finally, clean up the work area by removing any excess soil, debris, or tools that were used during the backfilling process. Ensure that the area is tidy and safe.
By following these steps, you can effectively backfill the trenches, providing stability and coverage to your drainage system. With the trenches properly backfilled, you’re ready to move on to the final step: adding the finishing touches. Stay tuned for step 7!
Step 7: Finishing Touches
With the drainage system installed and the trenches backfilled, it’s time to add the finishing touches to complete the project. These final steps will ensure that your drainage system functions properly and seamlessly blends into your garden. Follow these steps for the finishing touches:
Read more: How Deep Should Garden Drainage Be
1. Inspect the system:
Take a thorough look at your newly installed drainage system. Check all the connections, pipes, and fittings to ensure they are secure and free from any leaks. Verify that the slope is maintained, allowing water to flow freely along the desired path.
2. Test the system:
Run water through your garden or use a hose to test the effectiveness of the drainage system. Observe how the water flows and whether it is properly directed away from problem areas. Make any necessary adjustments to ensure optimal drainage and functionality.
3. Cover exposed pipes:
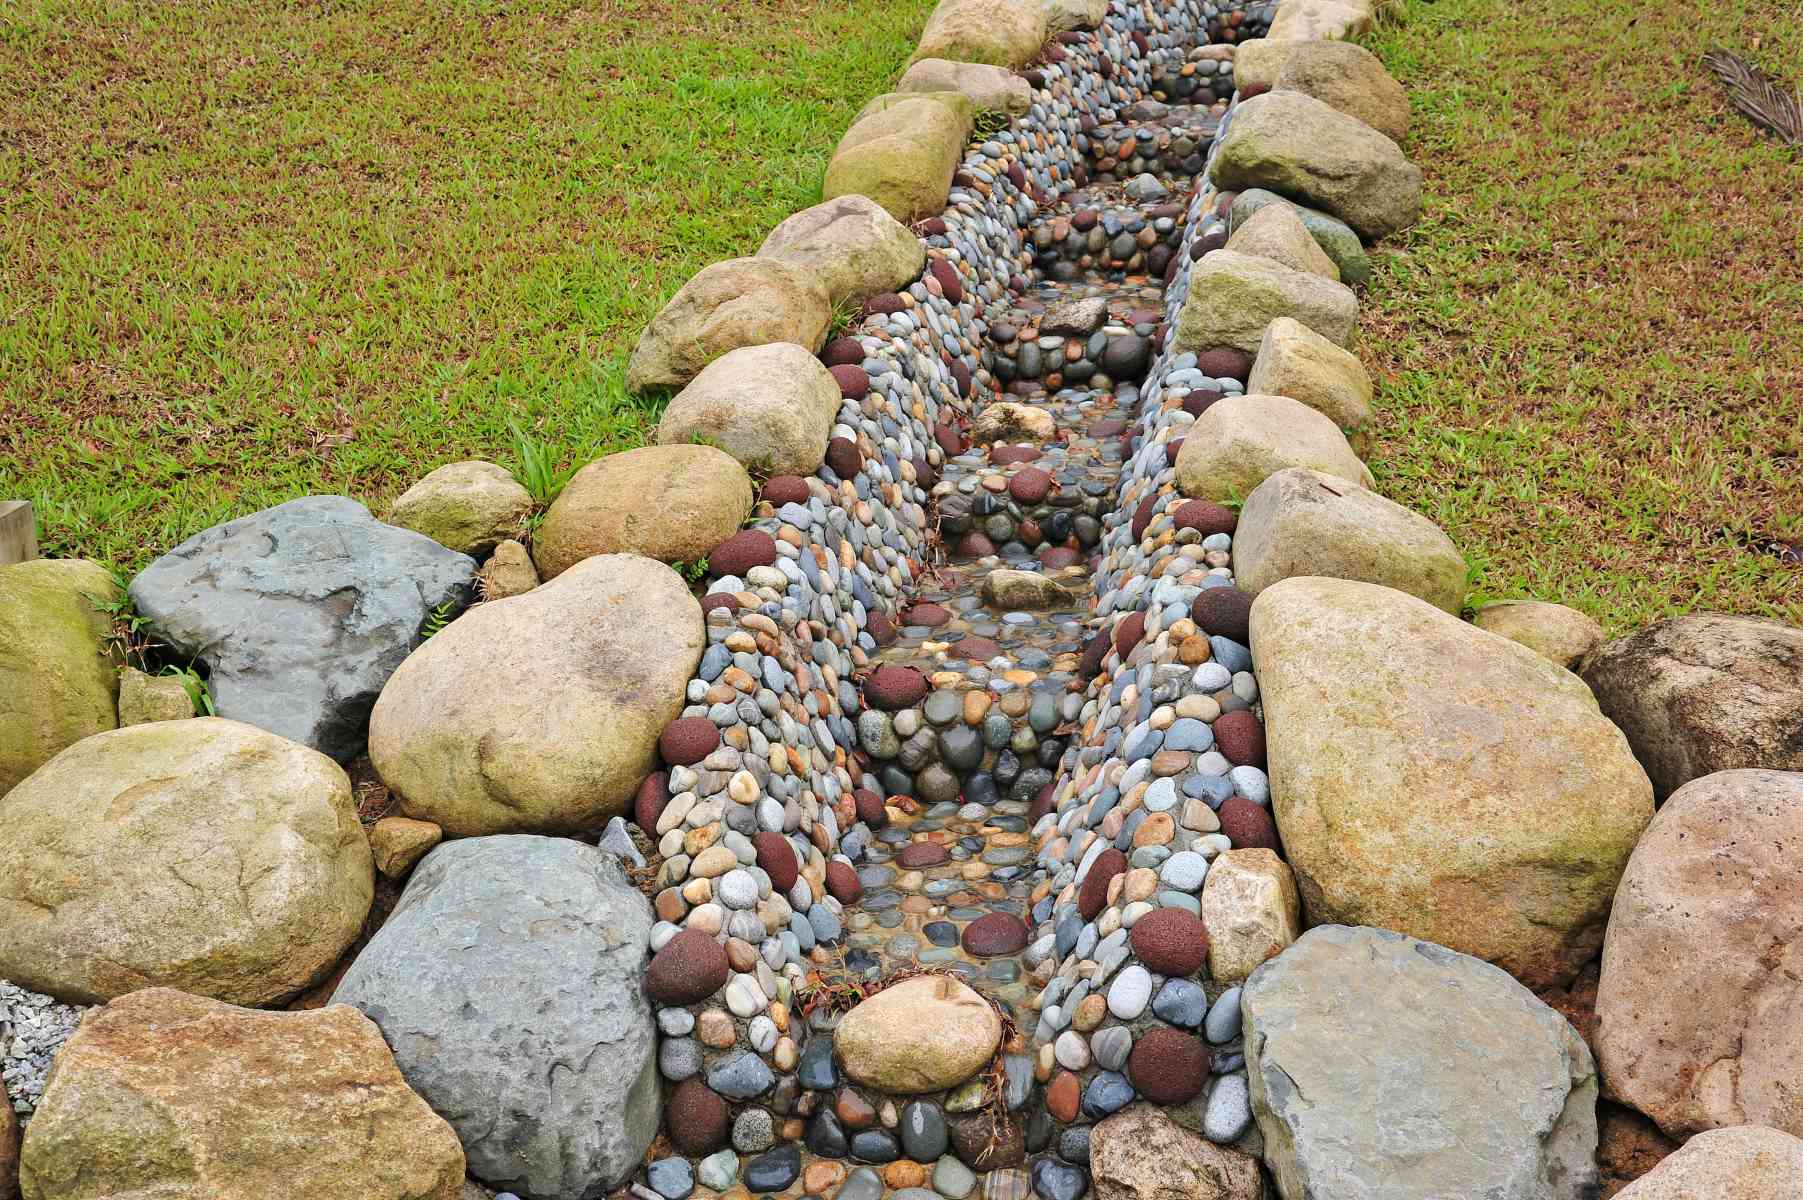
If any sections of your drainage system have exposed pipes, consider covering them with decorative materials. This can include rocks, river stones, or other landscaping materials that blend well with your garden. Not only will this improve the visual appeal, but it will also provide protection and prevent accidental damage to the pipes.
4. Restore the landscape:
If any plants, flowers, or garden features were temporarily removed during the installation process, now is the time to replant and restore them. Add fresh mulch or topsoil, water your plants, and ensure they are properly situated in their original locations.
Read more: How Deep Should Garden Drainage Be
5. Regular maintenance:
To keep your drainage system in optimal condition, it’s essential to perform regular maintenance. This includes cleaning any debris or blockages from the system, inspecting and repairing any damaged components, and monitoring the system’s effectiveness during heavy rainfalls or irrigation.
6. Monitor for improvements:
After the installation and maintenance, observe your garden for any improvements in drainage. Notice whether problem areas have become drier, soil erosion has been reduced, or waterlogging has been eliminated. Keep an eye out for any signs of water pooling or any issues that may require further attention.
7. Seek professional help if needed:
If you encounter any persistent drainage issues or are unsure about the effectiveness of your system, don’t hesitate to seek professional help. Landscape professionals or drainage experts can provide valuable advice and guidance to further enhance your drainage system and address any concerns.
By following these final steps, you can ensure that your drainage system is fully functional and seamlessly integrated into your garden. With the finishing touches completed, stand back and admire your well-drained and healthy outdoor space.
Congratulations on successfully installing your garden drainage system! Enjoy the benefits of improved water management and a thriving garden.
Conclusion
Installing a drainage system in your garden is a crucial step in maintaining a healthy and vibrant outdoor space. It helps prevent waterlogging, soil erosion, and damage to plants and structures. By following the steps outlined in this guide, you can successfully install a drainage system on your own.
Starting with proper planning and design, you’ll assess your garden’s needs and choose the right drainage system to address the specific issues you face. Gathering the necessary materials and tools will ensure a smooth installation process. From marking the drainage route and digging trenches to connecting pipes and adding a gravel bed, each step plays a vital role in creating an effective drainage system.
Backfilling the trenches and adding the finishing touches will complete the installation, leaving you with a well-designed and functional drainage system that seamlessly blends into your garden. Regular maintenance and monitoring will ensure its continued effectiveness in managing water runoff and preserving the health of your plants.
Remember, if you have any doubts or encounter persistent drainage issues, it’s always wise to seek professional help. Landscape professionals or drainage experts can provide expert advice and assistance, ensuring the optimal performance of your drainage system.
With a properly installed drainage system, you can enjoy a garden free from the problems caused by excessive water. Your plants will thrive, your structures will remain stable, and you’ll have peace of mind knowing that you’ve taken steps to protect your outdoor space.
So, roll up your sleeves and get started on installing your garden drainage system. Enjoy the benefits of a well-drained garden and create an outdoor space that you can truly appreciate.
Frequently Asked Questions about How To Install Drainage In The Garden
Was this page helpful?
At Storables.com, we guarantee accurate and reliable information. Our content, validated by Expert Board Contributors, is crafted following stringent Editorial Policies. We're committed to providing you with well-researched, expert-backed insights for all your informational needs.
0 thoughts on “How To Install Drainage In The Garden”