Home>Renovation & DIY>Home Renovation Guides>How To Finish A Crawl Space
Home Renovation Guides
How To Finish A Crawl Space
Modified: April 22, 2024
Learn how to properly finish a crawl space with our comprehensive home renovation guide. Get expert tips and advice for a successful project.
(Many of the links in this article redirect to a specific reviewed product. Your purchase of these products through affiliate links helps to generate commission for Storables.com, at no extra cost. Learn more)
Introduction
Finishing a crawl space is a crucial step in maintaining the structural integrity and overall health of your home. While often overlooked, the crawl space plays a significant role in regulating moisture levels and preventing potential issues such as mold growth, wood rot, and pest infestations. By taking the time to properly finish your crawl space, you can create a healthier and more energy-efficient environment within your home.
In this comprehensive guide, we will walk you through the essential steps to finish a crawl space effectively. From clearing out the space to adding insulation and sealing off potential entry points, each step is vital in ensuring that your crawl space remains dry, clean, and well-protected.
By following the detailed instructions provided in this guide, you will not only enhance the overall quality of your living space but also potentially increase the value of your home. So, let's roll up our sleeves and dive into the process of finishing a crawl space to create a more comfortable and durable foundation for your home.
Key Takeaways:
- Don’t overlook your crawl space! Clear out debris, address moisture and pest issues, and inspect for mold to create a healthier and more durable home foundation.
- Seal, insulate, and maintain your crawl space for a resilient and energy-efficient home. Add finishing touches and establish a maintenance routine for long-term protection.
Read more: How To Inspect A Crawl Space
Step 1: Clearing out the space
Before embarking on the process of finishing your crawl space, it is essential to start with a clean slate. Clearing out the space is the first crucial step in preparing the area for further enhancements. Here's a detailed breakdown of how to effectively clear out your crawl space:
-
Remove Debris: Begin by removing any debris, such as rocks, wood scraps, and old insulation, that may have accumulated in the crawl space over time. Use a sturdy pair of gloves and a dust mask to protect yourself from potential allergens and irritants.
-
Address Moisture: Take note of any signs of moisture or water accumulation in the crawl space. If there are any visible pools of water or damp areas, it's important to address the underlying causes before proceeding further. This may involve fixing any plumbing leaks or improving the drainage around your home's foundation.
-
Inspect for Pest Infestations: Look for signs of pest infestations, such as rodent droppings, chewed materials, or nesting areas. If you suspect a pest problem, it's advisable to consult with a professional pest control service to address the issue before moving forward with the finishing process.
-
Check for Mold and Mildew: Inspect the crawl space for any signs of mold or mildew growth. These can be indicative of excess moisture and poor ventilation, which need to be remedied before proceeding. If mold is present, it's crucial to address the underlying moisture issue and consider mold remediation measures.
-
Assess Structural Integrity: Take the time to assess the structural integrity of the crawl space, paying attention to any signs of damage or deterioration in the support beams, floor joists, or foundation walls. Any structural issues should be addressed promptly to ensure the stability and safety of your home.
By thoroughly clearing out the crawl space and addressing any underlying issues, you are laying the groundwork for a successful finishing process. This initial step sets the stage for the subsequent enhancements that will transform your crawl space into a clean, dry, and well-protected area within your home.
Step 2: Inspecting for any issues
After clearing out the crawl space, the next critical step in finishing the space is conducting a thorough inspection to identify any underlying issues that may compromise its integrity and functionality. This meticulous assessment is essential for addressing potential problems before they escalate and ensuring that the crawl space is well-prepared for the subsequent finishing steps.
Identifying Moisture Intrusion
One of the primary concerns during the inspection is identifying any sources of moisture intrusion. This involves examining the walls, floor, and ceiling of the crawl space for signs of water seepage, condensation, or dampness. Common indicators of moisture issues include water stains, efflorescence (white, powdery residue), and musty odors. By pinpointing the areas affected by moisture, you can take proactive measures to mitigate the problem and prevent future damage.
Assessing Ventilation and Air Circulation
Proper ventilation is crucial for maintaining a healthy crawl space environment. During the inspection, it's important to evaluate the ventilation system, ensuring that air circulation is adequate to prevent stagnant, humid conditions. Blocked or inadequate vents can impede airflow, leading to moisture buildup and potential mold growth. By assessing the ventilation components, such as vents, fans, and air pathways, you can address any deficiencies that may compromise air quality and moisture control.
Read more: How To Maintain A Crawl Space
Checking Insulation Condition
Insulation plays a vital role in regulating temperature and moisture levels within the crawl space. During the inspection, carefully examine the condition of the insulation material. Look for signs of damage, compression, or displacement that may compromise its effectiveness. Additionally, assess the coverage and thickness of the insulation to determine if any areas require reinforcement or replacement. By ensuring that the insulation is in good condition, you can optimize energy efficiency and thermal comfort within the crawl space.
Evaluating Pest and Termite Activity
Pests and termites can pose significant threats to the structural integrity of a crawl space. As part of the inspection, thoroughly examine the area for signs of pest infestation, including droppings, gnaw marks, and nesting materials. Additionally, look for evidence of termite activity, such as mud tubes and wood damage. Identifying and addressing pest and termite issues early on can prevent extensive damage to the wooden components of the crawl space.
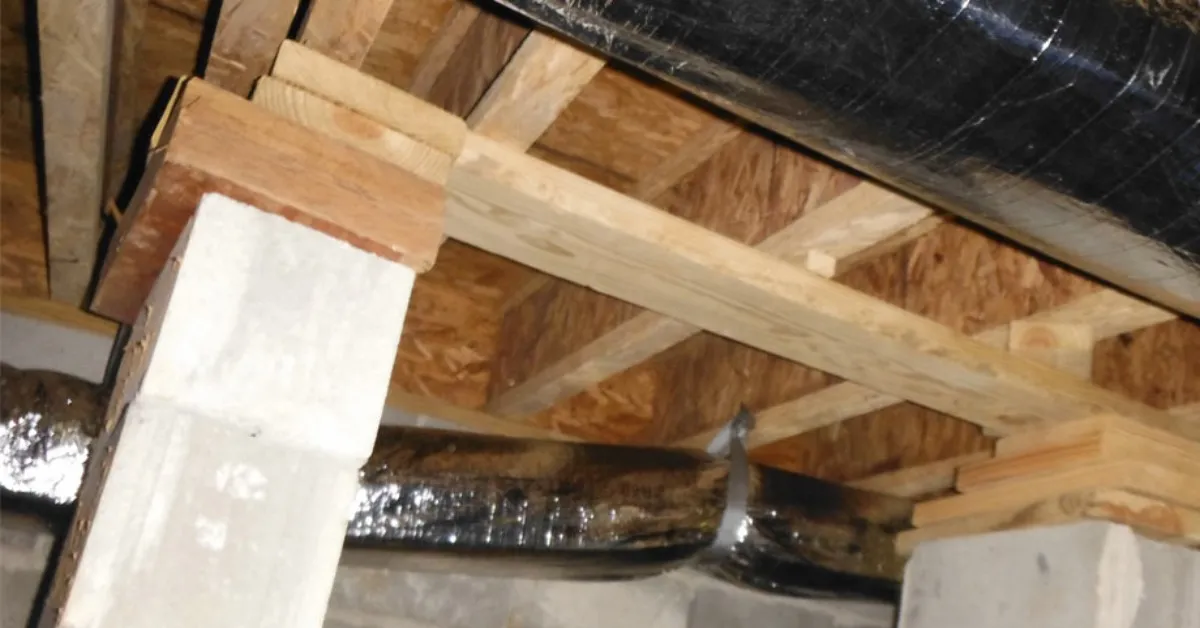
Verifying Structural Integrity
Lastly, the inspection should encompass a comprehensive assessment of the structural elements within the crawl space. This involves examining the condition of support beams, floor joists, and foundation walls for any signs of deterioration, sagging, or damage. Identifying structural issues early on is crucial for implementing timely repairs and ensuring the stability and safety of the crawl space.
By conducting a meticulous inspection for moisture intrusion, ventilation, insulation, pest activity, and structural integrity, you can gain a comprehensive understanding of the crawl space's condition. This proactive approach allows you to address any underlying issues effectively, setting the stage for the subsequent repair and enhancement processes.
Step 3: Repairing any damage
Upon completing the inspection of the crawl space, the next crucial step is to address any identified damage or deterioration. Repairing any structural, moisture-related, or insulation issues is essential for ensuring the long-term integrity and functionality of the space. By promptly addressing these issues, you can prevent further damage and create a solid foundation for the subsequent finishing enhancements.
Read more: How To Winterize A Crawl Space
Structural Repairs
If the inspection revealed any structural damage, such as rotting wood, sagging beams, or compromised foundation walls, it is imperative to initiate repairs promptly. This may involve reinforcing weakened support beams, replacing damaged floor joists, or addressing foundation cracks. Structural repairs are vital for maintaining the stability and load-bearing capacity of the crawl space, safeguarding the overall structural integrity of your home.
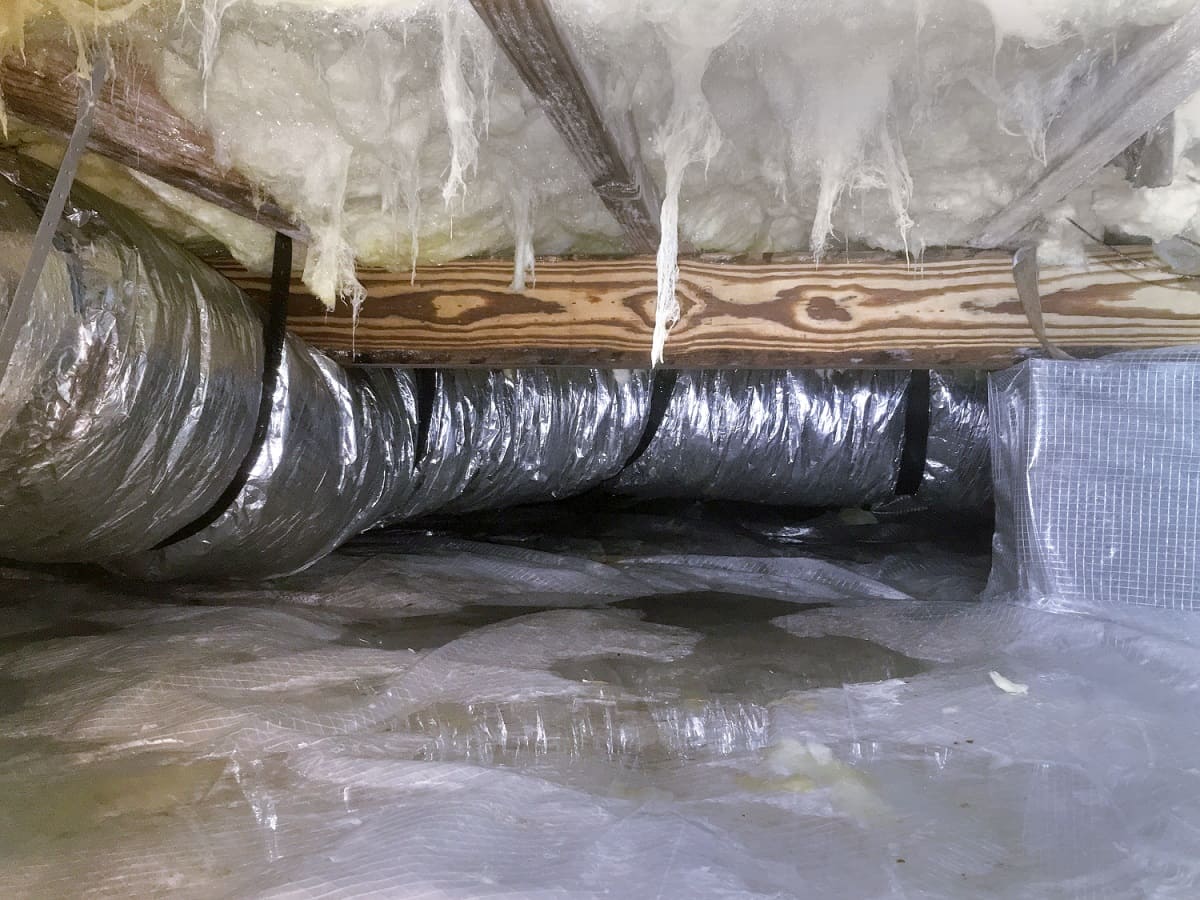
Moisture Damage Mitigation
In cases where moisture intrusion has caused damage, such as wood rot, mold growth, or deteriorated insulation, it is essential to mitigate the effects of moisture promptly. This may involve replacing water-damaged insulation, treating affected areas for mold remediation, and implementing moisture control measures. Addressing moisture-related damage is crucial for preventing further deterioration and creating a dry, healthy environment within the crawl space.
Insulation Reinforcement
If the inspection revealed inadequate or damaged insulation, reinforcing or replacing the insulation material is necessary to optimize energy efficiency and thermal performance. By ensuring proper insulation coverage and integrity, you can create a more comfortable and temperature-regulated crawl space environment. Additionally, reinforcing insulation helps prevent heat loss and condensation, contributing to overall moisture control.
Pest and Termite Remediation
In the event of pest or termite activity within the crawl space, it is essential to address the infestation and implement preventive measures. This may involve removing pest nesting materials, sealing off entry points, and consulting with pest control professionals to eradicate the infestation. By remedying pest and termite issues, you can protect the wooden components of the crawl space from further damage and infestation.
Read more: How To Waterproof A Crawl Space
Sealing and Waterproofing
As part of the repair process, sealing off potential entry points for moisture and pests is crucial for maintaining a dry and secure crawl space. This may involve sealing foundation cracks, installing vapor barriers, and ensuring that crawl space access points are properly sealed. Additionally, waterproofing measures, such as applying sealants and moisture-resistant coatings, can further enhance the moisture protection of the space.
By diligently addressing any identified damage through structural repairs, moisture damage mitigation, insulation reinforcement, pest remediation, and sealing, you can effectively restore the integrity and functionality of the crawl space. These proactive repair measures lay the groundwork for the subsequent installation of moisture barriers, insulation, and ventilation enhancements, ensuring that the finished crawl space remains resilient and well-protected.
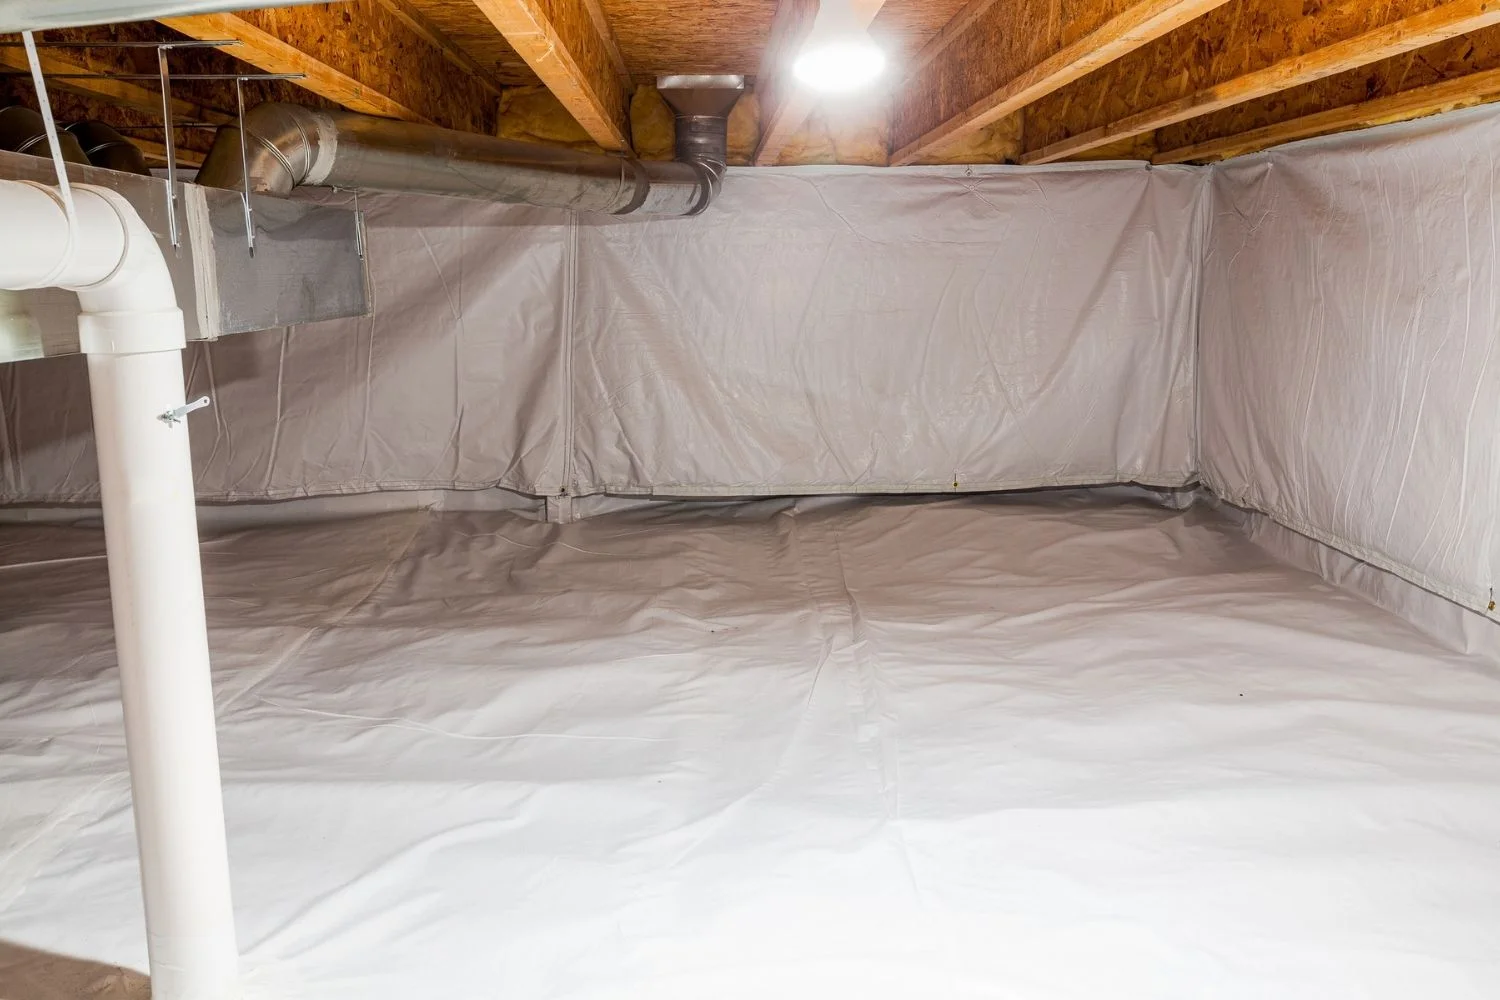
Step 4: Installing a vapor barrier
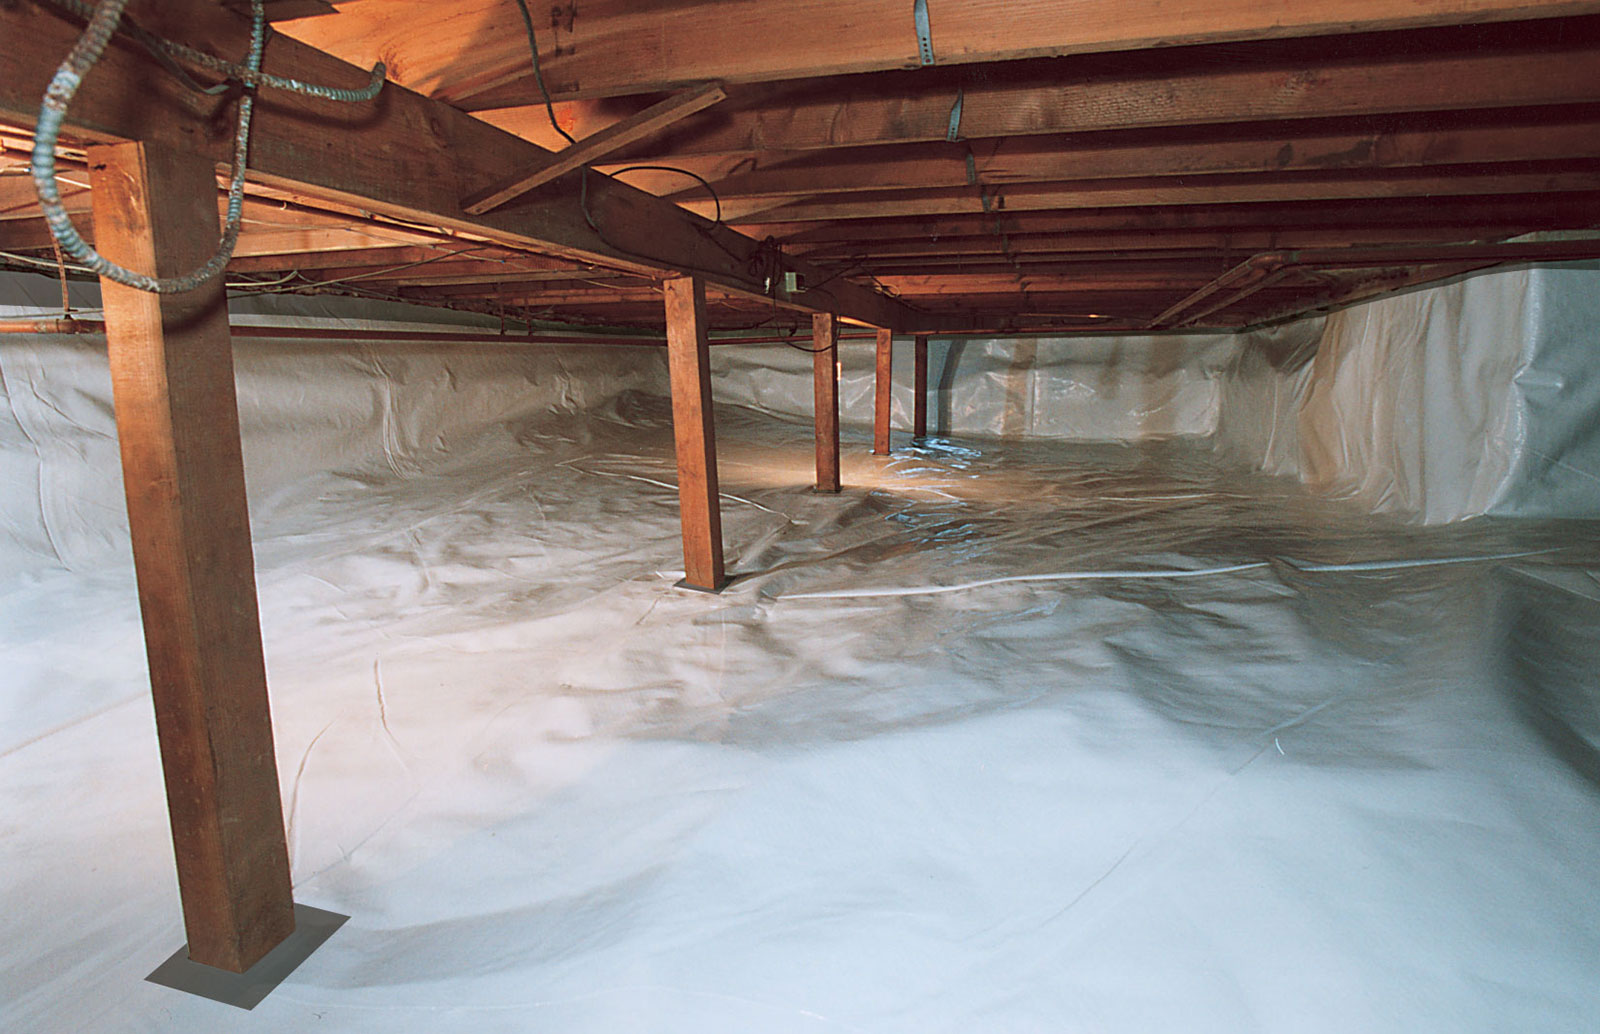
Installing a vapor barrier is a pivotal step in finishing a crawl space, as it plays a crucial role in controlling moisture levels and preventing water vapor from permeating the space. A vapor barrier, typically made of polyethylene plastic sheeting, acts as a protective barrier against moisture, helping to create a drier and more controlled environment within the crawl space.
The process of installing a vapor barrier involves meticulous attention to detail and precision to ensure effective moisture control. Here's a comprehensive overview of the steps involved in installing a vapor barrier in a crawl space:
1. Preparation and Cleaning
Before laying down the vapor barrier, it is essential to prepare the crawl space by clearing out any remaining debris and ensuring that the surface is clean and free of obstructions. This may involve sweeping the area, removing loose particles, and addressing any remaining moisture or dampness. A clean and dry surface provides the ideal foundation for the vapor barrier installation.
2. Measuring and Cutting
The next step involves measuring the dimensions of the crawl space to determine the required size of the vapor barrier. It is crucial to ensure that the vapor barrier will cover the entire floor area of the crawl space, extending up the walls to create a seamless moisture barrier. Once the measurements are taken, the vapor barrier material is carefully cut to fit the dimensions of the crawl space.
Read more: How To Vent Crawl Space
3. Placement and Securing
With the vapor barrier cut to size, it is carefully positioned on the crawl space floor, ensuring that it extends up the walls to create a continuous barrier. The edges of the vapor barrier are securely sealed and fastened in place using appropriate adhesives, tapes, or mechanical fasteners. Attention to detail during this step is essential to prevent any gaps or openings that could compromise the effectiveness of the vapor barrier.
4. Overlapping and Sealing
In areas where multiple sections of the vapor barrier meet, overlapping the edges is crucial to create a seamless and watertight barrier. The overlapping sections are securely sealed using high-quality vapor barrier tape or adhesive to prevent moisture from seeping through the seams. Additionally, any penetrations, such as pipes or conduits, are carefully sealed to maintain the integrity of the vapor barrier.
5. Insulation Compatibility
In conjunction with the vapor barrier installation, it is important to ensure compatibility with the insulation material. If insulation is present in the crawl space, the vapor barrier is installed in a manner that complements and enhances the insulation's effectiveness. This may involve creating a protective layer between the insulation and the ground, preventing moisture from compromising the insulation's performance.
By meticulously following these steps, the installation of a vapor barrier can effectively create a moisture-resistant environment within the crawl space, contributing to improved air quality, reduced moisture-related issues, and enhanced overall durability. The vapor barrier serves as a proactive measure to safeguard the crawl space against moisture intrusion, ultimately contributing to a healthier and more resilient home environment.
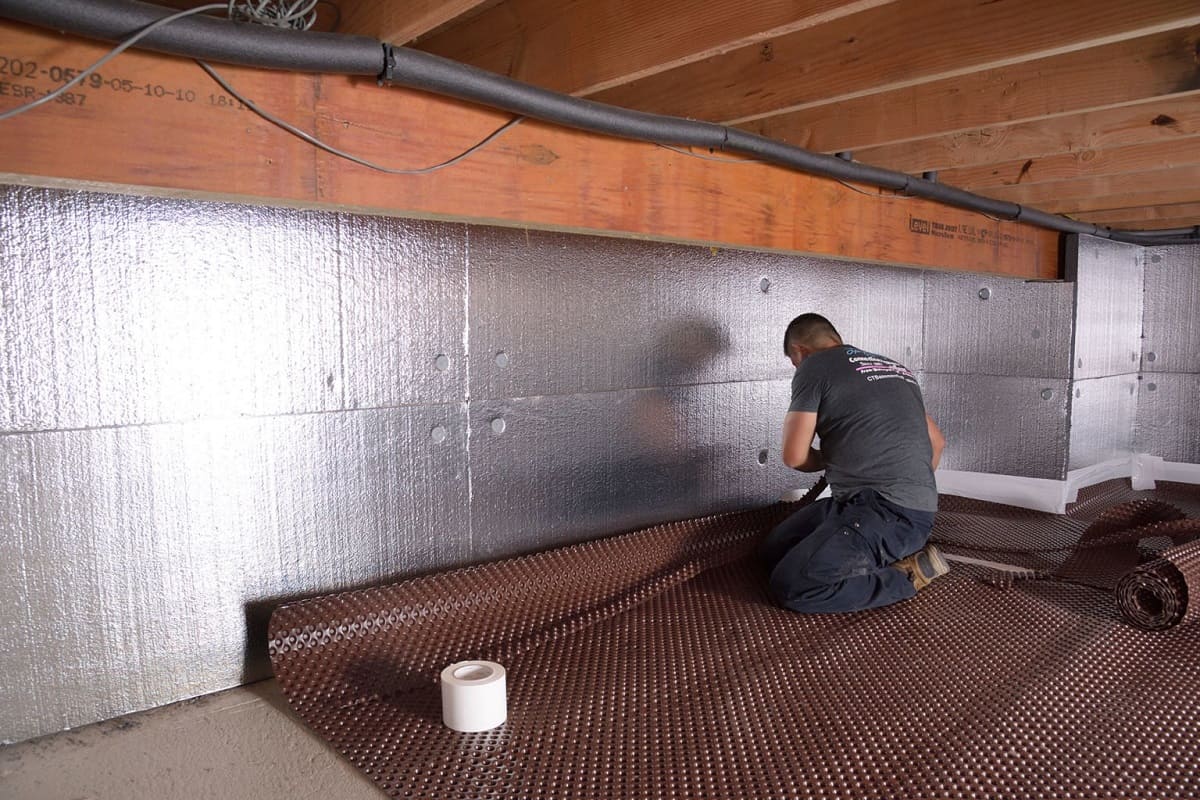
Step 5: Adding insulation
Adding insulation to the crawl space is a critical step in creating a more energy-efficient, comfortable, and moisture-controlled environment within your home. Proper insulation helps regulate temperature, reduce energy costs, and prevent moisture-related issues, contributing to overall home comfort and durability. When approaching the task of adding insulation to the crawl space, it's essential to consider the specific insulation materials, installation techniques, and compatibility with the crawl space environment.
Read more: What Is A Crawl Space?
Selecting Suitable Insulation Materials
The choice of insulation materials plays a significant role in determining the effectiveness of thermal performance and moisture control within the crawl space. Common insulation materials suitable for crawl space applications include rigid foam board, fiberglass batts, and spray foam insulation. Each type of insulation offers unique benefits in terms of R-value, moisture resistance, and installation versatility. When selecting insulation materials, it's important to consider the local climate, moisture levels, and specific requirements of the crawl space environment to ensure optimal performance.
Installation Techniques and Considerations
The installation of insulation in the crawl space requires careful attention to detail and adherence to best practices to achieve maximum effectiveness. Depending on the chosen insulation material, installation techniques may involve securing rigid foam boards to the interior walls, laying fiberglass batts between floor joists, or applying spray foam insulation to create a seamless thermal barrier. Proper installation techniques ensure that the insulation effectively minimizes heat transfer, prevents air infiltration, and contributes to moisture control within the crawl space.
Moisture Control and Ventilation Compatibility
Incorporating insulation into the crawl space environment should be accompanied by considerations for moisture control and ventilation compatibility. Proper moisture control measures, such as the installation of a vapor barrier and addressing any underlying moisture issues, are essential for preventing moisture-related damage and ensuring the longevity of the insulation. Additionally, ventilation compatibility is crucial for maintaining adequate air circulation and preventing the buildup of stagnant, humid air within the insulated crawl space.
Energy Efficiency and Thermal Comfort
By adding insulation to the crawl space, homeowners can significantly improve energy efficiency and thermal comfort throughout the home. Insulation helps minimize heat loss in the winter and heat gain in the summer, creating a more consistent and comfortable indoor environment. Additionally, the thermal barrier created by insulation contributes to reduced energy consumption, leading to potential cost savings on heating and cooling expenses.
Read more: How To Insulate The Floor In A Crawl Space
Overall Benefits of Crawl Space Insulation
The addition of insulation to the crawl space offers a range of benefits, including improved indoor air quality, reduced energy costs, enhanced structural durability, and increased comfort. Properly insulated crawl spaces contribute to a healthier and more resilient home environment, mitigating the risk of moisture-related issues and promoting overall energy efficiency.
By carefully selecting suitable insulation materials, employing proper installation techniques, addressing moisture control and ventilation compatibility, and reaping the benefits of enhanced energy efficiency and thermal comfort, homeowners can effectively enhance the crawl space environment through the addition of insulation. This proactive measure contributes to a more comfortable, durable, and energy-efficient home, ultimately improving the overall quality of living for occupants.
Step 6: Sealing off the space
Sealing off the crawl space is a pivotal step in the process of finishing a crawl space, as it serves to create a comprehensive barrier against moisture intrusion, air infiltration, and pest ingress. By effectively sealing off the space, homeowners can enhance the overall durability, energy efficiency, and indoor air quality of their homes. This step involves meticulous attention to detail and the implementation of various sealing measures to ensure a secure and well-protected crawl space environment.
Addressing Air Leaks and Openings
The first aspect of sealing off the crawl space involves identifying and addressing any air leaks, gaps, or openings that may allow outside air to infiltrate the space. This may include sealing around utility penetrations, sealing gaps in the foundation walls, and ensuring that access doors and vents are tightly sealed. By preventing air infiltration, homeowners can minimize energy loss, maintain consistent indoor temperatures, and reduce the workload on heating and cooling systems.
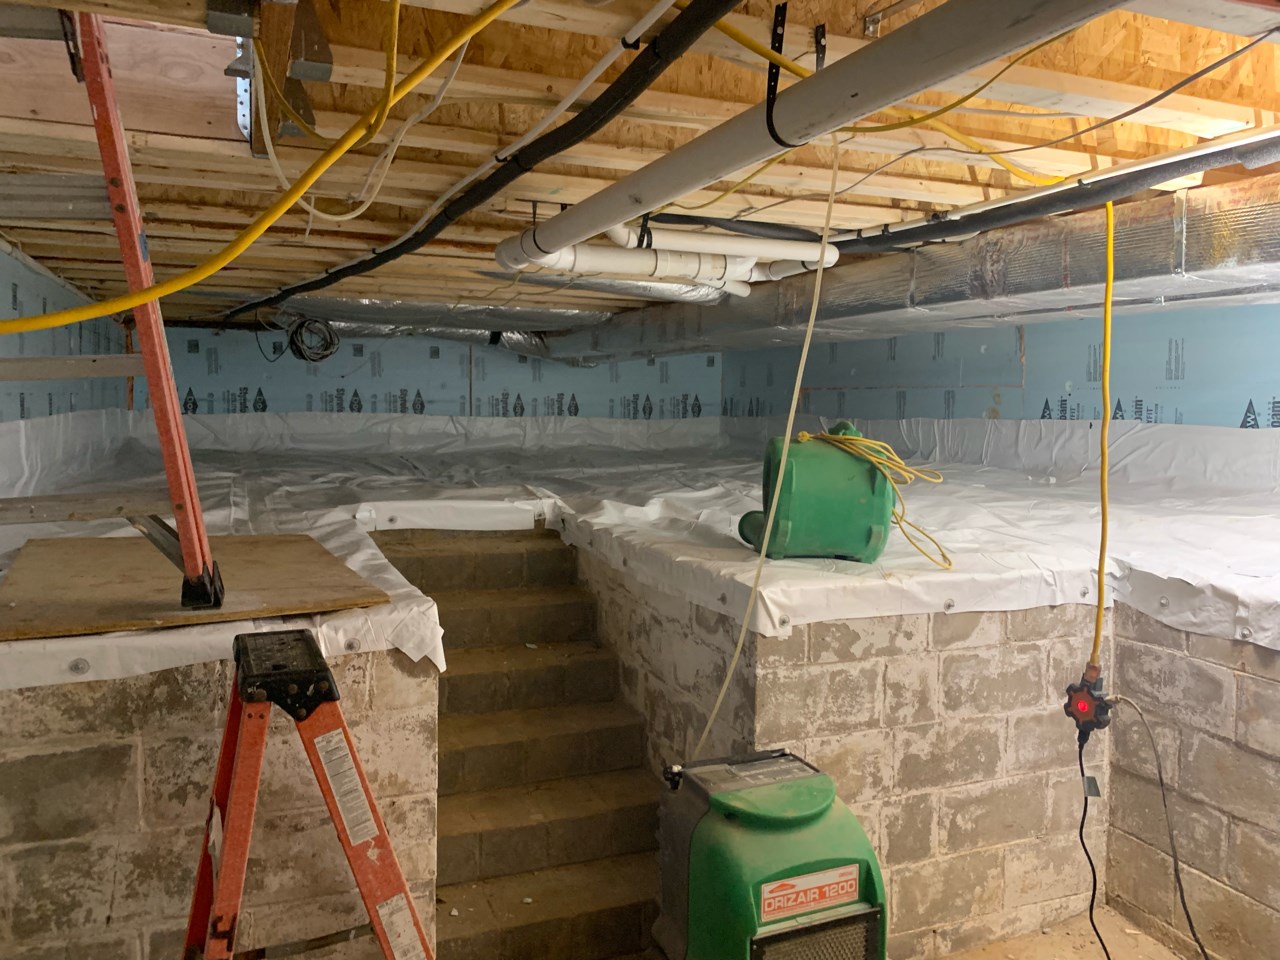
Implementing Crawl Space Encapsulation
Crawl space encapsulation is a comprehensive sealing measure that involves covering the entire crawl space floor and walls with a durable moisture barrier material, such as reinforced polyethylene. This encapsulation effectively creates a sealed environment, preventing moisture from the ground and walls from permeating the space. Additionally, crawl space encapsulation helps mitigate the risk of mold growth, wood rot, and structural damage caused by excess moisture.
Read more: How To Build A Crawl Space Door
Sealing Foundation Cracks and Gaps
Foundation cracks and gaps can serve as entry points for moisture and pests, compromising the integrity of the crawl space. Sealing these cracks and gaps using appropriate sealants and materials is essential for preventing water intrusion and pest ingress. By addressing foundation vulnerabilities, homeowners can fortify the structural resilience of the crawl space and minimize the risk of moisture-related issues.
Ensuring Proper Ventilation and Air Circulation
While sealing off the crawl space is crucial for moisture control, it is equally important to ensure that proper ventilation and air circulation are maintained. This involves evaluating the functionality of crawl space vents, installing vent covers to prevent pest entry, and optimizing air pathways to facilitate adequate airflow. Balancing moisture control with ventilation is essential for creating a healthy and well-regulated crawl space environment.
Sealing Access Points and Entryways
To further fortify the crawl space against external elements, it is essential to seal off access points and entryways that may serve as potential entry routes for pests and moisture. This may involve installing weather-stripping around access doors, sealing gaps around pipes and conduits, and reinforcing the integrity of crawl space access points. By securing these entryways, homeowners can create a more secure and protected crawl space environment.
By diligently implementing these sealing measures, homeowners can effectively fortify the crawl space against moisture intrusion, air infiltration, and pest ingress, contributing to a more durable, energy-efficient, and resilient home environment. The comprehensive sealing off of the crawl space serves as a proactive measure to safeguard the structural integrity and indoor air quality of the home, ultimately enhancing the overall comfort and longevity of the living space.
Step 7: Finishing touches and maintenance
With the foundational enhancements and protective measures in place, the final step in finishing a crawl space involves adding the finishing touches and establishing a maintenance routine to ensure the long-term effectiveness of the improvements.
Read more: How To Use Crawl Space
Enhancing Accessibility and Lighting
As a finishing touch, enhancing the accessibility and lighting within the crawl space can significantly improve its usability and maintenance capabilities. This may involve installing durable access doors or hatches that provide convenient entry for inspections and maintenance activities. Additionally, adequate lighting, such as LED fixtures, can be installed to facilitate visibility and safety within the crawl space, making it easier to identify potential issues and perform routine maintenance tasks.
Implementing Routine Maintenance Practices
Establishing a proactive maintenance routine is essential for preserving the integrity and functionality of the finished crawl space. Regular inspections for signs of moisture, pest activity, and structural issues should be conducted to identify and address potential concerns promptly. Additionally, maintaining the cleanliness of the crawl space, ensuring proper ventilation, and monitoring the condition of the vapor barrier and insulation are integral aspects of ongoing maintenance.
Monitoring and Addressing Moisture Levels
Monitoring moisture levels within the crawl space is crucial for preventing potential issues such as mold growth and wood rot. Utilizing moisture meters and hygrometers to assess humidity levels and moisture content can provide valuable insights into the effectiveness of the moisture control measures. If elevated moisture levels are detected, proactive measures, such as dehumidification or ventilation adjustments, should be implemented to maintain optimal moisture levels.
Sustaining Insulation Integrity
The integrity and effectiveness of the insulation material should be regularly monitored to ensure that it continues to provide optimal thermal performance and moisture control. Addressing any signs of damage, displacement, or compression of the insulation is essential for preserving its functionality. Additionally, reinforcing the insulation as needed and addressing any gaps or exposed areas contributes to sustained energy efficiency and thermal comfort.
Read more: How To Access A Crawl Space
Professional Inspections and Servicing
Periodic professional inspections and servicing by qualified contractors or specialists can provide valuable assessments of the crawl space condition and the effectiveness of the implemented enhancements. Professional inspections may include structural assessments, moisture level evaluations, and ventilation system checks, offering homeowners valuable insights and recommendations for maintaining a healthy and resilient crawl space environment.
By incorporating these finishing touches and establishing a proactive maintenance regimen, homeowners can ensure that the finished crawl space remains resilient, energy-efficient, and well-protected against potential issues. The combination of ongoing maintenance practices and periodic professional assessments contributes to the long-term sustainability and functionality of the crawl space, ultimately enhancing the overall quality and durability of the home.
Frequently Asked Questions about How To Finish A Crawl Space
Was this page helpful?
At Storables.com, we guarantee accurate and reliable information. Our content, validated by Expert Board Contributors, is crafted following stringent Editorial Policies. We're committed to providing you with well-researched, expert-backed insights for all your informational needs.

0 thoughts on “How To Finish A Crawl Space”