Articles
How To Braid The Edges Of A Fleece Blanket
Modified: December 7, 2023
Learn how to beautifully braid the edges of your fleece blanket with our step-by-step articles. Enhance your crafting skills and create stunning blankets now.
(Many of the links in this article redirect to a specific reviewed product. Your purchase of these products through affiliate links helps to generate commission for Storables.com, at no extra cost. Learn more)
Introduction
When it comes to adding a touch of style and personalization to a fleece blanket, braiding the edges can be a fun and creative way to achieve that. Not only does it give the blanket a unique and custom look, but it also helps to secure the edge and prevent fraying over time. Whether you’re making a blanket as a gift or just want to add a decorative element to your own cozy creation, braiding the edges of a fleece blanket is a simple yet satisfying technique.
In this article, we will guide you through the step-by-step process of how to braid the edges of a fleece blanket. We will provide a list of the materials you will need, along with detailed instructions on each stage of the braiding process. By the end of this article, you’ll have the knowledge and confidence to transform a plain fleece blanket into a stunning and personalized masterpiece.
So, grab your favorite fleece blanket and let’s get started on giving its edges a stylish twist!
Key Takeaways:
- Transform plain fleece blankets into personalized masterpieces by braiding the edges, adding a unique touch and preventing fraying. Enjoy the cozy warmth of your stylish creation!
- With basic braiding skills and creativity, turn ordinary blankets into extraordinary pieces that reflect your style and personality. Experiment with colors and patterns for unique designs.
Read more: How To Make A Fleece Blanket
What You Will Need
Before you begin braiding the edges of your fleece blanket, it’s important to gather all the necessary materials. Luckily, you won’t need many items, and most of them are probably already lying around your house.
Here’s a list of things you’ll need:
- Fleece blanket: Choose a fleece blanket in a color or pattern that suits your style. It should be large enough to comfortably wrap around you.
- Fabric scissors: Make sure you have a pair of sharp fabric scissors specifically designed for cutting through fleece material. Dull scissors may result in uneven edges.
- Measuring tape or ruler: It’s helpful to have a measuring tool to ensure even braids along the edge of the blanket.
- Pins or clips: These can be used to secure the fleece in place and prevent it from shifting while you’re braiding.
Once you have all your materials ready, find a comfortable and well-lit work area where you can spread out your blanket and work smoothly. Make sure you have enough space to move around and access all sides of the blanket.
Now that you have everything you need, it’s time to dive into the braiding process. Follow the next steps to achieve beautifully braided edges for your fleece blanket.
Step 1: Prepare the Edge of the Fleece Blanket
Before you start braiding, it’s important to prepare the edge of your fleece blanket to ensure clean and neat results. Follow these steps to get your blanket ready:
- Trim the edges: Use your fabric scissors to trim off any uneven or frayed edges of the fleece. This will create a clean starting point for your braiding.
- Measure and mark: Take your measuring tape or ruler and measure about 2-3 inches from the edge of the blanket, depending on how wide you want your braids to be. Mark this measurement at intervals along the edge of the blanket using a fabric pen or pin. These marks will serve as your guide when it’s time to start braiding.
- Cut slits or fringe: Once you’ve measured and marked the intervals, use your scissors to cut slits from the edge of the blanket up to the marked points. The slits should be about 2-3 inches long and spaced evenly apart. Be careful not to cut all the way through the blanket, just up to the marked points. This will create the fringe that you will use for braiding.
By trimming, measuring, and cutting the slits, you’ve now prepared the edge of your fleece blanket for the braiding process. Double-check that everything looks even and neat before moving on to the next step.
Now that the edge is ready, it’s time to start dividing it into sections for braiding. This will ensure a consistent and well-balanced pattern along the entire edge of the blanket.
Step 2: Divide the Edge into Sections
Dividing the edge of your fleece blanket into sections is essential for creating a neat and uniform braiding pattern. Follow these steps to divide the edge into sections:
- Identify your starting point: Choose one end of the blanket as your starting point. This will be where you begin your first braid.
- Divide into sections: Starting from your chosen starting point, count the number of slits or fringe sections you have along the edge of the blanket. Divide this number by three. This will determine how many sections you will have for braiding.
- Mark the sections: Use your fabric pen or pin to mark the sections along the edge of the blanket. You can create small dots or lines next to the slits to indicate the start and end points of each section. Make sure the sections are evenly distributed along the edge.
For example, if you have 15 slits along the edge of your blanket, dividing it by three would give you five sections for braiding. In this case, you would create five marks evenly spaced along the edge to guide your braiding.
Dividing the edge into sections will make it easier to keep track of your braids and ensure a consistent pattern. Now that your sections are marked, it’s time to move on to the actual braiding process!
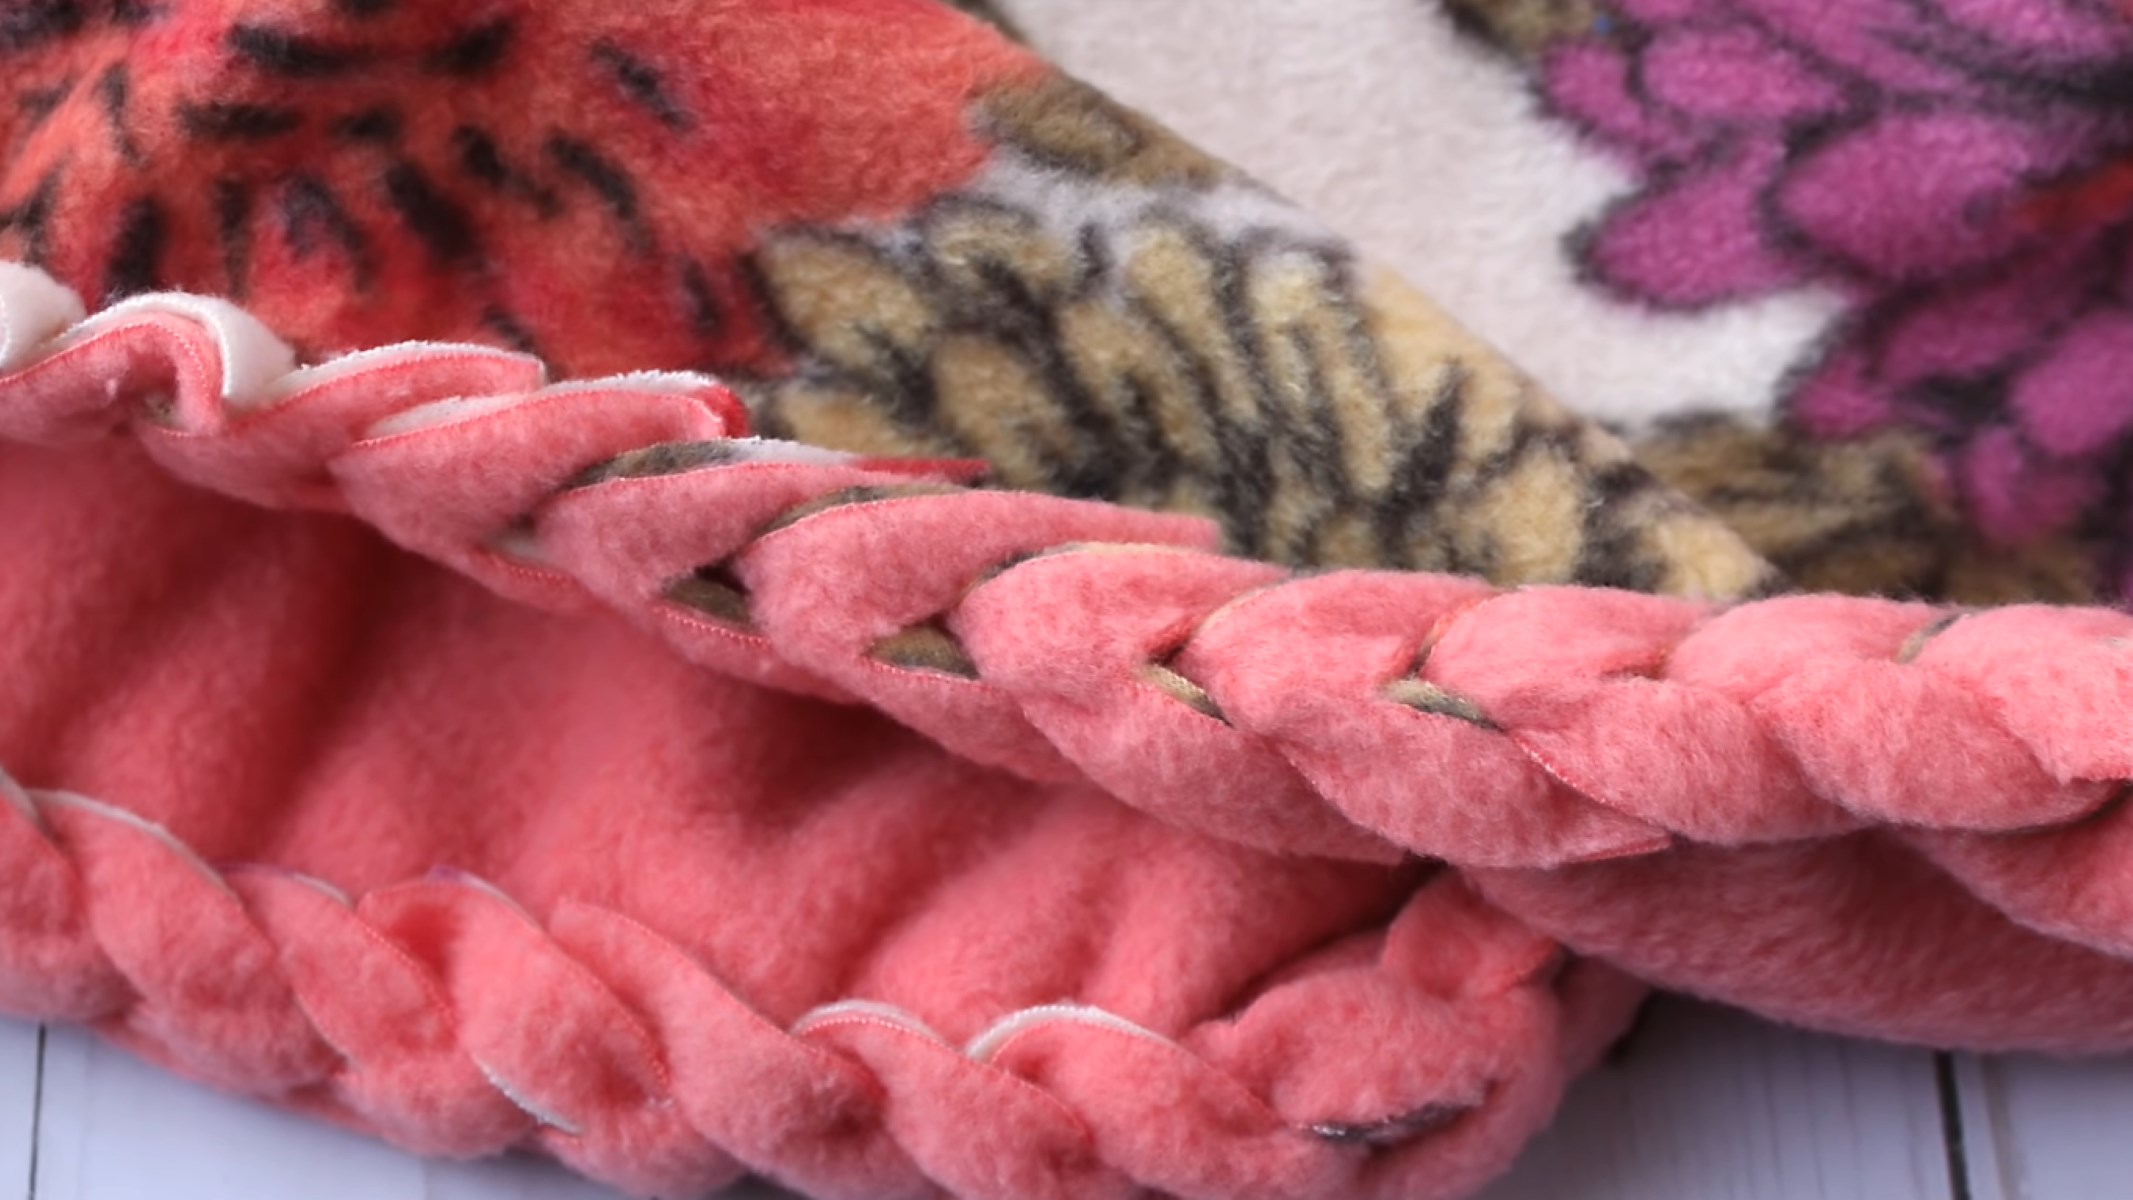
Step 3: Start Braiding
Now that you have divided the edge of your fleece blanket into sections, it’s time to start braiding! Follow these steps to create your first braid:
- Select your first section: Choose one of the marked sections as your starting point. This will be where you begin your first braid.
- Take three strips: From the selected section, pick up the first three strips of fringe. These will be the strands you will use for braiding. Hold them together firmly to keep them in place.
- Begin braiding: Start braiding the three strips, just like you would with hair. Cross the right strip over the middle strip, then cross the left strip over the new middle strip. Continue this pattern of alternating and crossing over until you reach the end of the section.
- Keep the braid tight: As you braid, make sure to keep the tension tight. This will help create a neat and secure braid. Adjust the strips as necessary to maintain an even appearance.
- Secure the end: When you reach the end of the section, braid the remaining strips tightly and secure them with a knot or a small piece of thread. This will keep the braid in place and prevent it from unraveling.
Repeat these steps for each section along the edge of the blanket, working your way from one end to the other. Keep in mind the markings you made to ensure you follow the correct sequence. As you progress, you’ll see the beautiful braided pattern taking shape!
Remember to take your time and be patient with the braiding process. It may take a little practice to get the hang of it, but once you do, it becomes easier and more enjoyable.
Now that you’ve braided your first section, it’s time to secure the braid and move on to the next section.
When braiding the edges of a fleece blanket, make sure to cut the fringe evenly and securely knot the braids to prevent unraveling. Use a contrasting color for a decorative touch.
Read more: What Is A Fleece Blanket
Step 4: Secure the Braid
After braiding each section along the edge of your fleece blanket, it’s important to secure the braid to ensure it stays in place. Follow these steps to secure your braid:
- Trim any excess: Take your fabric scissors and trim any excess fringe that sticks out beyond the end of the braid. This will give your braid a cleaner and more polished appearance.
- Tie a knot: Once you’ve trimmed the excess, tie a firm knot at the end of the braid. This will prevent it from unraveling and keep the braid secure.
- Hide the knot: If you prefer, you can fold the end of the braid under itself to hide the knot. This will give your finished blanket a more seamless and professional look.
- Repeat for each braid: Go through each section and repeat the trimming, knotting, and hiding process for every braid on the blanket.
Securing the braid not only ensures its longevity but also adds a neat and tidy finish to the edges of your fleece blanket. Take your time to carefully trim and tie each braid, paying attention to small details to achieve a polished final result.
Now that you’ve secured the braids, it’s time to move on to the final steps to complete the edges of your fleece blanket.
Step 5: Repeat for Remaining Sections
Now that you have secured the first set of braids on your fleece blanket, it’s time to repeat the process for the remaining sections. Follow these steps to complete the braiding for the remaining sections:
- Select the next section: Move on to the next marked section along the edge of the blanket.
- Take three new strips: From the selected section, pick up the first three strips of fringe, just like you did in the previous step. Hold them together firmly to keep them in place.
- Braid the strips: Start braiding the new set of strips using the same braiding technique as before. Cross the right strip over the middle, then cross the left strip over the new middle strip. Continue braiding until you reach the end of the section.
- Secure the braid: Trim any excess fringe, tie a knot at the end of the braid, and hide the knot if desired. Repeat this process for each remaining section.
Remember to maintain a consistent braiding pattern throughout the entire blanket, ensuring that each braid is secure and neatly finished. Take your time and pay attention to detail as you work through each section.
As you progress and complete the braiding for each section, you’ll notice the blanket taking on a beautiful and customized look. The braided edges add a touch of charm and uniqueness to your fleece blanket, making it truly special.
Once you have finished braiding all the remaining sections, it’s time to move on to the final step to complete the edges of your fleece blanket.
Step 6: Finish the Edges
Congratulations, you’re in the final step of braiding the edges of your fleece blanket! Now it’s time to add a finishing touch to make the edges neat and polished. Follow these steps to complete the edge finishing:
- Trim any remaining fringe: Take your fabric scissors and carefully trim any remaining loose fringe that extends beyond the braids. This will give the edges a clean and cohesive look.
- Optional: Fold and sew the edge: If you prefer a more finished look, you can fold the edge of the blanket inward and sew it in place. Use a needle and thread or a sewing machine to create a narrow hem along the edge. This will further prevent fraying and add durability to your blanket.
- Inspect and make final adjustments: Take a moment to inspect the blanket edges and make any final adjustments. Ensure that all braids are secure, the edges are trimmed neatly, and the overall appearance is to your liking.
By completing these steps, you have successfully braided and finished the edges of your fleece blanket. Take a step back and admire your handiwork – you’ve transformed a plain blanket into a personalized and stylish creation!
Now, wrap yourself in the cozy warmth of your newly braided fleece blanket and enjoy the fruits of your labor. It’s the perfect accessory for snuggling up on chilly evenings or gifting to someone special.
Remember, the braiding technique can be applied to future fleece blankets or even other fabric projects. Experiment with different colors and patterns to create unique designs and add your personal touch.
With a little creativity and some basic braiding skills, you can transform ordinary blankets into extraordinary pieces that reflect your style and personality.
Thank you for following this step-by-step guide on how to braid the edges of a fleece blanket. Happy braiding!
Conclusion
Braiding the edges of a fleece blanket is a simple yet rewarding way to add a touch of creativity and personalization to your cozy creation. By following the steps outlined in this guide, you can transform an ordinary blanket into a stunning masterpiece. Whether you’re making a blanket as a gift or for your own enjoyment, the braided edges will enhance its visual appeal and provide a unique touch.
Throughout this article, we discussed the materials needed, the step-by-step process for preparing the edge of the blanket, dividing it into sections, and the actual braiding technique. We also covered how to secure the braids and finish the edges with a neat and polished touch.
Remember, take your time and be patient as you go through each step. Learning to braid the edges of a fleece blanket may take a little practice, but with each braid, you’ll gain confidence and improve your skills. Soon enough, you’ll be able to create beautifully braided blankets with ease.
Don’t be afraid to get creative and experiment with different colors and patterns. Let your imagination run wild and make each blanket a unique expression of your style and personality. Whether you prefer simple and sleek braids or intricate and elaborate designs, the choice is yours.
So, gather your materials, find a comfortable work area, and start braiding those edges! Before you know it, you’ll have a one-of-a-kind fleece blanket that will keep you cozy and stylish for years to come.
Thank you for reading this comprehensive guide on how to braid the edges of a fleece blanket. Happy braiding!
Frequently Asked Questions about How To Braid The Edges Of A Fleece Blanket
Was this page helpful?
At Storables.com, we guarantee accurate and reliable information. Our content, validated by Expert Board Contributors, is crafted following stringent Editorial Policies. We're committed to providing you with well-researched, expert-backed insights for all your informational needs.


0 thoughts on “How To Braid The Edges Of A Fleece Blanket”