Articles
How To Make Braided Rugs
Modified: December 7, 2023
Learn how to make beautiful braided rugs with our informative articles. Discover tips, techniques, and step-by-step instructions to create stunning rugs for your home.
(Many of the links in this article redirect to a specific reviewed product. Your purchase of these products through affiliate links helps to generate commission for Storables.com, at no extra cost. Learn more)
Introduction
Braided rugs have a long history dating back to colonial times, where they were a practical solution for adding warmth and comfort to homes. Today, braided rugs remain a popular choice for their durability and timeless appeal. Making your own braided rug can be a rewarding and creative project, allowing you to customize the colors and patterns to match your decor.
In this article, we will guide you through the step-by-step process of making your own braided rug. From choosing the right fabric to sewing the braids together, we will cover all the necessary techniques and materials needed to create a beautiful and functional rug.
Before we get started, let’s gather the materials you will need for this project:
Key Takeaways:
- Crafting a braided rug is a creative and rewarding DIY project that allows you to customize your decor. From choosing durable fabrics to sewing the braids together, each step adds a personal touch to your home.
- The process of making a braided rug involves precision and patience, resulting in a beautifully crafted piece of decor. Enjoy the journey of transforming fabric strips into a cozy and inviting rug for your space.
Read more: How To Wash Braided Rugs
Materials Needed
- Fabric (such as cotton or wool)
- Scissors
- Measuring tape or ruler
- Sewing needle and thread
- Thimble (optional)
- Marker or pencil
- Straight pins
- Sewing machine (optional, but helpful)
Now that you have the materials ready, let’s dive into the step-by-step process of making a braided rug.
Key Takeaways:
- Crafting a braided rug is a creative and rewarding DIY project that allows you to customize your decor. From choosing durable fabrics to sewing the braids together, each step adds a personal touch to your home.
- The process of making a braided rug involves precision and patience, resulting in a beautifully crafted piece of decor. Enjoy the journey of transforming fabric strips into a cozy and inviting rug for your space.
Read more: How To Wash Braided Rugs
Materials Needed
Before you start making your own braided rug, it’s essential to gather all the necessary materials. Here’s a list of what you’ll need to get started:
- Fabric: Choose a fabric that is durable and suitable for a rug. Cotton or wool fabric is commonly used for braided rugs due to their strength and ability to withstand regular use.
- Scissors: You’ll need a pair of sharp scissors to cut the fabric strips. Make sure they are comfortable to hold and have a precise cutting edge to ensure clean cuts.
- Measuring tape or ruler: Accurate measurements are crucial in creating a well-proportioned rug. Use a measuring tape or ruler to ensure consistency in the length of fabric strips and braids.
- Sewing needle and thread: A needle and matching thread will be necessary to sew the braids together. Choose a thread color that complements your fabric choice.
- Thimble (optional): While not required, a thimble can be beneficial when sewing the braids together, especially if you’re working with thick fabric or using a needle with a smaller eye.
- Marker or pencil: You’ll need a marker or pencil to make markings on the fabric for cutting and sewing purposes. Ensure it’s a washable or erasable option to prevent permanent stains.
- Straight pins: Straight pins are useful for temporarily holding fabric layers together during the cutting and sewing process. Opt for sharp, rust-resistant pins that won’t damage the fabric.
- Sewing machine (optional, but helpful): While hand sewing is possible, using a sewing machine can save time and provide more precise and secure stitches. If you have access to a sewing machine, it can be a valuable tool for this project.
With these materials on hand, you’re all set to move on to the next steps of creating your braided rug. Take your time and enjoy the process of transforming fabric strips into a beautiful and functional piece of decor.
Step 1: Choosing the Right Fabric
When it comes to making a braided rug, selecting the right fabric is crucial for both durability and aesthetic appeal. Here are a few factors to consider when choosing the fabric for your rug:
- Durability: Look for a fabric that is sturdy and can withstand regular foot traffic. Cotton and wool are popular choices for braided rugs due to their strength and ability to retain their shape over time.
- Color and pattern: Consider the color palette and pattern of your fabric. Think about how it will complement your existing decor or if you want the rug to be a focal point in the room. Solids, stripes, and plaids are common choices for braided rugs.
- Texture: The texture of the fabric can add visual interest to your rug. You can opt for a smooth, uniform texture or experiment with different fabric textures for a more unique look.
- Stretch: Avoid fabrics that stretch excessively, as they can cause the rug to lose its shape and become distorted over time. Test the fabric for its stretchability by gently tugging on it from different angles.
- Size: Consider the size of your rug and how much fabric you will need. Measure the space where you plan to place the rug and calculate the length and width accordingly.
Depending on your preferences and the style of your home, you can choose from a wide variety of fabrics, including cotton, wool, denim, or even recycled materials like old t-shirts or fabric remnants. The key is to find a fabric that meets your desired criteria in terms of durability, color, pattern, texture, and stretch.
Once you’ve chosen the fabric for your braided rug, you’re ready to move on to the next step: cutting the fabric strips.
Step 2: Cutting the Fabric Strips
Now that you have selected the fabric for your braided rug, it’s time to cut the fabric into strips. Here’s how you can do it:
- Prepare the fabric: Start by washing and drying the fabric to ensure it is clean and free of any potential shrinkage. Iron it if necessary to remove any wrinkles or creases.
- Measure and mark: Use a ruler or measuring tape to measure the desired width of your fabric strips. The width will depend on the size of your rug and personal preference. Common widths range from 1 to 2 inches.
- Mark the fabric: Use a washable marker or pencil to mark the measurements on the fabric. Make straight, even lines across the fabric to guide your cutting.
- Cut the fabric: Carefully cut along the marked lines, using sharp scissors. Take your time to ensure clean, straight cuts. It is important to be accurate and consistent with the width of the fabric strips.
- Continue cutting: Repeat the marking and cutting process until you have enough fabric strips to complete your rug. The total number of strips will depend on the size and thickness of your rug. Aim for at least 20 to 30 fabric strips.
- Store the fabric strips: Once you have cut all the fabric strips, fold them neatly and store them in a safe place. Keep them organized and easily accessible for the next step of creating the braids.
Remember to take breaks as needed, especially if you’re cutting a large quantity of fabric strips. It’s important to maintain accuracy and avoid fatigue to ensure consistent strip widths.
With your fabric strips all cut and ready, you’re now one step closer to creating your braided rug. The next step involves preparing the fabric strips for braiding. So let’s move on to Step 3: Preparing the Fabric Strips.
When making braided rugs, use a sturdy fabric like denim or wool for durability. Pre-cut strips of fabric to ensure even braiding and use a non-slip rug pad to keep the rug in place.
Read also: 10 Unbelievable Braided Rugs for 2025
Step 3: Preparing the Fabric Strips
Now that you have your fabric strips cut, it’s time to prepare them for braiding. Properly preparing the fabric will ensure that your rug comes together smoothly and securely. Follow these steps to prepare your fabric strips:
- Remove any frayed edges: Inspect the fabric strips for any frayed or uneven edges. Trim off any loose threads or uneven portions to ensure that each strip is clean and even.
- Press the fabric strips: Use an iron to press the fabric strips. This will help to flatten and straighten them, making them easier to work with during the braiding process. Be sure to follow the fabric’s specific ironing instructions to prevent damage.
- Fold the edges: Fold each fabric strip in half lengthwise, bringing the long edges together. Use an iron to press the fold, creating a crisp crease. This will make it easier to handle and braid the fabric strips.
- Secure the ends: To prevent the folded ends from coming apart while braiding, you can either sew them together using a sewing machine or hand stitch them using a needle and thread. This will create a looped end that will anchor the braid securely.
- Label the fabric strips: If you’re using different fabric colors or patterns, it can be helpful to label or organize the strips beforehand. You can use small tags or markers to indicate the desired order or pattern for your braids.
Taking the time to properly prepare your fabric strips will ensure that your rug turns out neat and professional-looking. It will also make the braiding process smoother and more enjoyable. With your fabric strips now prepared, it’s time to move on to the exciting part: creating the braids. Read on to Step 4: Creating the Braids.
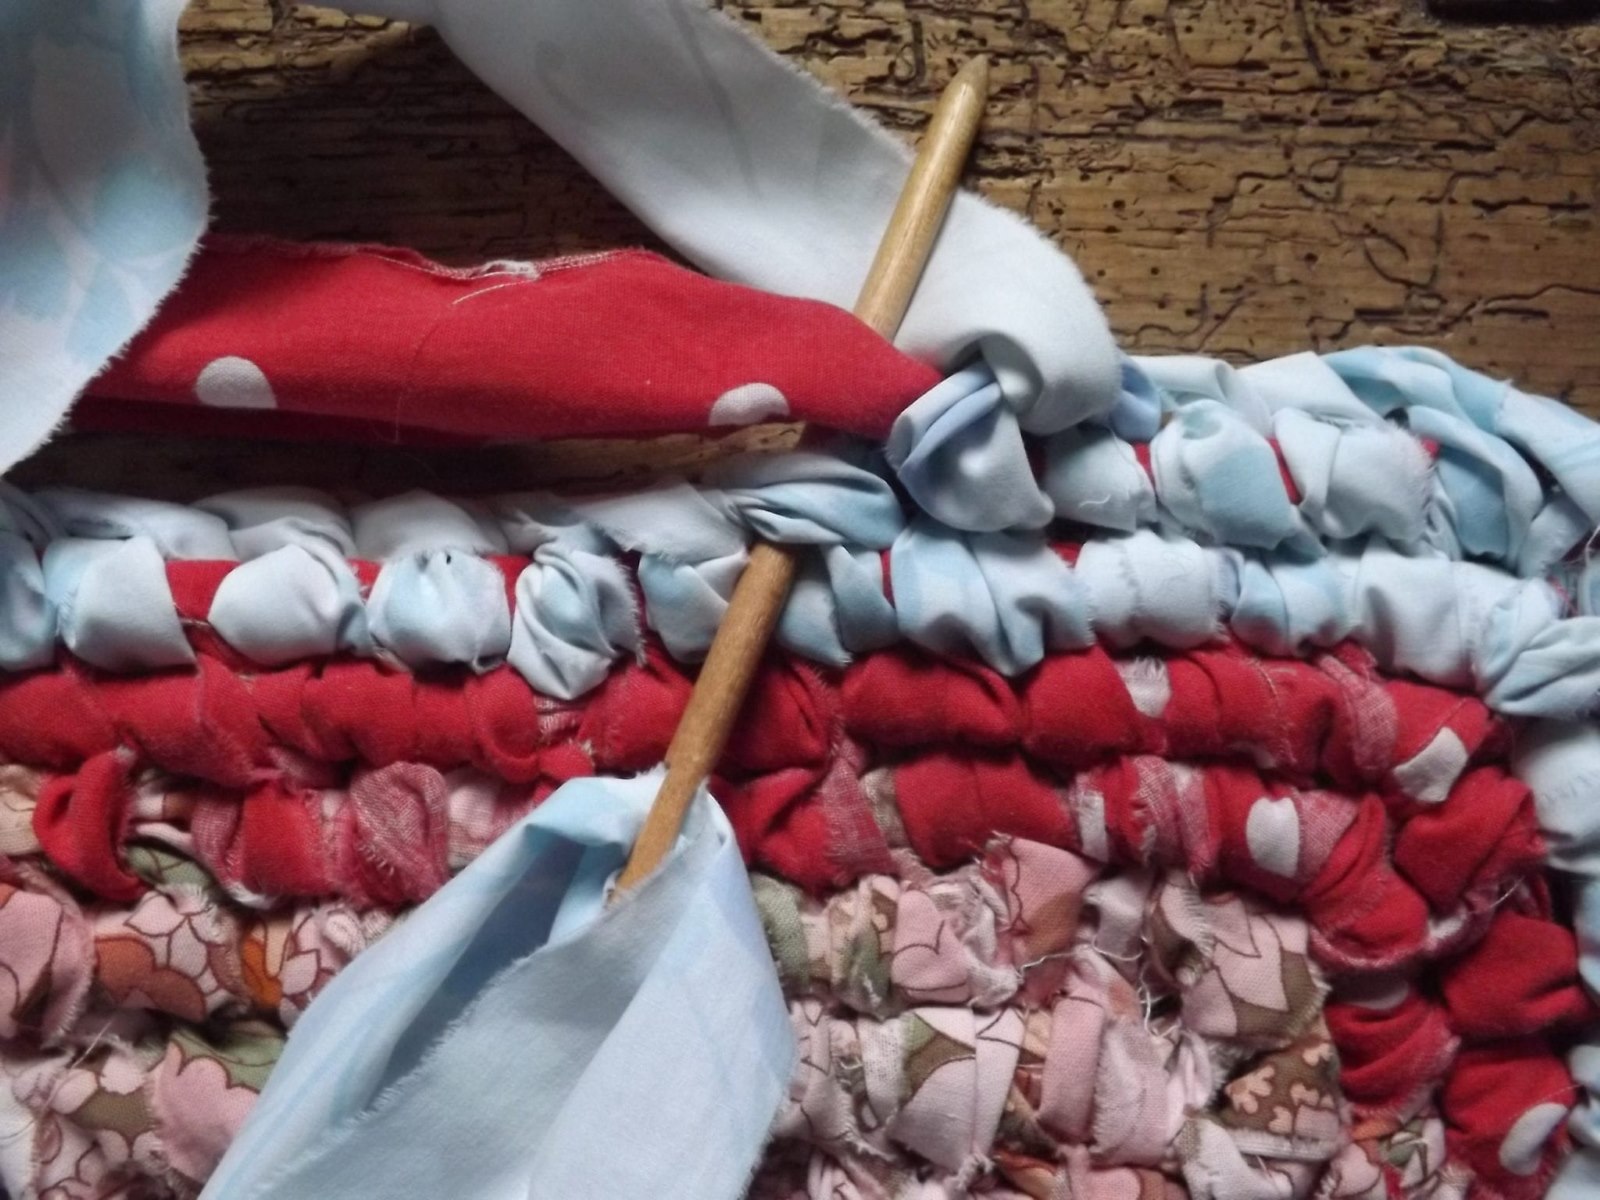
Step 4: Creating the Braids
Now that your fabric strips are prepared, it’s time to start creating the braids for your rug. Braiding is the process of intertwining three fabric strips to form a sturdy and attractive pattern. Follow these steps to create your braids:
- Select three fabric strips: Choose three fabric strips of your desired color or pattern. These will be the base strips for your braid.
- Secure the ends: Take the three fabric strips and secure one end together by tying a knot or using a clip. This will hold the strips in place as you braid.
- Start braiding: Hold the three fabric strips in your hands, one strip in each hand and one strip in the center. Cross the strip in your right hand over the center strip, then cross the strip in your left hand over the new center strip. Continue this pattern of crossing the outer strips over the center strip to create a continuous braid.
- Keep the tension even: As you braid, make sure to maintain an even tension on the fabric strips to create a tight and uniform braid. Avoid pulling too hard or too loosely, as it can affect the final appearance of the rug.
- Continue braiding: Keep braiding until you reach the desired length for your rug or until you run out of fabric. If you need to add more fabric to continue the braid, simply join additional fabric strips by sewing the ends together. Make sure to secure the new fabric strip tightly to maintain the integrity of the braid.
- Repeat the process: Once you’ve completed one braid, repeat the steps to create more braids using the remaining fabric strips. You can experiment with different color combinations and patterns to create a unique and personalized design.
Creating the braids for your rug may take some time and patience, but the end result will be worth it. Remember to take breaks if needed and enjoy the process of seeing your braids come together. With your braids complete, it’s time to move on to the next step: sewing the braids together. Continue reading for Step 5: Sewing the Braids Together.
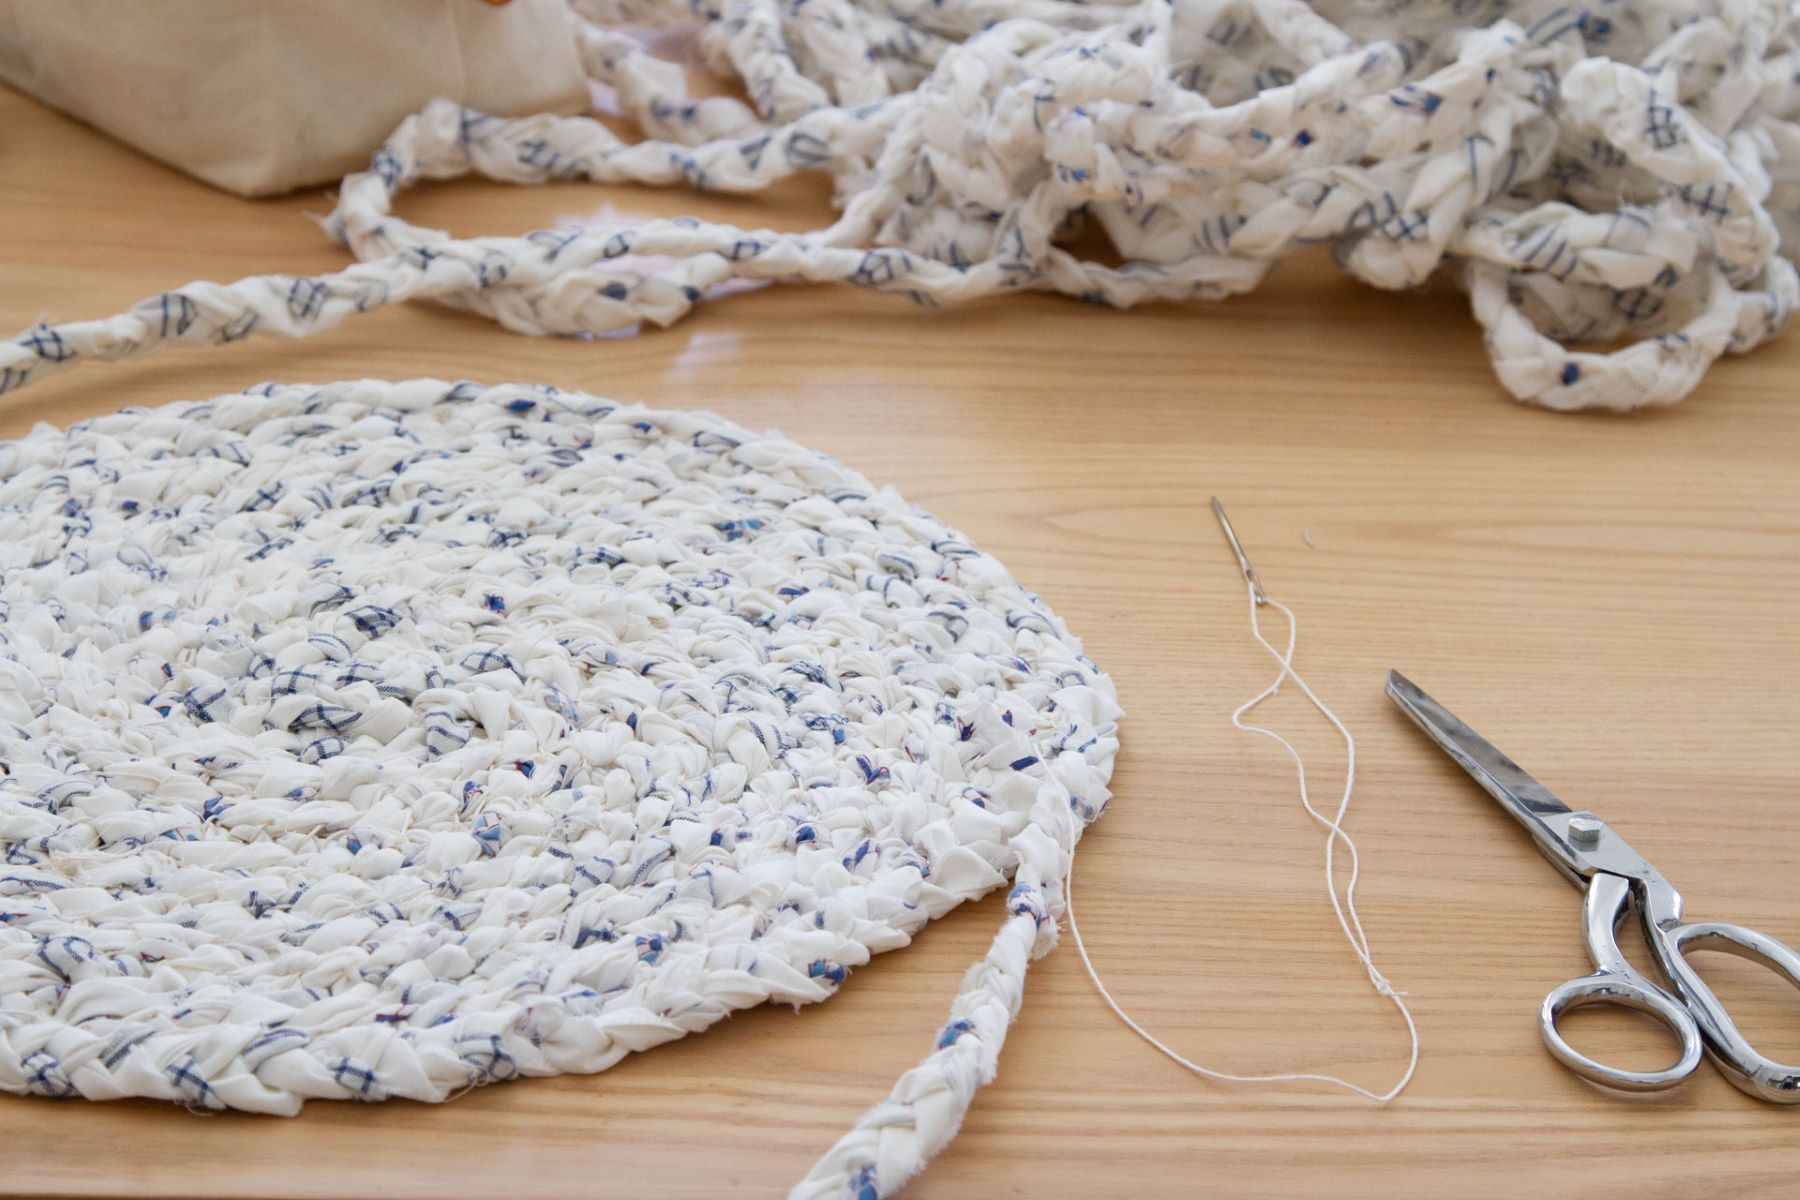
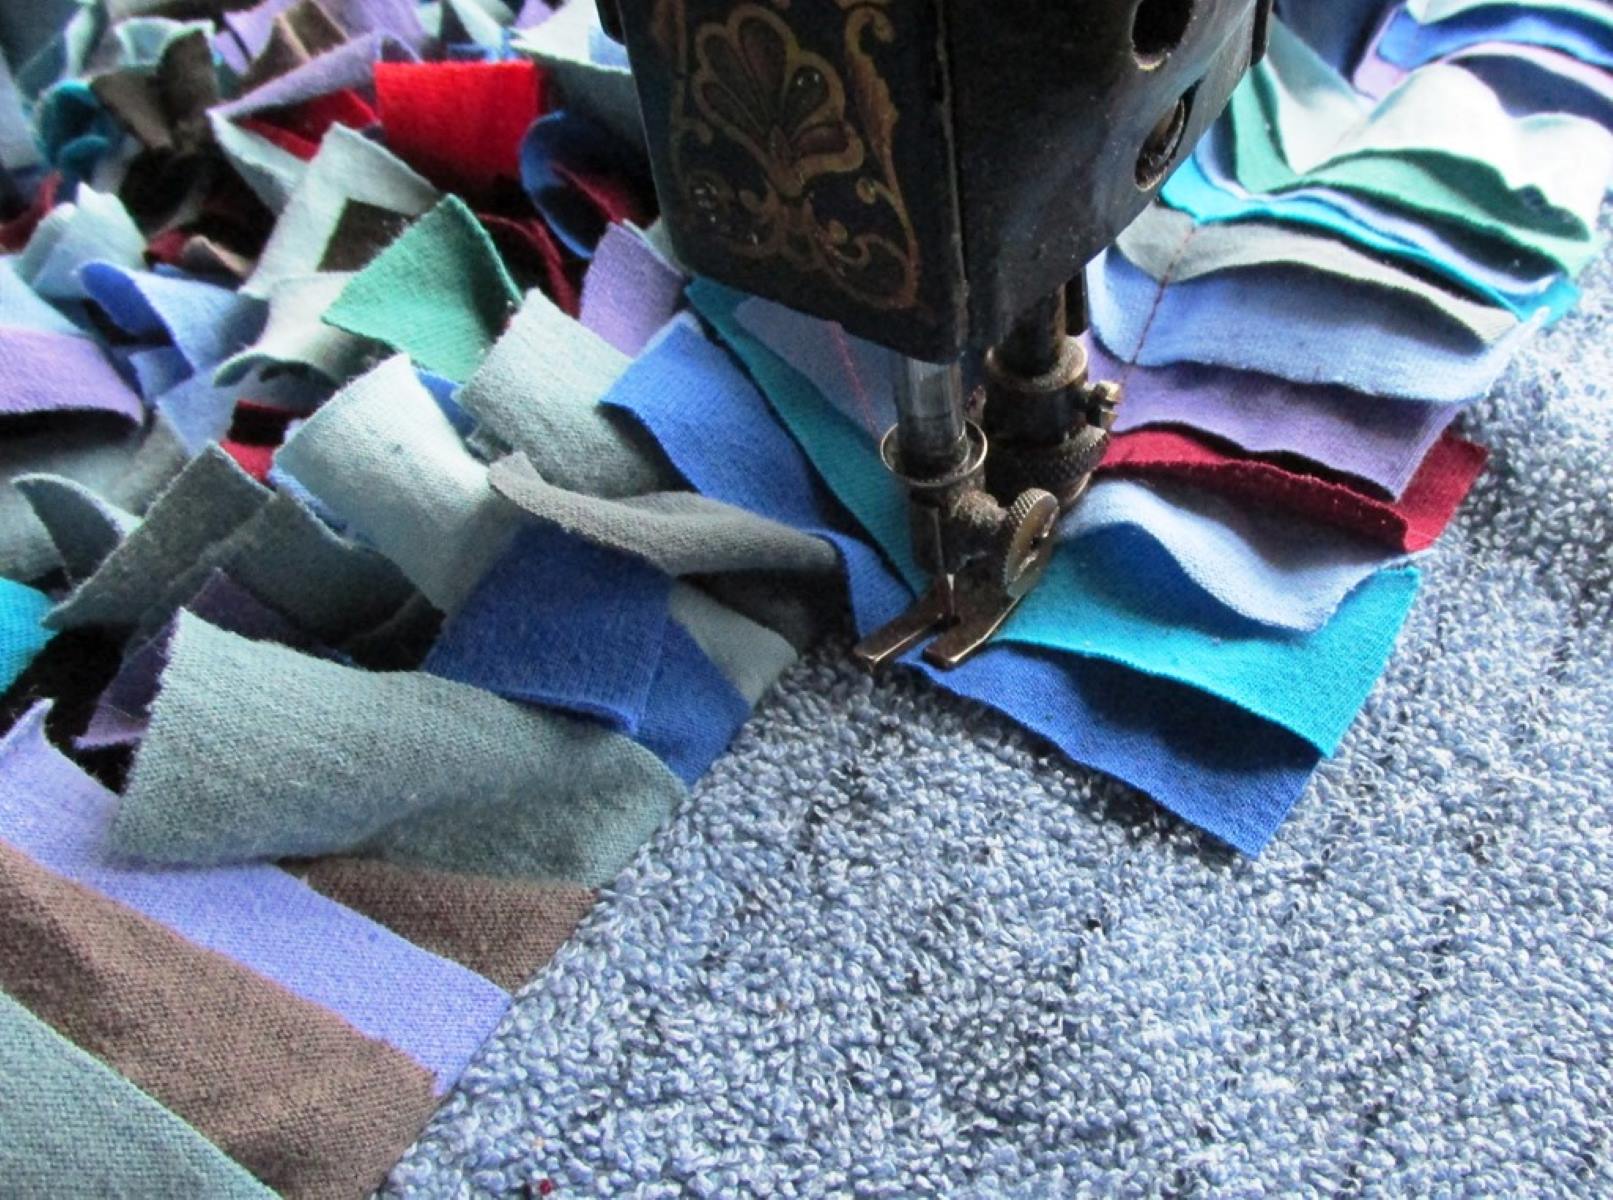
Step 5: Sewing the Braids Together
After successfully creating your braids, it’s time to sew them together to form your beautiful braided rug. Sewing the braids is a crucial step that will hold the rug securely and ensure its longevity. Here is a step-by-step guide to sewing the braids together:
- Prepare your workspace: Find a large, flat surface where you can spread out the braids. Make sure you have enough space to arrange the braids in the desired pattern of your rug.
- Arrange the braids: Lay the braids out in the desired shape and pattern for your rug. Overlap the ends of the braids to create smooth transitions between them.
- Secure the braids: Use straight pins to temporarily secure the overlapped ends of the braids. This will keep them in place while you sew them together.
- Thread your needle: Choose a strong and durable thread that matches the color of your fabric strips. Thread a sewing needle and tie a knot at the end of the thread.
- Start sewing: Begin sewing the braids together by taking small, even stitches. Insert the needle through the overlapped ends of the braids, making sure to catch both layers of fabric. Pull the thread tight after each stitch to ensure a secure connection.
- Continue sewing: Sew along the entire length of the overlapped ends, keeping the stitches close together and the tension even. As you sew, remove the straight pins and adjust the braids as needed to maintain a smooth and seamless appearance.
- Secure the end of the thread: Once you reach the end of the overlapped ends, secure the end of the thread by tying a knot. Trim any excess thread to keep the rug looking neat.
- Repeat the sewing process: Repeat the sewing process for all the overlapping points between the braids. This will ensure that the rug is securely held together and the braids are seamlessly connected.
Take your time when sewing the braids together, ensuring that each stitch is tight and secure. Regularly evaluate the rug’s shape and pattern to make any necessary adjustments as you sew. Once you have sewn all the braids together, you’re ready to move on to the final step: finishing the rug.
With the braids sewn together, your rug is almost complete. In the next step, we will cover how to finish the rug, giving it a polished and professional look. Continue reading to learn about Step 6: Finishing the Rug.
Step 6: Finishing the Rug
Congratulations on reaching the final step of creating your braided rug! Now, it’s time to give your rug a finished look and make it ready to use. Follow these steps to complete the finishing process:
- Trim excess fabric: Carefully trim any excess fabric or loose threads from the edges of your rug. This will give it a clean and polished appearance.
- Secure the ends: Fold the edges of the rug under and sew them down using small, even stitches. This will prevent the rug from unraveling and add extra durability.
- Hide the stitching: To hide the stitches, you can use a blanket stitch or a whip stitch along the folded edges. This will provide a neat and professional finish to your rug.
- Press the rug: If needed, use an iron on a low setting to gently press the rug and smooth out any wrinkles. Be cautious not to apply too much heat, especially if you’re working with delicate fabrics.
- Test for stability: To ensure that your rug stays in place, test its stability by placing it on the desired surface. If needed, you can use rug grippers or non-slip rug pads underneath to prevent it from sliding.
- Enjoy your braided rug: With the finishing touches complete, your braided rug is ready to enhance the comfort and style of your space. Place it in your desired room and enjoy the cozy and inviting atmosphere it creates.
Remember to regularly clean and maintain your braided rug to keep it in optimal condition. Vacuum or shake it to remove any dirt or debris, and spot clean any stains as soon as they occur to prevent them from setting.
Making your own braided rug is a labor of love, and the end result is a beautifully crafted piece of decor that reflects your creativity. Take pride in your finished rug and admire the warmth and charm it adds to your home.
Thank you for joining us on this step-by-step journey of making a braided rug. We hope you’ve enjoyed the process and are thrilled with your new creation. Happy rug making!
Read more: How To Make Braided Quilted Table Runners
Conclusion
Congratulations on completing your journey of making a braided rug! Through the steps of choosing the right fabric, cutting fabric strips, preparing the fabric, creating the braids, sewing them together, and finishing the rug, you have transformed simple materials into a beautiful and functional piece of decor.
Creating a braided rug allows you to express your creativity and customize your home’s ambiance. By selecting different fabrics, colors, and patterns, you can design a rug that perfectly complements your existing decor and personal style.
Throughout the process, you have learned the importance of choosing durable fabrics, cutting precise fabric strips, and preparing the fabric properly for braiding. You have mastered the art of creating consistent and secure braids, sewing them together, and finishing the rug to give it a polished and professional look.
Not only does a braided rug add warmth and comfort to your space, but it also brings a sense of accomplishment and pride. You have created a unique piece that reflects your craftsmanship and dedication.
Remember to care for your braided rug by regularly cleaning it and treating any stains promptly. This will help preserve its beauty and longevity, allowing you to enjoy it for years to come.
Now that you have completed your braided rug, take a moment to step back and admire the fruits of your labor. Place it in your desired room and revel in the cozy and inviting atmosphere it creates.
Thank you for joining us on this creative journey of making a braided rug. We hope you have found this article inspiring and informative. Embrace your newfound skills and continue exploring the world of DIY projects to bring your unique vision to life.
Happy decorating!
Frequently Asked Questions about How To Make Braided Rugs
Was this page helpful?
At Storables.com, we guarantee accurate and reliable information. Our content, validated by Expert Board Contributors, is crafted following stringent Editorial Policies. We're committed to providing you with well-researched, expert-backed insights for all your informational needs.


0 thoughts on “How To Make Braided Rugs”