
Articles
How To Build A Ladder Stand For Deer Hunting
Modified: September 1, 2024
Discover the best articles on how to build a sturdy ladder stand for deer hunting. Get expert tips, step-by-step instructions, and essential tools for a successful hunting experience.
(Many of the links in this article redirect to a specific reviewed product. Your purchase of these products through affiliate links helps to generate commission for Storables.com, at no extra cost. Learn more)
Introduction
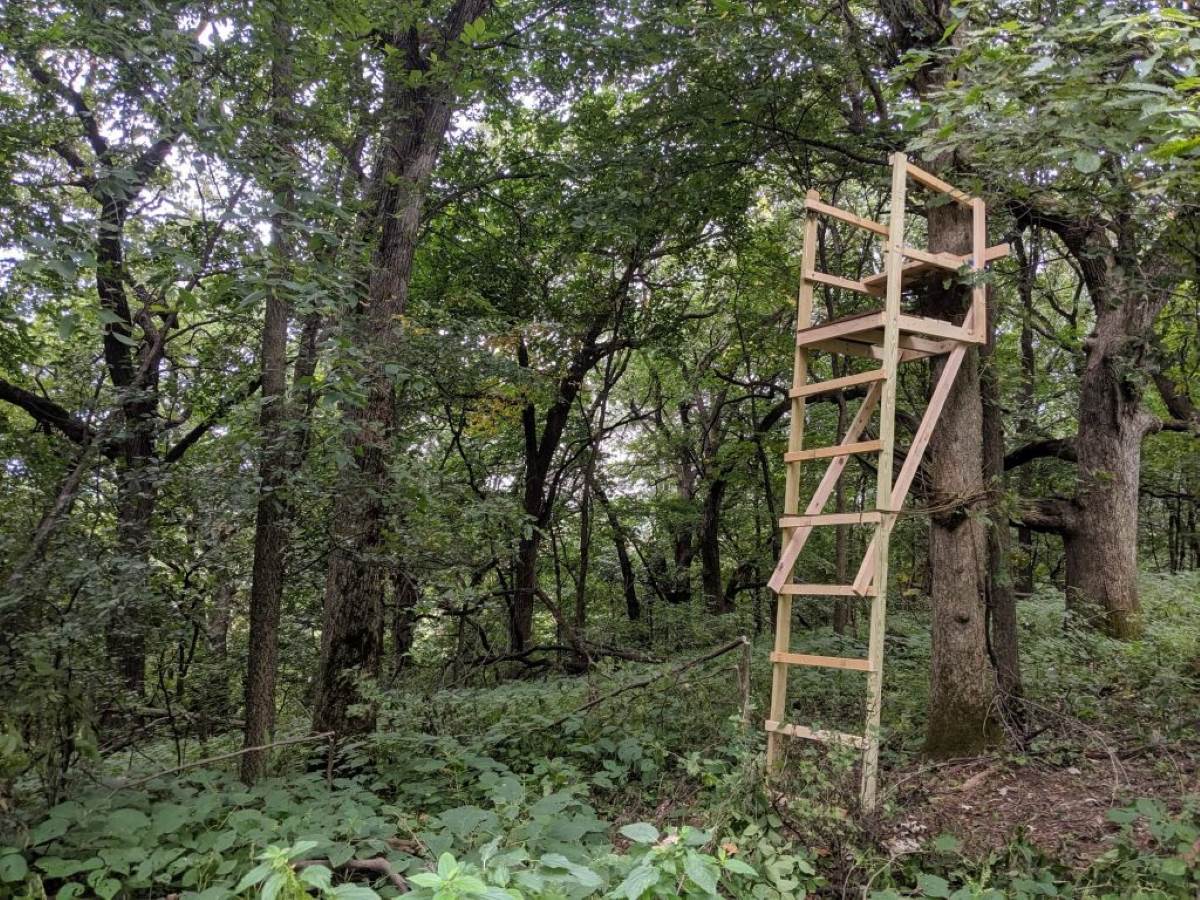
Deer hunting is a popular outdoor activity enjoyed by many individuals. One of the most effective ways to hunt deer is by using a ladder stand. A ladder stand provides the hunter with an elevated vantage point, allowing for better visibility and a strategic advantage.
While there are ready-made ladder stands available in the market, building your own ladder stand can be a rewarding and cost-effective option. By constructing your own ladder stand, you have the freedom to customize it to your specific needs and preferences.
In this article, we will guide you through the process of building a ladder stand for deer hunting. We will discuss the materials needed, step-by-step instructions, and important safety considerations to ensure a successful and secure hunting experience.
Before we dive into the construction process, it’s essential to understand the importance of choosing the right location for your ladder stand.
Key Takeaways:
- Build your own ladder stand for deer hunting to customize your setup and enhance your hunting experience. Prioritize safety, choose the right location, and follow step-by-step construction for a successful and secure platform.
- Prioritize safety, customize your hunting experience, and enjoy the benefits of an elevated vantage point with a well-built ladder stand. Follow the step-by-step process, add safety features, and finish with protective coatings for a rewarding hunting adventure.
Read more: How To Build Deer Fence
Materials Needed
Before starting the construction of your ladder stand, gather the following materials:
- Pressure-treated lumber: You will need various lengths of lumber to build the ladder, platform, and base of the stand. Make sure to choose pressure-treated lumber to ensure durability and resistance to weather elements.
- Deck screws: Opt for corrosion-resistant deck screws to securely fasten the lumber pieces together.
- Ladder sections: Purchase pre-made ladder sections or construct your own using sturdy metal or wooden ladder rungs.
- Plywood: This will be used to create the platform on top of the stand. Choose a thick and durable plywood sheet.
- Tree brackets or ratchet straps: These will be used to secure the ladder stand to the tree. Tree brackets provide a more permanent attachment, while ratchet straps offer flexibility for easy removal.
- Safety harness and rope: It’s crucial to have a safety harness and rope to ensure your safety while hunting from the ladder stand.
- Power tools: You will need a drill, circular saw, and measuring tape to cut and assemble the lumber pieces.
- Personal protective equipment: Don’t forget safety goggles, gloves, and ear protection to safeguard yourself during the construction process.
Having all the necessary materials on hand before starting the construction will streamline the process and ensure that you have everything you need to build a sturdy and functional ladder stand.
Step 1: Choosing a Location
Choosing the right location for your ladder stand is crucial for a successful deer hunting experience. Here are some factors to consider when selecting the perfect spot:
- Scouting: Before setting up your ladder stand, spend some time scouting the area. Look for signs of deer activity, such as tracks, droppings, or rub marks on trees. These indications will help you identify high-traffic areas where deer are likely to pass through.
- Food sources: Deer are attracted to food sources, so choose a location near their feeding areas. Look for areas with abundant food, such as acorn-bearing trees, agricultural fields, or food plots.
- Bedding areas: Deer tend to bed down in thick cover during the day, so it’s advantageous to set up your ladder stand near bedding areas. Look for areas with dense vegetation or areas with known bedding locations.
- Wind direction: Consider the prevailing wind direction in your hunting area. Position your ladder stand downwind from where you expect deer to approach. This will help conceal your scent and prevent deer from detecting your presence.
- Visibility: Choose a location that provides a clear line of sight. Avoid dense vegetation or obstructive obstacles that may hinder your view or shot opportunities.
Once you have identified a suitable location, take note of any specific tree characteristics that will support a ladder stand. Look for sturdy, mature trees that can withstand the weight of the stand and provide a stable platform for hunting.
Remember to follow all local regulations and obtain the necessary permits or permissions before setting up your ladder stand on public or private land.
Now that you have chosen the ideal hunting location, it’s time to gather the materials and move on to the next step of building your ladder stand.
Step 2: Gathering the Materials
Now that you have chosen the location for your ladder stand, it’s time to gather all the necessary materials. Make sure you have the following items on hand:
- Pressure-treated lumber: Purchase the required lengths of pressure-treated lumber for constructing the ladder, base, and platform of your ladder stand. Remember to choose the appropriate dimensions based on your desired height and design.
- Deck screws: Get corrosion-resistant deck screws to securely fasten the lumber pieces together. Make sure you have enough screws to complete the assembly.
- Ladder sections: If you are not constructing your own ladder rungs, purchase pre-made ladder sections of the desired length. Alternatively, if you prefer a custom ladder, acquire sturdy metal or wooden ladder rungs to build your own ladder sections.
- Plywood: Obtain a thick and durable plywood sheet to create the platform on top of the ladder stand. Ensure the dimensions of the plywood match your desired platform size.
- Tree brackets or ratchet straps: Choose either tree brackets or ratchet straps to secure the ladder stand to the tree. Tree brackets offer a more permanent attachment, while ratchet straps provide flexibility for easy removal.
- Safety harness and rope: Don’t forget to have a safety harness and rope on hand for your protection while hunting from the ladder stand. Safety should always be a top priority.
- Power tools: Gather the necessary power tools, such as a drill, circular saw, and measuring tape, to cut and assemble the lumber pieces during the construction process.
- Personal protective equipment: Ensure you have safety goggles, gloves, and ear protection to keep yourself safe while working with power tools and handling materials.
Having all these materials readily available will make the construction process much smoother and more efficient. Double-check the quantity and quality of the materials to ensure they are suitable for building a sturdy and reliable ladder stand.
Now that you have gathered all the necessary materials, you are ready to move on to the next step of cutting the ladder sections for your stand.
Step 3: Cutting the Ladder Sections
Now that you have gathered all the materials needed, it’s time to cut the ladder sections for your stand. Follow these steps:
- Measure the desired height of your ladder stand. Keep in mind the location and the terrain you will be placing it in.
- Using a measuring tape, mark the lengths of the ladder rungs on the pressure-treated lumber. Ensure each rung is evenly spaced, typically around 18 inches apart.
- Using a circular saw or a handsaw, carefully cut the ladder rungs along the marked lengths.
- Sand down the cut edges to remove any roughness and ensure a smooth finish.
If you prefer to use pre-made ladder sections, skip the above steps and move on to the next step of assembling the base of your ladder stand.
Remember to wear appropriate personal protective equipment, such as safety goggles and gloves, when cutting the lumber to ensure your safety.
With the ladder sections cut and ready, you can now proceed to the next step of constructing the base of your ladder stand.
Read more: How To Build Wooden Ladder
Step 4: Assembling the Base
With the ladder sections prepared, it’s time to start assembling the base of your ladder stand. Follow these steps:
- Lay out the two longest sections of pressure-treated lumber on the ground, parallel to each other. These will serve as the front and back supports of the base.
- Position the shorter sections of lumber between the front and back supports, spaced evenly. These will serve as the cross supports of the base. Make sure they are perpendicular to the front and back supports.
- Using deck screws, attach the cross supports to the front and back supports. Drill pilot holes first to prevent the lumber from splitting, and then secure each connection with deck screws.
- Add additional support by attaching an extra piece of lumber diagonally on each side of the base. This will provide stability and prevent wobbling.
- Double-check the stability of the base to ensure it is sturdy and secure. Make any necessary adjustments or reinforcements as needed.
It’s important to take your time during the assembly process and ensure that all connections are tight and secure. This will guarantee the stability and durability of your ladder stand.
With the base assembled, you can now move on to the next step of adding support braces for additional strength.
When building a ladder stand for deer hunting, make sure to use sturdy and durable materials such as treated lumber or steel to ensure the safety and stability of the stand.
Step 5: Adding Support Braces
Once you have assembled the base of your ladder stand, it’s time to add support braces for additional strength and stability. Follow these steps:
- Measure the distance between the front and back supports of the base. This will determine the length of the support braces.
- Cut two pieces of pressure-treated lumber to the measured length for the support braces.
- Position the support braces diagonally between the front and back supports, crossing over the center of the base.
- Secure each end of the support braces to the front and back supports using deck screws. Ensure that the support braces are firmly connected to the base.
- Check the stability of the base and support braces to ensure they are secure and properly aligned. Reinforce any weak areas or make adjustments as needed.
Adding support braces will contribute to the overall strength and rigidity of your ladder stand. It helps to distribute the weight and provides structural integrity.
Always use deck screws and drill pilot holes before securing the support braces to prevent splitting and ensure a strong connection.
Now that you have added support braces, you are ready to move on to the next step: constructing the platform for your ladder stand.
Step 6: Constructing the Platform
With the base and support braces in place, it’s time to construct the platform for your ladder stand. Follow these steps:
- Measure and mark the desired size for your platform on the plywood sheet. Consider the space needed for a comfortable hunting area.
- Using a circular saw or a handsaw, carefully cut the plywood along the marked dimensions.
- Place the cut plywood sheet on top of the ladder stand base, ensuring it is centered and aligned properly. The platform should overhang slightly on all sides to provide stability.
- Secure the plywood to the base by drilling pilot holes and using deck screws. Place screws along the edges and at regular intervals to ensure a secure attachment.
- Check the stability of the platform by applying gentle pressure and ensuring there is no excessive movement or wobbling.
When constructing the platform, it’s important to use a thick and durable plywood sheet that can support your weight and withstand outdoor conditions. Additionally, ensure that the platform is securely attached to the base to prevent any accidents or instability while hunting.
Now that the platform is complete, it’s time to move on to the next step: securing the ladder stand to the tree.
Step 7: Securing the Ladder to the Tree
Now that you have constructed the base and platform of your ladder stand, it’s time to secure it to the tree. Follow these steps:
- Position the ladder stand against the tree at the desired hunting height. Ensure that the ladder is straight and aligned with the tree.
- Mark the location of the tree brackets or ratchet straps on the tree. Usually, these are placed on the front and back sides of the ladder stand for added stability.
- If using tree brackets, attach them securely to the tree using appropriate hardware and ensure proper alignment with the ladder stand.
- If using ratchet straps, wrap them around the tree and feed them through the designated slots or hooks on the ladder stand. Tighten the straps until the ladder stand is securely fastened to the tree.
- Test the stability of the ladder stand by applying gentle pressure and ensuring it is firmly attached to the tree. Make any necessary adjustments or reinforcements to ensure a secure connection.
When securing the ladder stand to the tree, it’s important to follow the manufacturer’s instructions for tree brackets or ratchet straps. Ensure that all connections are tight and secure to prevent any accidents or instability during use.
Remember to consider your safety when positioning the ladder stand and avoid setting it up in unstable or hazardous tree conditions.
Once you have successfully secured the ladder stand to the tree, you can move on to the next step of adding safety features to ensure a safe hunting experience.
Read more: How To Set Up Ladder Stand
Step 8: Adding Safety Features
Ensuring your safety while hunting from a ladder stand is of paramount importance. Adding safety features to your stand will provide peace of mind and minimize the risk of accidents. Follow these steps:
- Attach a safety harness to the ladder stand. A safety harness is a vital piece of equipment that will prevent falls and keep you secure while on the stand. Make sure to follow the manufacturer’s instructions for properly fitting and securing the harness.
- Secure the safety harness to the tree using a safety rope. The safety rope should be attached to a secure point on the stand, such as the platform or a designated attachment point. This will provide an additional layer of safety in case of a fall.
- Install a safety rail or guardrail around the platform to prevent accidental falls. Ensure that the rail is securely attached and of sufficient height to provide adequate protection.
- Consider adding non-slip surfaces to the ladder rungs and platform to prevent slipping, especially in wet or icy conditions. This can be achieved by applying non-slip tape or paint to the surfaces.
- Regularly inspect the ladder stand for any signs of wear or damage. Replace any worn-out or damaged parts immediately to maintain the structural integrity and safety of the stand.
Remember to always use your safety harness and stay connected to the safety rope when on the ladder stand. Be cautious when climbing up or down the ladder, ensuring you have a firm grip on the ladder rungs.
By adding these safety features and following proper safety protocols, you can greatly reduce the risk of accidents and create a safer hunting environment for yourself and others.
Now that you have incorporated safety features into your ladder stand, it’s time to put the finishing touches on the construction process.
Step 9: Finishing Touches
With the construction and safety features in place, it’s time to add the finishing touches to your ladder stand. These final steps will help enhance your hunting experience and ensure the longevity of your stand. Follow these recommendations:
- Apply a protective coating to the wooden components of the ladder stand. This can be a wood sealant or a weatherproofing product to protect the wood from moisture, UV rays, and other outdoor elements. Regularly reapply the coating as needed to maintain its effectiveness.
- Remove any sharp or protruding edges from the ladder stand to prevent injuries. Use sandpaper or a file to smooth out any rough surfaces.
- Consider adding camouflage or painting the ladder stand to blend in with the surrounding environment. This will help conceal your presence and increase your chances of a successful hunt.
- Create a comfortable seating arrangement on the platform. Use a padded seat cushion or a hunting chair to ensure comfort during long hours of waiting. Remember, a comfortable hunter is a patient hunter!
- Place a gear and equipment storage box or hooks on the ladder stand to keep your hunting gear organized and easily accessible.
By adding these finishing touches, you will not only improve the aesthetics of your ladder stand but also ensure its durability and functionality for future hunting seasons.
Lastly, remember to familiarize yourself with any local hunting regulations, restrictions, and safety guidelines before using your ladder stand for hunting purposes.
Now that you have completed all the necessary steps, you are ready to embark on your deer hunting adventures from your well-built and secure ladder stand!
Happy hunting!
Conclusion
Building your own ladder stand for deer hunting can be a rewarding experience that allows you to customize your setup to your specific needs. By following the steps outlined in this article and being mindful of safety precautions, you can create a sturdy and reliable platform for your hunting adventures.
From choosing the right location and gathering the necessary materials to cutting the ladder sections and assembling the base, each step of the construction process is crucial in ensuring a successful and secure ladder stand. Adding support braces, constructing the platform, and securing the stand to the tree further enhance its stability.
Remember to prioritize safety by adding safety features such as a harness and rope, guardrails, and non-slip surfaces. Taking the time to apply finishing touches such as protective coatings, camouflage, and comfortable seating will contribute to the longevity and effectiveness of your ladder stand.
Before using your ladder stand for hunting, familiarize yourself with local hunting regulations and safety guidelines. Always exercise caution and adhere to proper hunting practices while using your ladder stand.
With your well-constructed ladder stand in place, you are now ready to enjoy the benefits of an elevated vantage point, improved visibility, and a strategic advantage for a successful deer hunting experience.
Happy hunting!
Frequently Asked Questions about How To Build A Ladder Stand For Deer Hunting
Was this page helpful?
At Storables.com, we guarantee accurate and reliable information. Our content, validated by Expert Board Contributors, is crafted following stringent Editorial Policies. We're committed to providing you with well-researched, expert-backed insights for all your informational needs.



0 thoughts on “How To Build A Ladder Stand For Deer Hunting”