Articles
How To Build A Ladder For A Loft
Modified: October 18, 2024
Learn how to build a sturdy and safe ladder for your loft with our informative articles. Gain the knowledge and confidence to tackle this DIY project!
(Many of the links in this article redirect to a specific reviewed product. Your purchase of these products through affiliate links helps to generate commission for Storables.com, at no extra cost. Learn more)
Introduction
Welcome to our comprehensive guide on how to build a ladder for a loft. Having a loft in your home provides valuable additional space that can serve as a storage area or even be converted into a cozy living space. However, accessing the loft can sometimes be a challenge, especially if there is no existing ladder or staircase. Building a ladder specifically designed for your loft can make the process of going up and down much safer and more convenient.
Before embarking on this DIY project, there are several important factors to consider. Making the right decisions in the planning and construction stages will ensure that your loft ladder is not only functional but also sturdy and secure. In this article, we will discuss the key aspects you need to think about before building your loft ladder, the materials and tools you’ll need, and provide step-by-step instructions to guide you through the process.
It’s worth noting that the specific construction details of a loft ladder may vary depending on the design of your loft and personal preferences. However, the general principles and steps we will outline here can be adapted to suit different situations.
Before diving into the specifics, it’s important to prioritize safety. Building a ladder for a loft involves working at heights, using power tools, and handling heavy materials. Take the necessary precautions, such as wearing protective gear and working with a partner, to minimize the risk of accidents or injuries.
Now, let’s explore the key considerations you need to keep in mind before embarking on your loft ladder construction project.
Key Takeaways:
- Prioritize safety and functionality when building a loft ladder by considering space, weight capacity, safety features, and building codes. Enjoy the convenience and accessibility it brings to your home’s loft space.
- Carefully measure, assemble, and test the stability of your loft ladder before installation. Consider adding safety enhancements and enjoy the value and accessibility it brings to your living space.
Read more: How To Install A Loft Ladder
Things to Consider Before Building a Loft Ladder
Before you start building your loft ladder, there are a few important factors you need to consider to ensure it meets your specific needs and requirements. These considerations will help guide your decision-making process and ensure a successful outcome:
1. Space and Accessibility
Assess the available space in your loft area to determine the most suitable ladder design. Consider the height and angle of the loft, as well as the available floor space for ladder placement. You want to ensure the ladder is easy to access and provides enough clearance for safe maneuverability.
2. Weight Capacity
Determine the weight capacity required for your loft ladder. Consider the maximum weight it needs to support, including any equipment or items that may be transported up and down the ladder. This will help you select suitable materials and ensure the ladder is built to withstand the intended load.
3. Safety Features
Safety should be a top priority when building a loft ladder. Consider incorporating features such as handrails, non-slip treads, and sturdy construction to minimize the risk of accidents or falls. It’s also essential to ensure the ladder is firmly secured to the loft and can withstand regular use.
Read more: How To Childproof Loft Bed Ladder
4. Building Codes and Regulations
Research local building codes and regulations to ensure compliance when constructing your loft ladder. Certain jurisdictions may have specific requirements regarding ladder design, dimensions, and safety features. Familiarize yourself with these guidelines to ensure your ladder meets the necessary standards.
5. Frequency of Use
Assess how frequently the loft ladder will be used. If it will be used frequently, prioritize durability and ease of use. Consider features such as locking mechanisms and foldable designs to provide convenience and functionality.
6. Aesthetics
Consider the overall aesthetics and design of your home when choosing the style and materials for your loft ladder. You may opt for a ladder that seamlessly blends in with the surrounding decor or choose one that makes a statement and adds visual interest to the space.
By carefully considering these factors, you can ensure that your loft ladder is not only functional and safe but also meets your specific needs and preferences. With these considerations in mind, you’re ready to gather the necessary materials and tools to start building your loft ladder.
Materials and Tools Needed
Before you start building your loft ladder, it’s important to gather all the necessary materials and tools. Having everything prepared beforehand will streamline the construction process and help prevent any unnecessary delays. Here’s a list of the materials and tools you’ll likely need:
Read more: How To Build A Loft In A Shed
Materials:
- Wooden boards or planks for the ladder rungs and uprights
- Screws or nails for securing the ladder components
- Ladder hooks or hinges for attaching the ladder to the loft entrance
- Wood glue for additional strength and stability
- Sanding paper or a sander for smoothing the ladder surfaces
- Paint or wood stain to finish the ladder and protect it from wear
- Optional: Non-slip treads or grip tape for added safety
Tools:
- Measuring tape for accurate measurements
- Saw for cutting the wooden boards to the desired lengths
- Drill with drill bits for making holes and attaching screws
- Screwdriver or hammer for manual screwing or nailing
- Square or protractor for marking and measuring angles
- Sandpaper or sander for smoothing the ladder surfaces
- Paintbrush or roller for applying paint or wood stain
- Optional: Level for ensuring the ladder is installed straight and level
These materials and tools are essential for constructing a basic loft ladder. Depending on the design and features you desire, additional materials and tools may be required. For example, if you plan to install handrails, you will need appropriate railing materials and tools for their installation. It’s always a good idea to carefully review your chosen ladder design and make a comprehensive list of the specific materials and tools you’ll need.
Once you’ve gathered all the necessary materials and tools, you’re ready to move on to the construction phase. In the following steps, we will guide you through the process of building your loft ladder, from measuring and cutting the wooden components to installing and testing the ladder’s stability.
Step 1: Measure the Height and Angle of the Loft
The first step in building a ladder for your loft is to accurately measure the height and angle of the loft space. This will help you determine the appropriate length and angle for your ladder rungs and uprights. Follow these steps to obtain precise measurements:
1. Measure the Height:
Using a measuring tape or ruler, measure the vertical distance between the floor and the entrance of the loft. This measurement will determine the overall length of your ladder. Make sure to measure from the point where the ladder will rest on the ground to the topmost point where it will be secured in the loft.
Read more: How To Build Loft Bed Stairs
2. Determine the Angle:
Next, you’ll need to determine the angle at which the ladder will lean against the loft entrance. Place a protractor or square against the ground and adjust it until it aligns with the angle you desire for your ladder. This angle will depend on the available space and your personal preference.
3. Measure the Base Width:
Measure the width of the loft entrance to determine the base width of your ladder. This measurement will help you decide on the number of ladder rungs and their spacing. Ensure that the base width is wide enough to provide stability and easy access to the ladder.
It’s crucial to take accurate measurements to ensure the ladder fits properly and functions safely. Double-check your measurements to avoid any mistakes before moving on to the next step.
Once you have measured the height, angle, and base width, you can proceed to the next step of determining the type of ladder that will best suit your loft design.
Step 2: Determine the Type of Ladder
After measuring the height and angle of your loft, the next step is to determine the type of ladder that will best suit your needs and the available space. There are several types of loft ladders to choose from, and each has its own advantages and considerations. Here are a few popular options:
1. Straight Ladder:
A straight ladder is the most basic and straightforward type of loft ladder. It consists of a series of rungs that are evenly spaced and parallel to each other. This type of ladder is ideal for lofts with sufficient space and a straight path leading to the loft entrance. It is relatively simple to construct, typically requiring fewer materials and tools.
Read more: How To Build A Storage Loft In A Garage
2. Folding Ladder:
A folding ladder is designed to be compact and easily stored when not in use. It typically consists of two or more sections that fold together, allowing for easy extension and retraction. This type of ladder is particularly suitable for lofts with limited space or when you prefer to minimize the ladder’s presence when it’s not in use.
3. Sliding Ladder:
A sliding ladder operates on a sliding mechanism that allows the ladder to be extended or retracted horizontally. This type of ladder is often used in spaces where there is limited vertical clearance or when the loft entrance is located at an angle or in a tight corner. Sliding ladders offer flexibility in terms of their extension and storage.
4. Spiral Staircase:
If you’re looking for a more elegant and space-saving option, a spiral staircase may be a suitable choice. This type of loft access features a compact and visually appealing design, with a circular staircase that spirals up to the loft. Spiral staircases can be made of various materials, such as wood or metal, and provide a stylish and functional way to access your loft.
When determining the type of ladder for your loft, consider factors such as available space, ease of use, intended frequency of use, and personal preferences. Each type of ladder has its own installation requirements, so make sure to take these into account as well.
Once you have decided on the type of ladder, you can move on to gathering the necessary materials and tools for construction. In the next step, we will discuss the specific materials and tools you will need to build your loft ladder.
Step 3: Purchase or Gather Materials
Now that you have determined the type of ladder for your loft, it’s time to gather all the necessary materials for construction. The specific materials you’ll need will depend on the type of ladder you’ve chosen and the design preferences you have. Here are some common materials required for building a loft ladder:
Read more: How To Build Wooden Ladder
1. Wooden Boards or Planks:
Choose high-quality wooden boards or planks for constructing the ladder rungs and uprights. Opt for hardwood, such as oak or maple, for durability and strength. The dimensions of the boards will depend on the width and thickness you desire for your ladder rungs. Consider the weight capacity requirements and size of your loft entrance when selecting the appropriate dimensions.
2. Screws or Nails:
Select screws or nails of the appropriate length and gauge to securely fasten the ladder components. Look for screws or nails specifically designed for woodworking projects to ensure they provide strong and reliable connections. The quantity will depend on the number of ladder rungs and uprights you plan to use.
3. Ladder Hooks or Hinges:
If you have chosen a straight ladder or folding ladder design, you will need ladder hooks or hinges to attach the ladder to the loft entrance. These hooks or hinges will provide stability and allow for easy retraction or extension of the ladder. Choose high-quality hooks or hinges that can support the weight of the ladder and withstand regular use.
4. Wood Glue:
Wood glue is optional but can be used to provide additional strength and stability to the joints between the ladder rungs and uprights. Apply a thin layer of wood glue before attaching the ladder components to ensure a solid connection. Make sure to choose a wood glue that is suitable for indoor use and provides a strong bond for wood materials.
Read more: How To Build An Attic Ladder
5. Sanding Paper or Sander:
Smooth the surfaces of the ladder rungs and uprights by using sanding paper or a sander. This will help prevent splinters and create a uniform and professional finish. Choose sanding paper or a sander with different grits to achieve the desired level of smoothness.
6. Paint or Wood Stain:
If desired, you can finish the ladder with paint or wood stain to protect the wood and enhance its appearance. Consider using paint or wood stain that is suitable for indoor use and matches your home’s aesthetic. Apply multiple coats and let each coat dry according to the manufacturer’s instructions for a durable and attractive finish.
Ensure you have gathered all the necessary materials before proceeding to the next step. Double-check your materials list against your ladder design to make sure you have everything you need for a smooth construction process.
Step 4: Cut the Ladder Rungs
With the materials gathered, it’s time to start constructing the ladder for your loft. The first step in building the ladder is cutting the ladder rungs to the appropriate length. Follow these steps to ensure accurate and precise cuts:
1. Mark the Measurements:
Using a measuring tape or ruler, mark the desired length of each ladder rung on the wooden boards. Measure and mark the same length for each rung to ensure a consistent ladder design.
Read more: How To Build Pool Ladder
2. Set Up the Cutting Area:
Find a suitable workspace, preferably outdoors or in a well-ventilated area, to set up your cutting area. Use a sturdy workbench or sawhorses to support the wooden boards during the cutting process.
3. Wear Safety Gear:
Before cutting, don’t forget to put on the necessary safety gear, such as safety glasses and gloves, to protect yourself from any potential hazards during the cutting process.
4. Cut the Rungs:
Using a saw, carefully cut along the marked lines to detach each ladder rung from the wooden board. Take your time and use steady, controlled movements to ensure clean and precise cuts. Double-check the length of each rung after cutting to ensure accuracy.
5. Sand the Rungs:
After cutting, use sandpaper or a sander to smooth the edges and surfaces of each ladder rung. This will help prevent splinters and create a comfortable and safe surface for hands and feet while using the ladder.
Remember to follow proper safety protocols while operating power tools and handling sharp materials. Keep your hands clear of the cutting area and be cautious during the cutting process.
Once you have cut and sanded all the ladder rungs, you’re ready to move on to the next step of assembling the ladder rungs and uprights. This will bring you one step closer to completing your loft ladder construction.
Read more: How To Build A Chicken Ladder
Step 5: Assemble the Ladder Rungs and Uprights
Now that you have cut and sanded the ladder rungs, it’s time to assemble them with the ladder uprights. This step will bring your loft ladder to life. Follow these steps below to ensure a secure and sturdy ladder:
1. Lay Out the Rungs and Uprights:
Find a flat and spacious area to lay out the ladder rungs and uprights. Arrange them in the desired order and orientation, ensuring that they are aligned and ready for assembly.
2. Measure and Mark the Rungs Placement:
Using a measuring tape or ruler, measure and mark the position of each rung on the ladder uprights. Make sure the spacing between rungs is consistent and suitable for comfortable climbing.
3. Attach the Rungs:
Starting from the bottom, secure the ladder rungs to the ladder uprights by driving screws or nails through the uprights and into the ends of each rung. Position the rungs flush with the markings and use a square to ensure proper alignment. Repeat this process for each rung, ensuring a secure connection at both ends of the rungs.
Read more: How To Build A Library Ladder
4. Apply Wood Glue (Optional):
If desired, you can apply wood glue to the joints between the rungs and the uprights for added stability. Apply a thin layer of wood glue to the connection points before securing with screws or nails. Wipe away any excess glue before it dries.
5. Double-Check Stability:
Once all the rungs are attached, check the ladder for stability. Shake the ladder gently to ensure it remains sturdy and secure. Make any necessary adjustments if the ladder feels unstable. Double-check that all screws or nails are tightly secured.
It’s important to follow proper safety precautions when assembling the ladder. Use caution while handling screws or nails and make sure the ladder is on a stable surface during assembly.
With the ladder rungs and uprights securely assembled, your loft ladder is taking shape. In the next step, we will discuss different methods for attaching the ladder to the loft entrance, depending on the type of ladder you have chosen.
Step 6: Attach Ladder Hooks or Hinges
After assembling the ladder rungs and uprights, the next step is to attach ladder hooks or hinges depending on the type of ladder you have chosen. This step will allow you to secure the ladder to the loft entrance and ensure smooth operation. Follow these steps to properly attach the ladder hooks or hinges:
1. Determine the Attachment Method:
Depending on the design of your loft and ladder, you may choose to use ladder hooks or hinges for attachment. Ladder hooks typically require positioning the ladder, while hinges allow for easy retraction and extension. Choose the method that suits your needs and preferences.
Read more: How To Build A Ships Ladder
2. Position the Ladder:
If you are using ladder hooks, carefully position the ladder at the desired angle against the loft entrance, making sure it is stable. Take measurements to ensure the ladder is correctly aligned with the height and angle determined during the planning phase.
3. Attach the Ladder Hooks or Hinges:
If using hooks, secure them to the loft entrance by screwing them into place. Ensure they are firmly attached and capable of supporting the weight of the ladder. If using hinges, attach them to both the ladder uprights and the loft entrance, allowing for smooth operation.
4. Test the Movement:
Once the hooks or hinges are securely attached, test the movement of the ladder. For hooks, ensure that the ladder can be easily lifted and hung on the hooks. For hinges, test the retraction and extension of the ladder to ensure smooth movement. Make any necessary adjustments to ensure proper operation.
5. Check Stability:
Double-check the stability of the ladder after attaching the hooks or hinges. Apply gentle pressure to the ladder, ensuring that it remains secure and steady. If any instability is detected, reinforce the attachment points and make necessary adjustments for optimal stability.
Remember, safety is crucial during this step. Ensure that the ladder hooks or hinges are securely fastened and that the ladder is capable of supporting weight and usage. Take your time to ensure a proper and secure attachment.
With the ladder hooks or hinges successfully attached, your loft ladder is almost complete. In the next step, we will discuss how to test the ladder’s stability and make any necessary adjustments before installation.
Read more: How To Build Ladder Shelf
Step 7: Test the Stability and Make Adjustments
Before installing the loft ladder, it is essential to test its stability and make any necessary adjustments to ensure safe and reliable operation. By following these steps and conducting a thorough stability test, you can ensure that your ladder is secure and properly aligned:
1. Check the Connections:
Inspect all the ladder connections, including the rungs and uprights, to ensure they are secure. Tighten any screws or nails that may have loosened during the assembly process. If you have used wood glue, make sure it has dried completely and is providing a strong bond.
2. Test the Weight Capacity:
If possible, place some weight on the ladder, such as a concrete block or weighted object, to assess its weight-bearing capacity. Ensure that the ladder can withstand the intended load and is not showing any signs of instability or bending. If you notice any issues, reinforce the ladder with additional screws or nails as needed.
3. Test the Ladder Stability:
Carefully climb up and down the ladder while paying close attention to its stability. The ladder should not wobble or sway excessively. If you notice any instability, check the attachment points, tighten screws or nails, and make necessary adjustments to improve the ladder’s stability.
Read more: How To Build A Rope Ladder For A Treehouse
4. Check for Smooth Operation:
If you have chosen a folding ladder or a ladder with hinges, test the folding or extending mechanism to ensure smooth operation. Make sure the ladder easily folds or extends without any obstructions or difficulties. Lubricate the hinge or folding mechanism if necessary.
5. Inspect Safety Features:
Check any safety features you have incorporated into the ladder design, such as non-slip treads or handrails. Ensure they are securely attached and functioning as intended. Make any adjustments or repairs if necessary.
Testing the stability and making necessary adjustments is crucial to ensure that your loft ladder is safe and reliable. Take your time during this step to thoroughly assess the ladder’s stability and address any issues that may compromise safety.
Once you are satisfied with the ladder’s stability and performance, you are ready to proceed with the final step: installing the loft ladder in your home.
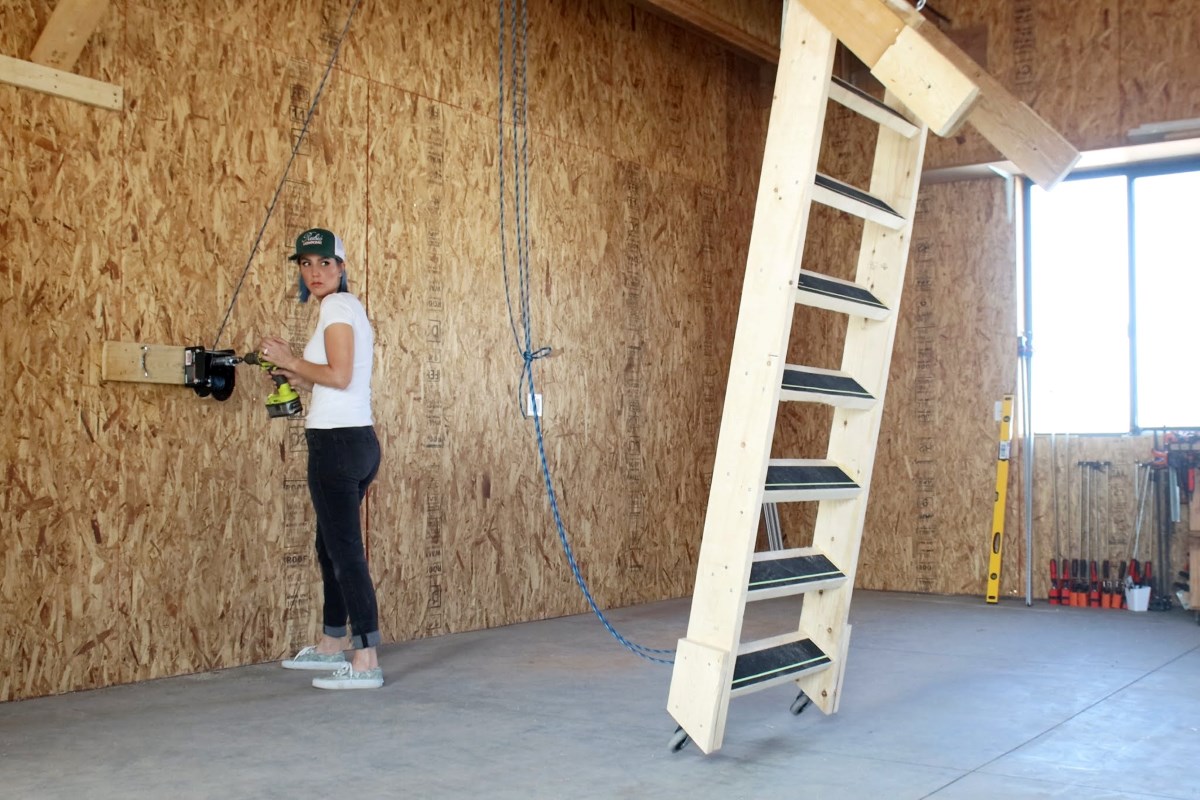
Step 8: Install the Loft Ladder
After thoroughly testing the stability and making any necessary adjustments, it’s time to install your loft ladder. Proper installation is crucial to ensure the ladder’s stability, safety, and ease of use. Follow these steps to install your loft ladder:
1. Prepare the Installation Area:
Clean and clear the area where you will be installing the ladder. Remove any obstructions or debris that could hinder the installation process or pose a safety risk.
Read more: How To Build A Ships Ladder
2. Position the Ladder:
Carefully position the ladder at the desired angle against the loft entrance, aligning it with the ladder hooks or hinges. Ensure that the ladder is securely resting on the hooks or hinges, and is level and straight.
3. Secure the Ladder:
Using screws or nails, secure the ladder hooks or hinges to the loft entrance. Ensure they are firmly attached, providing a secure connection between the ladder and the loft. Double-check the stability of the ladder after securing it in place.
4. Test the Functionality:
Climb up and down the ladder to test its functionality and stability. Ensure that the ladder is comfortable to use and operates smoothly. Check for any signs of instability or movement, and make any necessary adjustments to improve the ladder’s performance.
5. Make Safety Enhancements (Optional):
If desired, you can enhance the safety of the ladder by adding non-slip treads or handrails. Ensure that these safety features are securely attached and provide additional stability and support for climbers.
Read more: How To Build A Ladder Stand For Deer Hunting
6. Add Finishing Touches:
If you’ve chosen to paint or stain the ladder, allow it to dry fully before using it. Apply additional coats of paint or stain if needed for a professional and polished look. Wipe away any excess paint or stain and clean the ladder’s surfaces.
Once the ladder is securely installed and any optional finishing touches are complete, take a final moment to inspect and admire your work. You have successfully built and installed a loft ladder that will provide easy access to your loft space.
Remember to always prioritize safety when using the ladder. Ensure that it is used correctly, and that users understand how to safely climb up and down. Regularly inspect the ladder for any signs of wear or damage, and address any issues promptly.
Congratulations on completing the installation of your loft ladder! Enjoy the convenience and accessibility it brings to your loft space.
Conclusion
Congratulations on successfully building and installing a ladder for your loft space! By following the steps outlined in this guide and considering important factors such as space, weight capacity, safety features, and building codes, you have created a functional and secure access point to your loft.
Building a loft ladder not only provides convenience but also adds value to your home by optimizing the use of space. You can now easily access your loft for storage, create a cozy living space, or utilize the area in any way you desire.
Remember to prioritize safety at all times when using the ladder. Regularly inspect the ladder for any signs of wear or damage, tighten any loose screws or nails, and address any issues promptly to ensure its long-term stability and safety.
If you followed the steps in this guide, you should now have a fully functional loft ladder that meets your specific needs and enhances your living space. Enjoy the accessibility and convenience that your new ladder provides!
As with any DIY project, it’s important to understand your own limitations and skillset before attempting construction. If you have any doubts or concerns, it is always wise to consult with a professional contractor or carpenter to ensure the ladder meets safety standards and building codes.
We hope this guide has been informative and helpful in guiding you through the process of building a loft ladder. Whether you are using it for storage, creating a new living space, or simply improving access to your loft, a well-built and secure loft ladder can make a significant difference in your home.
Enjoy your newly built loft ladder and make the most of your loft space!
Frequently Asked Questions about How To Build A Ladder For A Loft
Was this page helpful?
At Storables.com, we guarantee accurate and reliable information. Our content, validated by Expert Board Contributors, is crafted following stringent Editorial Policies. We're committed to providing you with well-researched, expert-backed insights for all your informational needs.

0 thoughts on “How To Build A Ladder For A Loft”