Articles
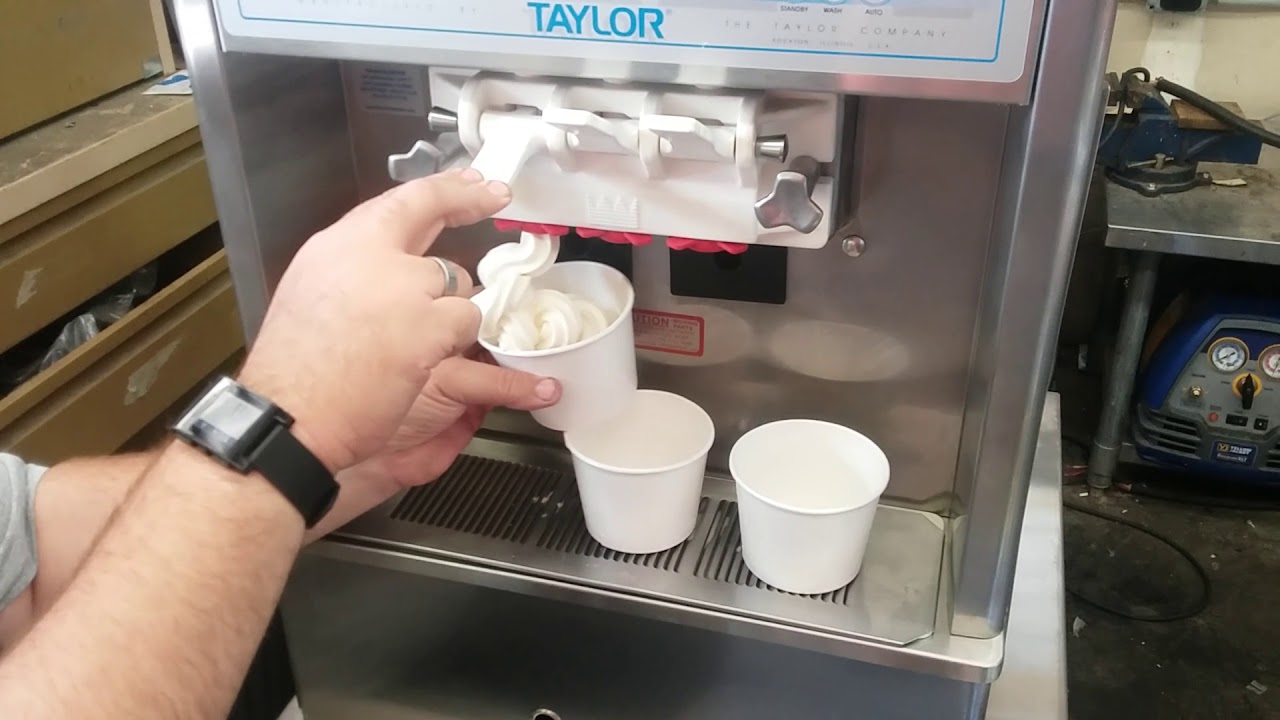
How To Clean Taylor Ice Cream Machine
Modified: September 2, 2024
Learn effective techniques for cleaning your Taylor ice cream machine with these informative articles. Follow our step-by-step guides to maintain optimal performance and hygiene.
(Many of the links in this article redirect to a specific reviewed product. Your purchase of these products through affiliate links helps to generate commission for Storables.com, at no extra cost. Learn more)
Introduction
Welcome to this comprehensive guide on how to clean your Taylor Ice Cream Machine. As a proud owner of this beloved appliance, it’s essential to keep it clean to ensure its optimal performance and longevity. Regular maintenance and cleaning not only help maintain the taste and quality of the ice cream but also prevent any potential health hazards.
Whether you own a Taylor countertop model or a larger commercial machine, proper cleaning procedures are crucial to keep it in top shape. In this article, we will walk you through a step-by-step process on how to clean your Taylor Ice Cream Machine effectively.
Before we dive into the cleaning process, it’s essential to understand that safety should always be your top priority. Always ensure the machine is unplugged and turned off before you begin cleaning. Additionally, remember to wear protective gloves and eyewear to protect yourself during the cleaning process.
Now that we have covered the basics let’s get started by gathering the necessary supplies.
Key Takeaways:
- Regularly cleaning and maintaining your Taylor Ice Cream Machine is crucial for preserving its performance, flavor, and hygiene, ensuring delightful frozen treats for years to come.
- Prioritize safety, gather the necessary supplies, and follow a systematic cleaning process to keep your Taylor Ice Cream Machine in top shape, delivering creamy goodness with every scoop.
Safety Precautions
Before beginning the cleaning process for your Taylor Ice Cream Machine, it’s crucial to take the necessary safety precautions to ensure a safe and accident-free experience. Here are a few important safety measures to keep in mind:
- Turn off and unplug the machine: Before starting any cleaning or maintenance tasks, make sure to switch off the power and unplug the machine. This will prevent any accidental injuries and protect you from electrical hazards.
- Wear protective gear: Cleaning the Taylor Ice Cream Machine may involve handling cleaning agents and chemicals. To protect your skin and eyes, always wear protective gloves and eyewear. Additionally, consider wearing an apron or protective clothing to avoid any spills or stains on your clothes.
- Handle hot components with caution: Some parts of the machine, such as the freezing cylinder or beater assembly, may become hot during operation. Allow sufficient time for these components to cool down before attempting to clean or touch them.
- Use safe cleaning agents: When selecting cleaning agents for your Taylor Ice Cream Machine, ensure that they are food-safe and recommended for use in ice cream machines. Avoid using abrasive cleaners or harsh chemicals that could damage the machine or contaminate the ice cream.
- Follow manufacturer’s instructions: Each Taylor Ice Cream Machine model may have specific cleaning instructions provided by the manufacturer. It’s important to read and follow these instructions to ensure you clean the machine correctly and safely.
- Keep the work area clean and organized: Clear any clutter or obstacles near the machine before you begin cleaning. A clean and organized work area will help prevent accidents and make the cleaning process more efficient.
By following these safety precautions, you can ensure a safe and hassle-free cleaning process for your Taylor Ice Cream Machine. Now, let’s move on to gathering the necessary supplies for the cleaning task.
Gather the Necessary Supplies
Before you begin the cleaning process for your Taylor Ice Cream Machine, it’s important to gather all the necessary supplies. Having the right tools and cleaning agents at hand will make the process more efficient and ensure a thorough cleaning. Here’s a list of supplies you’ll need:
- Warm water: This will be the main cleaning agent for most parts of the machine.
- Mild detergent or a specified cleaning solution: Depending on the manufacturer’s instructions, you may need a mild detergent or a cleaning solution recommended for ice cream machines.
- Clean microfiber cloths or soft sponges: These will be used to wipe and clean various parts of the machine, both inside and outside.
- Small brushes: To reach small, hard-to-reach areas, such as crevices or the dispensing mechanism, you’ll need small brushes, such as toothbrushes or bottle brushes.
- Sanitizer solution: It’s important to sanitize certain parts, such as the dispensing spouts or the beater assembly. Use a food-grade sanitizer approved for use in ice cream machines.
- Water hose or sink: Depending on the size of your Taylor Ice Cream Machine, you’ll either need a water hose or access to a sink with a sprayer for rinsing the components.
- Towels or drying rack: To dry the cleaned components, have clean towels or a drying rack ready.
- Lubricant (if required): Check the manufacturer’s instructions to see if any specific lubricant is recommended for certain parts of the machine.
By having these supplies ready, you’ll be well-prepared to begin the cleaning process for your Taylor Ice Cream Machine. With safety precautions in mind, and the necessary tools at hand, you’re now ready to disassemble the machine and begin cleaning. Let’s move on to the next step in the cleaning process.
Disassemble the Machine
Before you can effectively clean your Taylor Ice Cream Machine, you will need to disassemble it. This will allow you to access all the individual components and thoroughly clean each part. Follow these steps to disassemble your machine:
- Refer to the manufacturer’s instructions: Different models of Taylor Ice Cream Machines may have slightly different disassembly processes. To ensure you disassemble the machine correctly, refer to the manufacturer’s instructions specific to your model.
- Remove the attachments: Start by removing any attachments or accessories from the machine. This may include the dispenser nozzles, drip trays, or any other removable parts. Carefully set them aside for cleaning separately.
- Open the cover or access panel: Depending on your machine’s design, you may need to open the cover or access panel to reveal the internal components. Follow the instructions provided to safely open the machine without causing any damage.
- Remove the freezing cylinder: The freezing cylinder is the part of the machine that freezes the ice cream mixture. To remove it, carefully disconnect any connectors or hoses and gently lift it out. Place it on a clean surface.
- Detach the beater assembly: The beater assembly is responsible for churning the ice cream mixture. Refer to the manufacturer’s instructions to properly detach the beater assembly from the machine. Ensure you handle it with care as it may be heavy.
- Take out any additional components: Depending on your machine, there may be additional components that need to be removed. This could include parts like the mix hopper or dasher. Take note of these components and remove them according to the manufacturer’s directions.
By following these steps, you will successfully disassemble your Taylor Ice Cream Machine, allowing you to access all the necessary parts for cleaning. Ensure you handle each component with care to avoid any damage or injury. With the machine disassembled, you’re now ready to move on to the next step: cleaning the exterior of the machine.
Clean the Exterior
Once you have disassembled your Taylor Ice Cream Machine, it’s time to start cleaning the exterior. The exterior of the machine can accumulate dust, grime, and spills over time. Follow these steps to give the exterior a thorough cleaning:
- Prepare a cleaning solution: In a bucket or sink, mix warm water with a mild detergent or a cleaning solution recommended for ice cream machines. Ensure the cleaning agent is food-safe and will not damage the machine’s exterior.
- Dampen a clean microfiber cloth or sponge: Dip a clean microfiber cloth or sponge into the cleaning solution. Wring out any excess liquid to avoid dripping onto the machine.
- Gently wipe the exterior surfaces: Start by wiping the outer surfaces of the machine with the damp cloth or sponge. Pay attention to areas that may have accumulated more dirt, such as corners, seams, and handles. If there are stubborn stains, you can gently scrub them with a soft brush or sponge.
- Remove any residue or spills: Use the damp cloth or sponge to clean any spills or residue on the exterior of the machine. Make sure to wipe away any sticky residue, as it can attract more dirt and affect the performance of the machine.
- Rinse with clean water: Once you have wiped away any dirt or stains, rinse the exterior surfaces with clean water. This will remove any remaining cleaning solution or residue.
- Dry with a clean towel: Finally, use a clean towel or cloth to dry the exterior of the machine. Ensure that all surfaces are completely dry before reassembling the machine.
By following these steps, you can effectively clean the exterior of your Taylor Ice Cream Machine, restoring its shine and removing any built-up grime. Once the exterior is clean and dry, you can move on to cleaning the interior components of the machine. Let’s move on to the next step: cleaning the interior components.
Clean the Interior Components
With the exterior of your Taylor Ice Cream Machine sparkling clean, it’s time to shift your focus to the interior components. These components are responsible for freezing the ice cream mixture and ensuring it’s churned to perfection. Follow these steps to clean the interior components:
- Prepare a cleaning solution: In a bucket or sink, mix warm water with a mild detergent or a cleaning solution recommended for ice cream machines. Ensure the cleaning agent is food-safe and suitable for cleaning the interior components.
- Submerge removable components: If there are removable components, such as mixing paddles or dashers, submerge them in the cleaning solution. Allow them to soak for a few minutes to help loosen any residue or buildup.
- Scrub the components: Using a soft brush or sponge, gently scrub the submerged components to remove any dirt or residue. Pay extra attention to areas that may have accumulated more buildup, such as grooves or crevices on the paddles or dashers.
- Rinse with clean water: Once you have scrubbed the components, rinse them thoroughly with clean water. Ensure that all traces of the cleaning solution are removed.
- Clean non-removable components: For components that cannot be removed, such as the freezing cylinder or the beater assembly, use a clean microfiber cloth or sponge soaked in the cleaning solution. Gently wipe and scrub these components, paying attention to any visible dirt or residue.
- Rinse with clean water: After cleaning the non-removable components, rinse them thoroughly with clean water. Use a cloth or sponge soaked in clean water to wipe away any remaining residue.
- Sanitize if necessary: Depending on the manufacturer’s instructions, certain components may require sanitization. Follow the appropriate steps to sanitize the components, ensuring you use a food-grade sanitizer approved for use in ice cream machines.
By following these steps, you can effectively clean the interior components of your Taylor Ice Cream Machine. Regular cleaning of these components will help maintain the quality of the ice cream and prevent any unwanted buildup. With the interior components now clean, let’s move on to cleaning the dispensing mechanism of the machine.
To clean a Taylor ice cream machine, first unplug it and disassemble the parts. Wash the parts with warm, soapy water and rinse thoroughly. Use a soft cloth to wipe down the exterior. Sanitize all parts with a food-safe sanitizer before reassembling.
Clean the Dispensing Mechanism
The dispensing mechanism of your Taylor Ice Cream Machine plays a vital role in serving smooth and creamy ice cream. Over time, it can become clogged or dirty, affecting the flow and quality of the ice cream. Follow these steps to clean the dispensing mechanism:
- Remove any detachable parts: Start by removing any detachable parts of the dispensing mechanism, such as the dispenser nozzles or drip trays. These can usually be easily twisted or lifted off.
- Soak in a cleaning solution: Fill a bowl or sink with warm water and a mild detergent or a cleaning solution specifically designed for ice cream machines. Submerge the detachable parts in the cleaning solution and let them soak for a few minutes.
- Scrub the parts: Using a small brush, such as a toothbrush or bottle brush, gently scrub the detachable parts to remove any buildup or residue. Pay attention to any narrow openings or crevices where ice cream can get stuck.
- Rinse with clean water: Once you have scrubbed the parts, rinse them thoroughly with clean water. Ensure that all traces of the cleaning solution are removed.
- Clean the inside of the dispensing mechanism: For the main dispensing mechanism, use a clean microfiber cloth or sponge soaked in the cleaning solution. Wipe the inside of the mechanism, reaching as far as possible to remove any ice cream residue or buildup.
- Rinse with clean water: After cleaning the inside of the dispensing mechanism, rinse it thoroughly with clean water. Use a cloth or sponge soaked in clean water to wipe away any remaining residue.
- Dry the parts: Once all the parts are clean and rinsed, use a clean towel or allow them to air dry completely before reassembling the dispensing mechanism.
By following these steps, you can ensure that your Taylor Ice Cream Machine’s dispensing mechanism is clean and free from any obstructions. This will ensure a smooth and consistent flow of delicious ice cream. With the dispensing mechanism clean, let’s move on to cleaning the freezing cylinder.
Clean the Freezing Cylinder
The freezing cylinder of your Taylor Ice Cream Machine is the key component responsible for freezing the ice cream mixture. Over time, it can develop a buildup of ice cream residue or mineral deposits, affecting the performance of the machine. Follow these steps to clean the freezing cylinder:
- Prepare a cleaning solution: In a bucket or sink, mix warm water with a mild detergent or a cleaning solution recommended for ice cream machines. Ensure the cleaning agent is food-safe and suitable for cleaning the freezing cylinder.
- Disconnect any connectors: Depending on your machine’s design, there may be connectors or hoses attached to the freezing cylinder. Carefully disconnect these to remove the freezing cylinder from the machine.
- Soak the freezing cylinder: Submerge the freezing cylinder in the cleaning solution and allow it to soak for a specific duration recommended by the manufacturer. This will help loosen any residue or deposits inside the cylinder.
- Scrub the interior: Using a soft brush or sponge, gently scrub the interior surface of the freezing cylinder to remove any residue. Pay extra attention to any areas with stubborn buildup or deposits.
- Rinse with clean water: Once you have scrubbed the interior, rinse the freezing cylinder thoroughly with clean water. Ensure that all traces of the cleaning solution are removed.
- Inspect for mineral deposits: After rinsing, check the freezing cylinder for any mineral deposits. If there are mineral deposits present, you may need to use a mixture of vinegar and water or a commercial descaler to remove them. Follow the manufacturer’s instructions for descaling.
- Rinse again and dry: After descaling, thoroughly rinse the freezing cylinder again with clean water to remove any remaining descaling solution. Dry the cylinder completely before reassembling it.
- Reconnect the freezing cylinder: Once the freezing cylinder is clean and dry, carefully reconnect any connectors or hoses and ensure they are securely in place.
By following these steps, you can effectively clean the freezing cylinder of your Taylor Ice Cream Machine. Regular maintenance and cleaning of the cylinder will help maintain optimal freezing performance and prevent any unwanted buildup. With the freezing cylinder clean, let’s move on to cleaning the beater assembly.
Clean the Beater Assembly
The beater assembly of your Taylor Ice Cream Machine is responsible for churning and mixing the ice cream mixture to create a smooth and creamy texture. Over time, this assembly can accumulate residue and become less effective. Follow these steps to clean the beater assembly:
- Prepare a cleaning solution: In a bucket or sink, mix warm water with a mild detergent or a cleaning solution recommended for ice cream machines. Ensure the cleaning agent is food-safe and suitable for cleaning the beater assembly.
- Remove the beater assembly: Refer to the manufacturer’s instructions to safely detach the beater assembly from the machine. This may involve unscrewing or unlocking specific components.
- Soak the beater assembly: Submerge the beater assembly in the cleaning solution and allow it to soak for a few minutes. This will help loosen any residue or buildup on the assembly.
- Scrub the beater assembly: Using a soft brush or sponge, gently scrub the beater assembly to remove any residue. Pay extra attention to the beaters and any other components that come in contact with the ice cream mixture.
- Rinse with clean water: Once you have scrubbed the beater assembly, rinse it thoroughly with clean water. Ensure that all traces of the cleaning solution are removed.
- Inspect for any remaining residue: After rinsing, inspect the beater assembly for any remaining residue. If necessary, repeat the scrubbing process or use a toothpick or small brush to remove any stubborn traces of residue.
- Dry the beater assembly: Once the beater assembly is clean, dry it thoroughly using a clean towel or allow it to air dry completely before reassembling it.
- Reassemble the beater assembly: Carefully reassemble the beater assembly according to the manufacturer’s instructions. Ensure that all components are securely in place.
By following these steps, you can effectively clean the beater assembly of your Taylor Ice Cream Machine. Regular cleaning of the beater assembly will help maintain its performance and prevent any buildup that can affect the quality of your ice cream. With the beater assembly clean and dry, you’re now ready to reassemble your machine.
Read more: How To Clean Ice Cream Out Of A Carpet
Reassemble the Machine
Now that you have thoroughly cleaned all the individual components of your Taylor Ice Cream Machine, it’s time to reassemble them. Follow these steps to ensure a seamless reassembly process:
- Refer to the manufacturer’s instructions: Each model of Taylor Ice Cream Machine may have specific reassembly instructions. It’s important to consult the manufacturer’s instructions to ensure you reassemble the machine correctly.
- Start with the beater assembly: Begin by reattaching the beater assembly to the machine. Follow the instructions provided to securely lock or screw it back into place.
- Reconnect any hoses or connectors: If there were any hoses or connectors that you disconnected during the cleaning process, carefully reattach them to the appropriate components. Ensure they are securely connected to prevent any leaks or malfunctions.
- Place the freezing cylinder back in position: Lift the freezing cylinder and carefully place it back into its designated position in the machine. Ensure that any connectors or hoses are correctly aligned and securely attached.
- Reattach removable components: If there were any removable parts, such as the dispenser nozzles or drip trays, reattach them to the machine. Make sure they are fitted properly and securely.
- Close the cover or access panel: If you had opened the cover or access panel to disassemble the machine, close it securely according to the manufacturer’s instructions. Ensure that it is properly aligned and latched.
It is essential to ensure that all components are reassembled correctly and securely. Double-check that any connectors, hoses, or screws are tightly attached. Once you have completed the reassembly process, you are now ready for the final steps to ensure the long-term health and maintenance of your Taylor Ice Cream Machine.
Final Steps and Maintenance Tips
Congratulations! You have successfully cleaned and reassembled your Taylor Ice Cream Machine. To ensure its optimal performance and longevity, follow these final steps and maintenance tips:
- Run a cleaning cycle: Before making your next batch of ice cream, run a cleaning cycle with hot water to flush out any remaining cleaning solution or residue. This will ensure that your ice cream is free from any cleaning agents.
- Regularly clean and sanitize: Make it a habit to clean and sanitize your machine after each use. This will prevent any buildup of bacteria and maintain the quality of your ice cream.
- Use a soft cloth or sponge: When wiping down the machine, always use a soft cloth or sponge. Avoid abrasive materials that may scratch the surfaces.
- Monitor the temperature: Keep an eye on the temperature of your machine to ensure it stays within the recommended range. The freezing cylinder should be cold enough to freeze the ice cream mixture properly.
- Dispose of ice cream properly: When cleaning or maintaining the machine, always dispose of any leftover ice cream or mix according to food safety guidelines. Avoid letting ice cream sit in warm temperatures for an extended period.
- Inspect and replace worn parts: Regularly inspect your machine for any worn or damaged parts. If you notice any issues, consult the manufacturer’s instructions or contact a professional to replace the necessary components.
- Follow manufacturer’s maintenance recommendations: Refer to the manufacturer’s recommendations for routine maintenance and servicing of the machine. This may include lubrication of certain parts or scheduled maintenance visits.
- Keep the machine covered: When not in use, consider covering your Taylor Ice Cream Machine to protect it from dust, spills, and other contaminants. This will also help maintain its appearance and extend its lifespan.
- Stay up to date with the latest tips and updates: Stay informed about any new cleaning techniques, maintenance tips, or updates related to your specific model of Taylor Ice Cream Machine. This will ensure you are taking the best care of your machine.
By following these final steps and maintenance tips, you can enjoy consistently delicious ice cream from your Taylor Ice Cream Machine for years to come. Remember, regular cleaning and maintenance will not only prolong the life of the machine but also contribute to the quality of your frozen creations. Happy ice cream making!
Conclusion
Congratulations on completing the comprehensive cleaning process for your Taylor Ice Cream Machine! By following the step-by-step instructions outlined in this guide, you have successfully cleaned and maintained your machine to ensure its optimal performance and longevity.
Regular cleaning is essential to maintain the taste, quality, and hygiene of your ice cream. By disassembling the machine and cleaning each component thoroughly, you have eliminated any buildup and residue that can affect the performance and flavor of your frozen treats.
Remember to always prioritize safety during the cleaning process by following the necessary precautions, including wearing protective gear and ensuring the machine is turned off and unplugged.
In addition to cleaning, proper maintenance and routine care will go a long way in preserving the life of your Taylor Ice Cream Machine. Regular inspection, lubrication if required, and addressing any worn or damaged parts in a timely manner will help ensure the machine continues to churn out delicious ice cream for years to come.
Lastly, keep yourself updated with the latest recommendations and tips from the manufacturer to stay informed about any improvements or maintenance guidelines specific to your model.
Now that you have completed the cleaning process and equipped yourself with valuable maintenance knowledge, it’s time to enjoy the fruits of your labor by serving up delightful and delectable batches of homemade ice cream with confidence.
Go ahead, savor the creamy goodness, and indulge in the joy of creating frozen treats with your sparkling clean Taylor Ice Cream Machine!
Frequently Asked Questions about How To Clean Taylor Ice Cream Machine
Was this page helpful?
At Storables.com, we guarantee accurate and reliable information. Our content, validated by Expert Board Contributors, is crafted following stringent Editorial Policies. We're committed to providing you with well-researched, expert-backed insights for all your informational needs.


0 thoughts on “How To Clean Taylor Ice Cream Machine”