Articles
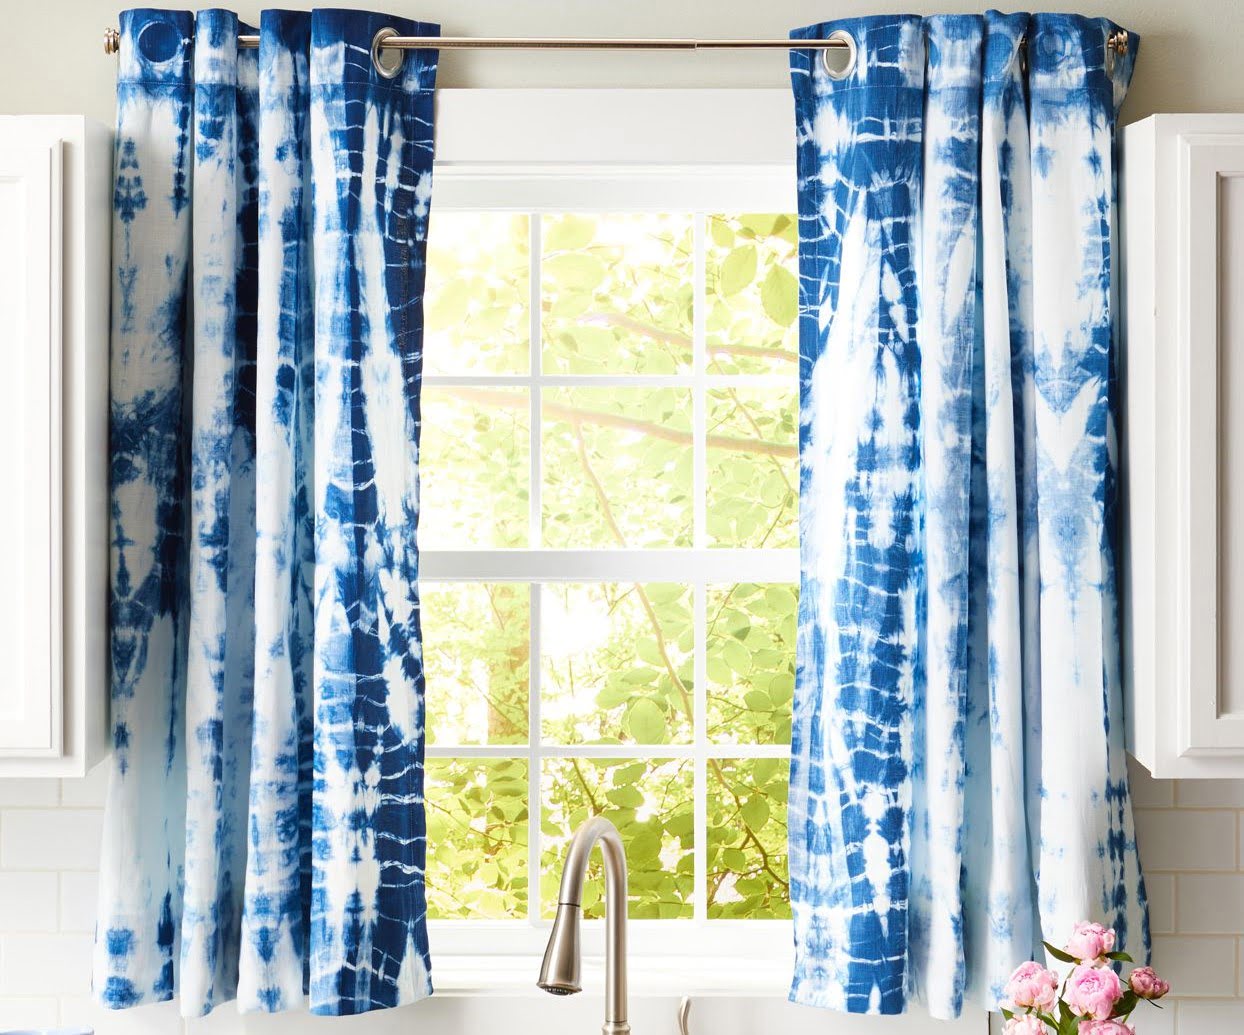
How To Dye Curtains
Modified: December 7, 2023
Learn how to dye curtains with our helpful articles. Transform your space with a vibrant splash of color.
(Many of the links in this article redirect to a specific reviewed product. Your purchase of these products through affiliate links helps to generate commission for Storables.com, at no extra cost. Learn more)
Introduction
If you’re looking to transform the look of your curtains and add a pop of color to your living space, dyeing them can be a fantastic solution. Dyeing curtains allows you to customize their appearance to match your personal style and give your room a fresh, vibrant update.
In this article, we’ll guide you through the process of dyeing curtains, from choosing the right dye to preparing the fabric and completing the dyeing process. We’ll also provide some tips and precautions to ensure a successful outcome.
Before we begin, it’s important to note that the dyeing process will differ depending on the fabric type, so be sure to check the instructions that come with your chosen dye, as well as any special care instructions for your curtains.
Now, let’s gather the materials needed and get started on transforming those curtains!
Key Takeaways:
- Transform your living space by dyeing your curtains to match your personal style. Follow fabric-specific dyeing methods and precautions for vibrant, long-lasting results.
- Choose the right dye, prepare your curtains, and mix the dye solution accurately for a successful curtain dyeing experience. Experiment with colors and have fun!
Read more: How To Get Hair Dye Out Of A Shower Curtain
Materials Needed
Before you begin the curtain dyeing process, make sure you have the following materials on hand:
- Curtains: Choose curtains made of a fabric that can be dyed, such as cotton, linen, or polyester.
- Fabric dye: Select a fabric dye that is suitable for the type of fabric your curtains are made of. You can find fabric dyes in various colors at craft stores or online.
- Bucket or large basin: This will be used to mix and hold the dye solution.
- Hot water: You’ll need hot water to dissolve the dye and soak the curtains.
- Measuring cup: Ensure accurate measurements for the dye and water ratios.
- Gloves: Protect your hands from coming into direct contact with the dye.
- Stirring utensil: Use a spoon or stick to thoroughly mix the dye solution.
- Plastic sheet or drop cloth: Lay this down to protect your work surface from any spills or splashes.
- Old towels or rags: These can be handy for drying any excess dye or cleaning up spills.
- Optional: Fabric conditioner or vinegar: These can help set the dye and prevent it from bleeding after the curtains are dyed.
Make sure you have all these materials ready before you start the dyeing process. It’s important to be prepared and have everything within reach to ensure a smooth and successful curtain dyeing experience.
Choosing the Right Dye
When it comes to choosing the right dye for your curtains, there are a few factors to consider. Here are some tips to help you make the best choice:
1. Fabric Compatibility: Check the fabric content of your curtains and ensure that the dye you choose is suitable for that specific fabric. Different dyes are designed to work best with certain fabric types, such as cotton, linen, or polyester. Be sure to read the label or instructions on the dye packaging to determine its compatibility.
2. Color Options: Consider the color you want to achieve for your curtains. Fabric dyes come in a wide range of colors, from bold and vibrant hues to more subtle and natural tones. It’s a good idea to test a small swatch of fabric or consult the color chart provided by the dye manufacturer to get a sense of the final color outcome.
3. Dyeing Method: Think about the dyeing method you want to use. Some dyes require you to use the stovetop method, where you simmer the curtains in a dye solution, while others can be applied directly to the fabric without heat. Choose a dyeing method that suits your comfort level and the amount of time you’re willing to spend on the process.
4. Fade Resistance: Consider the fade resistance of the dye. Some dyes are more prone to fading over time, especially when exposed to sunlight. If you want your curtains to maintain their color intensity for a longer period, look for dyes that specifically mention fade resistance on the packaging.
5. Allergies and Sensitivities: Take into account any allergies or sensitivities you or your household members may have. Some dyes contain chemicals that could trigger allergies or skin irritations. If you have concerns, opt for natural or plant-based dyes that are less likely to cause any adverse reactions.
Remember to always follow the instructions provided by the dye manufacturer for the best results. When in doubt, you can also consult with the staff at your local fabric store for personalized recommendations based on your specific needs and preferences.
Preparing the Curtains
Before you begin the dyeing process, it is important to properly prepare your curtains to ensure optimal results. Here are the steps to follow when preparing your curtains:
1. Wash the Curtains: Start by washing your curtains using a mild detergent to remove any dirt, dust, or stains. This will help ensure that the dye penetrates the fabric evenly. Make sure to follow the care instructions provided by the curtains’ manufacturer, as some fabrics may require specific washing conditions.
2. Remove Hardware: If your curtains have any hardware, such as curtain rods or hooks, remove them before dyeing. This will prevent any damage to the hardware and ensure a smooth dyeing process.
3. Pre-Treat Stains: If there are any stubborn stains on your curtains, pre-treat them before dyeing. Use a stain remover or spot treatment product and gently rub it into the stained areas. Allow the product to sit for the recommended amount of time before washing the curtains again.
4. Iron the Curtains: Once the curtains are clean and dry, iron them to remove any wrinkles or creases. This will provide a smooth surface for the dye to adhere to and ensure an even distribution of color during the dyeing process.
5. Protect Surrounding Areas: Before you start working with the dye, cover your work surface with a plastic sheet or drop cloth to protect it from any spills or splashes. This will make cleanup easier and prevent any accidental staining of nearby items.
By following these steps to prepare your curtains, you’ll ensure that they are in the best condition for absorbing the dye and achieving vibrant, even color results.
Mixing the Dye
Once your curtains are prepared, it’s time to mix the dye solution. Follow these steps to ensure a proper mixture:
1. Read the Instructions: Start by carefully reading the instructions provided by the dye manufacturer. Different dyes may have specific mixing ratios or additional steps that need to be followed. Make sure you understand the instructions before proceeding.
2. Wear Gloves: Before handling the dye, put on a pair of gloves to protect your hands from staining. Some dyes may contain chemicals that can stain or irritate the skin.
3. Fill the Bucket: Fill a bucket or large basin with hot water according to the instructions provided by the dye manufacturer. The temperature of the water can affect how well the dye dissolves and how vibrant the final color will be. Use a measuring cup to ensure accurate water measurements.
4. Add Dye to the Water: Slowly pour the dye into the hot water, following the recommended amount indicated on the dye packaging. Stir the mixture with a stirring utensil to fully dissolve the dye and create a uniform solution. Ensure that the dye is fully incorporated into the water to avoid any clumps or uneven coloring.
5. Test the Color: Before immersing your curtains in the dye solution, it’s a good idea to test the color on a small swatch of fabric. Dip a piece of fabric into the dye mixture and observe the color. Adjust the mixture if necessary to achieve your desired shade.
6. Optional: Add Fabric Conditioner or Vinegar: Depending on the dye manufacturer’s recommendations, you may choose to add fabric conditioner or vinegar to the dye mixture. These substances can help set the dye and prevent bleeding or fading in the future. Follow the recommended amounts and mixing instructions provided.
Remember, the dyeing process is irreversible, so it’s important to take the time to mix the dye properly and test the color before proceeding. This will help you achieve the desired results without any surprises.
When dyeing curtains, make sure to pre-wash them to remove any dirt or chemicals that may interfere with the dye. Also, use the appropriate dye for the fabric type and follow the instructions carefully for best results.
Read more: How To Dye Lamp Shades
Dyeing Process
Now that the dye solution is prepared, it’s time to start the dyeing process. Follow these steps to dye your curtains:
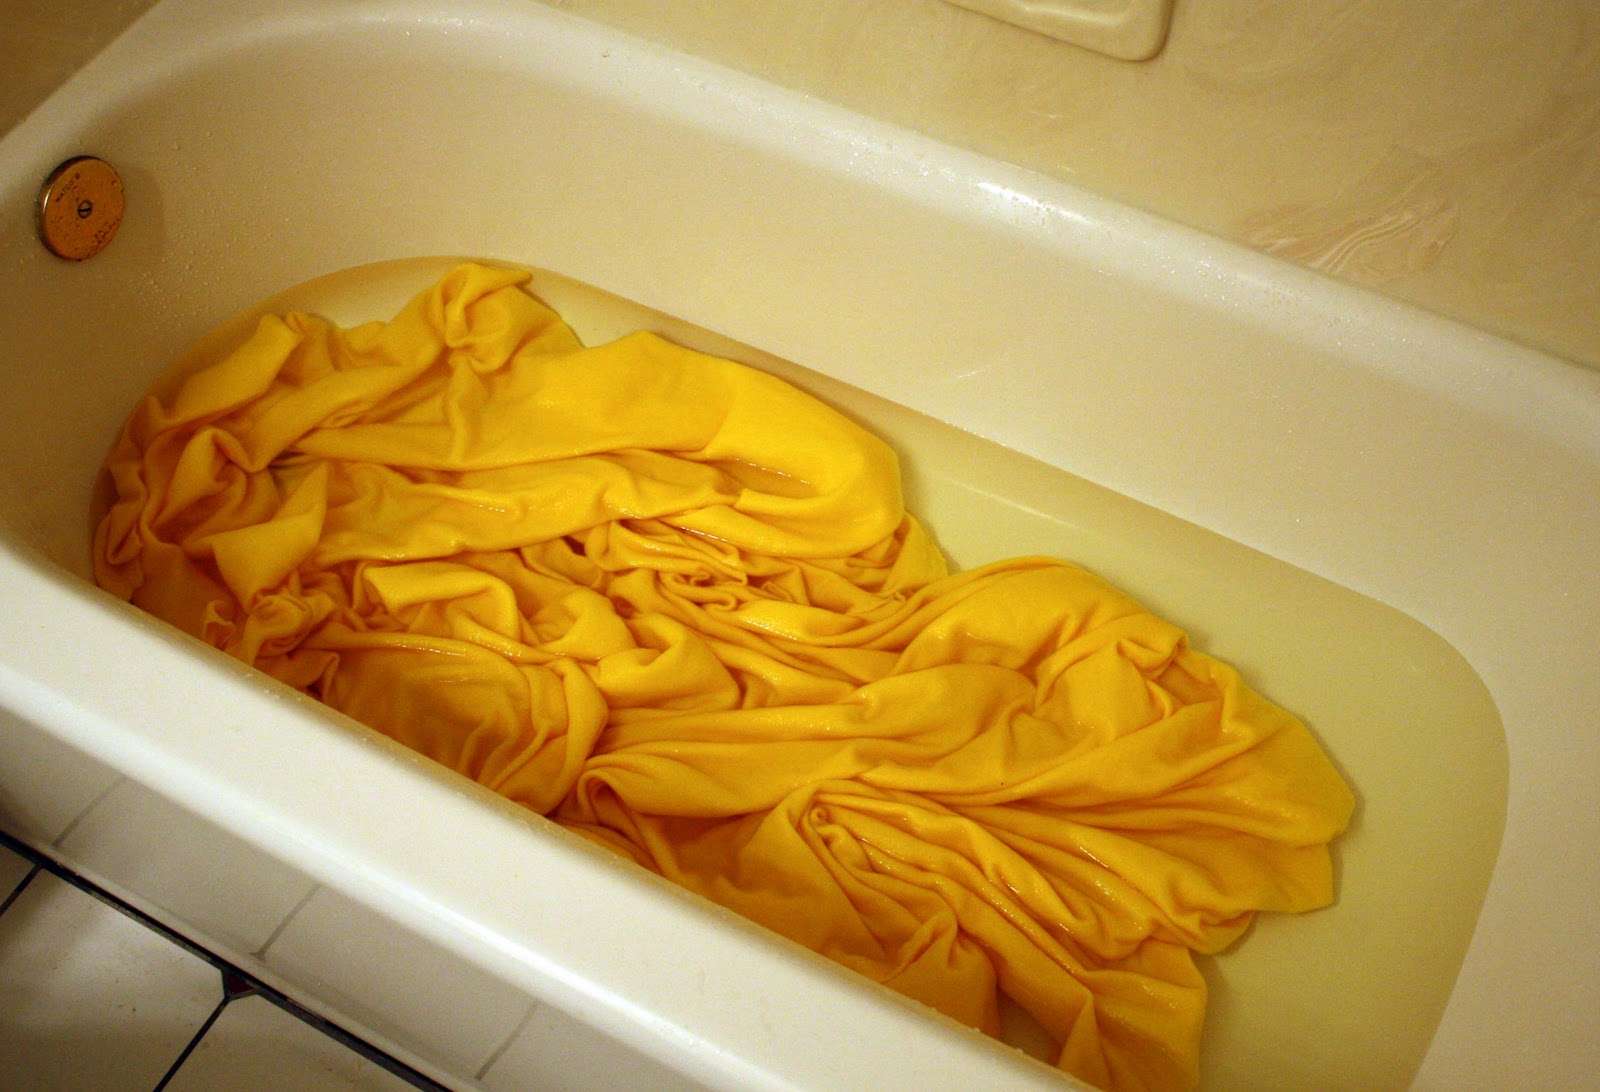
1. Submerge the Curtains: Carefully lower the curtains into the dye solution, ensuring that they are fully submerged. You can gently agitate the curtains in the dye bath to promote even dye distribution. Keep in mind that the longer the curtains remain in the dye, the more intense the color will be.
2. Stir Occasionally: During the dyeing process, stir the curtains occasionally to prevent the dye from settling in one area. This will help ensure an even and consistent color outcome.
3. Monitor the Color: Keep an eye on the curtains as they soak in the dye solution. Periodically check the color to determine if it has reached your desired shade. Remember that the color will appear darker when wet and will lighten slightly when dry.
4. Adjust Dyeing Time: If you prefer a lighter color, you can remove the curtains from the dye solution earlier than the recommended dyeing time. On the other hand, if you want a more intense color, you can leave the curtains in the dye solution for a longer period. Follow the dye manufacturer’s instructions for the recommended dyeing time as a starting point.
5. Rinse the Curtains: Once you are satisfied with the color, remove the curtains from the dye solution. Rinse them thoroughly with cold water to remove any excess dye. Continue rinsing until the water runs clear, indicating that the majority of the dye has been removed.
Remember, different fabric types and dye brands may have varying instructions for the dyeing process. Always refer to the instructions provided by the dye manufacturer to ensure the best results.
Once the curtains are rinsed, you can move on to the final steps to complete the dyeing process.
Rinse and Finishing Touches
After the curtains have been dyed and rinsed, it’s time to give them some finishing touches to ensure they look their best. Follow these steps:
1. Rinse with Cold Water: After the initial rinse to remove excess dye, continue rinsing the curtains under cold water until the water runs clear. This step is crucial to prevent any residual dye from bleeding onto other fabrics or surfaces.
2. Apply Fabric Conditioner or Vinegar Rinse: Depending on the dye manufacturer’s recommendations, you may choose to apply a fabric conditioner or vinegar rinse to set the color. This can help prevent bleed and fading in future washes. Follow the recommended instructions and dilution ratios provided by the manufacturer if you decide to use these products.
3. Allow the Curtains to Dry: Hang the curtains to air dry in a well-ventilated area. Ensure that they are not exposed to direct sunlight, as this can cause the color to fade. You may notice that the color appears slightly lighter when the curtains are dry compared to when they were wet. This is normal and expected.
4. Iron the Curtains: Once the curtains are completely dry, iron them on a low to medium heat setting to remove any wrinkles and give them a polished look. Make sure to use a pressing cloth to protect the fabric from direct heat and prevent any potential damage.
5. Hang and Enjoy: Once the curtains are ironed, hang them back in their designated place and admire the fresh, vibrant color you have achieved. Your newly dyed curtains will add a renewed sense of style and personality to your space.
Remember to follow any additional care instructions provided by the dye manufacturer or the curtains’ manufacturer. This will help maintain the integrity of the dye and ensure the longevity of your curtains’ new color.
With these finishing touches, your dyed curtains are now ready to enhance the aesthetic appeal of your room!
Drying and Ironing
After the curtains have been rinsed, it’s important to properly dry and iron them to achieve a polished and finished look. Follow these steps to ensure the best results:
1. Remove Excess Water: Gently squeeze out any excess water from the curtains after rinsing. Avoid wringing or twisting the fabric too tightly, as this can distort the shape and cause wrinkles.
2. Hang to Dry: Hang the curtains on a clothesline or a sturdy drying rack. Make sure to spread them out evenly to promote airflow and prevent wrinkling. Keep them away from direct heat or sunlight, as this can cause the color to fade.
3. Smooth Out Wrinkles: While the curtains are still damp, gently smooth out any wrinkles or creases with your hands. This will make the ironing process easier and ensure a smoother end result.
4. Iron on a Low Heat Setting: Once the curtains are slightly damp but not dripping wet, it’s time to iron them. Set your iron to a low to medium heat setting according to the fabric type. Always check the care instructions for your specific curtains to determine the appropriate heat level.
5. Use a Pressing Cloth: To protect the fabric from direct heat, place a clean pressing cloth or thin cotton fabric over the curtains before ironing. This will prevent any potential damage or discoloration caused by direct contact between the iron and the fabric.
6. Iron in Sections: Start ironing one section of the curtains at a time, applying gentle pressure and moving the iron in smooth, continuous strokes. Avoid leaving the iron in one spot for too long, as this can cause scorching or burning.
7. Pay Attention to Details: Take extra care when ironing any pleats, seams, or decorative elements of the curtains. Use a steam setting or a spray bottle with water to lightly dampen these areas for better results.
8. Hang the Curtains: Once you have finished ironing the curtains, hang them back in their designated place. Smooth out any remaining wrinkles with your hands, and let gravity help in naturally straightening the fabric.
By properly drying and ironing your curtains, you’ll ensure that they look neat, fresh, and ready to enhance the aesthetic appeal of your space.
Tips and Precautions
When dyeing your curtains, it’s important to keep a few tips and precautions in mind to ensure a successful and safe process. Here are some valuable recommendations:
1. Read the Instructions: Always read and follow the instructions provided by the dye manufacturer. Different dyes may have specific guidelines and precautions that need to be followed for best results.
2. Test a Swatch: Before dyeing the entire curtain, test the dye on a small swatch of fabric or a hidden portion of the curtains. This will give you a preview of the color outcome and help you avoid any surprises.
3. Use Protection: Wear gloves and protective clothing to avoid direct contact with the dye, as it may stain your skin or clothing. Additionally, protect your work surface with a plastic sheet or drop cloth to prevent any accidental spills or stains.
4. Mix Sufficient Dye Solution: Ensure that you mix enough dye solution to fully submerge your curtains. If in doubt, it’s better to have slightly more dye solution than not enough. Having an adequate amount of dye solution will ensure an even and consistent color distribution.
5. Keep Stirring: Stir the dye solution periodically while dyeing the curtains to prevent the dye from settling in one area. This will result in a more uniform color outcome.
6. Rinse Thoroughly: After dyeing, rinse the curtains with cold water until the water runs clear. This will remove any excess dye and help prevent bleeding or fading in the future.
7. Take Precautions with Metal Hardware: If your curtains have metal hardware, such as grommets or decorative hooks, take caution to protect them from the dye solution. Consider removing the hardware before dyeing or cover them with tape or plastic wrap to prevent staining.
8. Follow Care Instructions: Once your curtains are dyed, check the care instructions provided by the dye manufacturer to ensure they are properly maintained. Some dyes may require specific washing or drying methods to maintain the color integrity.
9. Avoid Sun Exposure: To prevent the color from fading, avoid placing your newly dyed curtains in direct sunlight for extended periods. Sunlight can cause the fabric dye to fade over time.
10. Experiment and Have Fun: Dyeing curtains is a creative process, so don’t be afraid to experiment with different colors and techniques. Let your imagination run wild and have fun with the transformation!
By following these tips and precautions, you’ll increase the chances of achieving beautiful, vibrant, and long-lasting results with your dyed curtains.
Read more: How To Dye A Patio Umbrella
Conclusion
Transforming the look of your curtains through the art of dyeing can be a rewarding and creative endeavor. By following the steps and tips outlined in this article, you can successfully dye your curtains and add a personalized touch to your living space.
Remember to choose the right dye for your fabric type, properly prepare your curtains, and mix the dye solution accurately. Take your time during the dyeing process, ensuring the curtains are fully immersed in the dye solution and occasionally stirred for even coloring.
After dyeing, thoroughly rinse the curtains, apply any necessary finishing touches, and allow them to air dry. Once dry, iron them to remove any wrinkles and creases, giving them a polished appearance.
Throughout the entire process, it’s crucial to read and follow the instructions provided by the dye manufacturer and to take proper precautions, such as wearing gloves and protecting your work surface.
By adhering to these guidelines, you can achieve stunning results and enjoy refreshed curtains that reflect your personal style and bring new life to your home.
So, gather your materials, let your creativity flow, and embark on the journey of transforming your curtains through the art of dyeing. With a little patience and attention to detail, your curtains will become a unique and eye-catching feature in your living space.
Frequently Asked Questions about How To Dye Curtains
Was this page helpful?
At Storables.com, we guarantee accurate and reliable information. Our content, validated by Expert Board Contributors, is crafted following stringent Editorial Policies. We're committed to providing you with well-researched, expert-backed insights for all your informational needs.

0 thoughts on “How To Dye Curtains”