Articles
How To Extend Cabinets To The Ceiling
Modified: August 20, 2024
Learn how to extend your cabinets to the ceiling with these helpful articles. Maximize your storage space and enhance the aesthetics of your kitchen.
(Many of the links in this article redirect to a specific reviewed product. Your purchase of these products through affiliate links helps to generate commission for Storables.com, at no extra cost. Learn more)
Introduction
Welcome to the world of cabinet extensions! If you have been looking to add more storage space or simply update the look of your kitchen, extending your cabinets to the ceiling is a fantastic option. This not only gives you extra room for your cookware and utensils, but it also creates an aesthetically pleasing and cohesive design. By following a few simple steps, you can easily achieve this transformation and make your kitchen feel more spacious.
When it comes to extending cabinets to the ceiling, there are a few considerations to keep in mind. First, you need to assess the space and determine if your cabinets can be extended without interfering with any existing fixtures or appliances. Next, you’ll need to prepare the cabinets and ensure they are structurally sound to support the extensions. Building a framework for the extensions is the next step, followed by attaching the cabinet extensions securely. Finally, sanding and painting the extensions will give your cabinets a flawless finish.
In this article, we will guide you through each of these steps in detail, providing you with all the information you need to successfully extend your cabinets to the ceiling. So, let’s dive in and turn your kitchen into a functional and stylish space!
Key Takeaways:
- Extending cabinets to the ceiling is a practical and stylish way to maximize storage space and create a cohesive kitchen design. Thoroughly assessing the space, preparing the cabinets, and building a sturdy framework are essential steps for a successful cabinet extension project.
- The process of extending cabinets to the ceiling involves careful planning, precise execution, and attention to detail. From attaching the extensions to sanding and painting, each step contributes to transforming the kitchen into a functional and visually appealing space.
Read more: How To Build Floor To Ceiling Cabinets
Assessing the Space
Before you begin extending your cabinets to the ceiling, it’s crucial to assess the space and determine if this project is feasible for your kitchen. Take a close look at the height of your ceiling and the existing cabinets to see if there is enough room for extensions.
Measure the height between the top of your cabinets and the ceiling. Ideally, you should have at least 12-18 inches of space for the cabinet extensions. This will ensure that there is enough clearance for the extensions and that they won’t interfere with any light fixtures or ventilation systems.
Next, consider any appliances or fixtures mounted on the walls. Make sure that extending the cabinets won’t obstruct their functionality or create an awkward layout. Take note of any electrical outlets or switches that may need to be relocated to accommodate the extended cabinets.
Additionally, check for any uneven sections of the ceiling or walls. If you notice any irregularities, you may need to make adjustments or repairs before proceeding with the extension project to ensure a seamless and professional-looking installation.
Finally, take into account the overall style and design of your kitchen. Consider if extending the cabinets to the ceiling will enhance the aesthetics of the space and fit in with the existing decor. It’s important to have a cohesive look that blends well with the rest of the kitchen.
By thoroughly assessing the space beforehand, you can save yourself from potential headaches and ensure a successful cabinet extension project. It’s better to be prepared and make any necessary adjustments or considerations before proceeding with the installation.
Preparing for Extension
Once you have assessed the space and determined that extending your cabinets to the ceiling is feasible, it’s time to prepare for the extension project. This involves taking some necessary steps to ensure that your cabinets are ready to support the extensions and that you have all the materials and tools you need.
The first step in preparing for the extension is to empty out your cabinets. Remove all items and store them in a safe place to avoid any damage or clutter during the installation process. This will also give you a clear workspace to work with.
Next, inspect the cabinets for any damage or wear and tear. If there are any loose hinges, handles, or panels, make sure to tighten them or repair them before proceeding. It’s important that the cabinets are sturdy and in good condition to support the weight of the extensions.
Once the cabinets are ready, gather the necessary materials for the extension project. This typically includes plywood or MDF boards for building the framework, screws, a measuring tape, a circular saw, a drill, sandpaper, and paint or stain for finishing the extensions. Make sure to choose materials that match the existing cabinets in terms of color and finish for a seamless look.
In addition to the materials, ensure that you have the appropriate safety equipment, such as safety goggles, gloves, and a dust mask. Safety should always be a priority when undertaking home improvement projects.
Lastly, create a plan or layout for the cabinet extensions. Measure the length and width of each cabinet that will be extended and determine the dimensions of the extensions accordingly. Having a clear plan in place will make the installation process smoother and more efficient.
By properly preparing for the extension project, you will set yourself up for success and ensure that the installation goes smoothly. Taking the time to assess the cabinets, gather materials, and create a plan will make the rest of the process much easier. Now, let’s move on to building the framework for the cabinet extensions.
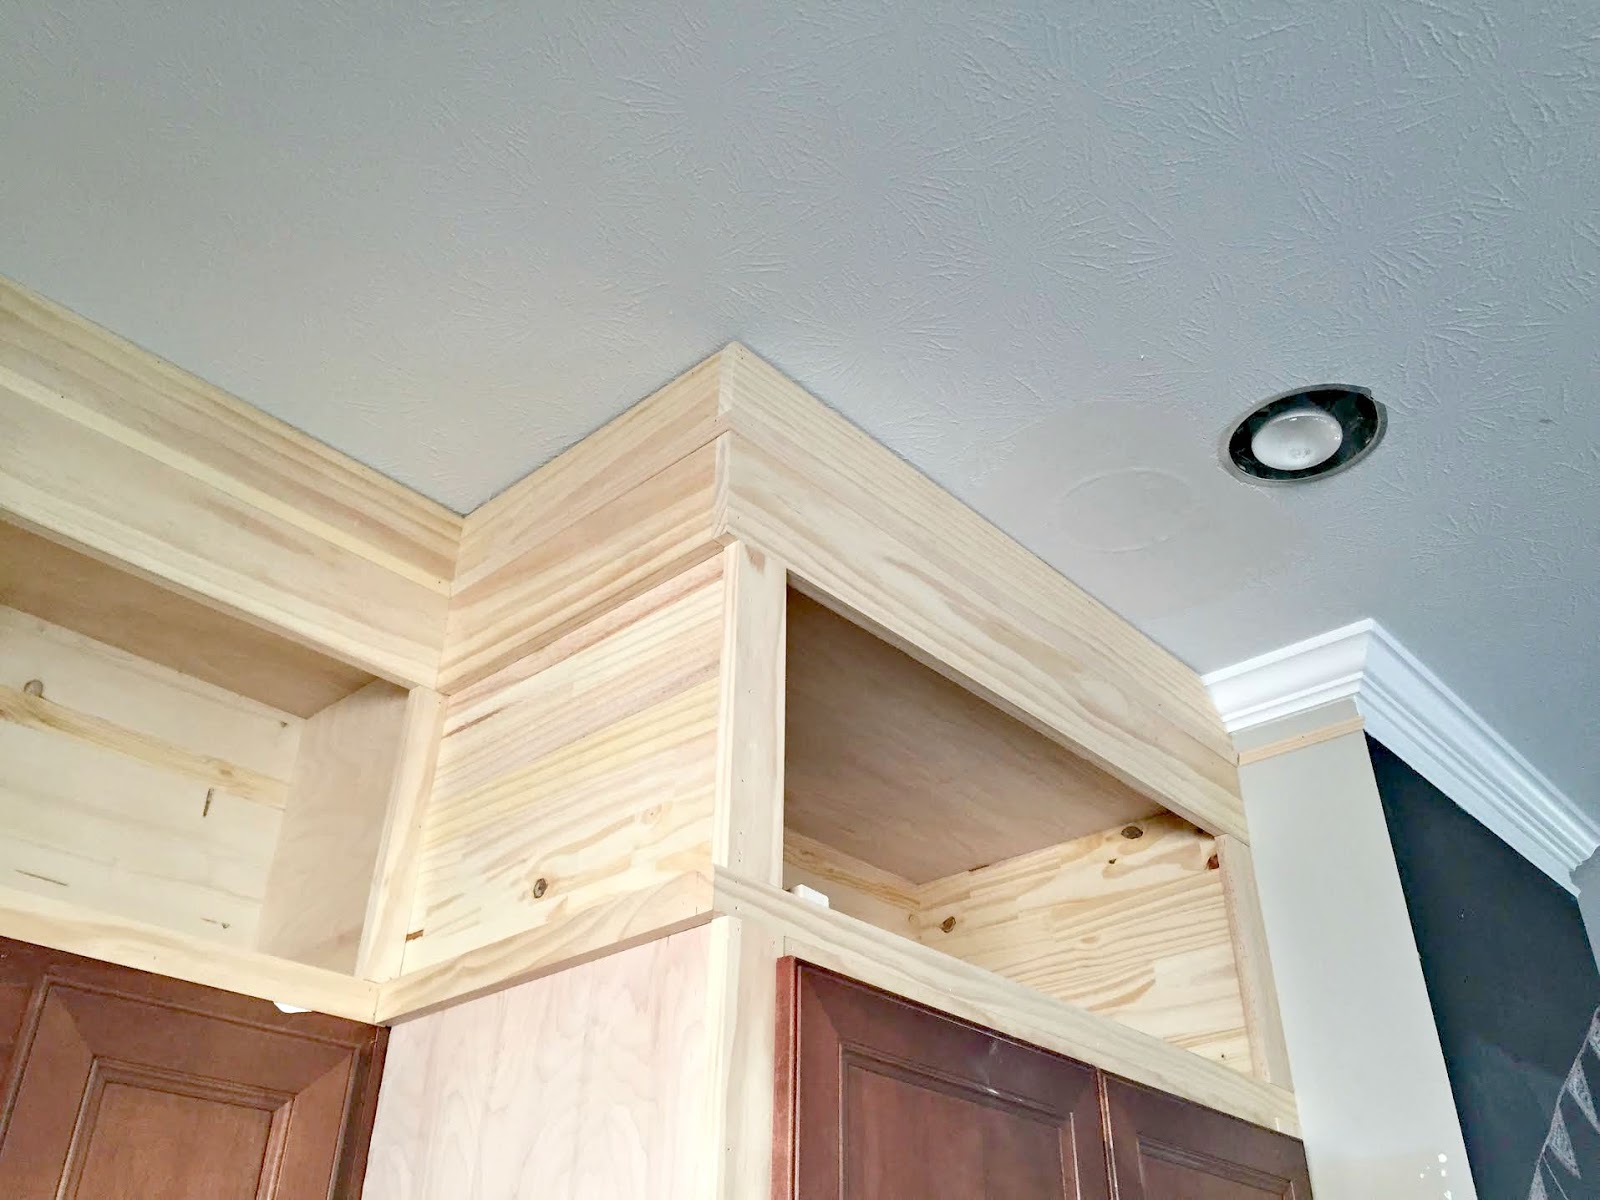
Building a Framework
Once you have prepared your cabinets and gathered all the necessary materials, it’s time to start building the framework for the cabinet extensions. The framework will provide support for the extended cabinets and ensure their stability.
The first step is to measure the length and width of each cabinet that you plan to extend. Use those measurements to cut the plywood or MDF boards to the appropriate size. It’s important to make precise cuts to ensure that the extensions fit snugly onto the existing cabinets.
Next, position the boards vertically along the sides of the cabinets, flush with the top edge. Secure them in place using screws. These vertical boards will act as the support structure for the extensions.
After the vertical boards are securely attached, measure and cut horizontal boards to fit between them. These boards will span across the top of the cabinets, creating a platform for the extensions to be attached to. Secure them in place using screws.
Once the horizontal boards are in place, it’s time to add additional support by installing diagonal braces. Measure and cut the braces to fit between the vertical and horizontal boards at an angle. Attach them securely with screws to reinforce the framework and provide extra stability.
Ensure that the framework is level and properly aligned before moving on to the next step. Use a level and measuring tape to make any necessary adjustments to ensure a straight and even surface.
Take a moment to check the sturdiness of the framework by applying some gentle pressure. It should feel secure and stable, with no wobbling or movement. If there are any areas that feel weak or unstable, reinforce them with additional screws or braces.
Building a solid framework is crucial to the success of your cabinet extension project. It provides the necessary support and stability for the extended cabinets. Take your time with this step and make sure that the framework is strong and properly aligned before proceeding to the next stage of the installation.
Consider adding a stacked molding or trim to the top of your cabinets to extend them to the ceiling. This will create a seamless and polished look while also maximizing storage space.
Attaching the Cabinet Extensions
With the framework in place, it’s time to move on to attaching the cabinet extensions. This is the step where you will physically connect the extended cabinets to the framework you have built.
Start by measuring and cutting the plywood or MDF boards for the cabinet extension panels. Make sure the dimensions match the size of the cabinets and the framework you have built. Use a circular saw or a table saw to make precise cuts.
Once the panels are cut, place them on top of the framework so that they align with the existing cabinets. Use screws to secure the panels to the framework, making sure to screw them in at regular intervals to ensure a secure attachment.
If your cabinets have doors, you can choose to remove them before attaching the extensions or attach the extensions with the doors on. Removing the doors may make it easier to attach the extensions, but it’s ultimately a matter of personal preference.
While attaching the extensions, ensure that they are aligned properly and level with the existing cabinets. Use a level to double-check and make any necessary adjustments. This will ensure a seamless and professional look once the installation is complete.
Continue attaching the extension panels to each cabinet, ensuring that there is a secure connection between the framework and the extended cabinets. Take your time with this step to ensure accuracy and avoid any mistakes.
Once all the cabinet extensions are attached, give them a gentle shake to check for stability. If any extensions feel loose, secure them with additional screws or reinforcement.
After attaching the cabinet extensions, check the overall appearance and make any final adjustments if needed. Ensure that the extensions blend well with the existing cabinets and that there are no visible gaps or discrepancies.
With the cabinet extensions securely attached, you have completed a significant portion of the project. Your cabinets now reach the ceiling, providing you with additional storage space and a more cohesive look in your kitchen.
Read more: How To Extend A Patio
Sanding and Painting
Once the cabinet extensions are securely attached, it’s time to move on to the next step: sanding and painting. This crucial stage will help achieve a smooth and professional finish to your extended cabinets.
Start by lightly sanding the entire surface of the cabinet extensions. Use fine-grit sandpaper to smooth out any rough edges or imperfections. Sanding will also provide a better surface for the paint or stain to adhere to.
Take care to sand in the direction of the wood grain to avoid any scratches or visible marks. Use a sanding block or sanding sponge for better control and to ensure even sanding across the surface.
Once you have finished sanding, wipe down the cabinet extensions with a clean cloth to remove any dust or debris. This will ensure a clean surface for painting or staining.
Next, choose whether you want to paint or stain the cabinet extensions. Both options have their benefits, so consider the overall look and feel you want to achieve in your kitchen.
If you decide to paint, choose a high-quality paint suitable for cabinetry. Consider the color scheme of your kitchen and choose a paint color that complements it. Use a brush or a paint sprayer to apply an even coat of paint to the cabinet extensions. Allow the paint to dry completely before applying a second coat if necessary.
If you prefer a more natural look, staining the cabinet extensions can enhance the beauty of the wood grain. Choose a stain color that matches or complements the existing cabinets. Apply the stain evenly with a brush or cloth, following the manufacturer’s instructions. Allow the stain to penetrate the wood and then wipe off any excess stain with a clean cloth. Apply additional coats as desired for a richer color.
Whether you choose to paint or stain, always follow the recommended drying times between coats and allow the final finish to fully cure before using your extended cabinets.
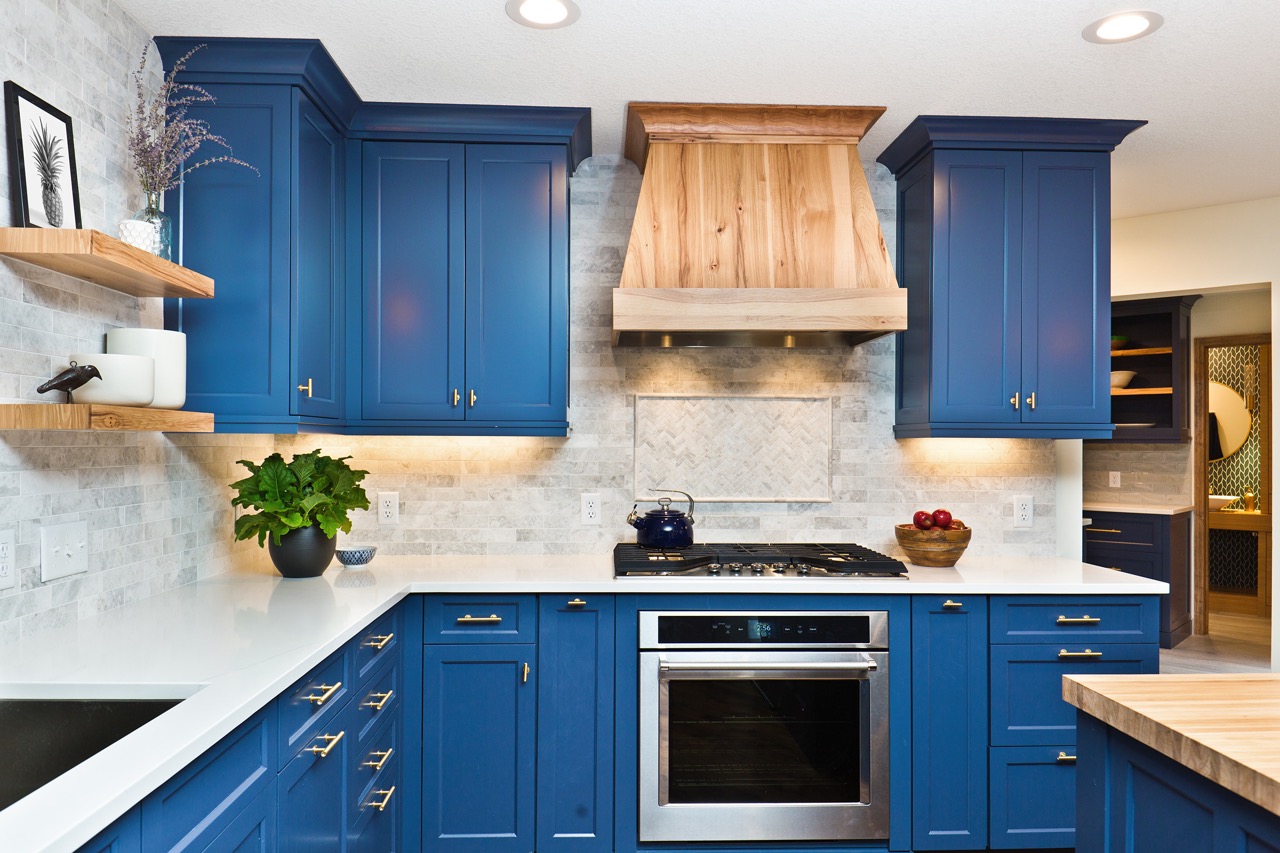
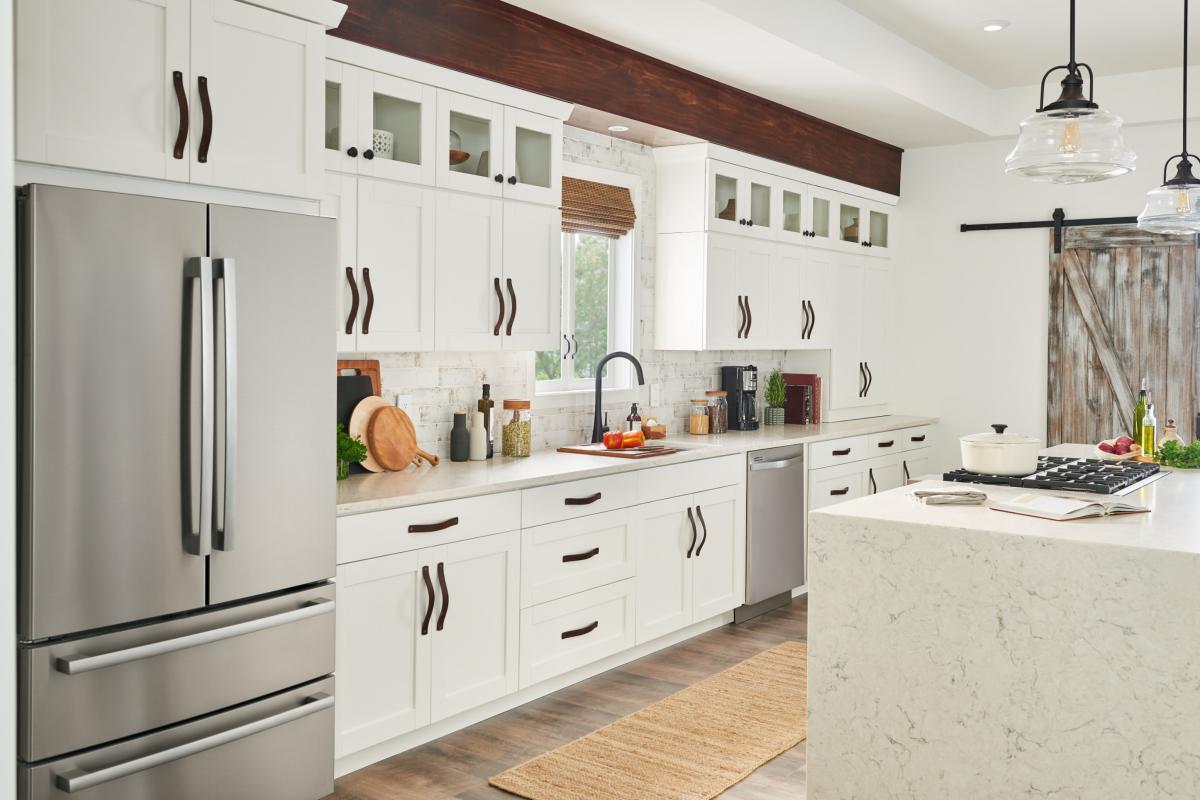
After the paint or stain has dried and cured, step back and admire the transformation. The cabinets now blend seamlessly with the extended extensions, giving your kitchen a polished and cohesive look.
Final Touches
With the cabinet extensions sanded, painted, or stained, it’s time to add the final touches to complete the project and ensure that your extended cabinets look and function beautifully.
First, reinstall any doors that were removed during the process. Attach them securely using the hinges and any hardware that was previously in place. Make sure that the doors align correctly and open and close smoothly.
Next, consider adding decorative elements to enhance the overall appearance of the extended cabinets. This could include adding crown molding along the top of the cabinets or installing decorative trim around the edges. These details can add a touch of elegance and sophistication to your new cabinets.
Additionally, you may choose to install new hardware, such as knobs or handles, to complement the updated look. Choose hardware that matches your kitchen’s style and matches the finishes of the existing cabinets and extensions. These small details can make a big difference in the overall aesthetic of your kitchen.
Once the hardware is in place, wipe down the entire surface of the cabinets, including the extensions, to remove any dust or fingerprints. Keeping your cabinets clean and well-maintained will help preserve their appearance and ensure they last for years to come.
Finally, take a moment to organize and arrange the items in your extended cabinets. Consider using organizational tools, such as drawer dividers or shelf organizers, to maximize storage space and keep everything tidy. This will make it easier to find what you need and maintain a clutter-free kitchen.
By paying attention to these final touches, you can truly complete the transformation of extending your cabinets to the ceiling. Step back and admire your work—your kitchen now has increased storage space, a cohesive design, and a fresh new look.
Congratulations on successfully extending your cabinets to the ceiling! Enjoy your revamped kitchen and the functional benefits it provides.
Conclusion
Extending cabinets to the ceiling is a fantastic way to add storage space and enhance the overall look and functionality of your kitchen. By following a few simple steps, you can successfully undertake this project and achieve impressive results.
Before beginning, make sure to assess the space and ensure that there is enough clearance for the cabinet extensions. Take into account any existing fixtures or appliances that could be impacted by the extensions.
Preparing for the extension involves emptying out the cabinets, inspecting them for any damage, and gathering the necessary materials and tools. Building a sturdy framework is crucial to provide support and stability for the extended cabinets.
Attaching the cabinet extensions involves carefully aligning and securing them to the framework, ensuring a tight and secure connection. Sanding and painting or staining the extensions will provide a smooth and polished finish that enhances the overall aesthetic of your cabinets.
Lastly, adding final touches such as reattaching doors, adding decorative elements, and organizing the contents of your cabinets will complete the project and give your kitchen a cohesive and stylish look.
By extending your cabinets to the ceiling, you not only increase your storage space but also create a visually appealing and functional kitchen. Enjoy the convenience and beauty of your newly extended cabinets, and take pride in the successful completion of your home improvement project.
Remember, while the steps outlined in this article provide a general guide, it’s important to adapt them to your specific situation and follow manufacturer’s instructions for any materials or tools used. With proper planning, attention to detail, and a willingness to put in the effort, you can transform your kitchen into a stunning space that you’ll love for years to come.
Frequently Asked Questions about How To Extend Cabinets To The Ceiling
Was this page helpful?
At Storables.com, we guarantee accurate and reliable information. Our content, validated by Expert Board Contributors, is crafted following stringent Editorial Policies. We're committed to providing you with well-researched, expert-backed insights for all your informational needs.


0 thoughts on “How To Extend Cabinets To The Ceiling”