Articles
How To Fit A Carpet
Modified: October 20, 2024
Looking for articles on how to fit a carpet? Discover step-by-step guides, expert tips, and helpful advice to ensure a seamless carpet installation.
(Many of the links in this article redirect to a specific reviewed product. Your purchase of these products through affiliate links helps to generate commission for Storables.com, at no extra cost. Learn more)
Introduction
When it comes to home improvement, one of the most common projects people undertake is replacing or installing new flooring. And if you’re considering a change from hard floors to the plush comfort of carpet, you’re in for a treat. Not only does carpet provide warmth and insulation, but it also adds a touch of luxury and coziness to any room. However, before you can enjoy the benefits of your new carpet, you need to know how to fit it properly.
Fitting a carpet may seem like a daunting task, but with the right knowledge and preparation, it can be a straightforward process. In this article, we will guide you through the steps involved in fitting a carpet, from measuring the room to finishing the edges. By following these instructions, you’ll be able to achieve a professional-looking result and enjoy your new carpet for years to come.
Before we dive into the details, it’s essential to gather the necessary tools and materials for the job. You will need a tape measure, utility knife, carpet grippers, underlay, knee pads, a hammer, a carpet stretcher, a bolster chisel, and a straightedge. Once you have everything ready, let’s get started!
Key Takeaways:
- Proper preparation is key to successful carpet fitting. From accurate room measurements to thorough floor inspection and underlay installation, attention to detail ensures a professional and long-lasting result.
- Attention to detail and patience are crucial when fitting a carpet. From precise cutting and stretching to finishing the edges, each step contributes to a visually stunning and durable installation.
Read more: How Much Is Ladder Fitness
Step 1: Measure the Room
The first step in fitting a carpet is to accurately measure the room. This step is crucial to ensure you purchase the right amount of carpet and minimize wastage. Here’s how to measure the room properly:
- Clear the room: Start by removing any furniture or obstacles from the room. This will allow you to get accurate measurements and have a clear space to work in.
- Measure the length and width: Use a tape measure to measure the length and width of the room. Start by measuring the longest straight wall and record the measurement. Then measure the width of the room from wall to wall. Take note of any alcoves or irregularities in the room that may affect the carpet layout.
- Add extra length for fitting: To ensure you have enough carpet for fitting, add 4-6 inches (10-15 cm) to the length and width measurements. This will give you some wiggle room during the installation process.
- Calculate the square footage: Multiply the length by the width to calculate the square footage of the room. If you have multiple areas, such as alcoves or closets, measure and calculate the square footage separately.
- Consider pattern repeats: If you’ve chosen a patterned carpet, take note of the pattern repeat measurement. This is the distance between identical points on the pattern. It’s crucial to factor in the pattern repeat when calculating the amount of carpet needed to ensure the pattern aligns correctly.
- Consult with the carpet supplier: Once you have your measurements, consult with the carpet supplier or retailer. They will be able to advise you on the amount of carpet needed, taking into account any additional materials like underlay and grippers.
By accurately measuring the room, you can avoid costly mistakes and ensure you have enough carpet to complete the installation. Take your time with this step and double-check your measurements to guarantee a smooth carpet fitting process.
Step 2: Prepare the Floor
Before you can start laying your new carpet, it’s essential to prepare the floor properly. This step ensures that the carpet has a smooth and stable surface to sit on, maximizing its lifespan and appearance. Follow these steps to prepare the floor:
- Remove existing flooring: If there is existing flooring in the room, such as old carpet or tiles, remove it carefully. Use a pry bar or scraper to lift and detach the flooring. Dispose of the old flooring responsibly.
- Inspect the subfloor: Once the existing flooring is removed, inspect the subfloor for any damage, unevenness, or moisture issues. Repair any damaged areas and level out any uneven sections using a floor leveling compound. Address moisture issues by applying a moisture barrier if necessary.
- Vacuum and clean the subfloor: Before proceeding, thoroughly vacuum the subfloor to remove any dust, debris, or loose particles. If the subfloor is dirty, wash it with a mild detergent solution and allow it to dry completely.
- Install carpet grippers: Carpet grippers are essential in keeping the carpet secure and preventing it from shifting. Install carpet grippers around the edges of the room, leaving a 3/8-inch gap between the grippers and the wall. Use a hammer and nails or adhesive to secure the grippers in place.
- Lay the underlay: Underlay is an important layer that provides cushioning, insulation, and sound absorption for the carpet. Roll out the underlay across the entire floor, trimming it to fit the shape of the room. Ensure the edges of the underlay meet the edges of the grippers. Use a utility knife to make precise cuts.
- Tape the underlay seams: If the underlay comes in separate pieces, use carpet tape to secure the seams together. This will prevent the underlay from shifting or separating during the carpet installation process.
By preparing the floor thoroughly, you create a solid foundation for your new carpet. A well-prepared floor not only enhances the overall appearance but also extends the lifespan of your carpet. Take your time with this step to ensure a smooth and professional installation.
Step 3: Lay the Underlay
Now that you have prepared the floor, it’s time to lay down the underlay. The underlay provides insulation, cushioning, and support for your carpet, ensuring a comfortable and long-lasting flooring option. Follow these steps to lay the underlay:
- Roll out the underlay: Start by unrolling the underlay across the entire floor. Make sure it covers the entire area and extends slightly up the walls.
- Trim and fit the underlay: Use a utility knife to trim the excess underlay along the edges, making sure it fits snugly against the walls and around any protrusions or obstacles. Take extra care when cutting around door frames and vents.
- Overlap and secure seams: If your underlay comes in separate pieces, overlap the edges by a few inches and secure them with underlay tape. This will prevent the underlay from shifting or separating during the carpet installation process.
- Smooth out any wrinkles or bubbles: Use your hands or a carpet smoothing tool to gently smooth out any wrinkles, bubbles, or lumps in the underlay. This will ensure a flat and even surface for your carpet.
- Trim excess underlay: If there is any excess underlay extending past the gripper strips, use a utility knife to trim it off. It’s important to have a clean and precise edge when fitting the carpet.
By laying the underlay correctly, you provide a comfortable and supportive base for your carpet. The underlay also helps to reduce noise and increase insulation, resulting in a more enjoyable and energy-efficient living space. Take your time to ensure the underlay is properly fitted and secured before moving on to the next step.
Step 4: Cut and Position the Carpet
With the underlay in place, it’s time to bring in the carpet and start fitting it into the room. This step requires careful measurement, cutting, and positioning to ensure a precise and seamless installation. Follow these steps to cut and position the carpet:
- Roll out the carpet: Carefully unroll the carpet in the room, making sure it covers the entire area with excess carpet on all sides. Allow the carpet to relax and settle for at least 24 hours to remove any wrinkles or creases.
- Position the carpet: Begin by positioning the carpet in one corner of the room, allowing it to overlap the gripper strips against the wall. Ensure there is enough excess carpet along the edges to fit properly around the walls or any protrusions.
- Make initial cuts: Use a straightedge and a utility knife to make an initial cut along one edge of the carpet. This cut should extend approximately three inches past the wall or intended edge. Be careful not to cut into the gripper strips.
- Trim around obstacles: If there are any obstacles in the room, such as door frames or vents, carefully measure and mark the carpet to fit around them. Use a carpet knife or scissors to make precise cuts and ensure a neat finish.
- Continue cutting: Once the initial cuts are made, continue to cut the carpet along the remaining edges, ensuring you maintain a straight and even line. Take your time and make precise cuts to achieve a professional finish.
- Position the carpet properly: Once the carpet is cut to size, position it in the room again, ensuring it aligns with the walls and any obstacles. Check that the carpet is smooth and evenly positioned without any wrinkles or bulges.
- Align patterned carpet (if applicable): If you’re working with patterned carpet, carefully align the pattern according to your desired layout. Take your time and adjust as needed to ensure the pattern looks cohesive and flows seamlessly.
By cutting and positioning the carpet accurately, you lay the foundation for a flawless installation. Take your time with this step, double-checking measurements and aligning patterns if necessary. A well-cut and positioned carpet ensures a visually stunning and professional-looking finish for your room.
When fitting a carpet, make sure to properly measure the room and add extra for cutting and fitting. Use a knee kicker and carpet stretcher to ensure a tight and smooth fit.
Read more: How To Store Fitted Hats
Step 5: Stretch and Attach the Carpet
Once the carpet is cut and positioned correctly, it’s time to stretch and attach it to the gripper strips. This step ensures that the carpet is taut, smooth, and securely in place. Follow these steps to stretch and attach the carpet:
- Begin stretching: Start by selecting one side of the room to begin stretching the carpet. Use a knee kicker, a tool with teeth and a padded head, to push the carpet onto the gripper strips. Place the knee kicker about six inches away from the wall and firmly kick it with your knee to stretch the carpet towards the wall.
- Continue stretching: Work your way along the length of the wall, gradually stretching and attaching the carpet to the gripper strips. Use the knee kicker in conjunction with a carpet stretcher tool for larger areas. Repeat the stretching process on the opposite side of the room.
- Stretch across the width: Once both sides of the room are stretched and attached, use the carpet stretcher tool to stretch the carpet across the width of the room. This ensures the carpet is evenly tensioned and properly anchored to the gripper strips.
- Check for wrinkles and bulges: As you stretch the carpet, keep an eye out for any wrinkles, bulges, or uneven areas. Use a carpet smoothing tool or your hands to smooth out any imperfections and ensure a flat surface.
- Trim excess carpet: After the carpet is stretched and smooth, use a carpet knife to trim any excess carpet along the edges. Make sure to cut close to the walls or baseboards for a neat and tidy finish.
- Secure transitions and seams: If your room requires multiple carpet pieces or has transitions between different flooring materials, use a seam iron and seam tape to connect and secure the edges. Follow the manufacturer’s instructions for the proper use of the seam iron and tape.
By stretching and attaching the carpet properly, you ensure a tight and wrinkle-free installation. Take your time with this step, making sure to evenly stretch the carpet and address any wrinkles or bulges along the way. A well-stretched carpet guarantees a visually appealing and long-lasting result for your flooring.
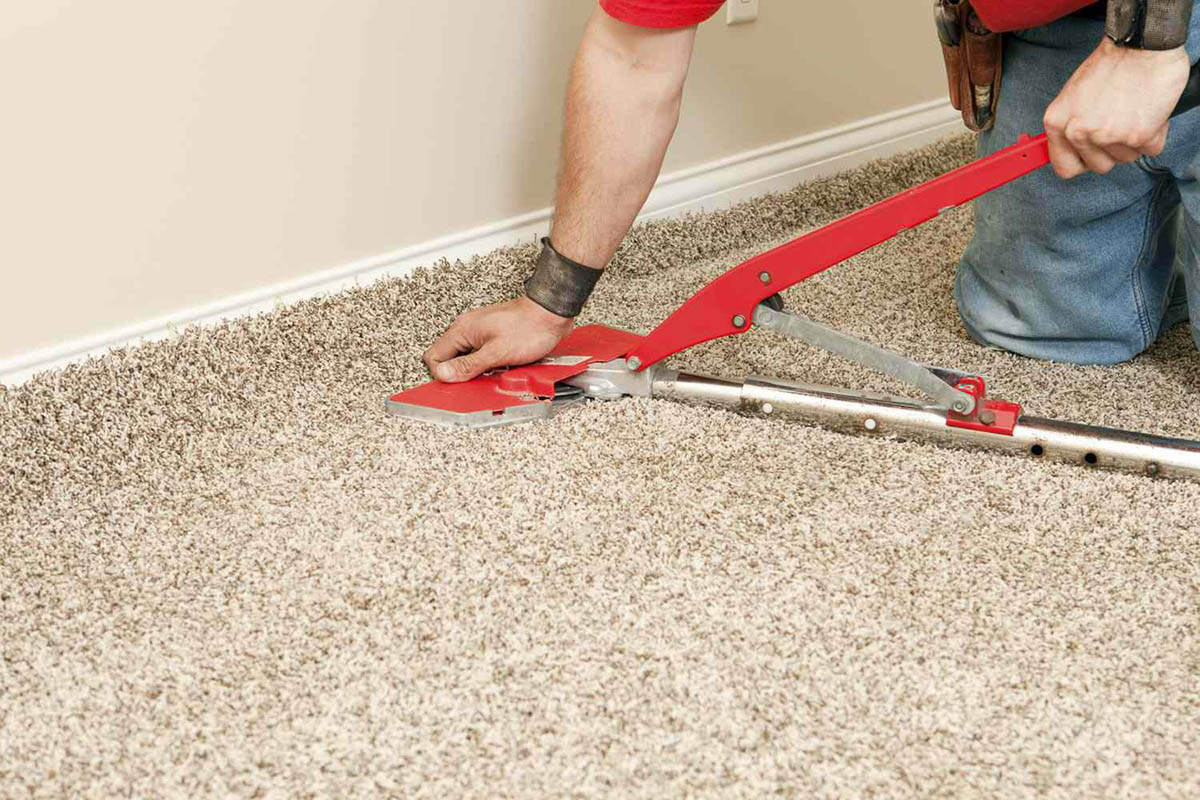
Step 6: Trim the Excess Carpet
With the carpet now stretched and attached, it’s time to trim any excess carpet along the edges of the room. This step gives your carpet a clean and finished look, ensuring everything fits snugly against the walls or baseboards. Follow these steps to trim the excess carpet:
- Gather the necessary tools: Before you begin, gather a carpet knife, a straightedge or trimmer, and a hammer. These tools will help you make precise cuts and secure the edges.
- Start on one edge: Begin trimming the excess carpet on one edge of the room. Use a straightedge or trimmer to guide the carpet knife and make a straight cut along the edge. Be cautious not to cut into the walls or baseboards.
- Continue along the edges: Work your way around the room, trimming the excess carpet along all the edges. Take your time and make precise cuts for a neat and professional finish. Use the straightedge or trimmer to ensure straight cuts.
- Secure the edges: After trimming the excess carpet, use a hammer to tuck the edges firmly against the baseboard or wall. You can use a carpet tucking tool or the handle of a screwdriver to push the carpet into the gap between the baseboard and the floor. This will give your carpet a clean and secure edge.
- Double-check the seam: If your carpet has a seam from joining multiple pieces, make sure the seam is clean and secure. Use a carpet seam roller or a rolling pin to gently press down on the seam and blend it with the surrounding carpet.
- Remove any visible threads: Check the carpet surface for any visible threads or loose fibers. If you spot any, carefully trim them with a pair of scissors to maintain a smooth and uniform appearance.
By trimming the excess carpet carefully and securing the edges, you achieve a polished and professional look for your newly installed carpet. Take your time with this step to ensure precise cuts and a seamless integration with the walls or baseboards.
Step 7: Finish the Edges
The final step in fitting a carpet is to finish the edges, ensuring they are clean, secure, and visually appealing. Properly finished edges not only enhance the overall appearance of your carpet but also help to prevent unraveling and fraying over time. Follow these steps to finish the edges of your carpet:
- Trim excess underlay: Start by trimming any excess underlay that extends beyond the carpet edges. Use a utility knife to make clean cuts, ensuring the underlay is flush with the carpet.
- Fold the edges: Fold the carpet edges under, tucking them securely against the baseboard or wall. Use a carpet tucking tool or the handle of a screwdriver to ensure a clean and tight fold.
- Secure with carpet trim: Install carpet trim or transition strips along the edges of the carpet to provide a finished look and protect the edges from wear and tear. Follow the manufacturer’s instructions for proper installation and use a hammer or adhesive to secure the trim in place.
- Apply carpet adhesive: If you desire a more permanent finish, you can apply carpet adhesive along the folded edges of the carpet. This will help to secure the edges and prevent them from coming loose over time. Follow the adhesive manufacturer’s instructions and use a roller or your hands to press the edges firmly onto the adhesive.
- Clean up: Once the edges are finished, take a moment to clean up any debris or loose carpet fibers. Thoroughly vacuum the entire carpeted area to remove any residue or particles.
- Inspect the finished carpet: Finally, step back and inspect the finished carpet installation. Check for any loose edges or areas that require further attention. Smooth out any visible imperfections or wrinkles and make any necessary adjustments for a polished and flawless finish.
By taking the time to finish the edges properly, you give your carpet a refined and professional look. Follow these steps carefully to ensure the edges of your carpet are secure, neat, and ready to be enjoyed for years to come.
Conclusion
Fitting a carpet may initially seem like a challenging task, but with the right knowledge and preparation, it can be a rewarding and satisfying DIY project. By following the step-by-step guide outlined in this article, you can achieve a professional and visually stunning carpet installation.
From measuring the room and preparing the floor to cutting, stretching, and finishing the carpet, each step plays a crucial role in the overall success of the project. Accurate measurements ensure you purchase the right amount of carpet, while proper floor preparation creates a solid foundation. Stretching and attaching the carpet tightly and securely ensures a smooth surface, and trimming and finishing the edges create a clean and polished look.
Throughout the process, it’s essential to take your time, carefully follow the instructions, and pay attention to detail. The extra effort put into each step will result in a long-lasting, comfortable, and visually appealing carpeted space.
Remember to gather the necessary tools and materials, consult with professionals or retailers when needed, and prioritize safety during the installation process. While fitting a carpet can be a DIY project, it’s important to recognize your limits and seek professional assistance if necessary.
Once your carpet is installed, take proper care of it by vacuuming regularly, addressing spills and stains promptly, and scheduling professional cleaning on a periodic basis. These maintenance practices will help preserve the quality and lifespan of your carpet.
In conclusion, fitting a carpet requires patience, precision, and attention to detail, but the end result is worth the effort. Enjoy the comfort, warmth, and beauty that your newly installed carpet brings to your home for years to come.
Frequently Asked Questions about How To Fit A Carpet
Was this page helpful?
At Storables.com, we guarantee accurate and reliable information. Our content, validated by Expert Board Contributors, is crafted following stringent Editorial Policies. We're committed to providing you with well-researched, expert-backed insights for all your informational needs.