Articles
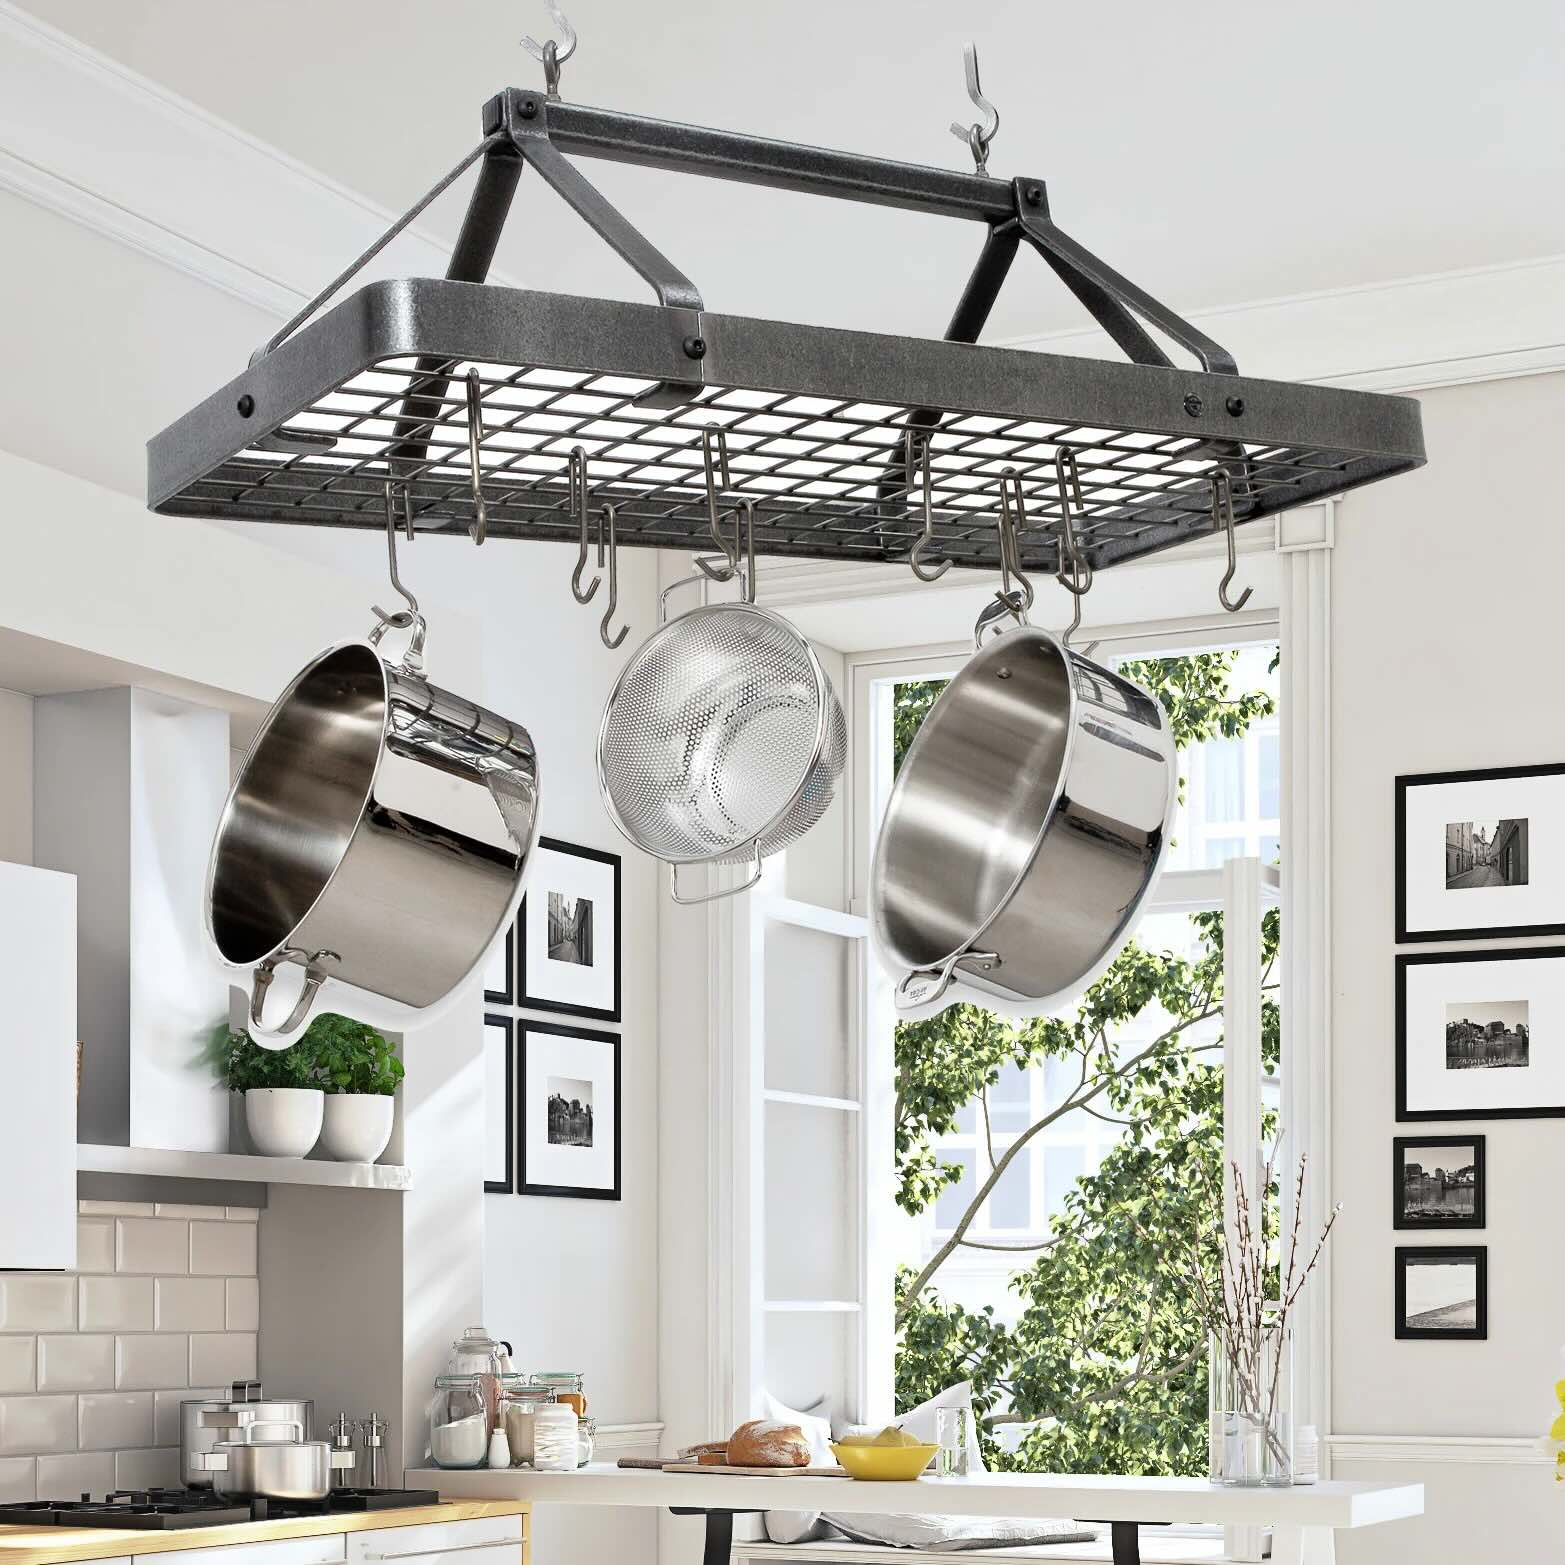
How To Hang Pot Rack From The Ceiling
Modified: December 7, 2023
Learn how to hang a pot rack from the ceiling with our step-by-step articles. Transform your kitchen into a stylish and organized space with this practical DIY project.
(Many of the links in this article redirect to a specific reviewed product. Your purchase of these products through affiliate links helps to generate commission for Storables.com, at no extra cost. Learn more)
Introduction:
When it comes to kitchen organization, pot racks are an excellent addition. They not only provide a functional and efficient way to store your pots and pans but also add a touch of style to your kitchen decor. Whether you have a small kitchen with limited cabinet space or simply want to showcase your beautiful cookware, hanging a pot rack from the ceiling can be a great solution.
In this article, we will guide you through the step-by-step process of hanging a pot rack from the ceiling. From gathering the necessary materials to securing the pot rack in place, we will cover all the essential aspects to ensure a successful installation.
Before we begin, it’s important to note that this guide is intended for pot racks that are specifically designed to be hung from the ceiling. If you have a different type of rack or if you’re unsure about the compatibility of your pot rack with ceiling installation, we recommend consulting the manufacturer’s instructions or seeking professional advice.
Now, let’s dive into the process and learn how to hang a pot rack from the ceiling!
Key Takeaways:
- Hanging a pot rack from the ceiling not only adds style to your kitchen but also provides a functional storage solution. Follow the step-by-step guide to ensure a successful and secure installation.
- Prioritize safety, gather necessary materials, measure and mark the ceiling accurately, and double-check the stability of the installation to enjoy the convenience and visual appeal of a well-organized kitchen space.
Read more: How To Hang Unistrut From The Ceiling
Step 1: Gather necessary materials
Before you begin the installation process, it’s crucial to gather all the necessary materials. By having everything ready, you can avoid any interruptions and ensure a smooth installation. Here are the materials you will need:
- Pot rack: Choose a pot rack that suits your kitchen decor and meets your storage needs. Make sure it is designed for ceiling installation.
- Tape measure: A tape measure will help you accurately measure the space and mark the proper placement for the pot rack.
- Pencil: You’ll need a pencil to mark the spots on the ceiling where the pot rack will be installed.
- Stud finder: A stud finder will help you locate the ceiling studs, which are essential for the stability and weight-bearing capacity of the pot rack.
- Drill: A drill will be needed to pre-drill holes in the ceiling and attach the pot rack mounting brackets.
- Ceiling anchors: Ceiling anchors, such as toggle bolts or screw-in anchors, will provide extra support and stability for the pot rack.
- Screws: Choose screws that are appropriate for your ceiling type and the weight of the pot rack. Be sure to use screws long enough to securely anchor the pot rack brackets to the ceiling studs or anchors.
- Screwdriver: Depending on the type of screws you’re using, you may need a screwdriver to tighten them securely.
- Ladder or step stool: Since you’ll be working at a height, a sturdy ladder or step stool is necessary to safely reach the ceiling.
Once you have gathered all these materials, you’re ready to move on to the next step: measuring and marking the ceiling.
Step 2: Measure and mark ceiling
Before you begin drilling any holes or making permanent marks on your ceiling, it’s important to measure and mark the exact placement for your pot rack. Follow these steps:
- Clear the area: Remove any furniture or obstructions from the space directly below where you plan to install the pot rack. This will provide you with a clear and safe working area.
- Measure the space: Use a tape measure to determine the desired length and width for your pot rack. Consider the size and shape of your cookware collection to ensure adequate space for hanging pots and pans.
- Mark the spots: Once you have determined the ideal dimensions, mark the spots on the ceiling where the pot rack will be installed. Use a pencil to make small, light marks that can easily be erased if needed.
- Double-check measurements: Take a step back and ensure that the marked spots align with your desired positioning. It’s essential to make sure the pot rack will be centered and symmetrical, both visually and functionally.
Remember to consider any potential obstructions such as light fixtures, ventilation systems, or other ceiling fixtures. Ensure there is enough clearance for hanging your pots and pans without them interfering with any other elements in your kitchen.
By measuring and marking the ceiling accurately, you’ll have a clear guide for the next steps of locating and marking the studs.
Step 3: Locate and mark studs
Locating and marking the ceiling studs is a crucial step in ensuring the stability and weight-bearing capacity of your pot rack. To locate the studs, follow these steps:
- Use a stud finder: Grab a stud finder and turn it on. Place it against the ceiling and move it slowly in a horizontal direction. The stud finder will detect changes in density and indicate the presence of a stud.
- Mark the stud locations: When the stud finder detects a stud, make a small pencil mark on the ceiling to indicate its location. Repeat this process in multiple spots along the desired area for your pot rack.
- Create a stud map: Connect the pencil marks with a straight line to create a visual representation of the stud locations. This will help you visualize the positioning of the studs when it’s time to install the pot rack.
It’s essential to locate and mark the studs accurately, as they will provide the necessary support for the weight of your pot rack and cookware. Once you have identified the stud locations, you can proceed to the next step: pre-drilling the ceiling holes.
Step 4: Pre-drill ceiling holes
In order to securely attach the pot rack to the ceiling, you will need to pre-drill holes. This step will ensure that the screws or anchors have a stable foundation to hold the weight of the pot rack. Follow these steps to pre-drill the ceiling holes:
- Choose the drill bit: Select a drill bit that is slightly smaller in diameter than the screws or anchors you will be using. This will allow for a snug fit and ensure proper anchoring.
- Put on safety goggles: Safety should always be a priority. Before drilling, put on a pair of safety goggles to protect your eyes from any debris that may be generated.
- Align the drill bit: Position the drill bit over the first marked spot on the ceiling. Ensure that the drill bit is perpendicular to the ceiling and aligned with the mark.
- Start drilling: Apply steady pressure and begin drilling into the ceiling. Go slowly to maintain control and prevent the drill from slipping or causing any damage.
- Drill to the appropriate depth: Drill to a depth that is slightly longer than the length of the screws or anchors you will be using. This will ensure that they have enough space to anchor securely.
- Repeat for other marked spots: Move on to the next marked spot and repeat the drilling process. Make sure to align the drill bit properly each time and maintain a consistent depth.
By pre-drilling the ceiling holes, you’ll have a guide for attaching the pot rack securely. Now that the holes are prepared, you can move on to the next step: attaching the ceiling anchors.
Read more: How To Hang Surfboard From The Ceiling
Step 5: Attach ceiling anchors
Attaching ceiling anchors is essential for providing extra support and stability to your pot rack. The type of anchors you use will depend on your ceiling type and the weight of your pot rack. Follow these steps to attach the ceiling anchors:
- Choose the appropriate anchors: Select ceiling anchors that are suitable for your ceiling type and can support the weight of your pot rack and cookware. Common types of anchors include toggle bolts, screw-in anchors, or molly bolts.
- Insert the anchor: Insert the anchor into the pre-drilled hole in the ceiling. Make sure it is aligned and positioned properly.
- Tighten the anchor: Use a screwdriver or a drill (if applicable) to tighten the anchor securely into place. Follow the manufacturer’s instructions for the specific type of anchor you are using.
- Repeat for other holes: Repeat the process for each pre-drilled hole. Insert and tighten the anchors, ensuring they are all securely in place.
- Test the anchors: Give the anchors a gentle tug to ensure they are firmly anchored and provide the necessary support for your pot rack. If any anchors feel loose or unstable, remove and replace them with a more suitable option.
By attaching the ceiling anchors, you are adding extra stability and strength to your pot rack installation. This will help ensure that your pot rack can safely hold the weight of your cookware. With the anchors in place, you can now move on to the next step: installing the pot rack mounting brackets.
When hanging a pot rack from the ceiling, be sure to use a stud finder to locate a ceiling joist for secure installation. Use heavy-duty hooks or anchors to support the weight of the rack and pots. Always follow the manufacturer’s instructions for installation.
Step 6: Install mounting brackets
Installing the mounting brackets is a crucial step in preparing your pot rack for hanging. The mounting brackets will provide the support needed to hold the weight of the pot rack and ensure its stability. Follow these steps to install the mounting brackets:
- Position the bracket: Hold one of the mounting brackets against the ceiling, aligning it with the pre-drilled holes and the stud markings. Make sure it is level and centered according to your desired pot rack placement.
- Mark the screw hole locations: Using a pencil, mark the locations of the screw holes on the ceiling through the mounting bracket holes. This will guide you when it’s time to attach the screws.
- Repeat for other brackets: If your pot rack requires multiple mounting brackets, repeat the process for each bracket, ensuring they are evenly spaced and aligned.
- Pre-drill the screw holes: Using the appropriate drill bit, pre-drill the screw holes in the marked locations on the ceiling. Be careful not to drill too deep or widen the holes excessively.
- Attach the mounting brackets: Align the mounting brackets with the pre-drilled holes and screw them into place using the appropriate screws. Make sure they are tightly secured to provide a sturdy base for the pot rack.
- Double-check alignment: Once all the mounting brackets are installed, double-check the alignment and levelness of each bracket. Adjust if necessary.
By installing the mounting brackets properly, you are setting the foundation for securely hanging your pot rack. With the brackets in place, you can now move on to the exciting part: hanging the pot rack itself.
Step 7: Hang pot rack
Now that the mounting brackets are securely in place, it’s time to hang your pot rack from the ceiling. Follow these steps to correctly hang your pot rack:
- Prepare the pot rack: Ensure that your pot rack is ready for hanging by removing any packaging materials or protective covers.
- Elevate the pot rack: With the help of a friend or a sturdy step stool, carefully lift the pot rack and position it above the installed mounting brackets.
- Align the pot rack with the brackets: Lower the pot rack with caution, aligning the hanging hooks or chains with the corresponding brackets on the ceiling. Take your time to ensure a proper fit.
- Secure the pot rack onto the brackets: Once the pot rack is aligned with the mounting brackets, gently lower it onto the brackets to securely hold it in place. Double-check that the pot rack is level and centered.
- Test the stability: Give the pot rack a slight tug to ensure it is properly secured onto the mounting brackets. It should be stable and firm, able to support the weight of your cookware without any wobbling or shifting.
By following these steps, you can safely and effectively hang your pot rack from the ceiling, creating a functional and visually appealing storage solution for your kitchen. With the pot rack in place, we can now move on to the next step: securing the pot rack to the ceiling.
Step 8: Secure pot rack to ceiling
Securing the pot rack to the ceiling is an important step to ensure its stability and prevent any accidents or damages. Follow these steps to securely fasten your pot rack to the ceiling:
- Examine the pot rack: Take a moment to inspect the pot rack and identify any pre-drilled holes or attachment points that are meant for securing it to the ceiling.
- Choose the appropriate screws: Select screws that are compatible with the pot rack’s attachment points and the type of anchors or mounting brackets used.
- Align the screws: Align the screws with the pre-drilled holes or attachment points on the pot rack. Ensure that they are properly positioned before driving them in.
- Secure the screws: Using a screwdriver or drill, carefully drive the screws into place, firmly attaching the pot rack to the ceiling. Take care not to over-tighten or strip the screws.
- Test the stability: Give the pot rack a gentle shake to verify its stability. It should remain securely in place without any noticeable movement or loose connections.
By securely fastening the pot rack to the ceiling, you can have peace of mind knowing that it is safely installed and ready to hold your cookware. With the pot rack secured, we can move on to the final step: double-checking the stability of the installation.
Read more: How To Hang Tablecloths From The Ceiling
Step 9: Double-check stability
Double-checking the stability of your pot rack installation is the final step to ensure a secure and reliable setup. Follow these steps to verify the stability of your pot rack:
- Observe for any movement: Take a few moments to observe the pot rack after it has been installed. Look for any noticeable movement, wobbling, or shifting that could indicate an insecure installation.
- Test with gentle pressure: Apply gentle pressure to the pot rack by lightly pushing or tapping it. The pot rack should remain stable and firmly in place without any significant movement or shifting.
- Hang a few utensils or lightweight items: Hang a few utensils or lightweight items on the pot rack to test its stability. Ensure that the pot rack can hold the weight without sagging or causing any strain.
- Periodically check over time: Periodically check the pot rack’s stability over time, especially after heavy use or changes in the kitchen environment. Regular maintenance and inspections can help prevent any potential issues or hazards.
If you notice any instability or concerns during the double-checking process, it’s essential to address them promptly. Make any necessary adjustments or seek professional assistance if needed to ensure a safe and secure pot rack installation.
Congratulations! By completing all the steps and double-checking the stability of your pot rack installation, you have successfully hung your pot rack from the ceiling. Enjoy the convenience and visual appeal of having your cookware easily accessible while adding a stylish touch to your kitchen!
Conclusion:
Hanging a pot rack from the ceiling is a practical and visually appealing way to organize your kitchen while showcasing your cookware collection. By following the step-by-step process outlined in this article, you can successfully install a pot rack and enhance the functionality of your kitchen space.
Throughout the installation process, we covered the necessary steps, including gathering the materials, measuring and marking the ceiling, locating and marking studs, pre-drilling ceiling holes, attaching ceiling anchors, installing mounting brackets, hanging the pot rack, securing it to the ceiling, and double-checking its stability.
Remember, safety is paramount throughout the installation process. Take your time, follow the instructions carefully, and seek professional assistance if needed. It’s crucial to ensure that your pot rack is properly secured and capable of supporting the weight of your cookware.
Once your pot rack is installed, you will enjoy the convenience of easy access to your pots and pans while adding a stylish touch to your kitchen decor. The organized and clutter-free space will make cooking more efficient and enjoyable.
Periodically check the stability of your pot rack and perform any necessary maintenance to keep it in optimal condition. With proper care, your pot rack will provide long-lasting service and enhance the functionality of your kitchen for years to come.
Now that you have learned the steps to hang a pot rack from the ceiling, it’s time to put your newfound knowledge into practice. Get started on transforming your kitchen into a well-organized and aesthetically pleasing space with the addition of a pot rack!
Frequently Asked Questions about How To Hang Pot Rack From The Ceiling
Was this page helpful?
At Storables.com, we guarantee accurate and reliable information. Our content, validated by Expert Board Contributors, is crafted following stringent Editorial Policies. We're committed to providing you with well-researched, expert-backed insights for all your informational needs.


0 thoughts on “How To Hang Pot Rack From The Ceiling”