Home>Articles>How To Install Glass Block Windows In Basement
Articles
How To Install Glass Block Windows In Basement
Modified: October 19, 2024
Learn step-by-step instructions on how to install glass block windows in your basement with our informative articles. Enhance your home's aesthetic and improve natural lighting.
(Many of the links in this article redirect to a specific reviewed product. Your purchase of these products through affiliate links helps to generate commission for Storables.com, at no extra cost. Learn more)
Introduction
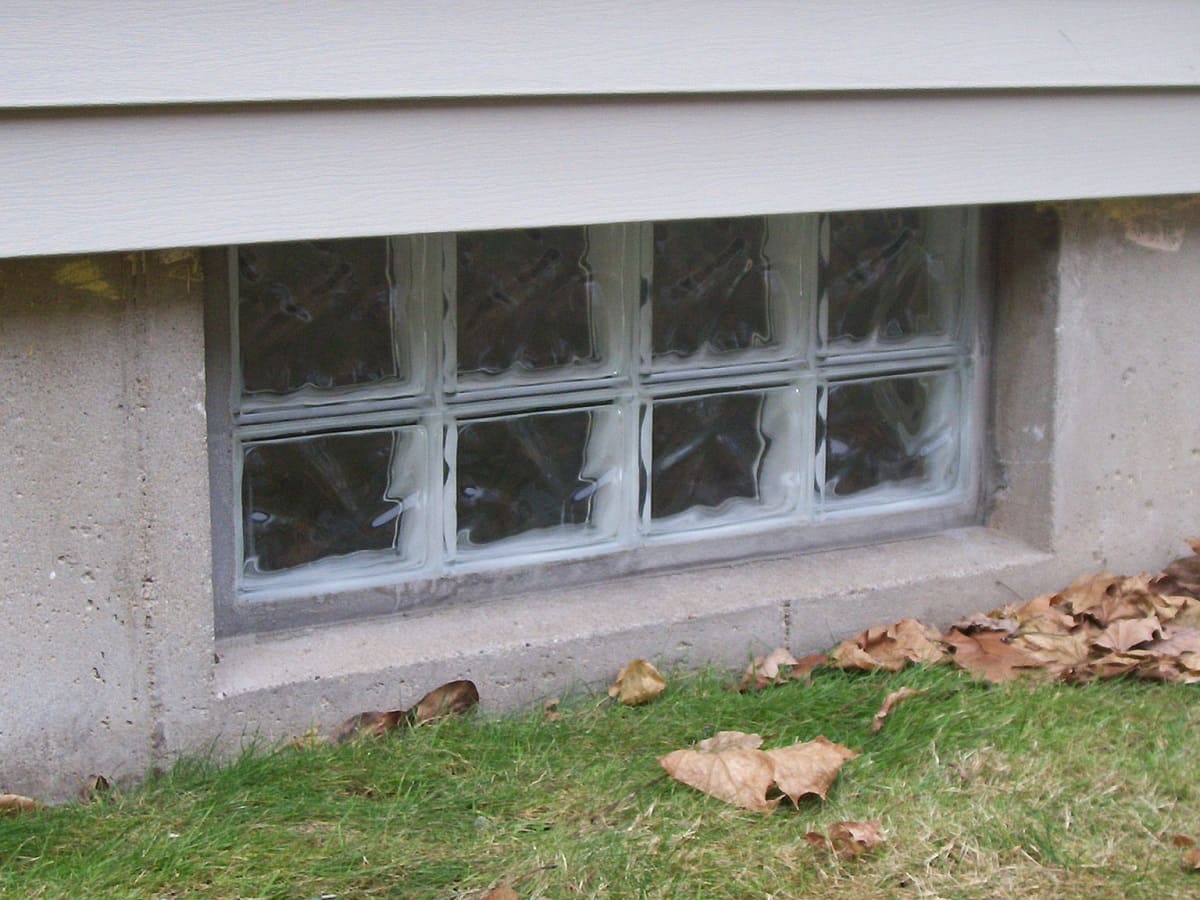
Welcome to our guide on how to install glass block windows in the basement. Glass block windows are a popular choice for homeowners who want to enhance the look and functionality of their basement. These windows not only provide natural light but also add a stylish and modern touch to any space. If you’re looking to update your basement with glass block windows, you’ve come to the right place!
In this article, we will take you through a step-by-step process of installing glass block windows in your basement. We will cover everything from gathering the necessary tools and materials to finishing touches, ensuring that you have all the information you need to successfully complete this project.
Before we dive into the installation process, it’s important to note that while installing glass block windows is a relatively straightforward project, it does require some basic handyman skills. If you are not comfortable with DIY projects or if you have limited experience with window installations, it may be best to hire a professional for this task.
Now, without further ado, let’s get started on transforming your basement with beautiful and functional glass block windows!
Key Takeaways:
- Transform your basement with natural light and modern elegance by following our step-by-step guide to installing glass block windows. Enhance aesthetics, privacy, and energy efficiency with this stylish and functional home improvement project.
- Ensure a successful glass block window installation by gathering the right tools, measuring accurately, and sealing the window properly. Enjoy the benefits of improved aesthetics, insulation, and durability in your transformed basement space.
Read more: How To Install Glass Block Windows
Step 1: Gather the necessary tools and materials
Before you begin the installation process, it’s important to gather all the necessary tools and materials. Having everything on hand will make the installation smoother and more efficient. Here is a list of what you’ll need:
- Glass block windows
- Glass block mortar
- Glass block spacers
- Glass block silicone sealant
- Mortar mixing tools (bucket, trowel)
- Measuring tape
- Pencil
- Safety glasses
- Gloves
- Utility knife
- Hammer
- Screwdriver
Make sure to select the appropriate size and style of glass block windows for your basement. Measure the window opening carefully to ensure a proper fit. Additionally, consider the thickness of the glass blocks you will be using. Thicker blocks may require larger spacers and mortar joints.
Once you have gathered all the necessary tools and materials, you will be ready to move on to the next step of the installation process. Ensuring that you have everything you need upfront will save you time and frustration later on.
Step 2: Prepare the work area
Before you start installing the glass block windows, it’s essential to prepare the work area properly. Here are the steps to follow:
- Clear the space: Remove any obstacles or furniture near the window area. This will give you ample space to work and prevent any accidental damage.
- Protect the surrounding surfaces: Use drop cloths or plastic sheets to cover the floor and nearby walls. This will protect your basement from any mortar or debris during the installation process.
- Clean the window opening: Ensure that the window opening is free from any dust, dirt, or old caulking. Use a vacuum cleaner or a brush to thoroughly clean the area.
- Inspect the window frame: Check the window frame for any signs of damage or rot. If you notice any issues, it’s important to address them before proceeding with the installation.
Preparing the work area is crucial in ensuring a smooth and successful installation. By clearing the space and protecting the surroundings, you’ll minimize the risk of accidents and damage to your basement. Additionally, cleaning the window opening and inspecting the frame will help create a solid foundation for the glass block windows.
Once you have completed the preparation steps, you’re now ready to move on to measuring the window opening in the next step of the installation process.
Step 3: Measure the window opening
Accurate measurements are crucial when installing glass block windows. Incorrect measurements can result in ill-fitting windows and compromised installation. To ensure a proper fit, follow these steps to measure the window opening:
- Start by measuring the width of the window opening. Measure from the inside edges of the existing window frame. Take measurements at the top, middle, and bottom of the opening. Record the smallest measurement as the window width.
- Next, measure the height of the window opening. Again, measure from the inside edges of the existing window frame. Take measurements on the left, center, and right sides of the opening. Record the smallest measurement as the window height.
- Check for squareness by measuring the diagonals. Measure from the top left corner to the bottom right corner and vice versa. The measurements should be equal if the opening is square. If the measurements differ, adjust your installation plan accordingly.
It’s important to note that glass block windows are usually designed to fit within the existing window frame. However, if you need to make adjustments to the frame or enlarge the opening, consult a professional for guidance.
Once you have obtained accurate measurements, you can proceed to the next step of purchasing the appropriate glass block windows.
Step 4: Purchase the appropriate glass block windows
Now that you have measured the window opening, you can proceed to purchase the appropriate glass block windows. Here are a few factors to consider when selecting the windows:
- Size: Choose glass block windows that match the measurements of your window opening. It’s crucial to select the correct width, height, and depth to ensure a proper fit.
- Style: Consider the style of the glass block windows and how it will complement the aesthetics of your basement. There are various patterns and designs available, such as clear, frosted, or decorative blocks.
- Material: Select glass block windows made from high-quality materials to ensure durability and longevity. Look for options that offer energy-efficient properties to enhance insulation and reduce heating or cooling costs.
- Accessories: Determine if you need any additional accessories, such as vents or dryer vents, to enhance ventilation and functionality.
When purchasing the glass block windows, it’s recommended to consult with a professional or visit a reputable supplier who specializes in glass block products. They can guide you in choosing the right windows based on your specific requirements and provide valuable advice on installation techniques.
Once you have purchased the appropriate glass block windows, you’re ready to move on to the next step of the installation process: removing the old window or frame.
When installing glass block windows in a basement, make sure to properly measure the window opening and use a mortar specifically designed for glass blocks to ensure a secure and durable installation.
Read more: How To Install Glass Blocks
Step 5: Remove the old window or frame
Before installing the glass block windows, you’ll need to remove the old window or frame from the opening. Here’s a step-by-step guide on how to do it:
- Start by carefully removing any window coverings, such as blinds or curtains, from the existing window.
- If there is a window frame, use a screwdriver to remove any screws or nails securing it in place. Keep a hammer handy to gently tap the frame and loosen it if needed.
- Once the frame is loose, use a pry bar to carefully pry it away from the wall. Work around the frame, applying gentle pressure to detach it from the opening. Be cautious not to damage the surrounding wall or trim.
- If the window is held in place by caulk or sealant, carefully cut along the edges using a utility knife. This will allow you to separate the window from the opening.
- With the window or frame removed, thoroughly clean the opening, removing any remaining debris or old caulking. Use a vacuum cleaner or a brush to ensure a clean surface for the glass block installation.
It’s important to approach the removal process with caution to avoid any accidents or damage to the surrounding area. If you’re unsure about removing the window or frame yourself, it’s best to seek professional assistance.
Once the old window or frame is successfully removed and the opening is clean, you’re now ready to move on to the exciting part – installing the glass blocks!
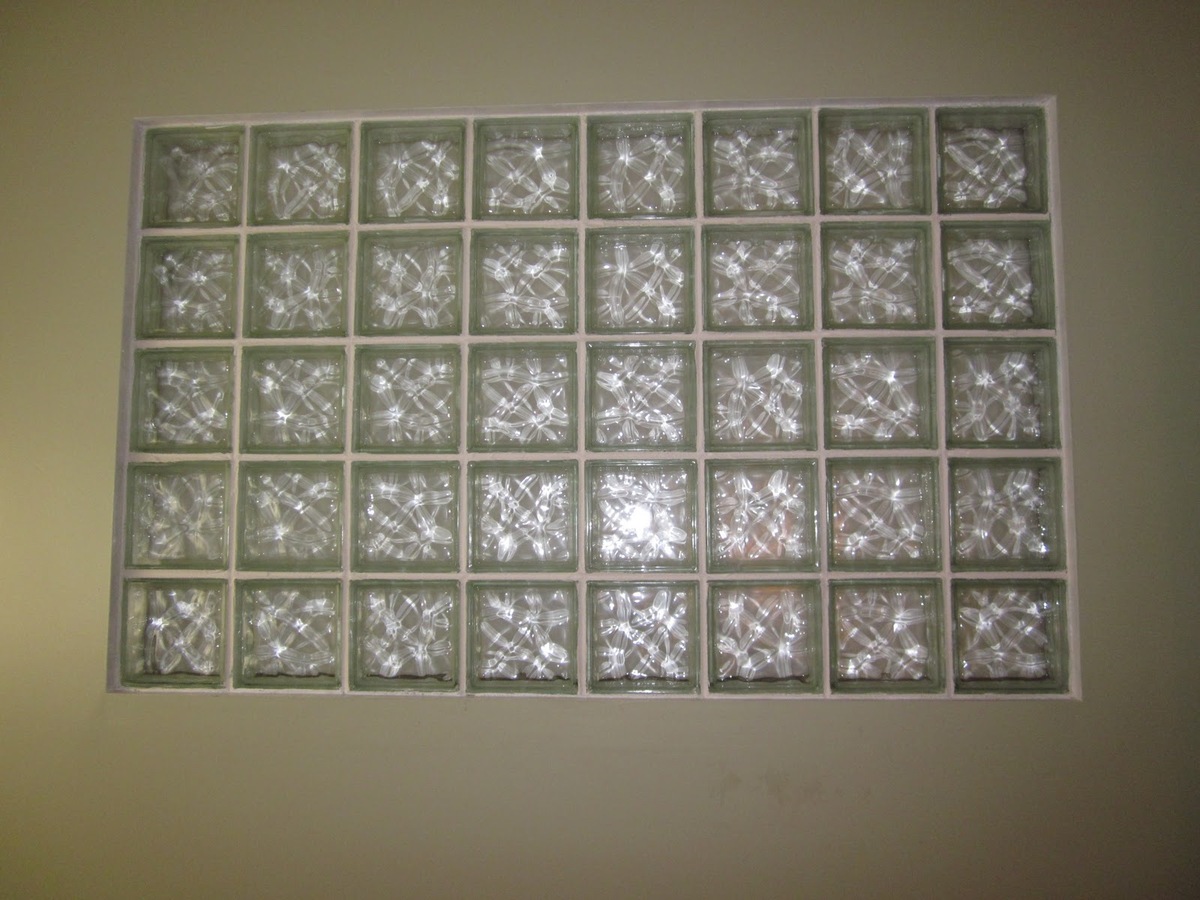
Step 6: Install the glass blocks
With the old window or frame removed and the opening prepared, it’s time to install the glass blocks. Follow these steps for a successful installation:
- Prepare the mortar: Follow the manufacturer’s instructions to mix the glass block mortar. Use a bucket and a trowel to create a smooth and consistent mortar mixture.
- Apply mortar to the bottom of the opening: Using a trowel, apply a layer of mortar to the bottom of the window opening. Make sure it’s evenly spread and about 1 to 2 inches thick.
- Place the first glass block: Carefully place the first glass block onto the mortar bed. Press it down gently, ensuring it sits level and securely in place. Use a level to double-check its position.
- Insert spacers: Insert glass block spacers between each glass block. These spacers will create even gaps for the mortar joints. Make sure they are securely positioned.
- Continue layering the glass blocks: Repeat the process of applying mortar, placing the glass blocks, and inserting spacers for each successive layer. Press each block down firmly and check for levelness.
- Fill the mortar joints: Once all the glass blocks are in place, use a trowel to fill the mortar joints between the blocks. Ensure the joints are completely filled and flush with the surface of the blocks.
- Remove excess mortar: Use a masonry sponge or damp cloth to gently wipe away any excess mortar from the glass blocks and the surrounding area. Take care not to disturb the mortar joints.
It’s important to work diligently and efficiently when installing the glass blocks to prevent the mortar from drying out too quickly. Take your time to ensure each block is securely placed and the mortar joints are properly filled.
Once the glass blocks are installed and the mortar has had some time to dry (typically 24 to 48 hours), you can proceed to the next step of sealing the glass block window.
Step 7: Seal the glass block window
After installing the glass blocks, it’s important to seal the window to ensure its durability and enhance energy efficiency. Follow these steps to seal the glass block window:
- Inspect the mortar joints: Before sealing, carefully inspect the mortar joints and ensure they are dry and fully set. If any joints appear cracked or incomplete, apply additional mortar and wait for it to dry.
- Apply silicone sealant: Using a caulk gun, apply a bead of glass block silicone sealant along the perimeter of the glass block window, where the glass blocks meet the surrounding wall. Make sure to create a watertight seal to prevent any leaks.
- Smooth the sealant: Use a caulk smoothing tool or your finger dipped in water to smooth the silicone sealant along the edges. This will create a neat and finished appearance while ensuring a proper seal.
- Remove excess sealant: Immediately wipe away any excess sealant with a damp cloth or sponge before it dries. This will help create a clean and professional-looking finish.
- Allow the sealant to dry: Follow the manufacturer’s instructions to determine the drying time for the silicone sealant. Avoid touching or disturbing the sealant until it is fully cured.
Sealing the glass block window is essential in preventing moisture infiltration and maintaining the integrity of the installation. Properly sealed windows will also improve energy efficiency and insulation in your basement.
Once the sealant has dried, you’re ready for the final step: adding the finishing touches to complete the glass block window installation!
Step 8: Finishing touches
Congratulations! You’re almost done with the glass block window installation. Now it’s time to add the finishing touches to complete the project. Here are a few important steps to consider:
- Clean the glass blocks: Use a glass cleaner and a soft cloth to clean the glass blocks and remove any fingerprints or smudges. This will ensure that your new window sparkles and looks its best.
- Install window trim: Consider adding window trim around the glass block window to enhance its appearance. Choose trim materials that complement the style of your basement and follow the manufacturer’s instructions for installation.
- Touch up the surrounding area: Inspect the surrounding wall and touch up any paint or finish that may have been disturbed during the installation process. This will help the window blend seamlessly with the rest of the room.
- Install window treatments: Consider installing window treatments, such as blinds or curtains, to add privacy and control the amount of light entering the room. Choose options that fit the size and style of your new glass block window.
- Enjoy your new glass block window: Once all the finishing touches are complete, step back and admire your handiwork. Enjoy the beautiful natural light and improved aesthetics that the glass block window brings to your basement.
By paying attention to these final details, you can ensure that your glass block window installation is not only functional but also visually appealing. Take your time and make sure everything is in place before considering the project complete.
With the finishing touches complete, you have successfully installed glass block windows in your basement. Sit back, relax, and enjoy the transformed space filled with natural light and a modern touch!
Note: The above steps are general guidelines for installing glass block windows in a basement. It’s always recommended to consult the manufacturer’s instructions and consider hiring a professional if you have any doubts or limited experience with window installations.
Read more: How To Update Glass Block Window
Conclusion
Congratulations on successfully installing glass block windows in your basement! By following the step-by-step process outlined in this guide, you have transformed your space with natural light and added a touch of modern elegance. The installation process may have required some handyman skills and attention to detail, but the end result is well worth the effort.
Glass block windows not only enhance the aesthetics of your basement but also offer functional benefits. They provide privacy, improve insulation, and contribute to energy efficiency. With their durability and timeless appeal, glass block windows are a long-term investment that can greatly enhance the value and appeal of your home.
Remember, safety should always be a priority when undertaking any home improvement project. If you ever feel unsure or uncomfortable with any step in the process, it’s best to seek professional assistance to ensure a successful and safe installation.
Now that your glass block windows are in place, take some time to appreciate the natural light flooding into your basement and the ambiance it creates. Consider adding window treatments or decorative accents to further enhance the space and make it your own.
We hope this guide has provided you with valuable insights and guidance on how to install glass block windows in your basement. Whether you’re looking to increase the functionality, style, or value of your home, glass block windows are a fantastic choice. Enjoy your newly transformed basement and all the benefits that come with it!
Frequently Asked Questions about How To Install Glass Block Windows In Basement
Was this page helpful?
At Storables.com, we guarantee accurate and reliable information. Our content, validated by Expert Board Contributors, is crafted following stringent Editorial Policies. We're committed to providing you with well-researched, expert-backed insights for all your informational needs.


0 thoughts on “How To Install Glass Block Windows In Basement”