Articles
How To Join Two Pieces Of Carpet
Modified: August 23, 2024
Learn how to easily join two pieces of carpet with our informative articles. Find step-by-step guides and expert tips for a seamless carpet installation.
(Many of the links in this article redirect to a specific reviewed product. Your purchase of these products through affiliate links helps to generate commission for Storables.com, at no extra cost. Learn more)
Introduction
When it comes to carpeting, there are times when you need to join two pieces of carpet together. Whether it’s due to a room expansion, repair, or simply wanting to create a larger area rug, knowing how to join two pieces of carpet is a valuable skill. It not only allows you to seamlessly connect the carpets, but also helps to maintain the overall aesthetic appeal and functionality of your flooring.
In this article, we will guide you through the step-by-step process of joining two pieces of carpet. We will discuss the tools and materials you will need, as well as provide detailed instructions on how to properly measure, cut, and secure the joining seam. Additionally, we will explore two popular methods for joining carpet: using double-sided carpet tape and using carpet seam adhesive.
By following this guide, you can ensure a professional-looking, durable, and long-lasting joint that will seamlessly blend the two carpet pieces together. So, let’s get started!
Key Takeaways:
- Joining two pieces of carpet requires careful preparation, accurate measuring, and secure seam securing. Whether using double-sided carpet tape or adhesive, attention to detail ensures a seamless and professional finish.
- Regular maintenance, including cleaning and prompt addressing of spills, is essential for preserving the appearance and longevity of joined carpet. Proper care and attention will keep the carpet looking fresh and seamless for years to come.
Read more: How To Join Two Rugs Together
Tools and Materials Needed
Before you begin joining two pieces of carpet, it’s important to gather all the necessary tools and materials. Here is a list of what you will need:
- Measuring tape
- Straightedge or ruler
- Carpet knife or utility knife
- Double-sided carpet tape or carpet seam adhesive
- Carpet seam roller or rolling pin
- Stiff-bristled brush
- Heavy-duty scissors
- Carpet seam iron (optional, for carpet seam adhesive method)
- Seam sealer (optional, for carpet seam adhesive method)
It’s crucial to have all these tools and materials ready before starting the carpet joining process. This will ensure that you have everything you need within reach, making the process smoother and more efficient.
Keep in mind that the specific tools and materials required may vary depending on the method you choose and the type of carpet you are working with. Therefore, it’s essential to read the instructions provided by the manufacturers of the carpet tape or adhesive you intend to use.
Once you have gathered all the necessary tools and materials, you’re ready to move on to the next steps of preparing the carpet pieces and measuring for the join.
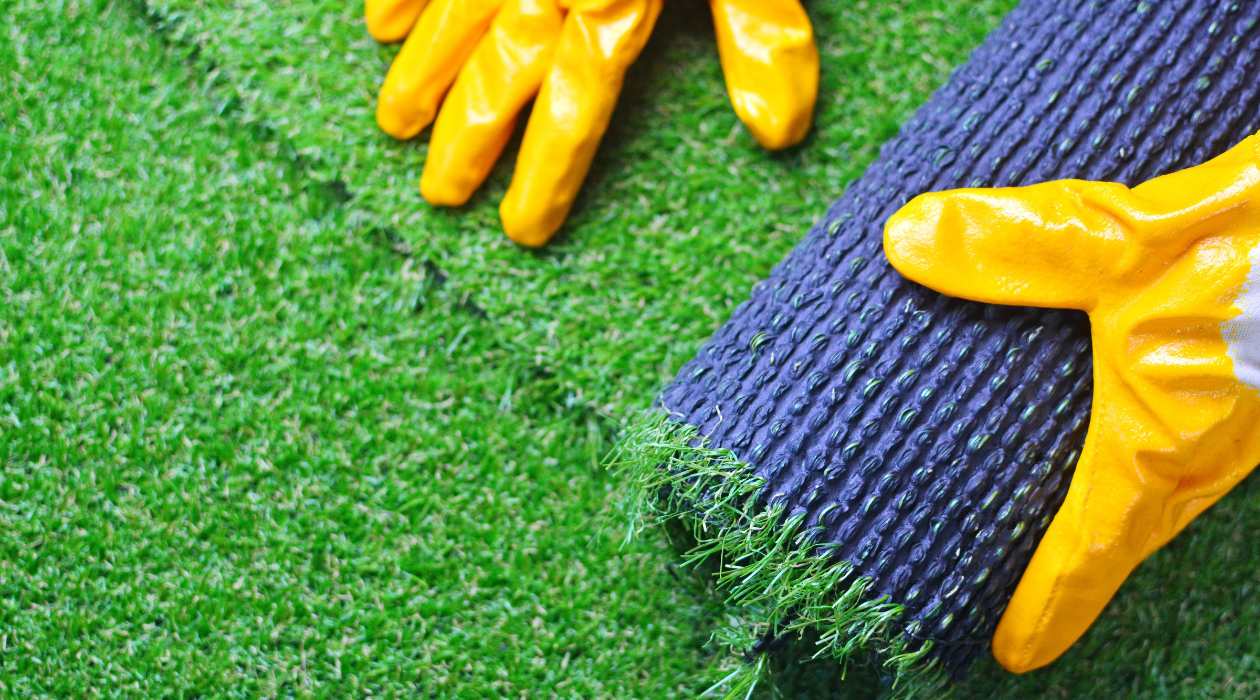
Preparing the Carpet Pieces
Before you can join two pieces of carpet together, it’s important to prepare the carpet pieces for the joining process. Here are the steps to follow:
- Clean the carpet: Ensure that both carpet pieces are clean and free from any dirt, debris, or stains. Vacuum the carpets thoroughly and spot clean any stains as needed.
- Trim any loose fibers or frayed edges: Carefully inspect the edges of each carpet piece. If there are any loose fibers or frayed edges, use heavy-duty scissors to trim them away. This will create clean edges for a neat and seamless join.
- Align the carpet pieces: Lay both carpet pieces side by side in the desired configuration. Ensure that the pile direction, pattern, and color match as closely as possible for a seamless blend.
- Overlap the edges: On one side of the join, carefully overlap the edges of the carpet pieces by about 1-2 inches. This will create a secure and stable foundation for the joining process.
By properly preparing the carpet pieces, you are setting the stage for a successful join. Taking the time to clean, trim, align, and overlap the edges will ensure a smooth and professional-looking seam.
Once you have completed these steps, you can proceed with measuring and cutting the carpet pieces to fit the required area.
Measuring and Cutting
Accurate measurements and precise cutting are essential when joining two pieces of carpet. Follow these steps to ensure a seamless fit:
- Measure the area: Use a measuring tape to determine the length and width of the area where the join will be made. Add an additional 2-3 inches to each measurement to allow for trimming and adjustments.
- Transfer measurements to the carpet: Mark the measurements on the backside of the carpet pieces using a straightedge or ruler. Make sure the marks are clear and precise.
- Cut the carpet pieces: Lay the carpet pieces on a flat surface with the backside facing up. Use a carpet knife or utility knife to carefully cut along the marked lines. Take your time and make smooth and even cuts. Avoid applying excessive pressure, as this can result in uneven edges or damage to the carpet fibers.
- Check the fit: Once the pieces are cut, test the fit by placing them together. Ensure that there is no noticeable gap or overlap between the carpet pieces. The edges should align neatly and seamlessly.
Remember, accuracy is key when it comes to measuring and cutting the carpet pieces. Taking the time to measure carefully and make precise cuts will result in a professional-looking join.
If you find that the pieces do not fit perfectly, you may need to trim or adjust them accordingly. Use a straightedge and a sharp carpet knife to make any necessary modifications.
Once you are satisfied with the fit, you can proceed to secure the joining seam using either double-sided carpet tape or carpet seam adhesive.
Securing the Joining Seam
Securing the joining seam is a crucial step in ensuring that the two pieces of carpet remain firmly connected. There are two popular methods for securing the seam: using double-sided carpet tape or using carpet seam adhesive. Let’s explore both methods:
Read more: How To Join Two Gable Roofs Together
Using Double-Sided Carpet Tape
- Prepare the surface: Clean the area where the joining seam will be placed. Ensure that it is free from dust, debris, and moisture.
- Place the tape: Cut a strip of double-sided carpet tape slightly shorter than the width of the overlapping edges. Position the tape along the center of the seam, sticky side down. Press firmly to secure it to the floor.
- Remove the backing: Carefully peel off the backing from the tape, exposing the sticky adhesive.
- Join the carpet pieces: Align the edges of the carpet pieces and carefully press them onto the exposed tape. Apply firm pressure along the entire length of the seam to ensure a strong bond.
- Secure the seam: Use a carpet seam roller or a rolling pin to firmly press down on the joined area. This will help the adhesive bond the fibers together and create a seamless appearance.
Using Carpet Seam Adhesive
- Prepare the surface: Clean the area where the joining seam will be placed. Ensure that it is free from dust, debris, and moisture.
- Apply the adhesive: Following the manufacturer’s instructions, apply the carpet seam adhesive to both edges of the overlapping carpet pieces. Use a carpet seam iron to activate the adhesive and create a strong bond.
- Press and secure the seam: Immediately after applying the adhesive, press the edges of the carpet pieces together firmly. You can use a carpet seam roller or a rolling pin to ensure a tight bond.
- Seal the seam: Apply a small amount of seam sealer along the edges of the seam. This will help protect the join from moisture and prevent the edges from fraying.
Regardless of the method you choose, be sure to follow the manufacturer’s instructions for the specific brand of tape or adhesive you are using. This will help you achieve the best results and ensure a strong and durable join.
Once you have secured the joining seam, it’s time to move on to the next steps of pressing and securing the seams, as well as blending and trimming the edges for a seamless finish.
Using Double-Sided Carpet Tape
One popular method for securing the joining seam of two pieces of carpet is by using double-sided carpet tape. This method is relatively simple and effective. Here’s how you can use double-sided carpet tape to join your carpet pieces:
- Prepare the surface: Make sure the area where the joining seam will be placed is clean and free from any dust, debris, or moisture. This will ensure a strong and secure bond.
- Measure and cut the tape: Cut a strip of double-sided carpet tape slightly shorter than the width of the overlapping edges. It’s important to have the tape positioned along the center of the seam for an even and secure bond.
- Apply the tape: Position the tape with the sticky side facing down onto the clean floor surface. Press the tape firmly to secure it in place.
- Remove the backing: Carefully peel off the backing from the tape, exposing the sticky adhesive.
- Join the carpet pieces: Align the edges of the carpet pieces and carefully press them onto the exposed tape. Apply firm pressure along the entire length of the seam to ensure a strong bond.
- Press and secure the seam: To enhance the adhesion between the carpet fibers and the tape, use a carpet seam roller or a rolling pin to firmly press down on the joined area. This will help create a seamless appearance and ensure a tight bond.
Using double-sided carpet tape is a convenient and reliable way to join your carpet pieces. With proper application and sufficient pressure, the tape will securely hold the joining seam in place.
It’s essential to note that the specific brand and type of double-sided carpet tape you choose may have its own set of instructions. Always refer to the manufacturer’s guidelines for best results and to ensure the tape is suitable for your particular carpet type.
Once you have successfully joined the carpet pieces using double-sided tape, you can proceed to additional steps, such as pressing and securing the seams, as well as blending and trimming the edges for an impeccable finish.
Using Carpet Seam Adhesive
Another popular method for securing the joining seam of two carpet pieces is by using carpet seam adhesive. This method provides a strong and durable bond, ensuring a seamless and long-lasting join. Here’s how you can use carpet seam adhesive:
- Prepare the surface: Ensure that the area where the joining seam will be placed is clean and free from any dust, debris, or moisture. This will allow for a proper bond between the carpet and the adhesive.
- Measure and cut the carpet pieces: Before applying the adhesive, make sure the carpet pieces are properly measured and cut to fit the desired area. Trim any loose fibers or frayed edges to ensure a smooth alignment.
- Apply the adhesive: Follow the manufacturer’s instructions for the specific carpet seam adhesive you are using. Generally, you will apply a thin, even layer of adhesive to both edges of the carpet pieces using a specialized adhesive applicator or a trowel.
- Join the carpet pieces: Once the adhesive is applied, carefully align the edges of the carpet pieces and press them together firmly. Make sure the edges are evenly matched and there are no gaps or overlaps.
- Secure the seam: Use a carpet seam roller or a rolling pin to firmly press down on the joined area. This will help the adhesive bond the carpet fibers together and create a seamless appearance. Apply even pressure along the entire length of the seam.
- Seal the seam (optional): If the carpet seam adhesive you are using requires it, apply a small amount of seam sealer along the edges of the seam. This will help protect the join from moisture and prevent the edges from fraying.
It’s important to note that carpet seam adhesive requires proper application and sufficient curing time to achieve the best results. Refer to the manufacturer’s instructions for recommended drying and curing times, and ensure you allow sufficient time for the adhesive to set and bond the carpet pieces together firmly.
Using carpet seam adhesive provides a professional-quality and durable join between two carpet pieces. The adhesive creates a strong bond that can withstand regular foot traffic and maintain the integrity of the carpeting.
Once the carpet seam adhesive has fully cured, you can proceed to additional steps, such as pressing and securing the seams as well as blending and trimming the edges for a flawless and seamless finish.
Read more: How To Join Carpet Seams
Pressing and Securing the Seams
After joining two pieces of carpet together, it’s important to properly press and secure the seams. This step helps to ensure a tight bond and a seamless appearance. Here’s how you can press and secure the seams:
- Allow the join to settle: Give the joined carpet pieces some time to settle and acclimate to the surrounding environment. This will help the carpet fibers relax and adjust to their new position.
- Use a carpet seam roller: Take a carpet seam roller or a rolling pin and go over the entire length of the seam. Apply firm and even pressure to press the fibers together and activate the adhesive or tape. Roll in both directions to ensure a thorough and secure bond.
- Check for any gaps or loose edges: Inspect the seam carefully to ensure there are no visible gaps or loose edges. If you notice any, you may need to readjust the carpet pieces and reapply adhesive or tape as needed.
- Secure any loose edges: If you find any loose edges along the seam, use a stiff-bristled brush to gently blend and brush the carpet fibers together. This will help create a seamless and cohesive appearance.
Properly pressing and securing the seams is essential for a professional-looking and durable join. Taking the time to ensure a tight bond will help prevent any future issues such as unraveling or separation of the joined pieces.
Keep in mind that the pressing and securing process may vary slightly depending on the joining method you used (double-sided carpet tape or carpet seam adhesive). Always refer to the manufacturer’s instructions for specific guidance on pressing and securing the specific adhesive or tape you used.
Once the seams are pressed and secured, you can move on to the next steps of blending and trimming the edges for a seamless finish.
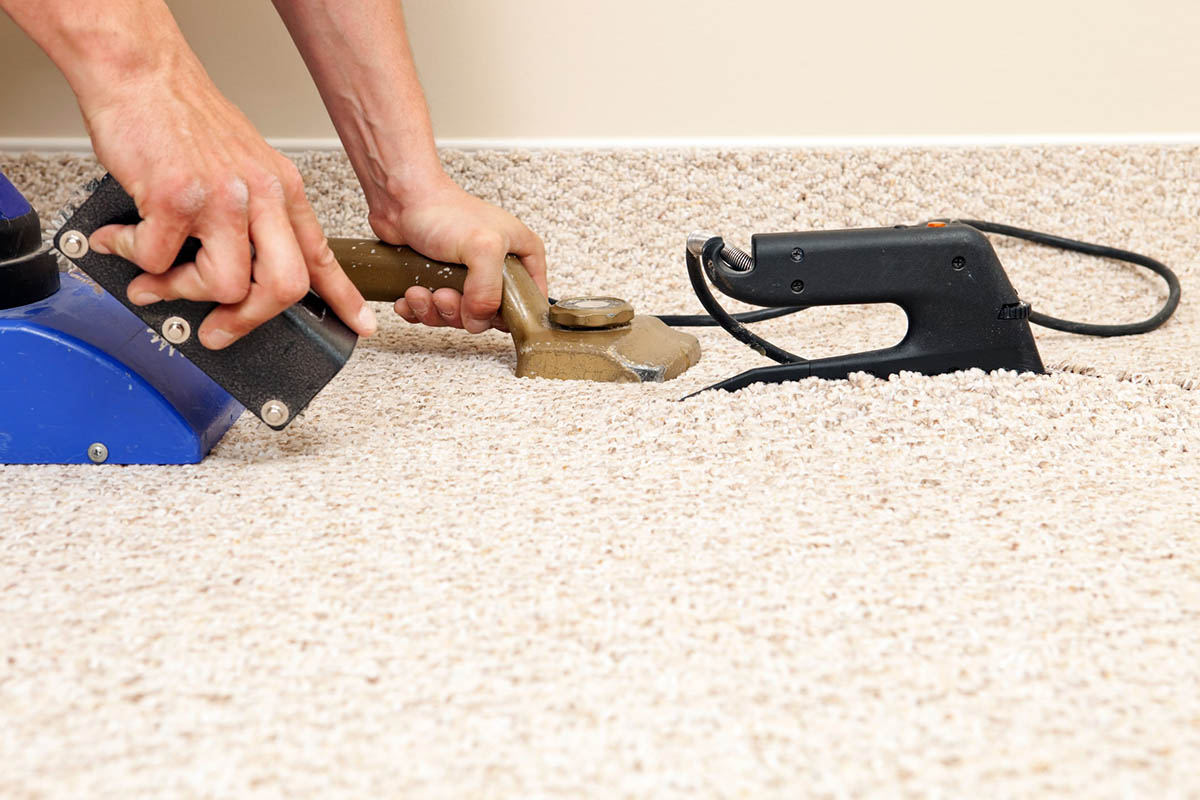
Use a seam tape and a hot glue gun to join two pieces of carpet. Place the seam tape between the two edges, then use the hot glue gun to secure the edges to the tape. Press the edges firmly together for a strong bond.
Blending and Trimming the Edges
After joining two pieces of carpet together, it’s important to blend and trim the edges for a seamless and professional-looking finish. This step helps to ensure that the join is not noticeable and that the carpet appears as one cohesive unit. Here’s how you can blend and trim the edges:
- Inspect the seam: Carefully examine the seam where the two carpet pieces are joined. Look for any visible lines, gaps, or unevenness.
- Blend the fibers: Use a stiff-bristled brush to gently blend the carpet fibers along the seam. Brushing in the same direction as the rest of the carpet will help to create a more uniform appearance.
- Trim any excess carpet: If there are any edges that protrude or stand out, use sharp heavy-duty scissors to carefully trim them. Trim the edges so that they are flush with the surrounding carpet, making sure not to cut into the seam itself.
- Blend the trimmed edges: After trimming, once again use the stiff-bristled brush to blend the trimmed edges with the surrounding carpet. This will help the trimmed edges seamlessly integrate into the overall carpet surface.
Take your time during the blending and trimming process and pay close attention to detail. The goal is to make the join as inconspicuous as possible and create a smooth transition between the two carpet pieces.
Remember, the exact blending and trimming technique may vary depending on the type and style of carpet you are working with. Some carpet types may require more or less brushing or special techniques to achieve the desired result. Refer to the manufacturer’s guidelines or consult a professional if you have any specific concerns or questions.
Once you have successfully blended and trimmed the edges, you can move on to the final touches and maintenance to ensure the longevity of your joined carpet.
Final Touches and Maintenance
After joining two pieces of carpet together and completing the necessary steps, there are a few final touches and maintenance practices to consider. These will help ensure the longevity and appearance of the joined carpet. Here’s what you should do:
Finishing Steps:
- Clean the joined area: Give the joined carpet area a thorough cleaning. Vacuum the seams and surrounding carpet to remove any loose debris or fibers. This will help maintain a clean and neat appearance.
- Inspect for any issues: Take a close look at the joined area to ensure there are no visible gaps, loose edges, or damage. If you notice any issues, address them promptly to prevent further damage or wear and tear.
- Allow sufficient drying time: If you used carpet seam adhesive, ensure that you allow the recommended drying and curing time before subjecting the joined area to heavy foot traffic or furniture placement. This will help the adhesive fully set and bond the carpet pieces together.
Maintenance Tips:
- Vacuum regularly: Implement a regular vacuuming routine to remove dirt, dust, and debris from the carpet. This will help maintain the appearance and prevent the buildup of particles that can cause premature wear.
- Address spills and stains immediately: In the event of spills or stains, attend to them promptly using appropriate cleaning methods and products suitable for your carpet type. This will help prevent permanent staining and ensure that the joined area remains in good condition.
- Protect the joined area: Place furniture pads or coasters under heavy furniture to prevent indentations and damage to the joined area. This will help distribute weight evenly and protect the carpet surface.
- Periodic professional cleaning: Consider scheduling professional carpet cleaning every 12-18 months to deep clean and refresh the carpet fibers, including the joined area.
By following these final touches and maintenance tips, you can maintain the quality and appearance of your joined carpet. Regular cleaning and maintenance will help extend its lifespan and keep it looking fresh and seamless for years to come.
Congratulations! You have successfully joined two pieces of carpet and completed the necessary steps for a professional and seamless finish. Enjoy the beauty and functionality of your joined carpet!
Note: The specific instructions and maintenance practices may vary depending on the type of carpet you are working with. Always refer to the manufacturer’s guidelines for the best care and maintenance practices for your specific carpet type.
Conclusion
Joining two pieces of carpet together may seem like a daunting task, but with the right tools, materials, and guidance, it can be accomplished successfully. By following the step-by-step process outlined in this article, you can achieve a seamless, professional-looking join that enhances the overall aesthetics and functionality of your carpeted space.
Whether you choose to use double-sided carpet tape or carpet seam adhesive, it’s crucial to properly prepare the carpet pieces, measure and cut them accurately, and secure the joining seams with care. Additionally, pressing and securing the seams, as well as blending and trimming the edges, contribute to a finished result that is undetectable to the naked eye.
Remember to conduct regular maintenance and address any issues promptly to ensure the longevity and appearance of the joined carpet. Vacuuming regularly, addressing spills and stains, and scheduling periodic professional cleanings are essential practices to keep your carpet in top condition.
By mastering the art of joining two pieces of carpet, you have the power to expand your living space, repair damaged areas, or create custom area rugs to suit your design preferences. With attention to detail and dedication to quality workmanship, you can achieve a seamless union that brings beauty and practicality to your flooring.
Now that you have the knowledge and skills needed to properly join two pieces of carpet, it’s time to put them into practice. Embrace the challenge, enjoy the process, and take pride in the results. Happy carpet joining!
Frequently Asked Questions about How To Join Two Pieces Of Carpet
Was this page helpful?
At Storables.com, we guarantee accurate and reliable information. Our content, validated by Expert Board Contributors, is crafted following stringent Editorial Policies. We're committed to providing you with well-researched, expert-backed insights for all your informational needs.